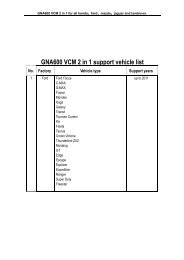
Instruction Manual Instruction Manual
Instruction Manual Instruction Manual
Instruction Manual Instruction Manual
- No tags were found...

Create successful ePaper yourself
Turn your PDF publications into a flip-book with our unique Google optimized e-Paper software.
Without further notice, please regard the actual product<br />
as the standard should there is any modification in the<br />
instruction manual.<br />
<strong>Instruction</strong> <strong>Manual</strong>
Preface<br />
Thank you for purchasing the HD Sports Digital Video Camera.<br />
This product is stylish, small and exquisite in appearance. It’s the<br />
digital product that you must have for outdoor sports, travelling<br />
and automobile data recording.<br />
This manual explains in detail how to use this video camera.<br />
And it provides you with detailed information on the use,<br />
operation, safety precautions as well as technical specifications of<br />
this product. Please read this manual carefully before using and<br />
keep it properly for your reference. We sincerely hope that this<br />
product will meet your requirements and serve you for a long<br />
time to come.<br />
Product Overview<br />
This product is an ultra‐small water‐proof high definition<br />
digital video camera tailored to market demand. It has a variety of<br />
prominent functions including HD digital video & audio recording,<br />
photo‐shooting, high‐speed USB data transferring, USB charging,<br />
TV/HDMI, etc.<br />
It has a wide range of applications so that you can start<br />
recording any time anywhere......<br />
1
I. Features<br />
‐Ultra small and portable; 120°*5‐megapixel and 170°*12‐megapixel<br />
A+ HD wide‐angle lens available for diverse needs of customers.<br />
‐Water‐proof up to 20 meters depth under the water.<br />
‐Built‐in lithium battery; able to record while charging.<br />
‐Supports High Capacity Micro SD card<br />
‐ TV/HDMI interface connect to HD TV set directly.<br />
‐Web camera function.<br />
‐Built‐in microphone/buzzer/vibration motor.<br />
II.<br />
Standard accessories as shown below:<br />
1.Charger<br />
2. USB Cable<br />
3. TV OUT Cable<br />
4. CD<br />
5. 3M Double‐Sided Tape<br />
6.Lubricant for O‐Shaped Water‐Proof Ring<br />
2
7. Wiping Cloth<br />
8. Water‐Proof Ring<br />
9. Screws & Screw Tools<br />
10. <strong>Instruction</strong> <strong>Manual</strong><br />
11. Silicon Band<br />
12. Sports Band<br />
13. Product Stand<br />
14. Bicycle Stand<br />
15. Product Rear Casing<br />
16. Protection Goggles Stand<br />
17. Silicon Band Buckle<br />
III.<br />
Optional Accessories:<br />
1. HDMI<br />
2. MICRO SD Card<br />
3. Car Battery Charger<br />
4. Vehicle‐Mounted Stand<br />
3
IV.<br />
Function Diagram<br />
1. Power Charging Indicator<br />
2. Working Indicator<br />
3. Recording Mode<br />
4. Shooting Mode<br />
5. 720P Mode<br />
6. 1080P Mode<br />
7. TV OUT<br />
8. Reset Hole<br />
9. On/off/Pause key<br />
10. USB Interface<br />
11. HDMI Interface 12. TF Card Slot<br />
4
V. Basic Operations<br />
I. USB Drive Mode<br />
You can play the video files in the Micro SD Card and delete<br />
unwanted files in 1080p mode and connecting with the computer<br />
through U‐drive.<br />
II. Webcam Mode<br />
In 720p mode, connect to the computer, an icon of video camera will<br />
appear under the root directory of the computer after 10~15 seconds.<br />
Double click the icon to turn on webcam mode.<br />
III. Battery Charging<br />
1. With charger: Connect one end of the data cable with the charger<br />
that comes with the camera and the other end with the video<br />
camera, plug into the power.<br />
2. With computer: Connect one end of the USB cable with the<br />
computer and the other end with the video camera.<br />
3. With car battery charger: Connect the car battery charger directly<br />
with the camera’s USB interface.<br />
5
VI. Inserting and Removing Micro SD Card<br />
1. Insert the Micro SD Card into the card slot as indicated until it’s<br />
fixed.<br />
2. Press down the Micro SD Card and wait until it pops out, then<br />
remove the card.<br />
Cautions:<br />
1. Please insert the card in the right direction or the device or the<br />
card will be damaged.<br />
2. If the card is incompatible with the device, please insert it again<br />
or try a new card.<br />
3. Please use genuine Micro SD card.<br />
VII. Operation of Special Features<br />
Video Recording and Photo‐shooting<br />
1. Press and hold Function Key 9 to turn on the video camera. You<br />
will hear a beep when you put the camera in recording mode.<br />
Two resolutions (1440*1080/1280*720) are available on this<br />
product. Press Function Key 9 to enter recording mode and<br />
press again to pause or save the clip recorded.<br />
2. In shooting mode, press Function Key 9 to enable continuous<br />
shooting (approx. 0.2 shots/sec). Press Function Key 9 to pause.<br />
3. Charging‐Recording Mode<br />
Connect the camera’s USB interface with the charger that comes with<br />
6
the device or with the car battery charger, turn on the camera and<br />
you can enter the synchronized charging‐recording mode.<br />
VIII. Time Setting<br />
Time display is default for this product. Follow the instructions below<br />
If you want to delete or modify the time:<br />
1. Create a new Time File under the root directory. Edit the time in<br />
yyyy mm dd hr min sec format (e.g. 2012.09.09 12:30:00N). Save<br />
and exit the file and deletion of time is now completed. And it will<br />
not be displayed next time when you turn on the camera.<br />
2. Follow the following instructions if you want the time to be<br />
displayed on the camera: Create a new Time File under the root<br />
directory. Edit the time in yyyy mm dd hr min sec format (e.g.<br />
2012.09.09 12:30:00N). Save and exit the file and the modification<br />
is now completed. And time will be displayed next time when you<br />
turn on the camera.<br />
VIIII.<br />
DHMI & TV OUT<br />
1. Connect one end of the HDMI cable with the Camera and the other<br />
end with HD TV interface, turn on the device to playback AV files<br />
2. Be careful with the video and audio signal lines when connecting<br />
the TV cable. In the meantime, switch the TV set in AV2 mode and<br />
select the TV system that is consistent with the device. Press<br />
Function Key 9 to play.<br />
7
X. Technical specifications<br />
Lens<br />
5‐megapixel * 120° & 12‐megapixel*170°<br />
A+ HD wide‐angle lens<br />
Video Recording Resolution 1440*1080 1280*720<br />
Video Recording Format<br />
AVI<br />
Compressed Format of Video H.264<br />
Picture Resolution 4032*3024 2560*1920<br />
Picture Format<br />
Memory Card<br />
Shooting Mode<br />
Light Source Frequency<br />
TV OUT<br />
JPG<br />
MICRO SD<br />
Continuous Shooting<br />
60Hz<br />
NTSC/PAL<br />
USB Interface USB 2.0<br />
Power Interface<br />
5V500MA<br />
System Windows 2000/XP/Vista/Windows 7<br />
8
Vorwort<br />
Wir danken Ihnen für den Kauf dieses HD-Bewegung digitale<br />
Videokamera, dieses Produckt, stilvoll, Mini und fein, wird Ihr<br />
unverzichtbarer digitaler Begleiter beim Outdoor-Sport, Reisen und<br />
für Auto-Recoder.<br />
Diese Bedienungsanleitung wird Ihnen Operation erklären und<br />
gleichzeitig Ihnen detallierte Informationen bieten, einschließlich der<br />
Anwendung, Bedienung, Installation, Vorsichtsmaßnahmen und<br />
technischer Datei. Lesen Sie bitte dieses Handbuch vor Gebrauch<br />
sorgfältig und lassen Sie es vollständig verstehen. Behwahren Sie<br />
dieses Handbuch und wir hoffen, dass unser Produkt Ihr Bedürnissen<br />
erfüllen und Ihnen langfristig zur Verfügung stehen kann.<br />
Produktbeschreibung<br />
Für die Nachfrage am Markt wird eine ultra-kleine wasserdichte<br />
digitale High-Definition-Kamera eingeführt, das eine führende<br />
Funktion enthält, wie qualitativ hochwertigen digitalen Audio-und<br />
Videoaufnahme, fotografieren, High-Speed-USB-Datenübertragung,<br />
USB-Kabel TV / HDMI.<br />
Eine bereite Verwendung, Aufnahme zu jeder Zeit.<br />
9
I.—Charakter<br />
— Ultra-klein, leicht zu tragen, fünf Millionen 120 Grad und 12<br />
Millionen 170 Grad, A+hochauflösende Weitwinkel wählen zu<br />
können, unterschiedliche Bedürfnisse der Kunden erfüllen zu<br />
können.<br />
— Stark wasserdicht ,unter Wasser 20M<br />
— Lithium-Batterie eingebaut, während des Ladevorgangs kann es<br />
auch aufnehmen<br />
— Micrso SD-Karte höher Kapazität unterstützen<br />
— TV/HDMI Anschluss, mit High-Definition TV-Anschluss<br />
verbinden kann<br />
— Webcam Funktion<br />
— Mikrofon/Summer/Vibrationsmotor integriert<br />
II. Standard-Zubehör wie folgend gezeigt<br />
1.Ladegerät, 2.USBDatenkabel 3.TV OUT Kabel 4.CD<br />
5.Doppelsetiger Kavelband 6 Wasserdichter O-Ring Schmiermittel<br />
7Clotch 8 Wasserdichter Ring 9.Schrauben und Werkzeug 10.<br />
Anleitung 11.Silikon-Band 12. Bewegungsband 13.Artikel Konsole<br />
10
14.Konsole 15 Hintere Abdeckung 16<br />
17.Silizium-Schnalle<br />
III.Passende Zubehör (optional)<br />
1.HDMI 2.MICRO SD Karte 3. Kfz-Ladengerät 4.Auto-Halterung<br />
IV. Funktionsplan des Produktes<br />
1.Anzeiger für aufladen 2. Indikator für Arbeit 3.Aufnahmemoduls<br />
4.Kamera-Moduls 5.720P-Moduls 6.1080P Moduls 7. TV OUT 8.<br />
Resetöffnug 9.An-und Abschalten /Pause 10.USB Anschluss<br />
11.HDMI Anschluss 12. TF Slot<br />
11
V. Bedieung<br />
I.U-Disk-Moduls<br />
Resolutions-Moduls-Taste ist unter 1080P, mit dem Computer<br />
verbunden U-Disk-Moduls, so dass Viedo im MICRO SD abgespielt<br />
werden und unflüißge Dateien löschen.<br />
II.Webcam-Moduls<br />
Resoltions-Moduls-Taste ist unter 720P, mit dem Computer<br />
verbunden. In 10 bis 15 Sekunden wird ein Zeichen in der<br />
Computer-Rooter-Verzeichnis vom Kamera auftretten, dieses Logo<br />
doppelklicken.<br />
IIIAkku geladen<br />
1. Durch Ladegeraet: Daten-Kabel in die mit dem Kamera<br />
zusammmen gegebenem Ladegerät stecken, anderes Anschluss in<br />
Kamera eintrecken, das Netzteil anschließen, um Akku aufzuladen.<br />
2.Durch Computer: USB Datenkabel an den Computer anschließen,<br />
anderes Ende mit Kamera verbinden, dann kann Akuu geladen<br />
werden.<br />
3.Auto-Ladengerät: Auto-Ladengerät einfach mit USB Schnittstelle<br />
des Kameras verbinden, dann wird aufgeladen.<br />
VI.Speicherkarte installieren und entfernen<br />
1.Der angegebene Richtung nach die Speicherkarte in den Schlitz<br />
einzufhrüen und sicherzustellen, dass die Karte feste in dem<br />
12
Kartespeicherraum.<br />
2.Beim Entfernen der Speicherkarte sie sanft drüken, nach Pop-up der<br />
Karte kann sie entfernt weden.<br />
Hinweis:<br />
1.Der richtigen Richtung nach die Speicherkarte einsetzen, wenn der<br />
entgegengesezten Richtung nach, wird Schäden der Machine oder<br />
Karte verurschen wird.<br />
2. Wenn die Speicherkarte mit der Machsine unvereinbar ist, stecken<br />
Sie es noch einmal oder erstezen Sie eine neue.<br />
3. Bitte benutzen Sie eine echte High-Speed-Karte.<br />
VII.Funktion<br />
Aufnehmen und Fotografieren<br />
1. Funktionstasten 9 Kamera lange Zeit drücken, die Mode-Taste<br />
Video-Modus einschalten, die Alarmton wird dann aufgefordert.<br />
Zu diesem produkt haben 1440 * 1080/1280 * 720 zwei Type<br />
auszuwählen.Die Fuktionstaste einmal drücken, wird es dann in<br />
Viedoarbeit Zustand, die Taste 9 nocheinmal drücken, kann es<br />
Pause haben und Video-Clips speichern.<br />
2. Modul-Taste sich in der Kamera befindet, die Funktionstaste 9<br />
drücken und die Kamera wird kontiuierlich fotografieren, alle 5<br />
Sekunden ein Foto, Funktionstaste nochmal drücken, wird es dann<br />
stoppen.<br />
3. Während Ladevorgangs des Aufnahmemodus<br />
Sowohl die mit Kamera gegebene Stromversorgung als auch<br />
Auto-Stromversorgung, die Schnittstelle von USB anschließen,<br />
13
die Kamera wird dann in Währand Ladevorgangs des<br />
Aufnahmemodus.<br />
VIII. Zeiteinstellung<br />
Dieses Produkte ist die Standard-Zeitanzeiger, wenn der Benutzer die<br />
Zeit löschen oder einstellen will, soll in folgende Weise.<br />
1. Ein neuer Ordner “Time”unter einem Root-Verzeichnis erstellen,<br />
im Ordner Zeit bearbeiten (Z.B 2012.09.09 12:30:00N), diese Datei<br />
speichern und dann es beenden, Wenn das Löschen der Zeit erfolgt,<br />
wird es beim nächsen Mal nach Starten des Kameras, keine<br />
Zeitanzeiger geben.<br />
2. Wenn der Benutzer die Zeit auf dem Kamera anzeigen will, soll er<br />
nach folgender Weise durchführen. Ein neues Ordner unter einem<br />
Root-Verzeichnis erstellen. In der Datei Sekunden, Minuten, Tag,<br />
Monate, diese Format bearbeiten,(Z.B 2012.09.09 00.30.00), diese<br />
Datei speichern und dann es beenden. Wenn dieses Prozess erledigt,<br />
wird beim nächsten Mal nach dem Starten des Kameras Zeit<br />
anzeigen.<br />
IX. DHMI und TVOUT<br />
1. Mit HDMI Kabel den Kamera anschließen, ein anderes Ende mit<br />
dem High-Definition-TV-Schnittstelle, starten Sie die Wiedergabe<br />
von Audio-und Videodaten.<br />
2. Achten Sie auf die Video-und Audiosingal beim Anschluss der<br />
TV-Linien und gleichzeitg den TV an die AV2-Modus einzustellen,<br />
und wählen Sie der Ausrüstung entsprechend<br />
TV-System,Fuktionstasten 9 drücken, dann wird es abspielen.<br />
14
X Technische Daten<br />
Schuss — 5 Millionen 120 Grad und 12<br />
Millionen<br />
170Grad,<br />
A+hochauflösende Weitwinkel.<br />
unterschiedliche Bedürfnisse der<br />
Kunden erfüllen zu können.<br />
Aufnahme 1280*720 1440*1080<br />
Format vom Aufnahme AVI<br />
Video<br />
H.264<br />
Kompressionsformat<br />
Foto-Auflösung 4032*3024 2560*1920<br />
Photo-Format<br />
JPG<br />
Speichernkarte<br />
MICRO SD<br />
Kamera-Moduls<br />
kontiuierlich Fotografiern<br />
Lichtfrequenz<br />
60Hz<br />
TV-Ausgang<br />
NTSC/PAL<br />
USB-Schnittestelle USB 2.0<br />
Power Interface<br />
5V500MA<br />
Systemanforderungen Windws 2000/XP/Vista/Windows 7.<br />
15
前<br />
言<br />
感 谢 您 购 买 高 清 运 动 数 码 摄 像 机 , 本 产 品 外 观 时 尚 ,<br />
迷 你 精 致 , 是 您 户 外 运 动 , 旅 游 汽 车 记 录 仪 不 可 缺 少<br />
的 必 备 数 码 伴 侣 。<br />
本 用 户 手 册 详 细 说 明 如 何 使 用 , 同 时 提 供 给 您 详 细<br />
信 息 , 包 括 使 用 , 操 作 , 安 装 注 意 事 项 及 技 术 规 格 等 ,<br />
使 用 前 请 仔 细 阅 读 本 手 册 并 完 全 理 解 。 请 妥 善 保 存 本 手<br />
册 , 我 们 希 望 本 产 品 能 满 足 您 的 需 求 并 长 期 服 务 您 。<br />
产 品 概 括 :<br />
此 款 产 品 是 针 对 市 场 需 求 推 出 的 一 款 超 小 防 水 型 高<br />
画 质 的 数 码 摄 像 机 , 此 产 品 具 有 领 先 群 雄 的 高 画 质 数 码<br />
影 音 录 像 , 拍 照 , 高 速 USB 数 据 传 输 USB 充 电 ,TV/<br />
HDMI 等 功 能 。<br />
使 用 范 围 广 泛 , 可 方 便 随 时 随 地 录 影 ...........<br />
16
一 产 品 特 性<br />
- 超 小 体 积 , 携 带 方 便 , 2 度 500 万 和 170 度<br />
1200 万 A+ 级 高 解 析 度 广 角 镜 头 可 选 。 方 便 不 同<br />
客 户 需 求 。<br />
- 深 度 防 水 , 可 达 水 下 20M 。<br />
- 内 置 锂 电 池 , 边 充 边 录 影 功 能 。<br />
- 支 持 高 容 量 micrso SD card。<br />
- TV/HDMI 接 口 , 可 以 直 接 与 高 画 质 的 电 视 机 连 接<br />
使 用 。<br />
- 网 络 摄 像 头 功 能 。<br />
- 内 置 麦 克 风 / 蜂 鸣 器 / 震 动 马 达 。<br />
二 产 品 标 配 配 件 如 下 图 :<br />
1<br />
5<br />
4<br />
2 3<br />
11 12 13<br />
6<br />
7<br />
8<br />
9<br />
10 17 16 15 14<br />
1. 充 电 器 2.USB 数 据 线 3. TV OUT 线 4. 光 盘 5.3M 双 面 胶 6. 防 水 O 型 圈 润<br />
滑 油 7. 擦 拭 布 8. 防 水 圈 9. 螺 丝 及 螺 丝 工 具 10. 说 明 书 11. 硅 胶 带 12. 运 动 带<br />
13. 产 品 支 架 14. 单 车 支 架 15. 产 品 后 盖 16. 防 目 镜 支 架 17. 硅 带 扣<br />
17
三 产 品 选 配 配 件 图 :<br />
1<br />
2 3 4<br />
1.HDMI 2.MICRO SD Card 3. 汽 车 充 电 器 4. 汽 车 支 架<br />
四 产 品 功 能 示 意 图 :<br />
2<br />
1<br />
4<br />
11<br />
8<br />
3<br />
12<br />
5<br />
6<br />
9<br />
7<br />
10<br />
1. 电 源 充 电 指 示 灯 2. 工 作 指 示 灯 3. 摄 影 模 式 4. 拍 照<br />
模 式 5.720P 模 式 6. 1080P 模 式 7. TV OUT 8. 复 位 孔<br />
9. 开 关 键 / 暂 停 键 10.USB 接 口 11.HDMI 接 口 12.TF<br />
卡 槽<br />
18
五 使 用 操 作<br />
一 U 盘 模 式<br />
分 辨 率 模 式 键 在 1080p 模 式 下 , 连 接 电 脑 是 U 盘<br />
模 式 , 可 播 放 在 MICRO SD 里 面 的 视 频 文 件 及 删 除 不<br />
必 要 的 文 件 。<br />
二 网 络 摄 像 头 模 式<br />
分 辨 率 模 式 键 在 720P 模 式 下 , 连 接 电 脑 , 等 待<br />
10-15 秒 后 , 在 电 脑 更 目 录 里 。 会 出 现 一 个 摄 像 机 的 标<br />
志 , 双 击 摄 像 机 标 志 即 可 。<br />
三 电 池 充 电<br />
1. 充 电 器 充 电 : 将 随 机 配 送 的 充 电 器 插 上 数 据 线 ,<br />
另 一 端 连 接 摄 像 机 , 插 上 电 源 即 可 充 电 。<br />
2. 电 脑 充 电 :USB 数 据 线 连 接 电 脑 上 , 另 一 端 连<br />
接 摄 像 机 上 即 可 充 电<br />
3. 车 载 充 电 : 直 接 将 车 充 连 接 摄 像 机 USB 接 口 ,<br />
即 可 充 电<br />
19
六 存 储 卡 安 装 和 取 出<br />
1. 按 照 指 示 的 方 向 将 存 储 卡 插 入 卡 槽 , 直 到 存 储 卡<br />
固 定 卡 槽 为 止<br />
2. 取 出 存 储 卡 时 , 轻 轻 压 下 存 储 卡 , 待 存 储 卡 弹 出<br />
后 即 可 取 出<br />
注 意 :<br />
1. 按 照 正 确 的 方 向 插 出 存 储 卡 , 若 插 反 , 肯 能 会 损 坏 机 器 及 存 储 卡<br />
2. 如 果 存 储 卡 与 机 器 不 相 容 时 , 请 重 新 再 插 一 次 或 者 换 张 新 的 存 储 卡 重 试<br />
3. 请 使 用 正 品 高 速 卡<br />
七 功 能 操 作<br />
摄 影 及 拍 照<br />
1. 长 按 功 能 键 9 摄 影 机 开 启 , 模 式 键 录 影 模 式 下 ,<br />
提 示 声 将 提 示 一 下 , 本 产 品 有 1440*1080/1280*720<br />
两 种 分 辨 率 可 选 , 在 按 功 能 键 9 键 入 录 影 工 作 状 态 , 在<br />
按 功 能 键 9 暂 停 及 保 存 录 影 片 段 ,<br />
2. 模 式 键 在 拍 照 模 式 下 , 按 功 能 键 9, 摄 像 机 将<br />
连 续 拍 照 , 每 5 秒 一 张 图 片 , 如 需 暂 停 , 请 在 按 功 能 键 9。<br />
3. 边 充 电 边 录 影 模 式<br />
可 以 用 本 机 配 送 的 电 源 , 或 者 车 充 电 源 。 连 接 机 器<br />
的 USB 端 , 开 机 即 可 以 进 入 边 充 边 录 影 模 式<br />
20
八 时 间 设 置<br />
本 产 品 默 认 时 间 显 示 , 如 果 用 户 需 去 掉 或 更 改 时 间 ,<br />
按 下 列 方 式 :<br />
1. 根 目 录 上 新 建 一 个 time 文 档 . 在 文 件 里 编 辑 ,<br />
年 月 日 时 分 秒 格 式 ( 如 2012.09.09 12:30:00N)<br />
并 保 存 此 文 件 退 出 , 去 掉 时 间 修 改 完 成 , 在 下 次 启 动 摄<br />
像 机 时 , 产 品 无 时 间 显 示 .<br />
2. 用 户 需 要 在 摄 像 机 上 显 示 时 间 , 按 下 列 方 式 进<br />
行 修 改 : 根 目 录 上 新 建 一 个 time 文 档 . 在 文 件 里 编 辑 ,<br />
年 月 日 时 分 秒 格 式 ( 如 2012.09.09 12:30:00) 并<br />
保 存 此 文 件 退 出 , 去 掉 时 间 修 改 完 成 , 在 下 次 启 动 摄 像<br />
机 时 , 产 品 显 示 时 间 .<br />
九 DHMI 及 TVOUT<br />
1. 用 HDMI 线 连 接 线 摄 影 机 , 另 一 端 连 接 高 清 电<br />
视 接 口 , 开 机 进 行 回 放 影 音 资 料 。<br />
2. 连 接 TV 线 时 注 意 视 频 和 音 频 信 号 线 , 同 时 需 要<br />
调 节 电 视 机 到 AV2 模 式 下 , 并 选 择 和 设 备 一 致 的 电 视<br />
制 式 , 按 摄 影 机 的 功 能 键 9 播 放 。<br />
21
十 技 术 规 格<br />
镜 头<br />
500 万 120 度 和 1200 万 170 度<br />
A+ 级 高 解 析 度 广 角 镜 头<br />
录 像 视 频 1440*1080 1280*720<br />
录 像 视 频 格 式 AVI<br />
视 频 压 缩 格 式 H.264<br />
相 片 分 辨 率 4032*3024 2560*1920<br />
照 片 格 式 JPG<br />
存 储 卡 MICRO SD<br />
拍 照 模 式 连 续 拍 照<br />
光 源 频 率 60Hz<br />
电 视 输 出 NTSC/PAL<br />
USB 接 口 USB 2.0<br />
电 源 接 口 5V500MA<br />
系 统 要 求 Windws 2000/XP/Vista/Windows 7.<br />
22