FRET - acceptor photobleaching
FRET - acceptor photobleaching
FRET - acceptor photobleaching

You also want an ePaper? Increase the reach of your titles
YUMPU automatically turns print PDFs into web optimized ePapers that Google loves.
May 10, 2011<br />
BALM Protocols – Ab <strong>FRET</strong><br />
<strong>FRET</strong> EXPERIMENTS DEMAND ADVANCED SKILLS IN USE OF MICROSCOPES AND IMAGE ANALYSIS and antibody staining<br />
or transfections which are robust, clear and reproducible.<br />
If you do not know what a <strong>FRET</strong> donor or a <strong>FRET</strong> <strong>acceptor</strong> is please go and read about <strong>FRET</strong> Theory. It is absolutely<br />
essential you understand <strong>FRET</strong> theory before starting these experiments as you will not be able to analyse and interpret<br />
the data otherwise. The BALM facility staff can technically support you with use of equipment but the design, and<br />
analysis and interpretation of the experiments must be yours.<br />
If you need more information please see the original reference for Ab <strong>FRET</strong> which is:<br />
Fluorescence resonance energy transfer from cyan to yellow fluorescent protein detected by <strong>acceptor</strong> <strong>photobleaching</strong><br />
using confocal microscopy and a single laser. T. S. Karpova 1 and J. G. McNally 1,* Journal of Microscopy Volume 209,<br />
Issue 1, pages 56–70, January 2003<br />
Read about <strong>FRET</strong> theory here:<br />
http://www.embl.de/eamnet/downloads/modules/<strong>FRET</strong>_teaching_module.pdf<br />
http://www.olympusmicro.com/primer/techniques/fluorescence/fret/fretintro.html<br />
See how to present the data by looking at these papers:<br />
Tsang SM, Liu L, Teh M-T, Wheeler A, Grose R, et al. 2010 Desmoglein 3, via an Interaction with E-cadherin,<br />
Is Associated with Activation of Src. PLoS ONE 5(12): e14211. doi:10.1371/journal.pone.0014211<br />
Y. Gu, W. L. Di, D. P. Kelsell and D. Zicha. Quantitative fluorescence resonance energy transfer (<strong>FRET</strong>)<br />
measurement with <strong>acceptor</strong> <strong>photobleaching</strong> and spectral unmixing Journal of Microscopy 215. Article first<br />
published online: 16 JUL 2004 | DOI: 10.1111/j.0022-2720.2004.01365.x<br />
An integrin-α4–14-3-3ζ–paxillin ternary complex mediates localised Cdc42 activity and accelerates cell<br />
migration. Nicholas O. Deakin1,*‡, Mark D. Bass1,*, Stacey Warwood1, Julia Schoelermann2,3, Zohreh<br />
Mostafavi-Pour1,§, David Knight1, Christoph Ballestrem1 and Martin J. Humphries1, J Cell Sci. 2009 May<br />
15;122(Pt 10):1654-64. Epub 2009 Apr 28.<br />
BASIC THEORY<br />
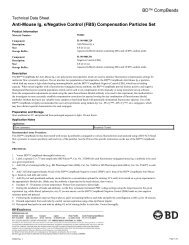
Acceptor <strong>photobleaching</strong> works by eliminating the <strong>acceptor</strong>, so in a sample where <strong>FRET</strong> is occuring after Acceptor<br />
<strong>photobleaching</strong> the energy which was being passed to the <strong>acceptor</strong> will be kept by the donor molecule. This leads to an<br />
increase in the fluorescence of the donor molecule. The fluorescence increase can be measured quantitatively.<br />
<strong>FRET</strong> Occurring<br />
Acceptor<br />
Photobleaching<br />
Donor<br />
Energy Acceptor<br />
Donor <strong>FRET</strong> Acceptor<br />
No energy transfer from<br />
donor to <strong>acceptor</strong>
May 10, 2011<br />
Recommended controls:<br />
Positive and negative <strong>FRET</strong> controls – Donor alone, Acceptor alone,<br />
Control to determine baseline of <strong>FRET</strong> A condition where <strong>FRET</strong> is not expected to happen. The condition where <strong>FRET</strong> is not<br />
expected to happen can be unstimulated cells or where you have sent the donor fluorophore to a part of the cells where the<br />
<strong>acceptor</strong> definitely won't bind to it. E.g. donor bound to nucleus, <strong>acceptor</strong> bound to plasma membrane. You can then<br />
photobleach the <strong>acceptor</strong> and look to see if the donor fluorescence changes.<br />
Control where you have a strong feeling <strong>FRET</strong> has worked or have identified an interaction by IP<br />
When you start the experiment – Set up will take your first session.<br />
<br />
<br />
<br />
<br />
Turn on microscope at least 4 hours prior to start of experiment to allow it to stabilise.<br />
Find sample using microscope.<br />
Check on camera that you can see enough cells / whatever you are measuring in the right amount of detail.<br />
Set up acquisition read out channels to as follows:<br />
1. Fluorescence of the donor (reading donor excitation, donor emission) – Data channel<br />
2. Fluorescence of <strong>acceptor</strong> (reading <strong>acceptor</strong> excitation, <strong>acceptor</strong> emission) – Prooves <strong>photobleaching</strong> works<br />
3. <strong>FRET</strong> Fluorescence (reading donor excitation, <strong>acceptor</strong> emission) – Just in case the reviewer asks….<br />
Setting up detectors<br />
The first sample to visualise under the microscope is the one where you suspect <strong>FRET</strong> has worked. Set up the microscope so<br />
you can clearly record your image in all channels on the detector (i.e. not by eye). Ensure for all channels that the image is<br />
in the middle of the intensity range of the detector. Set the detector so it is at the highest bit range, 16 bit for preference.<br />
Now put the negative controls on the microscope. Alter the channels so that as little as possible is being recorded in the<br />
<strong>FRET</strong> channel or. Make sure you take at least 3 pictures of both of the negative controls.<br />
Go back to the positive control and check that the donor, <strong>acceptor</strong> and <strong>FRET</strong> channels can be recorded. Now save the<br />
settings for the channels, write these settings down and do not change them during your experiment for a particular set of<br />
donor and <strong>acceptor</strong> pairs.<br />
Setting up bleach parameters<br />
Using the positive control sample pick an area which doesn't contain <strong>FRET</strong> or isn't relevant to the analysis. Use this to set up<br />
bleach conditions. This is done by selecting a small ROI and bleaching it with a given laser power and number of iterations.<br />
The ideal bleach is one which reduces the <strong>acceptor</strong> intensity by between 25 – 50% but doesn't photodamage the cell. The<br />
best bleach is one with the weakest laser power and smallest number of iterations to achieve 50% <strong>photobleaching</strong>. Check<br />
<strong>photobleaching</strong> doesn't damage the donor channel.
May 10, 2011<br />
Testing <strong>acceptor</strong> <strong>photobleaching</strong><br />
Using the positive control sample find a cell which potentially shows <strong>FRET</strong>. The <strong>FRET</strong> readout channel is useful here. To test<br />
<strong>photobleaching</strong> set up regions as follows:<br />
a. Regions which shows <strong>FRET</strong> – Termed data ROI, there can be as many of these as you like 3 is ideal<br />
b. A region which doesn't show <strong>FRET</strong> – Termed internal control<br />
c. A region which shows <strong>FRET</strong> but isn't bleached ‐ Termed Photodamage ROI<br />
Set up an experiment which bleaches regions 'a' and 'b' by about 25 – 50% but not 'c'. Measure Fluorescent intensities in<br />
donor channel in regions 'a', 'b' and 'c' before and after <strong>photobleaching</strong>.<br />
Use the <strong>acceptor</strong> <strong>photobleaching</strong> equation to determine % <strong>FRET</strong><br />
% <strong>FRET</strong> for Data ROI= 100 x Intensity in donor channel post‐bleach + Photodamage in donor channel<br />
Intensity of donor channel pre‐bleach<br />
If % <strong>FRET</strong> is about 5% the <strong>acceptor</strong> <strong>photobleaching</strong> has definitely worked.<br />
If for none of the data ROIS <strong>FRET</strong> is seen then:<br />
I. The <strong>acceptor</strong> photobleach hasn't worked,<br />
II. You have damaged the donor with your <strong>acceptor</strong> bleach so you need to check the bleaching parameters<br />
III. You can’t detect the change in donor intensity<br />
IV. There isn't any real <strong>FRET</strong><br />
If you see drift in the system between donor and <strong>acceptor</strong> imaging this will be caused by temperature changes. Ensure<br />
the microscope is fully warmed up before you start.<br />
PLEASE DISPOSE OF ALL YOUR CLINICAL WASTE IN THE YELLOW BAG/ LARGE SHARPS BIN PROVIDED