Manual - Ventus
Manual - Ventus
Manual - Ventus

Create successful ePaper yourself
Turn your PDF publications into a flip-book with our unique Google optimized e-Paper software.
SLIM WEATHER FORECASTER WITH<br />
RADIO CONTROLLED CLOCK,<br />
PRESSURE DISPLAY AND IN/ OUT<br />
THERMO-HYGROMETER<br />
USER MANUAL<br />
(TE636NL)<br />
16<br />
KSPO:1719-10<br />
NIL TE636NL & TS21 MANUAL 2(ENG)<br />
SIZE:W105 X H148(mm)<br />
BY Lai HZ 9/3/11<br />
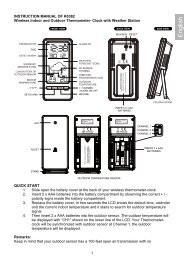
INTRODUCTION<br />
Thank you for selecting our slim Weather Forecaster. This device combines precise time<br />
keeping, monitoring and displaying of pressure information and current temperature/ humidity<br />
data from up to three remote locations (additional sensors are required).<br />
In this package, you will find:<br />
• One main unit (receiver)<br />
• One single-channel remote sensor (transmitter)<br />
• One user manual<br />
Please keep this manual handy as it contains practical instructions, technical specifications and<br />
precautions.<br />
INSTALLATION<br />
The communication between the main unit (receiver) and the remote sensor (transmitter) is<br />
wireless, thus simplifying the installation. The remote temperature sensor transmits data to the<br />
main unit, with an operating range of up to 30 meters in opened area.<br />
The remote temperature sensor can be placed indoors or outdoors, depending on the area where<br />
the temperature is intended to be measured. If you intend to measure outdoor conditions, place<br />
the remote sensor outdoors.<br />
NOTE:<br />
• It is critical to power the remote sensor BEFORE setting up the main unit.<br />
• It is critical to power up and test communication between the remote sensor and the main unit<br />
BEFORE permanently mounting if outside.<br />
BEFORE YOU BEGIN<br />
• We recommend using alkaline batteries for the remote sensor and the main unit. When the<br />
temperature falls below freezing point 0°C (32°F), battery voltage levels will be dropped and<br />
this may reduce the transmission range. For optimum performance, we recommend using<br />
lithium batteries.<br />
• Avoid using rechargeable batteries. (Rechargeable batteries cannot maintain correct power<br />
requirements.)<br />
• ALWAYS install batteries in the remote sensor before the main unit.<br />
• Insert batteries before first use, matching the polarity in the battery compartment.<br />
• During initial set up, place the remote sensor close to the main unit.<br />
• After reception is established (remote readings will appear on the main unit’s display),<br />
position the remote sensor and the main unit within the effective transmission range of up to<br />
30 meters.<br />
NOTE:<br />
• Avoid pressing any buttons on the main unit before the remote readings are displayed.<br />
• Transmission or reception range may be affected by trees, metal structures, and electronic<br />
appliances, surrounding building materials and how the main unit and transmitter are<br />
positioned.<br />
• Place the remote sensor so that it faces the main unit (receiver), minimizing obstructions<br />
such as doors, walls and furniture.<br />
• Though the remote sensors are weather-resistant, they should be placed away from direct<br />
sunlight, rain or snow. The optimal location for the remote sensor outdoors is under the eaves<br />
on the north side of the building.<br />
17 18<br />
REMOTE TEMPERATURE AND HUMIDITY SENSOR<br />
FEATURES<br />
• Remote data transmission to the main unit via 433 MHz frequency<br />
MAIN UNIT<br />
FEATURES<br />
TIME<br />
• Precise time and date set via radio controlled time signals (DCF 77) from the central atomic<br />
clock in Frankfurt<br />
• 12 or 24 hour time format<br />
• <strong>Manual</strong> adjustment of time and date<br />
• Calendar date with month and day in 7 languages English, German, French, Italian, Spanish,<br />
Dutch and Swedish<br />
• Dual crescendo alarms with snooze<br />
• Programmable ice warning alarm<br />
WEATHER<br />
• Weather forecast for the next 12 to 24 hour in seven large icons: sunny, slightly cloudy,<br />
cloudy, rainy, heavy rainy, snowy and heavy snowy.<br />
• User-defined high/low temperature alarm<br />
• Indoor/outdoor temperature and humidity in up to 3 remote locations (additional sensors<br />
required)<br />
• Barometric pressure in imperial or metric units<br />
• Altitude adjustment for pressure compensation<br />
• 24 hour barometric pressure history chart<br />
• Comfort level indicators (Dry, Humid, etc)<br />
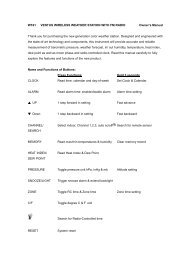
FRONT<br />
A<br />
A<br />
B<br />
A. BATTERY COMPARTMENT<br />
• Hold two AAA-size batteries<br />
B. WALL-MOUNT RECESSED HOLE<br />
• Mount the remote sensor on the wall<br />
MOUNTING<br />
• The remote sensor can be placed on the flat surface or mounted on the wall in vertical<br />
position.<br />
• Use a screw, rather than a nail, for best mounting of the sensor.<br />
• When mounting the main unit on the wall or vertical surface, fold the table stand back into<br />
the unit.<br />
PLACEMENT<br />
• The remote sensor should be placed under eaves or a similar location with free air circulation<br />
sheltered from direct sunlight and extreme weather.<br />
• Ideally, place the remote sensor over soil, rather than asphalt which would cause false<br />
readings.<br />
• Avoid placing the remote sensor near sources of heat, such as chimneys and heating elements<br />
• Avoid areas that collect heat from the sun and radiate heat, such as metal, brick or concrete<br />
structures, paving, and patios<br />
• The international standard for the valid air temperature measurements is 1.25meters above the<br />
ground<br />
OPERATION<br />
Immediately after batteries are installed, the remote sensor will start transmitting a temperature<br />
and humidity data to the main unit.<br />
19 20<br />
B<br />
C<br />
E<br />
F<br />
I<br />
G<br />
H<br />
D<br />
REAR<br />
J<br />
A. WEATHER/ PRESSURE window<br />
B. TEMPERATURE/ HUMIDITY window<br />
C. CLOCK window<br />
D. DOWN (▼) button<br />
• Select the next available mode<br />
L K<br />
• Press and hold for 2 seconds to search for wireless signal from remote sensor.<br />
• Decrease parameters.<br />
E. ALARM button<br />
• When time mode has been selected, press once to display the alarm time of weekday alarm<br />
( ), single alarm ( ) and pre-alarm ( ).<br />
• Hold for 2 seconds, set weekday, single or pre-alarm’s alarm time.<br />
• When temperature mode has been selected, press once to display the highest or lowest<br />
temperature alarm’s value.<br />
• Hold for 2 seconds, set the highest or lowest temperature alarm’s value.<br />
• When alarm is on, press once to stop the alarm temporarily.<br />
F. CHANNEL button<br />
• Press to display the outdoor temperature readings of Channels 1, 2 and 3. (additional remote<br />
sensors are required)<br />
• Hold for 2 seconds, enter into the circulation mode and outdoor temperature readings of<br />
Channels 1, 2 and 3 will be displayed automatically in every 5 seconds.<br />
G. MODE button<br />
• When pressure mode has been selected, press once to display the local pressure, altitude and<br />
sea level.<br />
• Press and hold for 2 seconds to set altitude and sea level.<br />
• When time mode has been selected, press once to toggle between time with seconds display<br />
or time with weekday display.<br />
• Press and hold for 2 seconds, set language of the day of the week, year digit, month digit,<br />
date digit, hour format (12/ 24 hours), hour digit and minute digit. (Note: calendar format is<br />
default in month-date display)<br />
• When temperature mode has been selected, press and hold for 2 seconds to toggle the<br />
temperature unit between Celsius or Fahrenheit.<br />
H. UP (▲) button<br />
• Press to select the next available mode<br />
• Increase the parameters<br />
• In time with seconds display mode, press and hold for 2 seconds to activate/ deactivate radio<br />
controlled time signal search manually.<br />
I. MEM button<br />
• When temperature mode has been selected, press to recall the minimum or maximum<br />
temperature and humidity readings of main and remote units.<br />
• Press and hold for 2 seconds, collected memories will be cleared.<br />
• When pressure mode has been selected, press once to check the historical pressure data for<br />
the past 24 hours.<br />
J. WALL- MOUNT hole<br />
• A recessed opening to mount the unit on a wall<br />
K. BATTERY COMPARTMENT<br />
• Accommodate two (2) CR2032 batteries<br />
L. TABLE STAND<br />
PLACEMENT<br />
• Make sure that the main unit is locating within the operating range of all remote sensors.<br />
• Ideally the main unit should be placed within line of sight of remote sensors. Avoid<br />
placing the main unit where surfaces emitting and radiating heat (e.g. heating ducts or air<br />
conditioners) and areas with interference from wireless devices (e.g. cordless phones, radio<br />
headsets, baby monitoring devices and other electronics).<br />
OPERATION<br />
Once the main unit is powered, the display will show all available LCD segments for a moment.<br />
IMPORTANT: All of the display functions will be locked, allowing setting your local altitude<br />
and pressure parameters by pressing the UP (▲) or DOWN (▼) and MODE buttons. The<br />
locked display will show the pressure icon and abbreviation “inHg” flashing in the Weather/<br />
Pressure Window, default time in Clock Window and channel 1’s temperature and humidity<br />
readings in Temperature/ Humidity Window.<br />
If pressure and altitude are not configured during this time, the unit will self-calibrate in a few<br />
minutes and show the default settings for the pressure and altitude (sea level) and all remote<br />
weather sensors readings.<br />
21 22
GETTING STARTED<br />
WEATHER FORECAST<br />
This unit is capable of detecting the atmospheric pressure changes. Based on collected weather<br />
data, it forecasts the weather for the next 12 to 24 hours.<br />
When the<br />
display<br />
shows...<br />
Forecast<br />
is...<br />
Sunny<br />
Partly<br />
Cloudy<br />
Heavy<br />
Cloudy Rainy Rainy Snowy<br />
Heavy<br />
Snowy<br />
NOTE: The weather forecast accuracy is approximately 70%.<br />
The main unit display shows forecasted (predicted) not current conditions. The<br />
SUNNY icon indicates clear weather, even when displayed during the night-time.<br />
PRESSURE OPERATION<br />
The pressure window displays: current barometric pressure, sea level pressure, and weather<br />
forecast. The information contains a number of historical statistics: pressure/ temperature/<br />
humidity history bar-chart for the past 24 hours<br />
Pressure can be measured in inHg, hPa/mBar or mmHg, and altitude is determined in either<br />
meters or feet.<br />
IMPORTANT: There are three viewing options available: barometric pressure SEA LEVEL<br />
or LOCAL and ALTITUDE. Local pressure is a measured value (can’t be adjusted) while Sea<br />
Level & Altitude are variables that you can enter. It is advisable to select and program only<br />
one of the variables and to allow the unit to calculate the third value.<br />
The unit is designed to measure pressure changes at your specific location, when LOCAL<br />
barometric pressure is selected. Information for programming your unit, with either Altitude<br />
or Sea Level values, may be obtained from GPS readings, online from the Internet, etc.<br />
SEA LEVEL barometric pressure provides you with information about pressure changes at<br />
lower elevations in your surrounding area. The SEA LEVEL pressure value can be set to<br />
match your local metro area weather information. (Sources – local TV or radio station, etc.)<br />
SETTING INITIAL PRESSURE PARAMETERS<br />
IMPORTANT: Allow the unit to set without touching ANY buttons for about 6-8 minutes<br />
during the main unit initial set up. This will give the unit time to synchronize with remotes,<br />
stabilize pressure readings and settle with default settings.<br />
SELECT PRESSURE UNITS OF MEASURE<br />
Press UP (▲) or DOWN (▼),as needed, until the pressure icon “PRESSURE”, to the left of<br />
the barometric pressure value, begins to flash.<br />
• Press MODE button, to toggle through selections until “SEA LEVEL” or “LOCAL”<br />
barometric pressure is displayed.<br />
• Press and hold MEM button to enter the pressure unit selection mode. Press the UP (▲) or<br />
DOWN (▼) button to select the preferred units of measure for pressure: inHG (English),<br />
hPa/mBar (scientific) or mmHg (metric)<br />
• Press MEM button to confirm your selection. Then press MODE to move to the ALTITUDE<br />
unit selection mode. Press the UP (▲) or DOWN (▼) button to select pressure unit as<br />
FEET or METER.<br />
• Press MEM button to confirm and hold MODE to move to the ALTITUDE value selection<br />
mode.<br />
• Press UP (▲) or DOWN (▼) to select or adjust the altitude value to your location. (Press<br />
and hold either button for accelerated digit advance)<br />
• Press MODE to confirm the programming selection.<br />
(NOTE: The unit will automatically exit programming mode if it does not detect a button<br />
press after 2 minutes.)<br />
VIEWING PRESSURE AND ALTITUDE INFORMATION<br />
To view pressure or altitude information, press MODE button. The display will alternate<br />
between the sea level pressure, local pressure and local altitude screens.<br />
PROGRAMMING SEA LEVEL PRESSURE (not required if you did altitude)<br />
• Press and hold MODE, until the barometric pressure digits are flashing.<br />
• Enter the desired sea level pressure value by pressing UP (▲) or DOWN (▼) buttons. (Press<br />
and hold either button for accelerated digit advance.)<br />
• Press MODE, to confirm sea level value selection.<br />
CHANGING PRESSURE AND ALTITUDE UNITS<br />
• Press MODE as needed, until “LOCAL” pressure is displayed.<br />
• Press and hold MEM/ HISTORY, until the pressure unit is flashing.<br />
• Change local or sea level pressure units by pressing the UP (▲) or DOWN (▼) buttons to<br />
select the pressure units. Choose from: inHg, hPa/mBar or mmHg.<br />
• Press MEM button to confirm your selection.<br />
• Press MODE button until the local altitude value will be displayed<br />
• Press and hold MEM button until the altitude unit is flashing.<br />
• Select the ALTITUDE unit:, meters or feet, by pressing UP (▲) or DOWN (▼) buttons.<br />
• Press MEM button to confirm your selection.<br />
VIEWING SEA LEVEL PRESSURE HISTORY<br />
• In pressure mode, press MEM button entering the sea level pressure display.<br />
• When the SEA LEVEL is displayed, press MEM button repeatedly viewing the sea<br />
level pressure history for the past 24 hours in 1 hour intervals.<br />
• If no buttons are pressed for 5 seconds, the unit will automatically return to the default<br />
Pressure and Weather Forecast Mode.<br />
VIEWING PRESSURE, TEMPERATURE AND HUMIDITY CHARTS<br />
The bar chart in Pressure Window can be configured to display a historical data for the sea<br />
level pressure and temperature or humidity for channel 1.<br />
After selecting the Pressure Window, press and hold ALARM button to toggle the bar chart<br />
between the sea level pressure with a word “PRESSURE” displayed at the right bottom corner<br />
of the chart, temperature with a thermometer icon and “CH1” and a humidity with “RH” icon<br />
and “CH1”.<br />
MOON PHASE ICONS<br />
New<br />
Moon<br />
Waning<br />
Crescent<br />
First<br />
Quarter<br />
Waxing<br />
Gibbous<br />
Full<br />
Moon<br />
Waning<br />
Gibbous<br />
Last<br />
Quarter Waning<br />
Crescent<br />
TEMPERATURE/ HUMIDITY WINDOW<br />
The main unit supports up to 3 remote sensors, corresponding to a separate channel of the<br />
temperature and relative humidity display. The temperature can be displayed in Celsius (ºC) or<br />
Fahrenheit (ºF).<br />
The main unit carries the temperature and humidity sensor and uses this data to calculate an<br />
indoors comfort level - Wet, Comfort or Dry.<br />
A temperature alert function is available for all channels. It can be programmed to sound if the<br />
channel temperature exceeds or falls below the pre-set upper and lower limits.<br />
23 24<br />
REMOTE SENSORS STATUS<br />
The wave icon above the current channel icon shows the connection status of the corresponding<br />
remote sensor:<br />
Icon<br />
Status<br />
Searching for the signals from the remote sensor<br />
RESETTING TEMPERATURE MEMORIES<br />
Press and hold MEM button for 3 seconds to clear all channel memories.<br />
COMFORT LEVEL INDICATION<br />
The main unit is capable of detecting and displaying the current indoor comfort levels of<br />
surrounding environment. The comfort level based on the combination of the current indoor<br />
temperature and humidity readings. The following comfort levels may be displayed:<br />
COMFORT (comfortable); WET (wet) and DRY (dry)<br />
Corresponding remote sensor signal received<br />
successfully<br />
No signals received for over 1 hour<br />
Indicator<br />
displayed<br />
COM<br />
Temperature<br />
Range<br />
20°C to 25°C<br />
(68°F to 77°F)<br />
Humidity<br />
Range<br />
40%RH-<br />
70%RH<br />
Shows current<br />
condition<br />
Ideal relative humidity<br />
and temperature<br />
-5°C to 50°C OVER Contains excess<br />
SEARCH FOR REMOTE SENSORS<br />
WET<br />
(23°F to122°F) 70%RH moisture<br />
• The main unit can be manually activated to search for the signals from remote sensors by<br />
pressing and holding DOWN (▼) button.<br />
-5°C to 50°C BELOW Contains inadequate<br />
DRY (23°F to122°F) 40%RH moisture<br />
OPERATION<br />
• To select the indoor/ outdoor temperature and humidity mode, press UP (▲) or DOWN (▼)<br />
until the IN icon flashing with a beep sound alert.<br />
CLOCK WINDOW<br />
VIEWING REMOTE (CHANNEL) TEMPERATURE AND HUMIDITY<br />
RADIO CONTROLLED TIME<br />
Static Display:<br />
The radio controlled signal for time (DCF 77) is transmitted from the central atomic clock in<br />
• Press the CHANNEL button to select measurements from different remote sensors, each is<br />
Frankfurt/Main in short intervals. It has a reception range of approx. 1500 km. If the tower icon<br />
MODE to a unique channel 1, 2 or 3.<br />
is not fully lit, or if the time and date are not set automatically, please consider the following:<br />
Channel Auto-Scan Display:<br />
• During night-time hours, atmospheric disturbances are typically less severe and radio signal<br />
• To enable an automatic scan of all channels, press and hold CHANNEL, until the icon is<br />
reception may improve. A single daily reception is sufficient enough to keep the clock<br />
displayed. The measurements from each remote channel will be alternately displayed with a 5 accuracy within 1 second.<br />
seconds viewing.<br />
• Make sure the unit is positioned at 2 meters distance from any interference source such as a<br />
NOTE: the channel auto-scan feature can be active only if there are more than one remote<br />
TV, computer monitor, microwave, etc.<br />
sensors operating and are MODE to different channels.<br />
• Within concrete wall rooms such as basements or office buildings, the received signal may<br />
be weakened. Always place the main unit near the window for better reception.<br />
PROGRAMMING TEMPERATURE IN CELSIUS OR FAHRENHEIT<br />
Once the radio controlled time signal is received, the date and time will be set automatically,<br />
• Press and hold MODE button for 3 seconds to toggle the temperature unit in Celsius (ºC) or<br />
and the [ ] icon will appear.<br />
Fahrenheit (ºF).<br />
SETTING TEMPERATURE ALARM<br />
• Press ALARM button selecting the desired alarm, the upper temperature alert with i con (if<br />
disabled, displays OFF), or lower temperature alert with icon (if disabled, displays OFF).<br />
• Press and hold ALARM button until the temperature digits flashing.<br />
• Adjust the temperature digits using the UP (▲) or DOWN (▼). Press and hold either button<br />
for fast digits advance<br />
• Press the ALARM to confirm selection and return to the temperature alarm selection screen<br />
ACTIVATING OR DEACTIVATING TEMPERATURE ALARMS<br />
• Once the above alerts are displayed, press the UP (▲) or DOWN (▼) to enable or disable<br />
the corresponding alert.<br />
ICON<br />
(Flashing)<br />
Time Signal Reception Strength<br />
Undefined data<br />
No Reception for the past 24 hours<br />
Weak signal, but can be decoded<br />
Strong signal<br />
• The radio controlled clock receiver is programmed that it will search for the time signal daily<br />
VIEWING MAX/MIN AND MINIMUM READINNGS<br />
Press the MEM/ HISTORY button recalling:<br />
• Current temperature and humidity<br />
• Minimum temperature and humidity<br />
• Maximum temperature and humidity at the remote location.<br />
for 0:00, 3:00, 6:00, and 12:00 am.<br />
• To enable or disable the radio controlled time receiver, press and hold UP (▲) button for 3<br />
seconds. If atomic time reception is activated, a tower icon will start flashing. If reception is<br />
disabled, the tower icon will disappear.<br />
• If the time signal has not been received in 8 minutes, you may set the time manually.<br />
25 26<br />
MANUAL SETTINGS<br />
To select the time mode, press UP (▲) or DOWN (▼) until the IN icon flashing with a beep<br />
sound alert.<br />
TIME AND CALENDER<br />
• Press and hold MODE button until the day of week language abbreviation “ENG” will flash<br />
• Press the UP (▲) or DOWN (▼) selecting the day of the week in English, German, French,<br />
Italian, Spanish, Dutch or Swedish.<br />
• After the language of weekday is set, press MODE button to confirm and move to the next<br />
parameter (year)<br />
• Continue setting the year, month, day, time format (12 or 24 hours), local hour and minutes,<br />
using the same technique<br />
• After programming is complete the display will return to the default hour and minutes with<br />
seconds display.<br />
CLOCK ALARMS<br />
There are two time alarms – Weekday alarm ( ) and Single day alarm( ) - and one Ice<br />
Warning Alarm ( ).<br />
• If Weekday ( ) alarm is activated, it will sound at the set time and the alarm icon will<br />
flash Mondays through Fridays<br />
• If Single ( ) day alarm is activated, it will sound at the set time and the alarm icon will flash<br />
only for this specific day and will not activate on subsequent days<br />
• If Ice Warning Alarm ( ) is activated, in will sound at the set time and alarm icon<br />
will flash once the remote temperature for Channel One (1) will reach 32°F(0°C) and below<br />
NOTE: Ice Warning Alarm can be set only if one or both - Weekday or Single alarm - are<br />
programmed.<br />
SETTING THE WEEKDAY ( ) AND SINGLE DAY ( ) ALARMS<br />
• Press ALARM button once to enter into the alarms setting mode. The default alarm is a<br />
Weekday alarm ( ). The abbreviation “OFF” with a letter “ ” next to it will be<br />
displayed, if the alarm has not been set previously<br />
• Press and hold ALARM button for two seconds. The hour digit will flash<br />
• Adjust the hour using UP ( ▲) or DOWN ( ▼) buttons<br />
• Press ALARM button again. The minute digits will flash<br />
• Adjust the minutes using UP (▲) or DOWN (▼) buttons<br />
• Press ALARM button again to confirm and the weekday alarm time will be set<br />
• Set Single ( ) day alarm if desired in the same manner<br />
SETTING THE ICE WARNING ALARM ( )<br />
If Weekday ( ) or Single day ( ) alarm is MODE, the Ice Warning Alarm ( ) can be<br />
programmed.<br />
• Press ALARM button once to enter into the Ice Warning Alarm setting mode. The<br />
abbreviation OFF with a PRE-AL next to it will be displayed.<br />
• Press and hold ALARM button for two seconds. The number 30 will flash, meaning that if<br />
selected, the alarm will sound 30 minutes earlier than the Weekday or Single alarm.<br />
• Select the desired Ice Warning Alarm interval in 15 minutes increments between 15 and 90<br />
minutes, using UP (▲) or DOWN (▼)buttons<br />
• Press ALARM button to confirm and exit from the alarm setting mode.<br />
ACTIVATING/ DEACTIVATINSALARMS<br />
• Press ALARM button to enter into the desired alarm mode.<br />
• Press UP ( ▲) to activate alarm and the corresponding icons , or<br />
will be displayed.<br />
• Press DOWN ( ▼) to deactivate alarm until “OFF” is displayed.<br />
MAINTANANCE<br />
CHANGING BATTERIES<br />
• If the low battery indicator lights up, replace batteries in the corresponding unit.<br />
• Do not mix old and batteries.<br />
CLEANING<br />
The main unit and remote sensors housings can be cleaned with a damp cloth. Small parts can<br />
be cleaned with a cotton tip or pipe-cleaner. Never use abrasive or corrosive cleaning agents or<br />
solvents. Do not immerse electronic components in water.<br />
TROUBLESHOOTING<br />
Check here before contacting customer service.<br />
Issue<br />
Main unit<br />
Remote sensor<br />
Symptom<br />
Radio Controlled<br />
Time signal is not<br />
received<br />
Cannot locate<br />
remote sensor<br />
Data does not<br />
match data on the<br />
main unit<br />
Solution<br />
Place unit by the window and keep it there<br />
overnight<br />
Check batteries<br />
Check location<br />
Press and hold DOWN ( ▼) button on the<br />
main unit to search for the signal form the<br />
remote sensor<br />
Initiate manual sensor search (Press and hold<br />
DOWN ( ▼) button on the main unit)<br />
PRECAUTIONS<br />
This product is engineered to give you years of satisfactory service if handled carefully. Here<br />
are a few precautions:<br />
• Do not immerse the units in water.<br />
• Do not clean the units with abrasive or corrosive materials. They may scratch the plastic parts<br />
and corrode the electronic circuits.<br />
• Do not subject the product to excessive force, shock, dust, temperature, or humidity, which<br />
may result in malfunctions, shorter lifespan, damaged batteries, and damaged parts.<br />
• Do not tamper with the units internal components. Doing so will invalidate the warranty and<br />
may cause damage. These units contain no user-serviceable parts.<br />
• Use only fresh batteries. Do not mix new and old batteries.<br />
• Read the user's manual thoroughly before operating the units.<br />
27 28<br />
CAUTION<br />
- The content of this manual is subject to change without further notice.<br />
- Due to printing limitation, the displays shown in this manual may differ from the actual<br />
display.<br />
- The contents of this manual may not be reproduced without the permission of the<br />
manufacturer. SPECIFICATIONS<br />
Main Unit<br />
Indoor Temperature<br />
Proposed operating range: 0°C to +50°C<br />
Temperature resolution: 0.1°C (0.2°F)<br />
User-selectable (°C or °F) temperature display<br />
Humidity (Indoor)<br />
Operating Range: 30% to 80%<br />
Resolution: 1%<br />
Accuracy: 7%<br />
Sampling Interval: 10 seconds<br />
Weather Forecast: in seven large icons: sunny, slightly cloudy, cloudy, rainy, heavy rainy,<br />
snowy and heavy snowy.<br />
Maximum number of remote sensors: 3 (one included)<br />
Readings update interval: every 45 seconds<br />
Low battery indicator<br />
Clock<br />
Radio Controlled time (DCF77)<br />
12/24 hour time format<br />
Crescendo 2 minutes alarm with 8 minutes snooze<br />
Barometric Pressure<br />
Measuring Range: 14.75 inHg to 32.44 inHg (500 Hpa to 1100Hpa); (374.5 mmHg to<br />
823.8 mmHg)<br />
Resolution: 0.003 inHg (0.1 Hpa, 0.08 mmHg)<br />
Accuracy: 0.015 inHg (5 Hpa; 0.38 mmHg)<br />
Sampling interval: 20 minutes<br />
Altitude Compensation Range: -200m to +5000 m<br />
Remote Sensor<br />
Remote Temperature<br />
Proposed operating range with alkaline batteries:<br />
-20°C to + 60°C<br />
Temperature resolution: 0.1°C/ 0.2°F<br />
Humidity (Outdoor)<br />
Operating Range: 30% to 80%<br />
Resolution: 1%<br />
Accuracy: 7%<br />
Sampling Interval: 10 seconds<br />
Transmitting Interval: around 47 seconds<br />
RF Transmission Frequency: 433 MHz<br />
RF range: Maximum 30 meters<br />
Temperature transmission cycle: approximately 45 seconds<br />
Wall-mount of Table stand<br />
Power<br />
Main unit: 2 CR2032 size 3V batteries (not included)<br />
Remote Sensor: 2 AAA size 1.5V batteries (not included)<br />
Dimensions<br />
Main unit: 178(L) x 120(H) x 9.5(W) mm<br />
Remote sensor: 37.5(L) x 110(H) x 23(W) mm<br />
EC-DECLARATION OF CONFORMITY<br />
Product: TE636NL<br />
This product contains the approved transmitter and complies with the essential requirements of<br />
Article 3 of the R&TTE 1999/5/EC Directives, if used for its intended use and that the<br />
following standard(s) has/have been applied:<br />
Efficient use of radio frequency spectrum (Article 3.2 of the R&TTE Directive)<br />
EN 300 220-2,V2.1.2:2007-06<br />
EN 300 330-2,V1.3.1:2006-04<br />
Electromagnetic compatibility (Article 3.1.b of the R&TTE Directive)<br />
EN 301 489-3,V1.4.1:2002-08<br />
Low voltage directive applied standard(s)<br />
EN 60950-1:2006+A11:2009<br />
Electromagnetic compatibility (Article3.1.b of the R&TTE Directive)<br />
EN 50371:2002<br />
Additional information:<br />
The product is therefore conform with the Low Voltage Directive 73/23/EC, the EMC Directive<br />
89/336/EC and R&TTE Directive 1999/5/EC (appendix II) and carries the respective CE<br />
marking.<br />
29 30