ReSound Aventa 3 User Guide - GN ReSound
ReSound Aventa 3 User Guide - GN ReSound
ReSound Aventa 3 User Guide - GN ReSound

You also want an ePaper? Increase the reach of your titles
YUMPU automatically turns print PDFs into web optimized ePapers that Google loves.
<strong>ReSound</strong> Unite TM Accessory Management<br />
The functionality for managing accessories can be accessed<br />
both from the Start Screen and from the Fit Screen. In a new fitting,<br />
click the “Manage Accessories” button after the instrument(s) have been<br />
assigned. To manage accessories from the Fit Screen, click the ”Unite<br />
Accessories” button on the left-hand side. The same page will come up<br />
regardless of which way you access it.<br />
To pair an accessory with the hearing instrument(s) click ”Add” and then<br />
follow the instructions on the screen that will put the accessory in pairing<br />
mode. Once the accessory is successfully paired, it is displayed with a<br />
graphic of the device and the ”Add” button changes to ”Remove”.<br />
If you are changing receivers on a <strong>ReSound</strong> RIE instrument (e.g. NP to<br />
HP), it’s important to physically change to the correct receiver, and reconfigure<br />
the instrument to ensure the proper gain settings.<br />
Reconfiguring instruments occurs on the Pre-Fit Screen.<br />
In the middle of the screen there is a button called reconfigure.<br />
Click this button and follow the instructions to reconfigure instruments for<br />
power level and/or change it from open or closed to the opposite.<br />
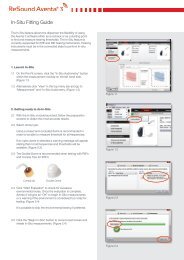
1. Click ”Unite Accessories” to open<br />
the accessory management window.<br />
1<br />
1<br />
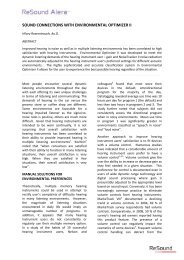
1. Click “Reconfigure”<br />
and follow the instructions<br />
2. Click “Add” to pair accessory with<br />
hearing instrument<br />
2<br />
2<br />
2. Select receiver size and<br />
open/closed configuration<br />
3. Follow the on-screen instructions<br />
to put the accessory in pairing<br />
mode and pair to the hearing<br />
instrument(s)<br />
3<br />
3. Click ’Reconfigure’.<br />
4. When finished click “Done”<br />
to return to the fitting<br />
3<br />
4<br />
Once all the required accessories are paired with the hearing instrument(s)<br />
click ”Done” and continue with the fitting.<br />
8 9