ReSound Aventa 3 User Guide - GN ReSound
ReSound Aventa 3 User Guide - GN ReSound
ReSound Aventa 3 User Guide - GN ReSound

You also want an ePaper? Increase the reach of your titles
YUMPU automatically turns print PDFs into web optimized ePapers that Google loves.
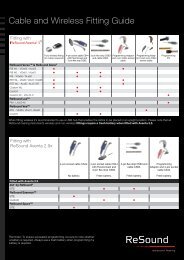
Fitting<br />
This fitting guide gives an overview of how to fit <strong>ReSound</strong> wireless hearing<br />
instruments with <strong>ReSound</strong> <strong>Aventa</strong> 3.<br />
The <strong>ReSound</strong> <strong>Aventa</strong> 3 fitting software supports all <strong>ReSound</strong> instruments<br />
built on the <strong>ReSound</strong> Range TM chip.<br />
Wireless Fitting and Wired Fitting<br />
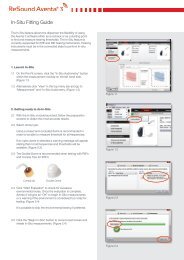
For wireless fittings, open and close the battery door of the hearing<br />
instrument(s). Once this is done, they will be in discovery mode for 30<br />
seconds. Click “Connect” in the upper right corner of the <strong>Aventa</strong> 3 Start<br />
screen to start the wireless detection. The Airlink TM will search for the<br />
hearing instrument(s).<br />
Getting Started<br />
Prior to connecting to <strong>ReSound</strong> instrument(s):<br />
• If fitting RIE instrument(s), attach the appropriate receiver for the<br />
client’s hearing loss to the hearing instrument(s).<br />
• <strong>ReSound</strong> instruments fitted with <strong>Aventa</strong> 3 require a battery when fitting.<br />
Make sure the battery is fresh and that it is inserted correctly.<br />
• a) For wireless fittings, insert Airlink TM in a USB slot on the fitting PC,<br />
or USB hub, and wait for the message that new hardware has been<br />
found. Then open <strong>Aventa</strong> 3.<br />
b) For wired fittings make sure that the programming interface (Speedlink,<br />
Hi-PRO or NOAHlink) is connected to the PC.<br />
• Launch <strong>Aventa</strong> 3. For new fittings, <strong>Aventa</strong> 3 begins in the Start screen,<br />
where the client’s experience with amplification can be selected, the<br />
programming interface can be chosen, and connection to hearing<br />
instrument(s) can be established.<br />
1<br />
1. The search for instruments will last<br />
for 30 seconds. If the instrument(s)<br />
are detected while the search is<br />
ongoing, you may click the ’Stop’<br />
button and proceed to assigning<br />
the instrument(s)<br />
2. Play a beep to identify right from<br />
left hearing instrument<br />
Connecting to the hearing instrument(s)<br />
Select the appropriate user experience level in the Patient information<br />
box. This will ensure the best starting gain settings for the client.<br />
3. Assign hearing instrument to right<br />
or left ear<br />
2 3<br />
Choose the appropriate programming interface in the “Connect using”<br />
drop-down menu in the <strong>Aventa</strong> 3 Start screen. For wireless fittings, select<br />
Airlink TM . For wired fittings, this will either be Speedlink, Hi-PRO or<br />
NOAHlink<br />
1. Choose patient experience level<br />
2. Select programming interface<br />
3. Click “Connect”<br />
1<br />
2<br />
3<br />
When the hearing instrument(s) have been identified, they can be<br />
assigned to the right or left ear. Click the “beep” button to have the<br />
hearing instrument play a beep and facilitate assigning the right and left<br />
instruments correctly. When the instrument(s) have been assigned, click<br />
“Done” to proceed to the Fit Screen or click “Manage accessories” to pair<br />
<strong>ReSound</strong> Unite TM accessories to the hearing instrument(s).<br />
For wired fittings, connect the hearing instrument(s) to the Speedlink, Hi-<br />
PRO or NOAHlink with the programming cables needed.<br />
Click “Connect” in the upper right corner of the <strong>Aventa</strong> 3 Start Screen.<br />
When instrument(s) are detected, the user lands directly on to the Fit<br />
Screen.<br />
To pair accessories, click ’Unite Accessories’ in the left navigation of the<br />
Fit Screen.<br />
6 7