ReSound Aventa 3 User Guide - GN ReSound
ReSound Aventa 3 User Guide - GN ReSound
ReSound Aventa 3 User Guide - GN ReSound

You also want an ePaper? Increase the reach of your titles
YUMPU automatically turns print PDFs into web optimized ePapers that Google loves.
Programming<br />
Once the fitting is complete and all the necessary adjustments are made,<br />
click ”Save” at the bottom right of the Fit Screen. Once the data is saved<br />
to the instrument(s) and to the database (NOAH) there will be a confirmation<br />
sentence with a green check mark at the bottom of the screen.<br />
Main Screen Functionality<br />
Start Screen<br />
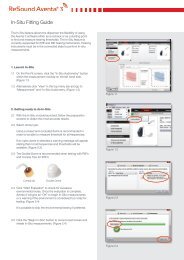
The Start Screen is the default screen for new clients when entering<br />
<strong>Aventa</strong> 3. Start Screen can be where you begin any new fitting regardless<br />
of whether the client is an experienced user or a client trying out hearing<br />
instruments for the first time.<br />
1. Click “Save” to complete the fitting<br />
1<br />
1<br />
2<br />
3<br />
1. Verify your patient data and choose<br />
the appropriate hearing instrument<br />
experience level<br />
2. Select in the drop down the programming<br />
interface you wish to<br />
use and click ”Connect” to connect<br />
to the hearing instruments<br />
3. Click ”Select Instrument” to go<br />
through the fitting steps without a<br />
psychical instrument(s) connected<br />
At this time it is safe to disconnect the instrument(s). A second option at<br />
this time is to go to the Summary Screen. If any changes are made the<br />
confirmation will disappear and it will be necessary to re-save the data<br />
before disconnecting. Remember to reboot the instrument(s) before sending<br />
the patient home.<br />
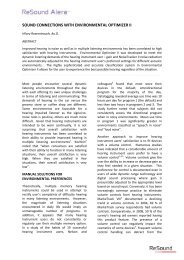
Pre-Fit Screen<br />
The Pre-Fit Screen assists you when choosing hearing instruments, displaying<br />
fitting ranges and provides a view of the form factors in and out of<br />
the ear. You can retrieve all the information about the hearing instruments<br />
and options.<br />
4<br />
4. AutoFit enables you to conduct<br />
fittings more directly than ever,<br />
without compromising accuracy.<br />
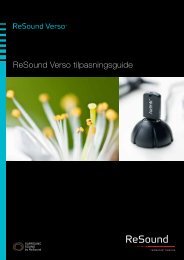
Summary<br />
The Summary Screen allows the clinician to print information for the client,<br />
a third party, or clinic notes for a chart. Notes can be made and<br />
saved and printed as needed.<br />
1. Click ”Reconfigure...” to reconfigure<br />
the hearing instruments into a<br />
different configuration.<br />
2. Click ”Change instruments” to see<br />
all the available hearing instruments<br />
in <strong>Aventa</strong> 3. Select an instrument<br />
for the left and the right ear.<br />
1. Click “Print” to customize<br />
fitting reports<br />
2. Write in session comments for<br />
this specific client. Comments<br />
are stored in NOAH<br />
1<br />
2<br />
3<br />
4<br />
6<br />
7<br />
1<br />
2<br />
5<br />
3. Create a Hearing Loss Simulation<br />
for a 3rd party present during the<br />
fitting.<br />
4. Click ”In-Situ Audiometry” to start<br />
In-Situ preparation. In-Situ Audiometry<br />
means that the dispenser<br />
uses the connected hearing<br />
instrument(s) to perform a hearing<br />
test rather than, or in addition to,<br />
using other audiometry equipment.<br />
5. View the hearing instrument fitting<br />
range and use the counseling<br />
overlays to explain the clients<br />
hearing loss.<br />
6. Use the ”Zoom” function to have a<br />
closer look at the hearing instrument<br />
and how it looks on the ear.<br />
10<br />
7. Enter speech scores and speech<br />
testing data. These data are<br />
used to re-calculate Natural<br />
Directionality.<br />
11