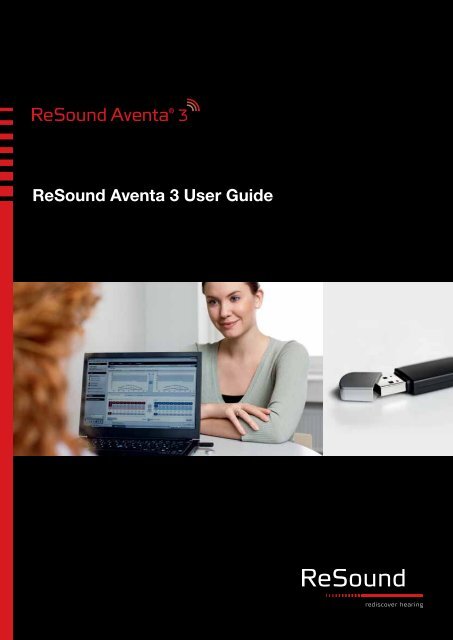
ReSound Aventa 3 User Guide - GN ReSound
ReSound Aventa 3 User Guide - GN ReSound
ReSound Aventa 3 User Guide - GN ReSound

Create successful ePaper yourself
Turn your PDF publications into a flip-book with our unique Google optimized e-Paper software.
<strong>ReSound</strong> <strong>Aventa</strong> 3 <strong>User</strong> <strong>Guide</strong>
Table of contents<br />
Introduction . . . . . . . . . . . . . . . . . . . . . . . . . . . . . . . . . . . . 3<br />
Installation . . . . . . . . . . . . . . . . . . . . . . . . . . . . . . . . . . . . . 4<br />
Launching <strong>Aventa</strong> 3 . . . . . . . . . . . . . . . . . . . . . . . . . . . . . 5<br />
Fitting . . . . . . . . . . . . . . . . . . . . . . . . . . . . . . . . . . . . . . . . 6<br />
Main Screen Functionality . . . . . . . . . . . . . . . . . . . . . . . . 11<br />
<strong>Aventa</strong> 3 Screen Structure . . . . . . . . . . . . . . . . . . . . . . . 13<br />
Fundamental Features in <strong>Aventa</strong> 3 . . . . . . . . . . . . . . . . . . 14<br />
Other Features and Functionality . . . . . . . . . . . . . . . . . . . 19<br />
General Precautions . . . . . . . . . . . . . . . . . . . . . . . . . . . . 26<br />
General Warnings . . . . . . . . . . . . . . . . . . . . . . . . . . . . . . 26<br />
Introduction<br />
<strong>ReSound</strong> <strong>Aventa</strong> ® just got even better<br />
Now truly wireless and with an optimized flow, <strong>ReSound</strong> <strong>Aventa</strong> ® 3 takes<br />
professional fitting to a new level.<br />
Its intuitive interface and wide range of proven fitting tools have been<br />
specifically designed to deliver an even faster, more efficient and more<br />
comfortable fitting experience.<br />
<strong>ReSound</strong> <strong>Aventa</strong> ® 3 is built on best practices from <strong>Aventa</strong> ® 2 and the<br />
results of in-depth research with audiologists and hearing care professionals.<br />
Its improved functionality ensures an optimized flow for easier<br />
and more intuitive fitting.<br />
<strong>ReSound</strong> <strong>Aventa</strong> ® 3 is your professional tool for every type of fitting –<br />
from the elementary to the highest level of sophistication. If you are not<br />
yet familiar with <strong>ReSound</strong> <strong>Aventa</strong> ® , this is your chance to get started. The<br />
new fitting software is extremely easy to learn and use.<br />
<strong>Aventa</strong> 3 continues to use Audiogram+, <strong>ReSound</strong>’s proprietary fitting algorithm<br />
for setting target gains and frequency response recommendations.<br />
Other target rules include DSL i/o, NAL–NL1, NAL-NL2 and NAL<br />
- R/P can also be the basis for your fittings. <strong>Aventa</strong> 3 provides you with a<br />
user centered screen format with information and tools at your fingertips<br />
or just a mouse click away.<br />
• The Start Screen will as the screen states get you started. This is the<br />
screen where you set the client experience level and choose your fitting<br />
approach. Are you fitting with Airlink or Speedlink? Are you going<br />
through the conventional fitting process or is the fast and automatic<br />
AutoFit approach the right way to go with this specific client? This<br />
screen efficiently assists you and your client in fitting <strong>ReSound</strong> hearing<br />
instruments.<br />
• The Pre-Fit Screen provides you with all the relevant product information.<br />
In this screen you can get a complete product overview,<br />
review fitting ranges, acoustical data etc. Pre-Fit Screen is also<br />
where you reconfigure the hearing instrument(s) to the desired<br />
configuration best suitable for the client. Various counseling tools<br />
are also available in this screen. Based on the clients audiogram<br />
counseling tools can help you explain your client about hearing and<br />
hearing loss.<br />
• The Fit Screen provides you with all the tools you’ll need to fit, adjust,<br />
fine tune, and complete your fittings. The tools are set up to assist you<br />
with the most complex task in an easy and intuitive interface. <strong>User</strong><br />
centered design methodology was utilized in conjunction with dispensers<br />
to customize the software to work the way you work with fitting<br />
tools designed by the practitioner.<br />
• The Summary Screen provides a final overview and completes your<br />
interaction with your clients. Customizable reports are available for you<br />
to print and for your clients to take home with them.<br />
This <strong>Aventa</strong> 3 <strong>User</strong> <strong>Guide</strong> walks through the <strong>Aventa</strong> 3 software and interface<br />
structure to insure you have the tools and information you need to<br />
assist you in creating the best fitting for your clients.<br />
2 3
1. Close all applications that may be<br />
running, including NOAH.<br />
2. Before you can install <strong>Aventa</strong> 3,<br />
you must have NOAH3 (3.x) installed.<br />
(unless you wish to only run<br />
<strong>Aventa</strong> 3 Standalone)<br />
3. Insert ”<strong>Aventa</strong> 3 CD” and <strong>Aventa</strong><br />
3 will automatically start up the<br />
installation process. If this does not<br />
happen go the CD and click the<br />
”Setup.exe”<br />
Installation<br />
Launching <strong>Aventa</strong> 3<br />
Let’s get started at the NOAH ”Module Selection” screen where you<br />
double-click on the ”<strong>ReSound</strong>” folder to get access to <strong>ReSound</strong>’s fitting<br />
software.<br />
4. Follow the on-screen instructions<br />
as prompted until <strong>Aventa</strong> 3 has<br />
been successfully installed.<br />
1<br />
2<br />
1 2<br />
1. Double-click the <strong>Aventa</strong> 3 icon to<br />
launch <strong>ReSound</strong> <strong>Aventa</strong> 3. The<br />
<strong>Aventa</strong> 3 fitting software supports<br />
all digital <strong>ReSound</strong> instruments<br />
built on the <strong>ReSound</strong> Range TM<br />
chip. <strong>ReSound</strong> Alera are the first<br />
<strong>ReSound</strong> products built on this<br />
technology.<br />
2. Double-click the <strong>Aventa</strong> 2.9 icon<br />
to launch <strong>ReSound</strong> <strong>Aventa</strong> 2.9.<br />
<strong>Aventa</strong> 2.9 continues to support<br />
all digital <strong>ReSound</strong> instruments<br />
launched up until the release of<br />
<strong>ReSound</strong> Alera.<br />
For more detailed installation instructions please find the <strong>Aventa</strong> 3 installation<br />
guide on the root of the <strong>Aventa</strong> 3 CD.<br />
There are multiple language versions availabel on the CD.<br />
4<br />
5
Fitting<br />
This fitting guide gives an overview of how to fit <strong>ReSound</strong> wireless hearing<br />
instruments with <strong>ReSound</strong> <strong>Aventa</strong> 3.<br />
The <strong>ReSound</strong> <strong>Aventa</strong> 3 fitting software supports all <strong>ReSound</strong> instruments<br />
built on the <strong>ReSound</strong> Range TM chip.<br />
Wireless Fitting and Wired Fitting<br />
For wireless fittings, open and close the battery door of the hearing<br />
instrument(s). Once this is done, they will be in discovery mode for 30<br />
seconds. Click “Connect” in the upper right corner of the <strong>Aventa</strong> 3 Start<br />
screen to start the wireless detection. The Airlink TM will search for the<br />
hearing instrument(s).<br />
Getting Started<br />
Prior to connecting to <strong>ReSound</strong> instrument(s):<br />
• If fitting RIE instrument(s), attach the appropriate receiver for the<br />
client’s hearing loss to the hearing instrument(s).<br />
• <strong>ReSound</strong> instruments fitted with <strong>Aventa</strong> 3 require a battery when fitting.<br />
Make sure the battery is fresh and that it is inserted correctly.<br />
• a) For wireless fittings, insert Airlink TM in a USB slot on the fitting PC,<br />
or USB hub, and wait for the message that new hardware has been<br />
found. Then open <strong>Aventa</strong> 3.<br />
b) For wired fittings make sure that the programming interface (Speedlink,<br />
Hi-PRO or NOAHlink) is connected to the PC.<br />
• Launch <strong>Aventa</strong> 3. For new fittings, <strong>Aventa</strong> 3 begins in the Start screen,<br />
where the client’s experience with amplification can be selected, the<br />
programming interface can be chosen, and connection to hearing<br />
instrument(s) can be established.<br />
1<br />
1. The search for instruments will last<br />
for 30 seconds. If the instrument(s)<br />
are detected while the search is<br />
ongoing, you may click the ’Stop’<br />
button and proceed to assigning<br />
the instrument(s)<br />
2. Play a beep to identify right from<br />
left hearing instrument<br />
Connecting to the hearing instrument(s)<br />
Select the appropriate user experience level in the Patient information<br />
box. This will ensure the best starting gain settings for the client.<br />
3. Assign hearing instrument to right<br />
or left ear<br />
2 3<br />
Choose the appropriate programming interface in the “Connect using”<br />
drop-down menu in the <strong>Aventa</strong> 3 Start screen. For wireless fittings, select<br />
Airlink TM . For wired fittings, this will either be Speedlink, Hi-PRO or<br />
NOAHlink<br />
1. Choose patient experience level<br />
2. Select programming interface<br />
3. Click “Connect”<br />
1<br />
2<br />
3<br />
When the hearing instrument(s) have been identified, they can be<br />
assigned to the right or left ear. Click the “beep” button to have the<br />
hearing instrument play a beep and facilitate assigning the right and left<br />
instruments correctly. When the instrument(s) have been assigned, click<br />
“Done” to proceed to the Fit Screen or click “Manage accessories” to pair<br />
<strong>ReSound</strong> Unite TM accessories to the hearing instrument(s).<br />
For wired fittings, connect the hearing instrument(s) to the Speedlink, Hi-<br />
PRO or NOAHlink with the programming cables needed.<br />
Click “Connect” in the upper right corner of the <strong>Aventa</strong> 3 Start Screen.<br />
When instrument(s) are detected, the user lands directly on to the Fit<br />
Screen.<br />
To pair accessories, click ’Unite Accessories’ in the left navigation of the<br />
Fit Screen.<br />
6 7
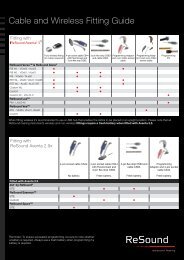
<strong>ReSound</strong> Unite TM Accessory Management<br />
The functionality for managing accessories can be accessed<br />
both from the Start Screen and from the Fit Screen. In a new fitting,<br />
click the “Manage Accessories” button after the instrument(s) have been<br />
assigned. To manage accessories from the Fit Screen, click the ”Unite<br />
Accessories” button on the left-hand side. The same page will come up<br />
regardless of which way you access it.<br />
To pair an accessory with the hearing instrument(s) click ”Add” and then<br />
follow the instructions on the screen that will put the accessory in pairing<br />
mode. Once the accessory is successfully paired, it is displayed with a<br />
graphic of the device and the ”Add” button changes to ”Remove”.<br />
If you are changing receivers on a <strong>ReSound</strong> RIE instrument (e.g. NP to<br />
HP), it’s important to physically change to the correct receiver, and reconfigure<br />
the instrument to ensure the proper gain settings.<br />
Reconfiguring instruments occurs on the Pre-Fit Screen.<br />
In the middle of the screen there is a button called reconfigure.<br />
Click this button and follow the instructions to reconfigure instruments for<br />
power level and/or change it from open or closed to the opposite.<br />
1. Click ”Unite Accessories” to open<br />
the accessory management window.<br />
1<br />
1<br />
1. Click “Reconfigure”<br />
and follow the instructions<br />
2. Click “Add” to pair accessory with<br />
hearing instrument<br />
2<br />
2<br />
2. Select receiver size and<br />
open/closed configuration<br />
3. Follow the on-screen instructions<br />
to put the accessory in pairing<br />
mode and pair to the hearing<br />
instrument(s)<br />
3<br />
3. Click ’Reconfigure’.<br />
4. When finished click “Done”<br />
to return to the fitting<br />
3<br />
4<br />
Once all the required accessories are paired with the hearing instrument(s)<br />
click ”Done” and continue with the fitting.<br />
8 9
Programming<br />
Once the fitting is complete and all the necessary adjustments are made,<br />
click ”Save” at the bottom right of the Fit Screen. Once the data is saved<br />
to the instrument(s) and to the database (NOAH) there will be a confirmation<br />
sentence with a green check mark at the bottom of the screen.<br />
Main Screen Functionality<br />
Start Screen<br />
The Start Screen is the default screen for new clients when entering<br />
<strong>Aventa</strong> 3. Start Screen can be where you begin any new fitting regardless<br />
of whether the client is an experienced user or a client trying out hearing<br />
instruments for the first time.<br />
1. Click “Save” to complete the fitting<br />
1<br />
1<br />
2<br />
3<br />
1. Verify your patient data and choose<br />
the appropriate hearing instrument<br />
experience level<br />
2. Select in the drop down the programming<br />
interface you wish to<br />
use and click ”Connect” to connect<br />
to the hearing instruments<br />
3. Click ”Select Instrument” to go<br />
through the fitting steps without a<br />
psychical instrument(s) connected<br />
At this time it is safe to disconnect the instrument(s). A second option at<br />
this time is to go to the Summary Screen. If any changes are made the<br />
confirmation will disappear and it will be necessary to re-save the data<br />
before disconnecting. Remember to reboot the instrument(s) before sending<br />
the patient home.<br />
Pre-Fit Screen<br />
The Pre-Fit Screen assists you when choosing hearing instruments, displaying<br />
fitting ranges and provides a view of the form factors in and out of<br />
the ear. You can retrieve all the information about the hearing instruments<br />
and options.<br />
4<br />
4. AutoFit enables you to conduct<br />
fittings more directly than ever,<br />
without compromising accuracy.<br />
Summary<br />
The Summary Screen allows the clinician to print information for the client,<br />
a third party, or clinic notes for a chart. Notes can be made and<br />
saved and printed as needed.<br />
1. Click ”Reconfigure...” to reconfigure<br />
the hearing instruments into a<br />
different configuration.<br />
2. Click ”Change instruments” to see<br />
all the available hearing instruments<br />
in <strong>Aventa</strong> 3. Select an instrument<br />
for the left and the right ear.<br />
1. Click “Print” to customize<br />
fitting reports<br />
2. Write in session comments for<br />
this specific client. Comments<br />
are stored in NOAH<br />
1<br />
2<br />
3<br />
4<br />
6<br />
7<br />
1<br />
2<br />
5<br />
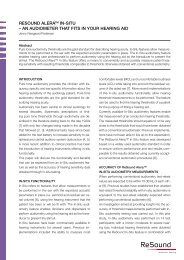
3. Create a Hearing Loss Simulation<br />
for a 3rd party present during the<br />
fitting.<br />
4. Click ”In-Situ Audiometry” to start<br />
In-Situ preparation. In-Situ Audiometry<br />
means that the dispenser<br />
uses the connected hearing<br />
instrument(s) to perform a hearing<br />
test rather than, or in addition to,<br />
using other audiometry equipment.<br />
5. View the hearing instrument fitting<br />
range and use the counseling<br />
overlays to explain the clients<br />
hearing loss.<br />
6. Use the ”Zoom” function to have a<br />
closer look at the hearing instrument<br />
and how it looks on the ear.<br />
10<br />
7. Enter speech scores and speech<br />
testing data. These data are<br />
used to re-calculate Natural<br />
Directionality.<br />
11
1. Calibrate DFS<br />
2. Mute hearing instrument(s)<br />
3. Set up programs and environments<br />
to match your clients lifestyle and<br />
needs. Swap program around,<br />
compare program A/B,<br />
Autorelate and much more<br />
Fit Screen<br />
With hearing instruments connected use the Fit Screen to make adjustment<br />
and fine-tuning. New hearing instruments are automatically fitted<br />
with recommended offsets based on audiogram and target rule.<br />
1<br />
<strong>Aventa</strong> 3 Screen Structure<br />
2<br />
1. Complete menu bar where you’ll<br />
find and access a large number<br />
of <strong>Aventa</strong> 3 functionality.<br />
4. Save your settings to the Hearing<br />
instruments and/or database<br />
(NOAH)<br />
5. Under ”Tools” you’ll find all the<br />
various fitting tools to help you<br />
create the best possible fitting:<br />
* Gain Adjustment<br />
* Advanced Features<br />
* Physical Properties<br />
* <strong>Aventa</strong> <strong>Guide</strong><br />
* Data Logging<br />
* Environmental Optimizer II<br />
* Beeps and Volume Control<br />
6. Click anywhere under ”Wireless”<br />
to access the window where you<br />
manage the wireless connectivity<br />
and pairing of accessories.<br />
5<br />
6<br />
1<br />
2<br />
9<br />
4<br />
7<br />
3<br />
8<br />
3<br />
4<br />
2. The Global Navigation takes you<br />
through the main <strong>Aventa</strong> screens<br />
always providing you with a clear<br />
indication of where you are in the<br />
fitting process<br />
3. Left-hand side navigation incl.<br />
Patient Information, Tools, Wireless<br />
and Feature Summary<br />
4. Multi-media player including<br />
over 200 sound files.<br />
7. The fitting graphs display the<br />
target and response curves, and<br />
the shaded grey area represent<br />
full-on gain and SafeFitting<br />
1 2 3 4 5 6<br />
1 2<br />
8. The gain matrix is where you can<br />
adjust gain and MPO. Use the<br />
up/down arrow to either increase<br />
or decrease the gain.<br />
Compression ratio is also<br />
displayed in the area.<br />
9. Choose between gain increments<br />
of 1 dB, 2 dB or 3 dB.<br />
3 4<br />
Summary Screen<br />
The Summary Screen provides a last look at the instruments and programs<br />
fitted. Here it is also possible to write fitting session comments for<br />
this specific client.<br />
5 6<br />
1. Confirm number of programs<br />
2. Enter session comments<br />
3. Click ”Print” to customize the<br />
Clinician Report and/or the Patient<br />
Handout slip.<br />
1<br />
4. Save to Hearing Instruments<br />
and/or database (NOAH)<br />
5. Close and exit the fitting session<br />
2<br />
3<br />
4 5<br />
12 13
Fundamental Features in <strong>Aventa</strong> 3<br />
This section is to describe the fundamental features in <strong>Aventa</strong> 3. The<br />
objective is to show the different sub-screens as well as frequently used<br />
features and control that are essential for the dispenser to do an efficient<br />
advanced fitting.<br />
Gain Adjustment<br />
Physical Properties<br />
To change vent or tube configurations,<br />
enter the ”Physical Properties” window.<br />
1. Select Vent configuration<br />
2. Select Tube size<br />
3. Select Dome size<br />
1. Gain Matrix<br />
2. dB increments<br />
3. Expand and collapse<br />
the gain handles<br />
4<br />
1<br />
2<br />
3<br />
5<br />
4<br />
4. Copy to left or right side<br />
5. Set check mark to recalibrate DFS<br />
if Vent configuration is changed<br />
4. Unlink<br />
5. Save<br />
1<br />
3<br />
2<br />
5<br />
<strong>Aventa</strong> <strong>Guide</strong><br />
Click ”<strong>Aventa</strong> <strong>Guide</strong>” to enter the questionnaire-based approach for<br />
fine-tuning. The <strong>Aventa</strong> <strong>Guide</strong> is ideally used at follow-up visits.<br />
Advanced Features<br />
To adjust or overview the feature pre-sets for the program operated,<br />
enter the ”Advanced Features” sub-screen.<br />
1. Select a category of complaint<br />
2. Select a problem<br />
3. Select a solution<br />
1. Advanced Features Drop-downs<br />
4. To carry out the solution, apply to<br />
Right, Left or Both Ears<br />
2. Unlink<br />
2<br />
1<br />
2<br />
5. Search function<br />
3. Save<br />
3<br />
1<br />
5<br />
4<br />
Alternatively you may search for a specific complaint by entering key<br />
words into the search function.<br />
3<br />
The Advanced Features sub-screen can also be accessed by clicking on<br />
the Features Summary<br />
14 15
1. Programs and Environments<br />
Data Logging<br />
Beeps and Volume Control<br />
2. Volume over time<br />
3. Volume per program<br />
4. Volume per environment<br />
5. Open Data Logging window<br />
automatically after reading<br />
hearing instruments<br />
6. Reset<br />
Click on ”Data Logging” to enter this sub-screen.<br />
6<br />
1<br />
2 3 4<br />
2<br />
To check beeps or volume control, click ”Beeps and Volume Control”<br />
to enter this window.<br />
1<br />
1. Select Beep Frequency<br />
2. Standard Beeps<br />
3. Wireless Beeps (only displayed<br />
for wireless products)<br />
4. Volume Control (only displayed<br />
for products with a VC)<br />
5<br />
3<br />
Environmental Optimizer II<br />
Environmental Optimizer II consists of an Environmental Fine-Tuner that<br />
enables easy adjustment in each of the listening environments. Both volume<br />
and noise reductions are available. Click on the slider thumb and<br />
move it to the desired position.<br />
4<br />
1. Gain sliders for each of the 7<br />
listening environment<br />
Program Tabs<br />
The program tabs in <strong>Aventa</strong> 3 are located below the fitting graph<br />
in Fit Screen.<br />
2. Change to adjustment of Noise<br />
Reduction<br />
2<br />
1<br />
To adjust noise reduction per environment, click the ”Adjust NoiseTracker II”<br />
button and the NoiseTracker II window will be displayed.<br />
1<br />
1. Click a program tab to display the<br />
various program options and select<br />
the desired environmental offsets.<br />
1. Noise Reduction sliders for each of<br />
the 7 listening environment<br />
2. Unlink<br />
1<br />
2<br />
3. Click Save or Cancel<br />
3<br />
16 17
The program toolbar gives you program<br />
options with easy access:<br />
1. Remove program<br />
2. Reorder program<br />
3. Create Comparison program<br />
4. Recalculate program<br />
5. Autorelate program(s)<br />
6. Copy to PhoneNow (function only<br />
active when in Acoustic Phone<br />
program)<br />
The Program Toolbar<br />
The Program Toolbar is where programs can be changed, added or<br />
removed.<br />
1 2 3 4 5 6<br />
Other Features and Functionality<br />
Custom Target Rule<br />
To make your own personalized approach to prescribed gain, create<br />
your personal custom target rule. Access the ”Custom Target Rules”<br />
functionality by entering ”Fitting” in the menu bar.<br />
Once fine-tuning is complete you can copy the relative gain changes<br />
to any other program in your fitting. This can be done by clicking the<br />
“Autorelate” button in the tool bar beneath the program tabs. Gain adjustments<br />
can be autorelated to all or to selected programs. Select which<br />
programs to autorelate to by checking off the boxes. A program can be<br />
autorelated to any of the other programs.<br />
1<br />
1. Enter the name of you new custom<br />
target rule<br />
2<br />
2. Select reference rule<br />
3<br />
4<br />
3. Make the gain offset changes<br />
4. Click ”Save” and Close the window<br />
1. When having clicked ”Autorelate”<br />
choose which program you want<br />
to Autorelate from and which<br />
program(s) you want to Autorelate<br />
to.<br />
2<br />
1<br />
Restore Factory Settings<br />
In order to put an already programmed hearing instrument back to its<br />
original state from the factory use the ”Restore Factory Settings” tool<br />
2. Choose whether you want to<br />
Autorelate to one hearing instrument<br />
or both the left and the right.<br />
18 19
1. Select the instrument you want to<br />
restore.<br />
2. Select the programming interface<br />
you want to use. You must have a<br />
wired connection.<br />
3. Click ”Restore to Factory Settings”<br />
1<br />
2<br />
Safe Fitting enabled<br />
Safe Fitting disabled<br />
3<br />
4. Click ”Close” when instrument has<br />
been successfully restored<br />
Preferences<br />
In <strong>Aventa</strong> 3, the Preferences Menu includes four tabs: <strong>User</strong> Preferences,<br />
Machine Preferences, Clinic Info and Web Updates.<br />
4<br />
Safe Fitting<br />
Once the DFS Ultra TM is calibrated, the Fit screen automatically opens<br />
with two shaded grey areas visible on the graph (applied to most cases).<br />
The darker grey shaded area indicates unavailable gain while the light<br />
grey indicates added maximum stable gain provided by DFS Ultra TM .<br />
If Safe Fitting is enabled, gain settings will be locked at the dark grey<br />
border. Safe Fitting can be turned off and on in the Fitting menu or set<br />
as a user preference. Note that if you have not calibrated DFS Ultra TM ,<br />
there will only be one shaded area which indicates the full-on gain of the<br />
particular hearing instrument(s).<br />
<strong>User</strong> Preferences are settings linked to the user account. Preference<br />
defaults changed here are changed specifically for the user/fitter using<br />
<strong>Aventa</strong> 3 when the Preference defaults are changed. The changes under<br />
<strong>User</strong> Preferences will only work for the single user account. All other user<br />
accounts will not be affected.<br />
1<br />
2<br />
Under ”<strong>User</strong> Preferences” you can:<br />
1. Change your language default<br />
2. Disable fitting and display<br />
functionality<br />
1. Gain Curves G[50] and G[80]<br />
3. Rearrange your preferred<br />
fitting flow<br />
2. Maximum Stable Gain<br />
3. Unavailable gain<br />
4. Manual gain controls<br />
3<br />
2<br />
1<br />
4<br />
3<br />
4. To save your ”<strong>User</strong> Preferences”<br />
click ”Save”<br />
4<br />
20 21
Under ”Machine Preferences” you<br />
can:<br />
1. Change a number of defaults for all<br />
user accounts for the PC<br />
2. Change <strong>ReSound</strong> web site hyperlink<br />
3. Enable or disable pin code or private<br />
label code<br />
4. To save your ”Machine Preferences”<br />
click ”Save”<br />
Machine Preferences are settings/default that are linked to the specific<br />
PC where <strong>Aventa</strong> 3 is installed. Changes to a Machine Preference will<br />
be impact all user accounts, meaning that it will be applied to all fitting<br />
sessions conducted on this specific PC.<br />
4<br />
1<br />
2<br />
3<br />
Printed Reports<br />
For the dispenser the Clinician Report provides the technical information<br />
that are related to the session:<br />
- Fitting Information<br />
- Patient Information<br />
- Clinic information<br />
- Hearing Instrument Information<br />
- Programs<br />
All information in the Clinician Report is optional and possible to remove<br />
or apply.<br />
The ”Clinic Info” tab is part of the customized report building that can be<br />
done within the <strong>Aventa</strong> 3 print functionality.<br />
The information typed in here will automatically also be present in the<br />
printed reports.<br />
In the Web Updates tab you can disable the Web Updates functionality<br />
or adjust the update frequency.<br />
It is recommended not to disable this feature as there may be important<br />
update made available.<br />
22 23
For the patient the Patient handout comprises customized, easy-to-understand<br />
information for the patient to bring home. The one-pager includes<br />
information on previous visit, instrument image(s), model names,<br />
serial numbers, plus brief description of the programs, batteries and tube<br />
size.<br />
To enter Print preview. To add or remove information to the Print Outs,<br />
click<br />
Edit your Printing preferences<br />
To change your preferences for printing, please click<br />
24 25
General Precautions<br />
This <strong>ReSound</strong> fitting software will apply recommended amplification<br />
settings based on available audiometrical information. Settings will be<br />
specific to each fitting.<br />
Manual modification of the fitting parameters will impact and change the<br />
amplification level prescribed. This change will be audible to the patient<br />
when the instruments are connected.<br />
Caution should be exercised with patients sensitive to sounds, for<br />
example suffering from tinnitus or hyperacusis.<br />
General Warnings<br />
• When connected, the <strong>Aventa</strong> Fitting Software controls the acoustic<br />
amplification levels in a hearing instrument. In some acoustic environments,<br />
over-amplification can cause discomfort and injury to the<br />
patient.<br />
• The Fitting System provides initial default amplification settings based<br />
on hearing threshold levels. These default settings could be higher<br />
than stable levels and cause feedback when amplification is first<br />
applied.<br />
• The Fitting System initiates the feedback calibration procedure.<br />
Feedback calibration uses broadband noise to measure the amount<br />
of sound leaking from the hearing instrument. The output level is designed<br />
to be on the boarder of “uncomfortable” level based on hearing<br />
threshold level at a specific frequency. The sound will be ramped up<br />
in volume and cease when the calibration data is received. It is possible<br />
for the level to exceed a patients comfort level, but it needs to be<br />
determined if it can obtain hazardous risk levels.<br />
• The Fitting System uses feedback calibration measurements to compute<br />
Max Stable Gain values. These values are an estimate of the<br />
amount of gain that can be safely applied to a hearing instrument before<br />
it begins to cause feedback. There is a warning when this gain is<br />
reached, and the over-gain values are highlighted with bold, red text.<br />
The safety margins give a “close” approximation of the actual feedback<br />
border. However, it is an estimation and feedback can occur before<br />
the warning is given. Sustained feedback on high power devices<br />
can damage residual hearing.<br />
• Warning to hearing care practitioners<br />
Special care should be exercised in selecting and fitting hearing<br />
instrument(s) whose maximum sound pressure level exceeds 132 dB<br />
SPL with an IEC 60711: 1981 occluded ear simulator, because there<br />
may be a risk of impairing the remaining hearing of the hearing instrument<br />
user.<br />
• Warning to hearing care practitioners Special care should be exercised<br />
in selecting and fitting hearing instrument(s) utilizing Tinnitus<br />
Sound Generator. The maximum output of the tinnitus sound generator<br />
feature falls into the range that can cause hearing loss according<br />
to OSHA regulations. For further details please consult the user guide<br />
of the relevant Hearing Aid that includes the Tinnitus Sound Generator<br />
feature. The user should not use the sound generator for more than<br />
eight (8) hours a day when this is set below 90db SPL. Above that level,<br />
the device should not be used for more than two hours per day. In<br />
no case should the sound generator be worn at uncomfortable levels.<br />
Children and physically or mentally challenged users will require guardian<br />
supervision while wearing the device.<br />
• The Fitting System initiates feedback calibration to measure the receiver-to-microphone<br />
transfer function. This is used primarily by the<br />
hearing instrument to manage feedback suppression but it is also<br />
used to display the limits of stable gain.<br />
• The maximum stable gain estimates are based on feedback calibration<br />
data, the presence of active feedback suppression, and a headroom<br />
estimate. The headroom value is meant to be conservative however<br />
the presence of directionality has shown to give inaccurate estimates<br />
of max. stable gain. The risk is that, under some situations, The Fitting<br />
System could show that the hearing instrument is stable when it is<br />
actually close to unstable and in risk of feedback.<br />
• If feedback calibration has not been performed during fitting the<br />
Max Stable Gain is not known and the device could cause feedback<br />
without warning.<br />
• The Fitting System uses the Audiogram+ algorithm to interpret audiogram<br />
data for determining optimal gain settings. The parameter used<br />
is “first time user”. This may give a less than optimal initial fitting but<br />
should not pose a safety risk. The algorithm has been independently<br />
validated with the specification and verified to be consistent with<br />
Fitting Software<br />
WARNING points out a situation that could lead to serious injuries.<br />
CAUTION indicates a situation that could lead to minor and<br />
moderate injuries<br />
26 27
<strong>ReSound</strong> ® provides excellent sound by offering innovative<br />
hearing solutions that combine original thinking<br />
and design with solid technology – all based on deep<br />
audiological insight and a profound understanding<br />
of users.<br />
Now modernised and truly wireless, <strong>ReSound</strong> <strong>Aventa</strong> ® 3<br />
takes professional fitting to a new level. Its ultraintuitive<br />
interface and wide range of proven fitting<br />
tools have been specifically designed to deliver<br />
an even faster, more intuitive and comfortable<br />
fitting experience.<br />
Any issues relating to the EU Medical<br />
Device Directive 93/42/EEC should be<br />
directed to <strong>ReSound</strong> A/S<br />
17461900-GB-11.03. Rev. B<br />
Worldwide headquarters<br />
<strong>ReSound</strong> A/S<br />
Lautrupbjerg 7<br />
DK-2750 Ballerup<br />
Denmark<br />
Tel.: +45 45 75 11 11<br />
Fax: +45 45 75 11 19<br />
www.resound.com<br />
United Kingdom<br />
<strong>GN</strong> <strong>ReSound</strong> Ltd.<br />
Kirtlington Business Centre<br />
Portway<br />
Kirtlington<br />
Oxon OX5 3JA<br />
Tel.: 0 1869 343 5000<br />
Fax: 0 1869 343 466<br />
www.resound.com<br />
Australia<br />
<strong>GN</strong> <strong>ReSound</strong> Pty. Ltd.<br />
Unit R1<br />
Regents Park Estate<br />
Regent Park NSW 2143<br />
Tel.: (free) 1800 658 955<br />
Fax: 02 9743 7472<br />
www.resound.com.au<br />
New Zealand<br />
<strong>GN</strong> <strong>ReSound</strong> (NZ) Ltd.<br />
12 Parkway Drive<br />
Mairangi Bay<br />
Auckland<br />
Tel.: (free) 0800 900 126<br />
Fax: (free) 0800 007 695<br />
www.resound.com.nz<br />
Canada<br />
<strong>GN</strong> <strong>ReSound</strong> Canada<br />
303 Super test Road<br />
Tronto, Ontario<br />
CANADA M3J 2M4<br />
Tel.: +1 888 737 6863<br />
Fax: +1 800 666 4089<br />
canada@gnresound.com<br />
www.gnresound.ca<br />
<strong>ReSound</strong> ® and rediscover hearing are registered trademarks of The <strong>GN</strong> <strong>ReSound</strong> Group, all rights reserved.