Cisco TelePresence Administering TC Endpoints on CUCM 9.0 ...
Cisco TelePresence Administering TC Endpoints on CUCM 9.0 ...
Cisco TelePresence Administering TC Endpoints on CUCM 9.0 ...

You also want an ePaper? Increase the reach of your titles
YUMPU automatically turns print PDFs into web optimized ePapers that Google loves.
<str<strong>on</strong>g>Cisco</str<strong>on</strong>g> <str<strong>on</strong>g>TelePresence</str<strong>on</strong>g> <str<strong>on</strong>g>Endpoints</str<strong>on</strong>g> running <str<strong>on</strong>g>TC</str<strong>on</strong>g>6 and <str<strong>on</strong>g>Cisco</str<strong>on</strong>g> Unified Communicati<strong>on</strong>s Manager <strong>9.0</strong><br />
Quick Reference Guide<br />
Quick Reference Guide<br />
• <str<strong>on</strong>g>Cisco</str<strong>on</strong>g> <str<strong>on</strong>g>TelePresence</str<strong>on</strong>g> MX Series<br />
• <str<strong>on</strong>g>Cisco</str<strong>on</strong>g> <str<strong>on</strong>g>TelePresence</str<strong>on</strong>g> EX Series<br />
• <str<strong>on</strong>g>Cisco</str<strong>on</strong>g> <str<strong>on</strong>g>TelePresence</str<strong>on</strong>g> Codec C Series<br />
• <str<strong>on</strong>g>Cisco</str<strong>on</strong>g> <str<strong>on</strong>g>TelePresence</str<strong>on</strong>g> Profile Series<br />
• <str<strong>on</strong>g>Cisco</str<strong>on</strong>g> <str<strong>on</strong>g>TelePresence</str<strong>on</strong>g> Quick Set C20<br />
• <str<strong>on</strong>g>Cisco</str<strong>on</strong>g> <str<strong>on</strong>g>TelePresence</str<strong>on</strong>g> SX20 Quick Set<br />
• <str<strong>on</strong>g>Cisco</str<strong>on</strong>g> Unified CM <strong>9.0</strong><br />
Software versi<strong>on</strong>s <str<strong>on</strong>g>TC</str<strong>on</strong>g>6.x and <str<strong>on</strong>g>Cisco</str<strong>on</strong>g> Unified CM <strong>9.0</strong><br />
January 2013<br />
D14996.01 <str<strong>on</strong>g>Administering</str<strong>on</strong>g> <str<strong>on</strong>g>TC</str<strong>on</strong>g>6 <str<strong>on</strong>g>Endpoints</str<strong>on</strong>g> <strong>on</strong> <strong>CUCM</strong> <strong>9.0</strong>, January 2013. www.cisco.com — Copyright © 2013 <str<strong>on</strong>g>Cisco</str<strong>on</strong>g> Systems, Inc. All rights reserved.<br />
1
<str<strong>on</strong>g>Cisco</str<strong>on</strong>g> <str<strong>on</strong>g>TelePresence</str<strong>on</strong>g> <str<strong>on</strong>g>Endpoints</str<strong>on</strong>g> running <str<strong>on</strong>g>TC</str<strong>on</strong>g>6 and <str<strong>on</strong>g>Cisco</str<strong>on</strong>g> Unified Communicati<strong>on</strong>s Manager <strong>9.0</strong><br />
Quick Reference Guide<br />
Thank you for choosing <str<strong>on</strong>g>Cisco</str<strong>on</strong>g> <str<strong>on</strong>g>TelePresence</str<strong>on</strong>g>!<br />
Your <str<strong>on</strong>g>Cisco</str<strong>on</strong>g> product has been designed to give you many<br />
years of safe, reliable operati<strong>on</strong>.<br />
This part of the product documentati<strong>on</strong> is aimed at<br />
administrators working with the setup of the <str<strong>on</strong>g>TelePresence</str<strong>on</strong>g><br />
endpoints <strong>on</strong> <str<strong>on</strong>g>Cisco</str<strong>on</strong>g> Unified CM.<br />
Our main objective with this guide is to address your goals<br />
and needs. Please let us know how well we succeeded! Go<br />
to the feedback page, click here...<br />
May we recommend that you visit the <str<strong>on</strong>g>Cisco</str<strong>on</strong>g> web site<br />
regularly for updated versi<strong>on</strong>s of this guide. Go to:<br />
http://www.cisco.com/go/telepresence/docs<br />
How to use this guide<br />
The top menu bar and the entries in the Table of c<strong>on</strong>tents<br />
are all hyperlinks. You can click <strong>on</strong> them to go to the topic.<br />
Table of c<strong>on</strong>tents<br />
Introducti<strong>on</strong>.......................................................................... 3<br />
Introducti<strong>on</strong>............................................................................4<br />
Products covered by this guide...........................................4<br />
Prerequisite.........................................................................4<br />
Before you start...................................................................4<br />
About device packages.......................................................5<br />
If previously used with TMS................................................5<br />
Supported software versi<strong>on</strong>s..............................................5<br />
Useful links..........................................................................5<br />
Endpoint c<strong>on</strong>figurati<strong>on</strong>......................................................... 6<br />
Preparati<strong>on</strong>s...........................................................................7<br />
Using the Touch c<strong>on</strong>troller..................................................7<br />
Using the remote c<strong>on</strong>trol.....................................................7<br />
Using the web interface......................................................8<br />
Using the command line interface......................................8<br />
Setting up provisi<strong>on</strong>ing..........................................................9<br />
Setting the call details.......................................................... 11<br />
Setting the system password.............................................. 13<br />
<strong>CUCM</strong> c<strong>on</strong>figurati<strong>on</strong>.......................................................... 14<br />
Logging in to <str<strong>on</strong>g>Cisco</str<strong>on</strong>g> Unified CM Administrati<strong>on</strong>................... 15<br />
Creating a SIP profile........................................................... 16<br />
Creating a security profile.................................................... 17<br />
Manual registrati<strong>on</strong> of the endpoint..................................... 18<br />
Adding a new device......................................................... 18<br />
C<strong>on</strong>figuring the line number..............................................23<br />
Auto-registrati<strong>on</strong> of the endpoint........................................24<br />
Enable auto-registrati<strong>on</strong>....................................................24<br />
Setting passwords............................................................. 25<br />
Setting the system password <strong>on</strong> the endpoint....................26<br />
Changing your own system password..............................26<br />
Changing another user’s system password......................26<br />
Setting the menu password <strong>on</strong> the endpoint......................27<br />
Setting the menu password..............................................27<br />
Appendices........................................................................ 28<br />
How to factory reset the endpoint.......................................29<br />
Understanding <str<strong>on</strong>g>Cisco</str<strong>on</strong>g> Discovery Protocol <strong>on</strong> the <str<strong>on</strong>g>Cisco</str<strong>on</strong>g><br />
<str<strong>on</strong>g>TelePresence</str<strong>on</strong>g> endpoints......................................................30<br />
User documentati<strong>on</strong> <strong>on</strong> the <str<strong>on</strong>g>Cisco</str<strong>on</strong>g> web site.........................34<br />
<str<strong>on</strong>g>Cisco</str<strong>on</strong>g> c<strong>on</strong>tacts................................................................... 35<br />
D14996.01 <str<strong>on</strong>g>Administering</str<strong>on</strong>g> <str<strong>on</strong>g>TC</str<strong>on</strong>g>6 <str<strong>on</strong>g>Endpoints</str<strong>on</strong>g> <strong>on</strong> <strong>CUCM</strong> <strong>9.0</strong>, January 2013. www.cisco.com — Copyright © 2013 <str<strong>on</strong>g>Cisco</str<strong>on</strong>g> Systems, Inc. All rights reserved.<br />
2
<str<strong>on</strong>g>Cisco</str<strong>on</strong>g> <str<strong>on</strong>g>TelePresence</str<strong>on</strong>g> <str<strong>on</strong>g>Endpoints</str<strong>on</strong>g> running <str<strong>on</strong>g>TC</str<strong>on</strong>g>6 and <str<strong>on</strong>g>Cisco</str<strong>on</strong>g> Unified Communicati<strong>on</strong>s Manager <strong>9.0</strong><br />
Quick Reference Guide<br />
Chapter 1<br />
Introducti<strong>on</strong><br />
This chapter gives an overview of what is important to<br />
know before you start to c<strong>on</strong>figure the <str<strong>on</strong>g>Cisco</str<strong>on</strong>g> Unified<br />
Communicati<strong>on</strong>s Manager and the <str<strong>on</strong>g>TelePresence</str<strong>on</strong>g><br />
endpoints.<br />
D14996.01 <str<strong>on</strong>g>Administering</str<strong>on</strong>g> <str<strong>on</strong>g>TC</str<strong>on</strong>g>6 <str<strong>on</strong>g>Endpoints</str<strong>on</strong>g> <strong>on</strong> <strong>CUCM</strong> <strong>9.0</strong>, January 2013. www.cisco.com — Copyright © 2013 <str<strong>on</strong>g>Cisco</str<strong>on</strong>g> Systems, Inc. All rights reserved.<br />
3
<str<strong>on</strong>g>Cisco</str<strong>on</strong>g> <str<strong>on</strong>g>TelePresence</str<strong>on</strong>g> <str<strong>on</strong>g>Endpoints</str<strong>on</strong>g> running <str<strong>on</strong>g>TC</str<strong>on</strong>g>6 and <str<strong>on</strong>g>Cisco</str<strong>on</strong>g> Unified Communicati<strong>on</strong>s Manager <strong>9.0</strong><br />
Quick Reference Guide<br />
Introducti<strong>on</strong><br />
This document describes the tasks you must perform to start<br />
using your <str<strong>on</strong>g>Cisco</str<strong>on</strong>g> <str<strong>on</strong>g>TelePresence</str<strong>on</strong>g> endpoints <strong>on</strong> <str<strong>on</strong>g>Cisco</str<strong>on</strong>g> Unified<br />
CM (<strong>CUCM</strong>).<br />
This guide describes <str<strong>on</strong>g>TC</str<strong>on</strong>g>6.0 and <strong>CUCM</strong> <strong>9.0</strong>, but most<br />
c<strong>on</strong>figurati<strong>on</strong>s will also apply to <strong>CUCM</strong> 8.6.2. Note that if you<br />
are c<strong>on</strong>figuring <strong>CUCM</strong> 8.6.2 you may find that some menus<br />
have changed.<br />
Products covered by this guide<br />
<str<strong>on</strong>g>Cisco</str<strong>on</strong>g> <str<strong>on</strong>g>TelePresence</str<strong>on</strong>g> endpoints:<br />
• <str<strong>on</strong>g>TC</str<strong>on</strong>g> 5.0 and later: MX200, MX300, EX90, EX60, Codec<br />
C90, Codec C60, Codec C40, Profiles w/ Codec C<br />
Series, Quick Set C20<br />
• <str<strong>on</strong>g>TC</str<strong>on</strong>g> 5.1 and later: SX20 Quick Set<br />
<str<strong>on</strong>g>Cisco</str<strong>on</strong>g> Unified CM – <strong>CUCM</strong> <strong>9.0</strong><br />
Prerequisite<br />
Users of this guide should be familiar with c<strong>on</strong>figurati<strong>on</strong> of the<br />
<str<strong>on</strong>g>Cisco</str<strong>on</strong>g> Unified CM and <str<strong>on</strong>g>Cisco</str<strong>on</strong>g> <str<strong>on</strong>g>TelePresence</str<strong>on</strong>g> endpoints.<br />
This document do not describe the basic c<strong>on</strong>figurati<strong>on</strong> of the<br />
endpoint, such as user accounts, network c<strong>on</strong>figurati<strong>on</strong>, date<br />
& time, etc. Refer to the user documentati<strong>on</strong>:<br />
<str<strong>on</strong>g>Cisco</str<strong>on</strong>g> <str<strong>on</strong>g>TelePresence</str<strong>on</strong>g> Video Systems Getting Started Guide<br />
This document do not describe c<strong>on</strong>figurati<strong>on</strong> of the <strong>CUCM</strong><br />
such as voice mail, shared lines, call forward, etc. Refer to the<br />
user documentati<strong>on</strong>:<br />
<str<strong>on</strong>g>Cisco</str<strong>on</strong>g> Unified Communicati<strong>on</strong>s Manager (CallManager)<br />
Before you start<br />
In most cases a factory reset of the endpoint is not needed<br />
before provisi<strong>on</strong>ing it to the <str<strong>on</strong>g>Cisco</str<strong>on</strong>g> Unified CM. But, in some<br />
cases it is recommended to factory reset the endpoint before<br />
provisi<strong>on</strong>ing:<br />
• When the system has been used with <str<strong>on</strong>g>Cisco</str<strong>on</strong>g><br />
<str<strong>on</strong>g>TelePresence</str<strong>on</strong>g> Management Suite (TMS), or a similar<br />
system.<br />
• When the system is re-deployed to another user.<br />
• When changing the security c<strong>on</strong>figurati<strong>on</strong>.<br />
• When moving the system to another security<br />
envir<strong>on</strong>ment.<br />
Factory reset is described in the Appendices secti<strong>on</strong>. Refer to<br />
"How to factory reset the endpoint" <strong>on</strong> page 29.<br />
D14996.01 <str<strong>on</strong>g>Administering</str<strong>on</strong>g> <str<strong>on</strong>g>TC</str<strong>on</strong>g>6 <str<strong>on</strong>g>Endpoints</str<strong>on</strong>g> <strong>on</strong> <strong>CUCM</strong> <strong>9.0</strong>, January 2013. www.cisco.com — Copyright © 2013 <str<strong>on</strong>g>Cisco</str<strong>on</strong>g> Systems, Inc. All rights reserved.<br />
4
<str<strong>on</strong>g>Cisco</str<strong>on</strong>g> <str<strong>on</strong>g>TelePresence</str<strong>on</strong>g> <str<strong>on</strong>g>Endpoints</str<strong>on</strong>g> running <str<strong>on</strong>g>TC</str<strong>on</strong>g>6 and <str<strong>on</strong>g>Cisco</str<strong>on</strong>g> Unified Communicati<strong>on</strong>s Manager <strong>9.0</strong><br />
Quick Reference Guide<br />
About device packages<br />
The <strong>CUCM</strong> device packages are available for download <strong>on</strong><br />
the <str<strong>on</strong>g>Cisco</str<strong>on</strong>g> web site. See the Release Notes for details.<br />
If previously used with TMS<br />
When selecting <str<strong>on</strong>g>Cisco</str<strong>on</strong>g> Unified CM as the <strong>on</strong>e to provisi<strong>on</strong>ing<br />
and providing the address book, make sure the endpoint is<br />
purged from <str<strong>on</strong>g>Cisco</str<strong>on</strong>g> <str<strong>on</strong>g>TelePresence</str<strong>on</strong>g> Management Suite (TMS).<br />
Supported software versi<strong>on</strong>s<br />
Before you start c<strong>on</strong>figuring, make sure the endpoints and<br />
<str<strong>on</strong>g>Cisco</str<strong>on</strong>g> Unified CM have the correct software installed.<br />
<str<strong>on</strong>g>Cisco</str<strong>on</strong>g> Unified CM versi<strong>on</strong> 8.6.1.10000-43 or higher<br />
Supported endpoints: MX200, EX Series (EX90, EX60), Quick<br />
Set C20, Codec C Series (C90, C60, C40) and Profiles using<br />
Codec C Series.<br />
<str<strong>on</strong>g>Cisco</str<strong>on</strong>g> Unified CM versi<strong>on</strong> 8.6.2 or higher<br />
Supported endpoints: SX20 Quick Set, MX Series (MX300,<br />
MX200), EX Series (EX90, EX60), Quick Set C20, Codec C<br />
Series (C90, C60, C40) and Profiles using Codec C Series.<br />
<str<strong>on</strong>g>Cisco</str<strong>on</strong>g> Unified CM versi<strong>on</strong> 8.6.2.21020 or lower<br />
If using a versi<strong>on</strong> lower than 8.6.2.21020, you need the <str<strong>on</strong>g>Cisco</str<strong>on</strong>g><br />
Unified CM device pack from December 2011 to support<br />
MX300 and SX20.<br />
<str<strong>on</strong>g>Cisco</str<strong>on</strong>g> <str<strong>on</strong>g>TelePresence</str<strong>on</strong>g> <str<strong>on</strong>g>TC</str<strong>on</strong>g> 5.0 and higher<br />
Supported endpoints: MX Series (MX300, MX200), EX Series<br />
(EX90, EX60), Quick Set C20, Codec C Series (C90, C60,<br />
C40) and Profiles using Codec C Series.<br />
<str<strong>on</strong>g>Cisco</str<strong>on</strong>g> <str<strong>on</strong>g>TelePresence</str<strong>on</strong>g> <str<strong>on</strong>g>TC</str<strong>on</strong>g> 5.1 and higher<br />
Supported endpoints: SX20 Quick Set, MX Series (MX300,<br />
MX200), EX Series (EX90, EX60), Quick Set C20, Codec C<br />
Series (C90, C60, C40) and Profiles using Codec C Series.<br />
To enable CTI m<strong>on</strong>itoring support for CTS Manager<br />
• <str<strong>on</strong>g>Cisco</str<strong>on</strong>g> Unified CM versi<strong>on</strong> 8.6.2 or later.<br />
• <str<strong>on</strong>g>Cisco</str<strong>on</strong>g> <str<strong>on</strong>g>TelePresence</str<strong>on</strong>g> MultiPoint Switch - CTMS 1.8 or later.<br />
• <str<strong>on</strong>g>Cisco</str<strong>on</strong>g> <str<strong>on</strong>g>TelePresence</str<strong>on</strong>g> Manager - CTS-MAN 1.8 or higher.<br />
Opti<strong>on</strong> package for C20<br />
Note that the C20 must have high definiti<strong>on</strong>/premium<br />
resoluti<strong>on</strong> opti<strong>on</strong> to interoperate with CTMS.<br />
Useful links<br />
User documentati<strong>on</strong> and software download for<br />
the <str<strong>on</strong>g>TelePresence</str<strong>on</strong>g> endpoints:<br />
http://www.cisco.com/go/telepresence/docs<br />
User documentati<strong>on</strong> and software download for<br />
<str<strong>on</strong>g>Cisco</str<strong>on</strong>g> Unified CM:.<br />
http://www.cisco.com/en/US/products/sw/voicesw/<br />
ps556/tsd_products_support_series_home.html<br />
<str<strong>on</strong>g>Cisco</str<strong>on</strong>g> support and software download page:<br />
http://www.cisco.com/cisco/web/support/index.html<br />
<str<strong>on</strong>g>Cisco</str<strong>on</strong>g> <str<strong>on</strong>g>TelePresence</str<strong>on</strong>g> <str<strong>on</strong>g>TC</str<strong>on</strong>g> Release Notes:<br />
http://www.cisco.com/en/US/products/ps11422/prod_<br />
release_notes_list.html<br />
D14996.01 <str<strong>on</strong>g>Administering</str<strong>on</strong>g> <str<strong>on</strong>g>TC</str<strong>on</strong>g>6 <str<strong>on</strong>g>Endpoints</str<strong>on</strong>g> <strong>on</strong> <strong>CUCM</strong> <strong>9.0</strong>, January 2013. www.cisco.com — Copyright © 2013 <str<strong>on</strong>g>Cisco</str<strong>on</strong>g> Systems, Inc. All rights reserved.<br />
5
<str<strong>on</strong>g>Cisco</str<strong>on</strong>g> <str<strong>on</strong>g>TelePresence</str<strong>on</strong>g> <str<strong>on</strong>g>Endpoints</str<strong>on</strong>g> running <str<strong>on</strong>g>TC</str<strong>on</strong>g>6 and <str<strong>on</strong>g>Cisco</str<strong>on</strong>g> Unified Communicati<strong>on</strong>s Manager <strong>9.0</strong><br />
Quick Reference Guide<br />
Chapter 2<br />
Endpoint c<strong>on</strong>figurati<strong>on</strong><br />
This chapter describes the steps required to c<strong>on</strong>figure<br />
the <str<strong>on</strong>g>TelePresence</str<strong>on</strong>g> endpoints for use with <str<strong>on</strong>g>Cisco</str<strong>on</strong>g> Unified<br />
Communicati<strong>on</strong>s Manager.<br />
D14996.01 <str<strong>on</strong>g>Administering</str<strong>on</strong>g> <str<strong>on</strong>g>TC</str<strong>on</strong>g>6 <str<strong>on</strong>g>Endpoints</str<strong>on</strong>g> <strong>on</strong> <strong>CUCM</strong> <strong>9.0</strong>, January 2013. www.cisco.com — Copyright © 2013 <str<strong>on</strong>g>Cisco</str<strong>on</strong>g> Systems, Inc. All rights reserved.<br />
6
<str<strong>on</strong>g>Cisco</str<strong>on</strong>g> <str<strong>on</strong>g>TelePresence</str<strong>on</strong>g> <str<strong>on</strong>g>Endpoints</str<strong>on</strong>g> running <str<strong>on</strong>g>TC</str<strong>on</strong>g>6 and <str<strong>on</strong>g>Cisco</str<strong>on</strong>g> Unified Communicati<strong>on</strong>s Manager <strong>9.0</strong><br />
Quick Reference Guide<br />
Preparati<strong>on</strong>s<br />
You can use the Touch c<strong>on</strong>troller or the remote c<strong>on</strong>trol to<br />
c<strong>on</strong>figure the system; alternatively, you can use the system's<br />
web interface or the command line interface with API<br />
commands.<br />
All methods are described <strong>on</strong> the following pages.<br />
Touch<br />
Using the Touch c<strong>on</strong>troller<br />
If no menu is displayed <strong>on</strong> the Touch c<strong>on</strong>troller, tap the<br />
display to wake up the system.<br />
OSD<br />
Using the remote c<strong>on</strong>trol<br />
If no menu is displayed <strong>on</strong> screen, press any key <strong>on</strong> the<br />
remote c<strong>on</strong>trol to wake up the system.<br />
If the system does not wake up:<br />
• Make sure the Touch c<strong>on</strong>troller is c<strong>on</strong>nected to the<br />
endpoint, either directly or by the network.<br />
• Make sure the endpoint is c<strong>on</strong>nected to power and<br />
switched <strong>on</strong>.<br />
• If the system has just been switched <strong>on</strong>, wait for a few<br />
minutes to allow the system to start up.<br />
• Make sure the Touch c<strong>on</strong>troller is properly paired with the<br />
endpoint.<br />
• If in doubt, read the Installati<strong>on</strong> guide for your product.<br />
You must use the Touch c<strong>on</strong>troller, or the remote<br />
c<strong>on</strong>trol with <strong>on</strong>-screen display, for the c<strong>on</strong>figurati<strong>on</strong>s<br />
until you know your system's IP address.<br />
If the system does not wake up:<br />
• Make sure the remote c<strong>on</strong>trol has working batteries.<br />
• Make sure the endpoint is c<strong>on</strong>nected to power and<br />
switched <strong>on</strong>.<br />
• If the system has just been switched <strong>on</strong>, wait for a few<br />
minutes to allow the system to start up.<br />
• If in doubt, read the Installati<strong>on</strong> guide for your product.<br />
You must use the Touch c<strong>on</strong>troller, or the remote<br />
c<strong>on</strong>trol with <strong>on</strong>-screen display, for the c<strong>on</strong>figurati<strong>on</strong>s<br />
until you know your system's IP address.<br />
D14996.01 <str<strong>on</strong>g>Administering</str<strong>on</strong>g> <str<strong>on</strong>g>TC</str<strong>on</strong>g>6 <str<strong>on</strong>g>Endpoints</str<strong>on</strong>g> <strong>on</strong> <strong>CUCM</strong> <strong>9.0</strong>, January 2013. www.cisco.com — Copyright © 2013 <str<strong>on</strong>g>Cisco</str<strong>on</strong>g> Systems, Inc. All rights reserved.<br />
7
<str<strong>on</strong>g>Cisco</str<strong>on</strong>g> <str<strong>on</strong>g>TelePresence</str<strong>on</strong>g> <str<strong>on</strong>g>Endpoints</str<strong>on</strong>g> running <str<strong>on</strong>g>TC</str<strong>on</strong>g>6 and <str<strong>on</strong>g>Cisco</str<strong>on</strong>g> Unified Communicati<strong>on</strong>s Manager <strong>9.0</strong><br />
Quick Reference Guide<br />
Preparati<strong>on</strong>s (c<strong>on</strong>tinued...)<br />
You can use the Touch c<strong>on</strong>troller or the remote c<strong>on</strong>trol to<br />
c<strong>on</strong>figure the system; alternatively, you can use the system's<br />
web interface or the command line interface with API<br />
commands.<br />
All methods are described <strong>on</strong> the following pages.<br />
WEB<br />
Using the web interface<br />
When you know the IP address you can c<strong>on</strong>figure the<br />
endpoint from the web interface.<br />
API<br />
Using the command line interface<br />
When you know the IP address you can c<strong>on</strong>figure the<br />
endpoint from a command line interface by API commands.<br />
Finding the IP address using the Touch c<strong>on</strong>troller<br />
Tap More > Settings ( ) > System Informati<strong>on</strong> <strong>on</strong> the Touch<br />
c<strong>on</strong>troller. If an IPv4 or IPv6 address is assigned to the<br />
system, you will find it in the Network secti<strong>on</strong>.<br />
Finding the IP address using the remote c<strong>on</strong>trol<br />
Use the remote c<strong>on</strong>trol and go to Home > Settings > System<br />
Informati<strong>on</strong>. If an IPv4 or IPv6 address is assigned to the<br />
system, you will find it <strong>on</strong> the System Informati<strong>on</strong> page.<br />
Signing in to the web interface<br />
1. Open a web browser and enter the system’s IP address in<br />
the address bar.<br />
2. Enter your user name and password and click Sign In.<br />
The default user name is admin with no password set.<br />
If you are not able to c<strong>on</strong>nect to the system:<br />
• Make sure the endpoint and computer are c<strong>on</strong>nected to<br />
the same network.<br />
• Make sure the endpoint is c<strong>on</strong>nected to power and<br />
switched <strong>on</strong>.<br />
• If the system has just been switched <strong>on</strong>, wait for a few<br />
minutes to allow the system to start up.<br />
• If in doubt, read the Installati<strong>on</strong> guide for your product.<br />
Saving changes<br />
Click the ok butt<strong>on</strong>, to the right of most menu items, to save<br />
and make the change take effect.<br />
Signing in through SSH<br />
1. Start a command line interface (for example PuTTY).<br />
Enter the host name (or IP address) of the codec and set<br />
c<strong>on</strong>necti<strong>on</strong> type to SSH.<br />
2. Log in with the appropriate username and password.<br />
The default user name is admin with no password set.<br />
3. Issue the commands as described later in this guide.<br />
If you are not able to c<strong>on</strong>nect to the system:<br />
• Make sure the endpoint and computer are c<strong>on</strong>nected to<br />
the same network.<br />
• Make sure the endpoint is c<strong>on</strong>nected to power and<br />
switched <strong>on</strong>.<br />
• If the system has just been switched <strong>on</strong>, wait for a few<br />
minutes to allow the system to start up.<br />
• If in doubt, read the Installati<strong>on</strong> guide for your product.<br />
D14996.01 <str<strong>on</strong>g>Administering</str<strong>on</strong>g> <str<strong>on</strong>g>TC</str<strong>on</strong>g>6 <str<strong>on</strong>g>Endpoints</str<strong>on</strong>g> <strong>on</strong> <strong>CUCM</strong> <strong>9.0</strong>, January 2013. www.cisco.com — Copyright © 2013 <str<strong>on</strong>g>Cisco</str<strong>on</strong>g> Systems, Inc. All rights reserved.<br />
8
<str<strong>on</strong>g>Cisco</str<strong>on</strong>g> <str<strong>on</strong>g>TelePresence</str<strong>on</strong>g> <str<strong>on</strong>g>Endpoints</str<strong>on</strong>g> running <str<strong>on</strong>g>TC</str<strong>on</strong>g>6 and <str<strong>on</strong>g>Cisco</str<strong>on</strong>g> Unified Communicati<strong>on</strong>s Manager <strong>9.0</strong><br />
Quick Reference Guide<br />
Setting up provisi<strong>on</strong>ing<br />
Provisi<strong>on</strong>ing allows the video c<strong>on</strong>ferencing network<br />
administrators to manage many video systems<br />
simultaneously. In general, you <strong>on</strong>ly have to input the<br />
credentials of the provisi<strong>on</strong>ing server to each video system;<br />
the rest of the c<strong>on</strong>figurati<strong>on</strong> is d<strong>on</strong>e automatically.<br />
C<strong>on</strong>tact your <str<strong>on</strong>g>Cisco</str<strong>on</strong>g> Unified CM (<strong>CUCM</strong>) provider if in doubt<br />
for any of the provisi<strong>on</strong>ing parameters.<br />
About the External Manager address<br />
If the network does not offer DHCP Opti<strong>on</strong> 150, the External<br />
Manager Address must be added manually. Note that any<br />
input in the field will override the setting provided by DHCP.<br />
When the infrastructure is set to <str<strong>on</strong>g>Cisco</str<strong>on</strong>g> UCM; then CDP (<str<strong>on</strong>g>Cisco</str<strong>on</strong>g><br />
Discovery Protocol) will be enabled and if CDP is successful,<br />
the endpoint will discover DHCP Opti<strong>on</strong> 150. In this case you<br />
can leave the External Manager Address field blank, as the<br />
DHCP server will provide the address automatically.<br />
About the CTL file<br />
Normally, you will not delete the old Certificate Trust List<br />
(CTL), but there are few cases were you will need to delete<br />
the file from the endpoint such as:<br />
• When changing the <strong>CUCM</strong> IP address.<br />
• When moving the endpoint between <strong>CUCM</strong> clusters.<br />
• When you need to re-generate or change the <strong>CUCM</strong><br />
certificate.<br />
Touch<br />
Running the Provisi<strong>on</strong>ing Wizard<br />
If you are c<strong>on</strong>necting the system for the first time, the<br />
Provisi<strong>on</strong>ing Wizard will start automatically. Otherwise, tap<br />
More > Settings ( ) > Network Settings > Provisi<strong>on</strong>ing.<br />
Run the provisi<strong>on</strong>ing wizard<br />
1. Click the Start butt<strong>on</strong>.<br />
2. Choose <str<strong>on</strong>g>Cisco</str<strong>on</strong>g> UCM infrastructure and click Next.<br />
3. If required: Enter the IP address or DNS name of the<br />
External Manager of the <str<strong>on</strong>g>Cisco</str<strong>on</strong>g> UCM cluster TFTP server<br />
in the Extermal Manager input field. A soft keyboard<br />
appears when you tap the field.<br />
4. If required: Check the Delete old Certificate Trust List<br />
(CTL) file check box. If no CTL file exist <strong>on</strong> the endpoint,<br />
this opti<strong>on</strong> will not be available.<br />
5. Tap Register to complete the registrati<strong>on</strong>, or Cancel to<br />
abort the procedure.<br />
6. When successfully registered a message will appear and<br />
display the URI for the endpoint.<br />
OSD<br />
Setting up provisi<strong>on</strong>ing<br />
If the system is in sleep mode, press any key <strong>on</strong> the remote<br />
c<strong>on</strong>trol to wake up the system.<br />
C<strong>on</strong>figure the provisi<strong>on</strong>ing<br />
1. Use the remote c<strong>on</strong>trol and select Home > Settings<br />
> Administrator Settings > Advanced C<strong>on</strong>figurati<strong>on</strong> ><br />
Provisi<strong>on</strong>ing.<br />
2. From the drop down list, set the Provisi<strong>on</strong>ing Mode to<br />
<strong>CUCM</strong>. The change will take effect immediately.<br />
3. Go to the ExternalManager secti<strong>on</strong> and the IP address<br />
or DNS name of the External Manager of the <str<strong>on</strong>g>Cisco</str<strong>on</strong>g> UCM<br />
cluster TFTP server in the Extermal Manager input field.<br />
Click Save to save the changes.<br />
D14996.01 <str<strong>on</strong>g>Administering</str<strong>on</strong>g> <str<strong>on</strong>g>TC</str<strong>on</strong>g>6 <str<strong>on</strong>g>Endpoints</str<strong>on</strong>g> <strong>on</strong> <strong>CUCM</strong> <strong>9.0</strong>, January 2013. www.cisco.com — Copyright © 2013 <str<strong>on</strong>g>Cisco</str<strong>on</strong>g> Systems, Inc. All rights reserved.<br />
9
<str<strong>on</strong>g>Cisco</str<strong>on</strong>g> <str<strong>on</strong>g>TelePresence</str<strong>on</strong>g> <str<strong>on</strong>g>Endpoints</str<strong>on</strong>g> running <str<strong>on</strong>g>TC</str<strong>on</strong>g>6 and <str<strong>on</strong>g>Cisco</str<strong>on</strong>g> Unified Communicati<strong>on</strong>s Manager <strong>9.0</strong><br />
Quick Reference Guide<br />
Setting up provisi<strong>on</strong>ing (c<strong>on</strong>tinued...)<br />
WEB<br />
API<br />
About the External Manager address<br />
If the network does not offer DHCP Opti<strong>on</strong> 150, the External<br />
Manager Address must be added manually. Note that any<br />
input in the field will override the setting provided by DHCP.<br />
When the infrastructure is set to <str<strong>on</strong>g>Cisco</str<strong>on</strong>g> UCM; then CDP (<str<strong>on</strong>g>Cisco</str<strong>on</strong>g><br />
Discovery Protocol) will be enabled and if CDP is successful,<br />
the endpoint will discover DHCP Opti<strong>on</strong> 150. In this case you<br />
can leave the External Manager Address field blank, as the<br />
DHCP server will provide the address automatically.<br />
Setting up provisi<strong>on</strong>ing<br />
When logged <strong>on</strong> to the endpoint through the web interface,<br />
go to the C<strong>on</strong>figurati<strong>on</strong> tab and choose Advanced<br />
C<strong>on</strong>figurati<strong>on</strong>, then choose Provisi<strong>on</strong>ing from the left sidebar.<br />
C<strong>on</strong>figure the provisi<strong>on</strong>ing<br />
1. Go to Provisi<strong>on</strong>ing secti<strong>on</strong> and set Mode to <strong>CUCM</strong>. Click<br />
ok to save the changes.<br />
2. Go to the ExternalManager secti<strong>on</strong> and the IP address<br />
or DNS name of the External Manager of the <str<strong>on</strong>g>Cisco</str<strong>on</strong>g> UCM<br />
cluster TFTP server in the Extermal Manager input field.<br />
Click ok to save the changes.<br />
Setting up provisi<strong>on</strong>ing<br />
When logged <strong>on</strong> to the endpoint through the command line<br />
interface, run the following commands:<br />
C<strong>on</strong>figure the provisi<strong>on</strong>ing<br />
xC<strong>on</strong>figurati<strong>on</strong> Provisi<strong>on</strong>ing Mode:<br />
[must be <strong>CUCM</strong>]<br />
xC<strong>on</strong>figurati<strong>on</strong> Provisi<strong>on</strong>ing ExternalManager<br />
Address: [<strong>CUCM</strong> cluster TFTP server address]<br />
xC<strong>on</strong>figurati<strong>on</strong> Provisi<strong>on</strong>ing ExternalManager<br />
Protocol: [must be HTTP for UCM mode]<br />
xC<strong>on</strong>figurati<strong>on</strong> Provisi<strong>on</strong>ing LoginName:<br />
[leave blank, it is not needed for UCM mode]<br />
xC<strong>on</strong>figurati<strong>on</strong> Provisi<strong>on</strong>ing Password:<br />
[leave blank, it is not needed for UCM mode]<br />
xC<strong>on</strong>figurati<strong>on</strong> Provisi<strong>on</strong>ing HttpMethod:<br />
[both GET and POST work in UCM mode]<br />
xC<strong>on</strong>figurati<strong>on</strong> Provisi<strong>on</strong>ing ExternalManager<br />
Path: [leave blank, it is not needed for UCM mode]<br />
xC<strong>on</strong>figurati<strong>on</strong> Provisi<strong>on</strong>ing ExternalManager<br />
Domain: [leave blank, it is not needed for UCM mode]<br />
D14996.01 <str<strong>on</strong>g>Administering</str<strong>on</strong>g> <str<strong>on</strong>g>TC</str<strong>on</strong>g>6 <str<strong>on</strong>g>Endpoints</str<strong>on</strong>g> <strong>on</strong> <strong>CUCM</strong> <strong>9.0</strong>, January 2013. www.cisco.com — Copyright © 2013 <str<strong>on</strong>g>Cisco</str<strong>on</strong>g> Systems, Inc. All rights reserved.<br />
10
<str<strong>on</strong>g>Cisco</str<strong>on</strong>g> <str<strong>on</strong>g>TelePresence</str<strong>on</strong>g> <str<strong>on</strong>g>Endpoints</str<strong>on</strong>g> running <str<strong>on</strong>g>TC</str<strong>on</strong>g>6 and <str<strong>on</strong>g>Cisco</str<strong>on</strong>g> Unified Communicati<strong>on</strong>s Manager <strong>9.0</strong><br />
Quick Reference Guide<br />
Setting the call details<br />
Some call details are c<strong>on</strong>figured at the endpoint.<br />
For deployment with <str<strong>on</strong>g>Cisco</str<strong>on</strong>g> <str<strong>on</strong>g>TelePresence</str<strong>on</strong>g> Multipoint<br />
Switch (CTMS), the recommended value is 2500 kbps<br />
or higher.<br />
The auto answer settings provisi<strong>on</strong>ed in <str<strong>on</strong>g>Cisco</str<strong>on</strong>g> Unified<br />
CM are ignored by the endpoint and must be set <strong>on</strong><br />
the endpoint itself.<br />
Touch<br />
Setting the call details<br />
If in doubt for any of the parameters below, c<strong>on</strong>tact your<br />
system administrator or your service provider.<br />
On the Touch c<strong>on</strong>troller, tap More > Settings ( ) ><br />
Administrator Settings > Call Settings.<br />
1. C<strong>on</strong>figure the auto answering<br />
Set Auto Answer to On or Off, and if appropriate set the<br />
Auto Answer Delay. Tap the plus (+) or minus (-) butt<strong>on</strong>s<br />
to increase or decrease the value.<br />
2. C<strong>on</strong>figure the default call settings<br />
Choose Call Rate and set the Default Call Rate to the<br />
appropriate value. Tap the plus (+) or minus (-) butt<strong>on</strong>s to<br />
increase or decrease the value.<br />
In <str<strong>on</strong>g>Cisco</str<strong>on</strong>g> UCM mode the Default Call Protocol is<br />
automatically set to SIP, and H.323 is not supported.<br />
OSD<br />
Setting the call details<br />
If in doubt for any of the parameters below, c<strong>on</strong>tact your<br />
system administrator or your service provider.<br />
1. C<strong>on</strong>figure the auto answering<br />
Use the remote c<strong>on</strong>trol and go to Home > Settings ><br />
Administrator Settings > Advanced C<strong>on</strong>figurati<strong>on</strong> ><br />
C<strong>on</strong>ference 1 and set to IPv6.<br />
Go to the Auto Answer secti<strong>on</strong> and set appropriate<br />
values for Delay, Mode and Mute.<br />
Click Ok to save the change.<br />
2. C<strong>on</strong>figure the default call settings<br />
Use the remote c<strong>on</strong>trol and go to the DefaultCall secti<strong>on</strong><br />
and set the Rate to the appropriate value.<br />
In <str<strong>on</strong>g>Cisco</str<strong>on</strong>g> UCM mode the Default Call Protocol is<br />
automatically set to SIP, and H.323 is not supported.<br />
Click Ok to save the change.<br />
D14996.01 <str<strong>on</strong>g>Administering</str<strong>on</strong>g> <str<strong>on</strong>g>TC</str<strong>on</strong>g>6 <str<strong>on</strong>g>Endpoints</str<strong>on</strong>g> <strong>on</strong> <strong>CUCM</strong> <strong>9.0</strong>, January 2013. www.cisco.com — Copyright © 2013 <str<strong>on</strong>g>Cisco</str<strong>on</strong>g> Systems, Inc. All rights reserved.<br />
11
<str<strong>on</strong>g>Cisco</str<strong>on</strong>g> <str<strong>on</strong>g>TelePresence</str<strong>on</strong>g> <str<strong>on</strong>g>Endpoints</str<strong>on</strong>g> running <str<strong>on</strong>g>TC</str<strong>on</strong>g>6 and <str<strong>on</strong>g>Cisco</str<strong>on</strong>g> Unified Communicati<strong>on</strong>s Manager <strong>9.0</strong><br />
Quick Reference Guide<br />
Setting the call details (c<strong>on</strong>tinued...)<br />
Some call details are c<strong>on</strong>figured at the endpoint.<br />
For deployment with <str<strong>on</strong>g>Cisco</str<strong>on</strong>g> <str<strong>on</strong>g>TelePresence</str<strong>on</strong>g> Multipoint<br />
Switch (CTMS), the recommended value is 2500 kbps<br />
or higher.<br />
The auto answer settings provisi<strong>on</strong>ed in <str<strong>on</strong>g>Cisco</str<strong>on</strong>g> Unified<br />
CM are ignored by the endpoint and must be set <strong>on</strong><br />
the endpoint itself.<br />
WEB<br />
Setting the call details<br />
If in doubt for any of the parameters below, c<strong>on</strong>tact your<br />
system administrator or your service provider.<br />
When logged <strong>on</strong> to the endpoint through the web interface,<br />
go to the C<strong>on</strong>figurati<strong>on</strong> tab and choose Advanced<br />
C<strong>on</strong>figurati<strong>on</strong>. Then open the C<strong>on</strong>ference 1 page from the<br />
left sidebar.<br />
1. C<strong>on</strong>figure the auto answering<br />
Go to the Auto Answer secti<strong>on</strong> and set appropriate<br />
values for Delay, Mode and Mute.<br />
Click Ok to save the change.<br />
2. C<strong>on</strong>figure the default call settings<br />
Go to the DefaultCall secti<strong>on</strong> and set the Rate to the<br />
appropriate value.<br />
In <str<strong>on</strong>g>Cisco</str<strong>on</strong>g> UCM mode the Default Call Protocol is<br />
automatically set to SIP, and H.323 is not supported.<br />
Click Ok to save the change.<br />
API<br />
Setting the call details<br />
If in doubt for any of the parameters below, c<strong>on</strong>tact your<br />
system administrator or your service provider.<br />
When logged <strong>on</strong> to the endpoint through the command line<br />
interface, run the following commands:<br />
1. C<strong>on</strong>figure the auto answering<br />
xC<strong>on</strong>figurati<strong>on</strong> C<strong>on</strong>ference 1 AutoAnswer Mode:<br />
[must be set locally <strong>on</strong> the endpoint]<br />
xC<strong>on</strong>figurati<strong>on</strong> C<strong>on</strong>ference 1 AutoAnswer Mute:<br />
[must be set locally <strong>on</strong> the endpoint]<br />
xC<strong>on</strong>figurati<strong>on</strong> C<strong>on</strong>ference 1 AutoAnswer<br />
Delay: [must be set locally <strong>on</strong> the endpoint]<br />
2. C<strong>on</strong>figure the default call settings<br />
xC<strong>on</strong>figurati<strong>on</strong> C<strong>on</strong>ference 1 DefaultCall<br />
Rate: [when used with CTMS; 2500 kbps<br />
or higher]<br />
xC<strong>on</strong>figurati<strong>on</strong> C<strong>on</strong>ference 1 DefaultCall<br />
Protocol: SIP [must be SIP for <strong>CUCM</strong> mode]<br />
D14996.01 <str<strong>on</strong>g>Administering</str<strong>on</strong>g> <str<strong>on</strong>g>TC</str<strong>on</strong>g>6 <str<strong>on</strong>g>Endpoints</str<strong>on</strong>g> <strong>on</strong> <strong>CUCM</strong> <strong>9.0</strong>, January 2013. www.cisco.com — Copyright © 2013 <str<strong>on</strong>g>Cisco</str<strong>on</strong>g> Systems, Inc. All rights reserved.<br />
12
<str<strong>on</strong>g>Cisco</str<strong>on</strong>g> <str<strong>on</strong>g>TelePresence</str<strong>on</strong>g> <str<strong>on</strong>g>Endpoints</str<strong>on</strong>g> running <str<strong>on</strong>g>TC</str<strong>on</strong>g>6 and <str<strong>on</strong>g>Cisco</str<strong>on</strong>g> Unified Communicati<strong>on</strong>s Manager <strong>9.0</strong><br />
Quick Reference Guide<br />
Setting the system password<br />
The system password will restrict access to the codec.<br />
The endpoint is delivered with a default user account with<br />
full credentials. The user name is admin, and initially, no<br />
password is set for the default user.<br />
Make sure to keep a copy of the password in a safe place.<br />
WEB<br />
Setting the system password<br />
Log in to the endpoint through the web interface with your<br />
username and current password. If a password is currently<br />
not set, use a blank password when logging <strong>on</strong>.<br />
API<br />
Setting the system password<br />
Log in to the endpoint through the command line interface<br />
with your username and current password. If a password is<br />
currently not set, use a blank password when logging <strong>on</strong>.<br />
We str<strong>on</strong>gly recommend that you set a password<br />
for the admin user, and to any other user with<br />
similar credentials, to restrict access to system<br />
c<strong>on</strong>figurati<strong>on</strong>.<br />
Note: The system password set <strong>on</strong> the endpoint must<br />
match the value set in the <str<strong>on</strong>g>Cisco</str<strong>on</strong>g> Unified CM in order for the<br />
<str<strong>on</strong>g>Cisco</str<strong>on</strong>g> <str<strong>on</strong>g>TelePresence</str<strong>on</strong>g> Manager (CTS-MAN) to discover the<br />
endpoint and provide One Butt<strong>on</strong> to Push scheduling to it.<br />
Refer to "Admin Username and Password" <strong>on</strong> page 21.<br />
Set or change the system password<br />
1. Click <strong>on</strong> your username in the upper right corner and<br />
choose Change password in the drop down menu.<br />
2. Enter the Current password, the New password, and<br />
repeat the new password in the appropriate input fields.<br />
The password format is a string with 0–64 characters.<br />
3. Click Change password.<br />
Set or change the system password<br />
xCommand SystemUnit AdminPassword Set<br />
Password: ***********<br />
The password format is a string with 0–64 characters.<br />
When the system password is set from the command<br />
line interface the codec must be restarted to make<br />
the password apply to the web interface.<br />
D14996.01 <str<strong>on</strong>g>Administering</str<strong>on</strong>g> <str<strong>on</strong>g>TC</str<strong>on</strong>g>6 <str<strong>on</strong>g>Endpoints</str<strong>on</strong>g> <strong>on</strong> <strong>CUCM</strong> <strong>9.0</strong>, January 2013. www.cisco.com — Copyright © 2013 <str<strong>on</strong>g>Cisco</str<strong>on</strong>g> Systems, Inc. All rights reserved.<br />
13
<str<strong>on</strong>g>Cisco</str<strong>on</strong>g> <str<strong>on</strong>g>TelePresence</str<strong>on</strong>g> <str<strong>on</strong>g>Endpoints</str<strong>on</strong>g> running <str<strong>on</strong>g>TC</str<strong>on</strong>g>6 and <str<strong>on</strong>g>Cisco</str<strong>on</strong>g> Unified Communicati<strong>on</strong>s Manager <strong>9.0</strong><br />
Quick Reference Guide<br />
Chapter 3<br />
<strong>CUCM</strong> c<strong>on</strong>figurati<strong>on</strong><br />
This chapter describes the steps required to c<strong>on</strong>figure<br />
the <str<strong>on</strong>g>Cisco</str<strong>on</strong>g> Unified Communicati<strong>on</strong>s Manager for<br />
<str<strong>on</strong>g>TelePresence</str<strong>on</strong>g> endpoints.<br />
D14996.01 <str<strong>on</strong>g>Administering</str<strong>on</strong>g> <str<strong>on</strong>g>TC</str<strong>on</strong>g>6 <str<strong>on</strong>g>Endpoints</str<strong>on</strong>g> <strong>on</strong> <strong>CUCM</strong> <strong>9.0</strong>, January 2013. www.cisco.com — Copyright © 2013 <str<strong>on</strong>g>Cisco</str<strong>on</strong>g> Systems, Inc. All rights reserved.<br />
14
<str<strong>on</strong>g>Cisco</str<strong>on</strong>g> <str<strong>on</strong>g>TelePresence</str<strong>on</strong>g> <str<strong>on</strong>g>Endpoints</str<strong>on</strong>g> running <str<strong>on</strong>g>TC</str<strong>on</strong>g>6 and <str<strong>on</strong>g>Cisco</str<strong>on</strong>g> Unified Communicati<strong>on</strong>s Manager <strong>9.0</strong><br />
Quick Reference Guide<br />
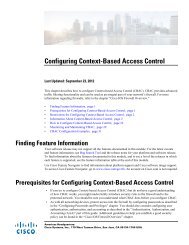
Logging in to <str<strong>on</strong>g>Cisco</str<strong>on</strong>g> Unified CM<br />
Administrati<strong>on</strong><br />
Open a web browser and enter the host name or IP address of the <str<strong>on</strong>g>Cisco</str<strong>on</strong>g><br />
Unified CM and select <str<strong>on</strong>g>Cisco</str<strong>on</strong>g> Unified Communicati<strong>on</strong>s Manager from the list<br />
of installed applicati<strong>on</strong>s.<br />
1. Select <str<strong>on</strong>g>Cisco</str<strong>on</strong>g> Unified CM Administrati<strong>on</strong> from the navigati<strong>on</strong> drop down<br />
list and press Go.<br />
2. Log in with your username and password.<br />
TIP: To bypass the first page and go directly to the <str<strong>on</strong>g>Cisco</str<strong>on</strong>g> Unified CM<br />
Administrati<strong>on</strong> page, you can add ccmadmin in the address bar:<br />
• http://your-cm-server-name/ccmadmin, where your-cmserver-name<br />
is the host name of your <strong>CUCM</strong>.<br />
• Or xxx.xxx.xxx.xxx/ccmadmin, where xxx is the IP address of<br />
your <strong>CUCM</strong>.<br />
1) Select <str<strong>on</strong>g>Cisco</str<strong>on</strong>g> Unified<br />
CM Administrati<strong>on</strong> from<br />
the navigati<strong>on</strong> drop<br />
down list and press Go.<br />
2) Log in with your user<br />
name and password.<br />
D14996.01 <str<strong>on</strong>g>Administering</str<strong>on</strong>g> <str<strong>on</strong>g>TC</str<strong>on</strong>g>6 <str<strong>on</strong>g>Endpoints</str<strong>on</strong>g> <strong>on</strong> <strong>CUCM</strong> <strong>9.0</strong>, January 2013. www.cisco.com — Copyright © 2013 <str<strong>on</strong>g>Cisco</str<strong>on</strong>g> Systems, Inc. All rights reserved.<br />
15
<str<strong>on</strong>g>Cisco</str<strong>on</strong>g> <str<strong>on</strong>g>TelePresence</str<strong>on</strong>g> <str<strong>on</strong>g>Endpoints</str<strong>on</strong>g> running <str<strong>on</strong>g>TC</str<strong>on</strong>g>6 and <str<strong>on</strong>g>Cisco</str<strong>on</strong>g> Unified Communicati<strong>on</strong>s Manager <strong>9.0</strong><br />
Quick Reference Guide<br />
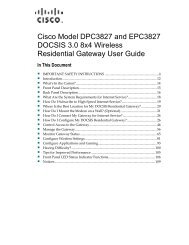
Creating a SIP profile<br />
1. Navigate to Device > Device Settings > SIP Profile<br />
How to create a new SIP Profile<br />
Log in to <str<strong>on</strong>g>Cisco</str<strong>on</strong>g> Unified CM Administrati<strong>on</strong> and navigate to Device > Device Settings > SIP Profile.<br />
2. Use the search opti<strong>on</strong>s available <strong>on</strong> the page, or leave the search field<br />
blank and press Find to list all.<br />
3. Locate the file you would like to copy and click the Copy butt<strong>on</strong>. This will<br />
take you to the SIP Profile C<strong>on</strong>figurati<strong>on</strong> page.<br />
You may give the profile a new name, or you can keep the default SIP<br />
profile name. If the latter, you will overwrite the template and use the<br />
modified profile as your default SIP profile.<br />
Device<br />
Device Settings<br />
SIP Profile<br />
1<br />
4. Navigate to the SIP Profile Informati<strong>on</strong> secti<strong>on</strong>:<br />
SDP Sessi<strong>on</strong>-level Bandwidth Modifier for Early Offer and Re-invites: Set<br />
to TIAS and AS.<br />
Redirect by Applicati<strong>on</strong>: Enable by checking the check box.<br />
Use Fully Qualified Domain Name in SIP Requests: Enable by checking<br />
the check box.<br />
5. Navigate to the Trunk Specific C<strong>on</strong>figurati<strong>on</strong> secti<strong>on</strong>:<br />
Allow Presentati<strong>on</strong> Sharing using BFCP: Enable by checking the check<br />
box.<br />
2<br />
3<br />
Click Apply C<strong>on</strong>fig.<br />
4<br />
5<br />
D14996.01 <str<strong>on</strong>g>Administering</str<strong>on</strong>g> <str<strong>on</strong>g>TC</str<strong>on</strong>g>6 <str<strong>on</strong>g>Endpoints</str<strong>on</strong>g> <strong>on</strong> <strong>CUCM</strong> <strong>9.0</strong>, January 2013. www.cisco.com — Copyright © 2013 <str<strong>on</strong>g>Cisco</str<strong>on</strong>g> Systems, Inc. All rights reserved.<br />
16
Bytte bilder til MX300<br />
<str<strong>on</strong>g>Cisco</str<strong>on</strong>g> <str<strong>on</strong>g>TelePresence</str<strong>on</strong>g> <str<strong>on</strong>g>Endpoints</str<strong>on</strong>g> running <str<strong>on</strong>g>TC</str<strong>on</strong>g>6 and <str<strong>on</strong>g>Cisco</str<strong>on</strong>g> Unified Communicati<strong>on</strong>s Manager <strong>9.0</strong><br />
Quick Reference Guide<br />
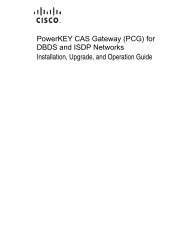
Creating a security profile<br />
If you want to setup the <strong>CUCM</strong> for encrypted calls, follow the steps below:<br />
<strong>CUCM</strong> must operate in mixed mode (cluster security mode) to enable<br />
secure (encrypted) communicati<strong>on</strong>.<br />
You must define <strong>on</strong>e device security profile for each endpoint type,<br />
and if you want to allow several authenticati<strong>on</strong> modes for the same<br />
endpoint type, you must define <strong>on</strong>e profile for each mode.<br />
1. Navigate to: System > Security > Ph<strong>on</strong>e Security Profile<br />
How to create a security profile<br />
Log in to <str<strong>on</strong>g>Cisco</str<strong>on</strong>g> Unified CM Administrati<strong>on</strong> and navigate to System > Security > Ph<strong>on</strong>e Security Profile<br />
1<br />
System<br />
Security<br />
Ph<strong>on</strong>e Security Profile<br />
2. Use the search opti<strong>on</strong>s available <strong>on</strong> the page to locate the file.<br />
3. You may Copy an existing profile or choose Add New.<br />
4. Navigate to the Ph<strong>on</strong>e Security Profile Informati<strong>on</strong> secti<strong>on</strong>:<br />
Name: Enter a name of the profile.<br />
Descripti<strong>on</strong>: Enter a descripti<strong>on</strong> (opti<strong>on</strong>al).<br />
Device Security Mode: Set to Encrypted.<br />
Transport Type: Set to TLS.<br />
2<br />
3<br />
5. Navigate to the Ph<strong>on</strong>e Security Profile CAPF Informati<strong>on</strong> secti<strong>on</strong>:<br />
Authenticati<strong>on</strong> Mode: Choose a value from the drop down list.<br />
By Null String: The Certificate Authority Proxy Functi<strong>on</strong> (CAPF)<br />
process will start automatically.<br />
By Authenticati<strong>on</strong> String: The CAPF process will commence when<br />
the correct authenticati<strong>on</strong> code is received from the endpoint.<br />
By Existing Certificate (precedence to LSC/MIC): This opti<strong>on</strong> can<br />
<strong>on</strong>ly be used when a Locally Significant Certificate (LSC) is already<br />
stored <strong>on</strong> the endpoint, i.e. it cannot be used the first time the CAPF<br />
process runs.<br />
Key-size: Choose the appropriate value from the drop down list.<br />
4<br />
5<br />
Click Save.<br />
D14996.01 <str<strong>on</strong>g>Administering</str<strong>on</strong>g> <str<strong>on</strong>g>TC</str<strong>on</strong>g>6 <str<strong>on</strong>g>Endpoints</str<strong>on</strong>g> <strong>on</strong> <strong>CUCM</strong> <strong>9.0</strong>, January 2013. www.cisco.com — Copyright © 2013 <str<strong>on</strong>g>Cisco</str<strong>on</strong>g> Systems, Inc. All rights reserved.<br />
17
<str<strong>on</strong>g>Cisco</str<strong>on</strong>g> <str<strong>on</strong>g>TelePresence</str<strong>on</strong>g> <str<strong>on</strong>g>Endpoints</str<strong>on</strong>g> running <str<strong>on</strong>g>TC</str<strong>on</strong>g>6 and <str<strong>on</strong>g>Cisco</str<strong>on</strong>g> Unified Communicati<strong>on</strong>s Manager <strong>9.0</strong><br />
Quick Reference Guide<br />
Manual registrati<strong>on</strong> of the endpoint<br />
Manual registrati<strong>on</strong> of the <str<strong>on</strong>g>TelePresence</str<strong>on</strong>g> endpoint is required when<br />
the <str<strong>on</strong>g>Cisco</str<strong>on</strong>g> Unified CM is set to mixed mode (cluster security mode).<br />
Adding a new device<br />
1. Navigate to Device > Ph<strong>on</strong>e.<br />
Adding a new device.<br />
Log in to <str<strong>on</strong>g>Cisco</str<strong>on</strong>g> Unified CM Administrati<strong>on</strong> and navigate to Device > Ph<strong>on</strong>e.<br />
Device<br />
Ph<strong>on</strong>e<br />
1<br />
Add a New Ph<strong>on</strong>e (endpoint)<br />
2. Click the Add new butt<strong>on</strong> and navigate to the Create a ph<strong>on</strong>e using the<br />
ph<strong>on</strong>e type or a ph<strong>on</strong>e template secti<strong>on</strong>:<br />
• From the Ph<strong>on</strong>e Type drop down list select the endpoint type.<br />
• Click the Next butt<strong>on</strong>.<br />
2<br />
Device Informati<strong>on</strong><br />
3. Navigate to the Device Informati<strong>on</strong> secti<strong>on</strong>:<br />
MAC Address: Enter the MAC Address of the endpoint.<br />
Device Pool: Choose a Device Pool.<br />
Ph<strong>on</strong>e Butt<strong>on</strong> Template: Choose a Ph<strong>on</strong>e Butt<strong>on</strong> Template.<br />
Click Save.<br />
3<br />
D14996.01 <str<strong>on</strong>g>Administering</str<strong>on</strong>g> <str<strong>on</strong>g>TC</str<strong>on</strong>g>6 <str<strong>on</strong>g>Endpoints</str<strong>on</strong>g> <strong>on</strong> <strong>CUCM</strong> <strong>9.0</strong>, January 2013. www.cisco.com — Copyright © 2013 <str<strong>on</strong>g>Cisco</str<strong>on</strong>g> Systems, Inc. All rights reserved.<br />
18
<str<strong>on</strong>g>Cisco</str<strong>on</strong>g> <str<strong>on</strong>g>TelePresence</str<strong>on</strong>g> <str<strong>on</strong>g>Endpoints</str<strong>on</strong>g> running <str<strong>on</strong>g>TC</str<strong>on</strong>g>6 and <str<strong>on</strong>g>Cisco</str<strong>on</strong>g> Unified Communicati<strong>on</strong>s Manager <strong>9.0</strong><br />
Quick Reference Guide<br />
Manual registrati<strong>on</strong> of the endpoint<br />
(c<strong>on</strong>tinued...)<br />
Adding a new device.<br />
Log in to <str<strong>on</strong>g>Cisco</str<strong>on</strong>g> Unified CM Administrati<strong>on</strong> and navigate to Device > Ph<strong>on</strong>e.<br />
Adding a new device (c<strong>on</strong>tinued...)<br />
Protocol Specific Informati<strong>on</strong><br />
Device<br />
Ph<strong>on</strong>e<br />
4. Navigate to the Protocol Specific Informati<strong>on</strong> secti<strong>on</strong>:<br />
Device Security Profile: Choose the Device Security Profile you<br />
previously defined.<br />
SIP Profile: Choose the SIP Profile you previously defined.<br />
Certificati<strong>on</strong> Authority Proxy Functi<strong>on</strong> (CAPF) Informati<strong>on</strong><br />
5. Navigate to the Certificati<strong>on</strong> Authority Proxy Functi<strong>on</strong> (CAPF) Informati<strong>on</strong><br />
secti<strong>on</strong>:<br />
Certificate Operati<strong>on</strong>: Set to Install/Upgrade.<br />
Click Save.<br />
4<br />
5<br />
D14996.01 <str<strong>on</strong>g>Administering</str<strong>on</strong>g> <str<strong>on</strong>g>TC</str<strong>on</strong>g>6 <str<strong>on</strong>g>Endpoints</str<strong>on</strong>g> <strong>on</strong> <strong>CUCM</strong> <strong>9.0</strong>, January 2013. www.cisco.com — Copyright © 2013 <str<strong>on</strong>g>Cisco</str<strong>on</strong>g> Systems, Inc. All rights reserved.<br />
19
<str<strong>on</strong>g>Cisco</str<strong>on</strong>g> <str<strong>on</strong>g>TelePresence</str<strong>on</strong>g> <str<strong>on</strong>g>Endpoints</str<strong>on</strong>g> running <str<strong>on</strong>g>TC</str<strong>on</strong>g>6 and <str<strong>on</strong>g>Cisco</str<strong>on</strong>g> Unified Communicati<strong>on</strong>s Manager <strong>9.0</strong><br />
Quick Reference Guide<br />
Manual registrati<strong>on</strong> of the endpoint<br />
(c<strong>on</strong>tinued...)<br />
How to c<strong>on</strong>figure the product specific c<strong>on</strong>figurati<strong>on</strong> layouts for the endpoint.<br />
Log in to <str<strong>on</strong>g>Cisco</str<strong>on</strong>g> Unified CM Administrati<strong>on</strong> and navigate to Device > Ph<strong>on</strong>e.<br />
Adding a new device (c<strong>on</strong>tinued...)<br />
Product Specific C<strong>on</strong>figurati<strong>on</strong> Layout<br />
If registered to TMS (<str<strong>on</strong>g>Cisco</str<strong>on</strong>g> <str<strong>on</strong>g>TelePresence</str<strong>on</strong>g> Management Suite) or<br />
CTSMAN (<str<strong>on</strong>g>Cisco</str<strong>on</strong>g> <str<strong>on</strong>g>TelePresence</str<strong>on</strong>g> Manager), c<strong>on</strong>figure the product<br />
specific c<strong>on</strong>figurati<strong>on</strong> layout as appropriate.<br />
6. Navigate to the Product Specific C<strong>on</strong>figurati<strong>on</strong> Layout secti<strong>on</strong> and<br />
c<strong>on</strong>figure the items according to your preferred settings.<br />
Room Name (from Exchange(R)): This is the Exchange C<strong>on</strong>ference Room<br />
Name. It is used for scheduling meetings where this <str<strong>on</strong>g>TelePresence</str<strong>on</strong>g> system<br />
participates. This setting must match the e-mail address used in Exchange<br />
exactly. Example: room123@example.com. Maximum length: 64.<br />
Web Access: This parameter indicates whether the device accepts<br />
c<strong>on</strong>necti<strong>on</strong>s from a web browser or other HTTP clients. Disabling the<br />
web server functi<strong>on</strong>ality of the device will block access to the ph<strong>on</strong>e's<br />
internal web pages and certain support capabilities, but will not<br />
degrade normal operati<strong>on</strong>. Default: Disabled. Note: For the Web<br />
Access c<strong>on</strong>figurati<strong>on</strong> change to take effect, please make sure to Save<br />
and RESET the device (do not use Restart or Apply C<strong>on</strong>fig).<br />
SSH Access: This parameter indicates whether the device accepts SSH<br />
c<strong>on</strong>necti<strong>on</strong>s. Disabling the SSH server functi<strong>on</strong>ality of the device will<br />
block certain support capabilities such as log file collecti<strong>on</strong> but will not<br />
degrade normal operati<strong>on</strong>. Default: Disabled.<br />
Default Call Protocol: This parameter sets the default call protocol of the<br />
device. This device <strong>on</strong>ly supports SIP when registering to <str<strong>on</strong>g>Cisco</str<strong>on</strong>g> Unified<br />
CM. Default: SIP.<br />
Quality Improvement Server: Specifies a host name or IP address of a<br />
remote system to collect quality improvement reports from the device.<br />
Default: ““ and Maximum length: 256.<br />
Multipoint Mode: Choose Use Endpoint to use the built-in MultiSite<br />
feature or choose Use Media Resource Group List to use the C<strong>on</strong>ference<br />
Bridge feature <strong>on</strong> <str<strong>on</strong>g>Cisco</str<strong>on</strong>g> Unified CM. Note: Applies to endpoints having<br />
MultiSite capability and having the opti<strong>on</strong> installed.<br />
6<br />
Device<br />
Ph<strong>on</strong>e<br />
Click Save and Apply C<strong>on</strong>fig.<br />
D14996.01 <str<strong>on</strong>g>Administering</str<strong>on</strong>g> <str<strong>on</strong>g>TC</str<strong>on</strong>g>6 <str<strong>on</strong>g>Endpoints</str<strong>on</strong>g> <strong>on</strong> <strong>CUCM</strong> <strong>9.0</strong>, January 2013. www.cisco.com — Copyright © 2013 <str<strong>on</strong>g>Cisco</str<strong>on</strong>g> Systems, Inc. All rights reserved.<br />
20
<str<strong>on</strong>g>Cisco</str<strong>on</strong>g> <str<strong>on</strong>g>TelePresence</str<strong>on</strong>g> <str<strong>on</strong>g>Endpoints</str<strong>on</strong>g> running <str<strong>on</strong>g>TC</str<strong>on</strong>g>6 and <str<strong>on</strong>g>Cisco</str<strong>on</strong>g> Unified Communicati<strong>on</strong>s Manager <strong>9.0</strong><br />
Quick Reference Guide<br />
Manual registrati<strong>on</strong> of the endpoint<br />
(c<strong>on</strong>tinued...)<br />
How to set the username and password for the endpoint.<br />
Log in to <str<strong>on</strong>g>Cisco</str<strong>on</strong>g> Unified CM Administrati<strong>on</strong> and navigate to Device > Ph<strong>on</strong>e.<br />
Adding a new device (c<strong>on</strong>tinued...)<br />
Admin Username and Password<br />
7. Navigate to the Product Specific C<strong>on</strong>figurati<strong>on</strong> Layout > Admin username<br />
and password secti<strong>on</strong>, and c<strong>on</strong>figure the items accordingly to your<br />
preferred settings.<br />
Admin username and password: C<strong>on</strong>figure the username and password,<br />
which must match the values set <strong>on</strong> the endpoint.<br />
Admin Username: Enter the username for the admin user.<br />
Default: admin<br />
Maximum length: 64<br />
Allowed values: Admin username cannot be <strong>on</strong>e of the following:<br />
apache, daem<strong>on</strong>, nobody, root, shutdown. It must be between 1<br />
and 64 characters l<strong>on</strong>g.<br />
Admin Password: Enter the password for the admin user.<br />
Default: “”<br />
Maximum length: 64<br />
Allowed values: Admin password can <strong>on</strong>ly c<strong>on</strong>tain printable<br />
characters from the ASCII character set, except a white space.<br />
Click Save and Apply C<strong>on</strong>fig.<br />
7<br />
Device<br />
Ph<strong>on</strong>e<br />
Note: The admin username and password will not be pushed to the<br />
endpoint, it must be set <strong>on</strong> both sides. The admin username and password<br />
set <strong>on</strong> <strong>CUCM</strong> must match the system password set <strong>on</strong> the endpoint in order<br />
for the <str<strong>on</strong>g>Cisco</str<strong>on</strong>g> <str<strong>on</strong>g>TelePresence</str<strong>on</strong>g> Manager (CTS-MAN) to discover the endpoint<br />
and provide One Butt<strong>on</strong> to Push scheduling to them.<br />
• Refer to "Setting the system password" <strong>on</strong> page 13.<br />
• The <str<strong>on</strong>g>Cisco</str<strong>on</strong>g> Unified CM user documentati<strong>on</strong>:<br />
http://www.cisco.com/en/US/products/sw/voicesw/ps556/tsd_<br />
products_support_series_home.html<br />
D14996.01 <str<strong>on</strong>g>Administering</str<strong>on</strong>g> <str<strong>on</strong>g>TC</str<strong>on</strong>g>6 <str<strong>on</strong>g>Endpoints</str<strong>on</strong>g> <strong>on</strong> <strong>CUCM</strong> <strong>9.0</strong>, January 2013. www.cisco.com — Copyright © 2013 <str<strong>on</strong>g>Cisco</str<strong>on</strong>g> Systems, Inc. All rights reserved.<br />
21
<str<strong>on</strong>g>Cisco</str<strong>on</strong>g> <str<strong>on</strong>g>TelePresence</str<strong>on</strong>g> <str<strong>on</strong>g>Endpoints</str<strong>on</strong>g> running <str<strong>on</strong>g>TC</str<strong>on</strong>g>6 and <str<strong>on</strong>g>Cisco</str<strong>on</strong>g> Unified Communicati<strong>on</strong>s Manager <strong>9.0</strong><br />
Quick Reference Guide<br />
Manual registrati<strong>on</strong> of the endpoint<br />
(c<strong>on</strong>tinued...)<br />
How to c<strong>on</strong>figure the dial plan and directory number for the endpoint.<br />
Log in to <str<strong>on</strong>g>Cisco</str<strong>on</strong>g> Unified CM Administrati<strong>on</strong> and navigate to Device > Ph<strong>on</strong>e.<br />
Adding a new device (c<strong>on</strong>tinued...)<br />
Dial Plan<br />
Navigate to the Product Specific C<strong>on</strong>figurati<strong>on</strong> Layout > Dial Plan secti<strong>on</strong>,<br />
and c<strong>on</strong>figure the items accordingly to your preferred settings.<br />
Device<br />
Ph<strong>on</strong>e<br />
8. C<strong>on</strong>figure the dial plan.<br />
Refer to <str<strong>on</strong>g>Cisco</str<strong>on</strong>g> <str<strong>on</strong>g>TelePresence</str<strong>on</strong>g> Manager documentati<strong>on</strong> for more details.<br />
Directory Number<br />
Navigate to the Product Specific C<strong>on</strong>figurati<strong>on</strong> Layout > Directory Number<br />
secti<strong>on</strong>, and c<strong>on</strong>figure the items accordingly to your preferred settings.<br />
9. C<strong>on</strong>figure the directory number.<br />
Refer to <str<strong>on</strong>g>Cisco</str<strong>on</strong>g> <str<strong>on</strong>g>TelePresence</str<strong>on</strong>g> Manager documentati<strong>on</strong> for more details.<br />
When d<strong>on</strong>e, click Save and Apply C<strong>on</strong>fig.<br />
<str<strong>on</strong>g>Cisco</str<strong>on</strong>g> <str<strong>on</strong>g>TelePresence</str<strong>on</strong>g> Manager documentati<strong>on</strong><br />
The <str<strong>on</strong>g>Cisco</str<strong>on</strong>g> <str<strong>on</strong>g>TelePresence</str<strong>on</strong>g> Manager documentati<strong>on</strong> is found <strong>on</strong> the<br />
<str<strong>on</strong>g>Cisco</str<strong>on</strong>g> web site. Go to:http://www.cisco.com/en/US/products/<br />
ps7074/tsd_products_support_series_home.html<br />
8<br />
9<br />
D14996.01 <str<strong>on</strong>g>Administering</str<strong>on</strong>g> <str<strong>on</strong>g>TC</str<strong>on</strong>g>6 <str<strong>on</strong>g>Endpoints</str<strong>on</strong>g> <strong>on</strong> <strong>CUCM</strong> <strong>9.0</strong>, January 2013. www.cisco.com — Copyright © 2013 <str<strong>on</strong>g>Cisco</str<strong>on</strong>g> Systems, Inc. All rights reserved.<br />
22
<str<strong>on</strong>g>Cisco</str<strong>on</strong>g> <str<strong>on</strong>g>TelePresence</str<strong>on</strong>g> <str<strong>on</strong>g>Endpoints</str<strong>on</strong>g> running <str<strong>on</strong>g>TC</str<strong>on</strong>g>6 and <str<strong>on</strong>g>Cisco</str<strong>on</strong>g> Unified Communicati<strong>on</strong>s Manager <strong>9.0</strong><br />
Quick Reference Guide<br />
Manual registrati<strong>on</strong> of the endpoint<br />
(c<strong>on</strong>tinued...)<br />
How to c<strong>on</strong>figure the line number.<br />
Log in to <str<strong>on</strong>g>Cisco</str<strong>on</strong>g> Unified CM Administrati<strong>on</strong> and navigate to Device > Ph<strong>on</strong>e.<br />
C<strong>on</strong>figuring the line number<br />
1. Navigate to Device > Ph<strong>on</strong>e.<br />
Search to find the previously defined endpoint<br />
2. Use the search opti<strong>on</strong>s to list the available <str<strong>on</strong>g>TelePresence</str<strong>on</strong>g> devices.<br />
3. From the list, choose the endpoint you previously defined.<br />
Associati<strong>on</strong> Informati<strong>on</strong><br />
4. Navigate to the Associati<strong>on</strong> Informati<strong>on</strong> secti<strong>on</strong> and click the<br />
Line[1] - Add a new DN to define the Line number.<br />
Device<br />
Ph<strong>on</strong>e<br />
2<br />
3<br />
1<br />
Directory Number Informati<strong>on</strong><br />
5. Navigate to the Directory Number Informati<strong>on</strong> secti<strong>on</strong>.<br />
Enter the number of the endpoint, according to the E.164 Numbering<br />
Plan.<br />
4<br />
Click Save and Apply C<strong>on</strong>fig.<br />
5<br />
D14996.01 <str<strong>on</strong>g>Administering</str<strong>on</strong>g> <str<strong>on</strong>g>TC</str<strong>on</strong>g>6 <str<strong>on</strong>g>Endpoints</str<strong>on</strong>g> <strong>on</strong> <strong>CUCM</strong> <strong>9.0</strong>, January 2013. www.cisco.com — Copyright © 2013 <str<strong>on</strong>g>Cisco</str<strong>on</strong>g> Systems, Inc. All rights reserved.<br />
23
<str<strong>on</strong>g>Cisco</str<strong>on</strong>g> <str<strong>on</strong>g>TelePresence</str<strong>on</strong>g> <str<strong>on</strong>g>Endpoints</str<strong>on</strong>g> running <str<strong>on</strong>g>TC</str<strong>on</strong>g>6 and <str<strong>on</strong>g>Cisco</str<strong>on</strong>g> Unified Communicati<strong>on</strong>s Manager <strong>9.0</strong><br />
Quick Reference Guide<br />
Auto-registrati<strong>on</strong> of the endpoint<br />
C<strong>on</strong>figurati<strong>on</strong> of the <strong>CUCM</strong> for auto-registrati<strong>on</strong> of the endpoint is described<br />
<strong>on</strong> this page.<br />
Auto-registrati<strong>on</strong> of the <str<strong>on</strong>g>TelePresence</str<strong>on</strong>g> endpoint is not possible when<br />
the <str<strong>on</strong>g>Cisco</str<strong>on</strong>g> Unified CM is set to mixed mode (cluster security mode).<br />
Enable auto-registrati<strong>on</strong> of the <str<strong>on</strong>g>TelePresence</str<strong>on</strong>g> endpoint.<br />
Log in to <str<strong>on</strong>g>Cisco</str<strong>on</strong>g> Unified CM Administrati<strong>on</strong> and navigate to System > <str<strong>on</strong>g>Cisco</str<strong>on</strong>g> Unified CM.<br />
1<br />
System<br />
<str<strong>on</strong>g>Cisco</str<strong>on</strong>g> Unified CM<br />
Enable auto-registrati<strong>on</strong><br />
1. Navigate to System > <str<strong>on</strong>g>Cisco</str<strong>on</strong>g> Unified CM.<br />
2<br />
Search to find the <str<strong>on</strong>g>Cisco</str<strong>on</strong>g> Unified Communicati<strong>on</strong> Manager<br />
2. Use the search opti<strong>on</strong>s available <strong>on</strong> the page, or leave the search field<br />
blank and press Find to list all.<br />
3<br />
3. Select your <str<strong>on</strong>g>Cisco</str<strong>on</strong>g> Unified CM from the list.<br />
Auto-registrati<strong>on</strong> Informati<strong>on</strong><br />
4. Navigate to the Auto-registrati<strong>on</strong> Informati<strong>on</strong> secti<strong>on</strong>.<br />
Auto-registrati<strong>on</strong> Disabled <strong>on</strong> this <str<strong>on</strong>g>Cisco</str<strong>on</strong>g> Unified Communicati<strong>on</strong>s<br />
Manager: Uncheck the check box to enable auto-registrati<strong>on</strong>.<br />
Click Save and Apply C<strong>on</strong>fig.<br />
4<br />
D14996.01 <str<strong>on</strong>g>Administering</str<strong>on</strong>g> <str<strong>on</strong>g>TC</str<strong>on</strong>g>6 <str<strong>on</strong>g>Endpoints</str<strong>on</strong>g> <strong>on</strong> <strong>CUCM</strong> <strong>9.0</strong>, January 2013. www.cisco.com — Copyright © 2013 <str<strong>on</strong>g>Cisco</str<strong>on</strong>g> Systems, Inc. All rights reserved.<br />
24
<str<strong>on</strong>g>Cisco</str<strong>on</strong>g> <str<strong>on</strong>g>TelePresence</str<strong>on</strong>g> <str<strong>on</strong>g>Endpoints</str<strong>on</strong>g> running <str<strong>on</strong>g>TC</str<strong>on</strong>g>6 and <str<strong>on</strong>g>Cisco</str<strong>on</strong>g> Unified Communicati<strong>on</strong>s Manager <strong>9.0</strong><br />
Quick Reference Guide<br />
Chapter 4<br />
Setting passwords<br />
This secti<strong>on</strong> explains about passwords <strong>on</strong> the<br />
<str<strong>on</strong>g>TelePresence</str<strong>on</strong>g> endpoints.<br />
D14996.01 <str<strong>on</strong>g>Administering</str<strong>on</strong>g> <str<strong>on</strong>g>TC</str<strong>on</strong>g>6 <str<strong>on</strong>g>Endpoints</str<strong>on</strong>g> <strong>on</strong> <strong>CUCM</strong> <strong>9.0</strong>, January 2013. www.cisco.com — Copyright © 2013 <str<strong>on</strong>g>Cisco</str<strong>on</strong>g> Systems, Inc. All rights reserved.<br />
25
<str<strong>on</strong>g>Cisco</str<strong>on</strong>g> <str<strong>on</strong>g>TelePresence</str<strong>on</strong>g> <str<strong>on</strong>g>Endpoints</str<strong>on</strong>g> running <str<strong>on</strong>g>TC</str<strong>on</strong>g>6 and <str<strong>on</strong>g>Cisco</str<strong>on</strong>g> Unified Communicati<strong>on</strong>s Manager <strong>9.0</strong><br />
Quick Reference Guide<br />
Setting the system password <strong>on</strong><br />
the endpoint<br />
The system password will restrict access to the codec.<br />
You need to sign in to be able to use the web interface of<br />
your system.<br />
The video system is delivered with a default user account<br />
with full credentials. The user name is admin, and initially, no<br />
password is set for the default user.<br />
Make sure to keep a copy of the password in a safe place.<br />
You have to c<strong>on</strong>tact your <str<strong>on</strong>g>Cisco</str<strong>on</strong>g> representative if you have<br />
forgotten the password.<br />
We str<strong>on</strong>gly recommend that you set a password<br />
for the admin user, and to any other user with<br />
similar credentials, to restrict access to system<br />
c<strong>on</strong>figurati<strong>on</strong>.<br />
Changing your own system password<br />
Perform the following steps to change the system password.<br />
If a password is currently not set, use a blank Current<br />
password; to remove a password, leave the New password<br />
fields blank.<br />
1. Sign in to the web interface with your username and<br />
current password.<br />
2. Click your username in the upper right corner and choose<br />
Change password in the drop down menu.<br />
3. Enter the Current password, the New password, and<br />
repeat the new password in the appropriate input fields.<br />
The password format is a string with 0–64 characters.<br />
4. Click Change password.<br />
Changing another user’s system password<br />
If you have administrator access rights, you can change all<br />
users’ passwords by performing the following steps:<br />
1. Sign in to the web interface with your username and<br />
password.<br />
2. Go to the Maintenance tab and choose User<br />
Administrati<strong>on</strong>.<br />
3. Choose the appropriate user from the list.<br />
4. Enter a new password and PIN code.<br />
5. Click Save.<br />
D14996.01 <str<strong>on</strong>g>Administering</str<strong>on</strong>g> <str<strong>on</strong>g>TC</str<strong>on</strong>g>6 <str<strong>on</strong>g>Endpoints</str<strong>on</strong>g> <strong>on</strong> <strong>CUCM</strong> <strong>9.0</strong>, January 2013. www.cisco.com — Copyright © 2013 <str<strong>on</strong>g>Cisco</str<strong>on</strong>g> Systems, Inc. All rights reserved.<br />
26
<str<strong>on</strong>g>Cisco</str<strong>on</strong>g> <str<strong>on</strong>g>TelePresence</str<strong>on</strong>g> <str<strong>on</strong>g>Endpoints</str<strong>on</strong>g> running <str<strong>on</strong>g>TC</str<strong>on</strong>g>6 and <str<strong>on</strong>g>Cisco</str<strong>on</strong>g> Unified Communicati<strong>on</strong>s Manager <strong>9.0</strong><br />
Quick Reference Guide<br />
Setting the menu password <strong>on</strong> the<br />
endpoint<br />
The menu password will restrict access to some menus.<br />
When starting up the video c<strong>on</strong>ference system for the first<br />
time any<strong>on</strong>e can access the Administrator menu <strong>on</strong> the Touch<br />
c<strong>on</strong>troller because the menu password is not set.<br />
We str<strong>on</strong>gly recommend that you define a menu<br />
password, because the administrator settings may<br />
severely affect the behavior of the system.<br />
You have to issue a command from the command line<br />
interface to set the menu password <strong>on</strong> the Touch; neither the<br />
Touch c<strong>on</strong>troller nor the web interface can be used.<br />
Setting the menu password<br />
1. C<strong>on</strong>nect to the system through the network or its serial<br />
data port (if available) and open a command line interface<br />
(SSH or Telnet).<br />
See below how to find the system’s IP address.<br />
2. Sign in to the system with username and password. The<br />
user needs ADMIN rights.<br />
3. Type the following command:<br />
xCommand SystemUnit MenuPassword Set<br />
Password: <br />
The password format is a string with 0–255 characters.<br />
To find the system’s IP address tap Settings ( ) ><br />
System Informati<strong>on</strong> <strong>on</strong> the Touch c<strong>on</strong>troller.<br />
D14996.01 <str<strong>on</strong>g>Administering</str<strong>on</strong>g> <str<strong>on</strong>g>TC</str<strong>on</strong>g>6 <str<strong>on</strong>g>Endpoints</str<strong>on</strong>g> <strong>on</strong> <strong>CUCM</strong> <strong>9.0</strong>, January 2013. www.cisco.com — Copyright © 2013 <str<strong>on</strong>g>Cisco</str<strong>on</strong>g> Systems, Inc. All rights reserved.<br />
27
<str<strong>on</strong>g>Cisco</str<strong>on</strong>g> <str<strong>on</strong>g>TelePresence</str<strong>on</strong>g> <str<strong>on</strong>g>Endpoints</str<strong>on</strong>g> running <str<strong>on</strong>g>TC</str<strong>on</strong>g>6 and <str<strong>on</strong>g>Cisco</str<strong>on</strong>g> Unified Communicati<strong>on</strong>s Manager <strong>9.0</strong><br />
Quick Reference Guide<br />
Chapter 5<br />
Appendices<br />
The appendices secti<strong>on</strong> provides you with additi<strong>on</strong>al<br />
informati<strong>on</strong> that you may find useful as an system<br />
administrator.<br />
D14996.01 <str<strong>on</strong>g>Administering</str<strong>on</strong>g> <str<strong>on</strong>g>TC</str<strong>on</strong>g>6 <str<strong>on</strong>g>Endpoints</str<strong>on</strong>g> <strong>on</strong> <strong>CUCM</strong> <strong>9.0</strong>, January 2013. www.cisco.com — Copyright © 2013 <str<strong>on</strong>g>Cisco</str<strong>on</strong>g> Systems, Inc. All rights reserved.<br />
28
<str<strong>on</strong>g>Cisco</str<strong>on</strong>g> <str<strong>on</strong>g>TelePresence</str<strong>on</strong>g> <str<strong>on</strong>g>Endpoints</str<strong>on</strong>g> running <str<strong>on</strong>g>TC</str<strong>on</strong>g>6 and <str<strong>on</strong>g>Cisco</str<strong>on</strong>g> Unified Communicati<strong>on</strong>s Manager <strong>9.0</strong><br />
Quick Reference Guide<br />
How to factory reset the endpoint<br />
You can reset the endpoint to its factory defaults by:<br />
• The Touch c<strong>on</strong>troller, if you have <strong>on</strong>e.<br />
• The web interface, which available for all endpoints.<br />
• The command line interface by issuing an API command.<br />
• The power butt<strong>on</strong> (SX20/EX60/EX90).<br />
It is not possible to undo a factory reset.<br />
When factory resetting the endpoint the following happens:<br />
• The call logs will be deleted.<br />
• All system parameters will be reset to default values.<br />
• All files that have been uploaded to the system will be<br />
deleted.<br />
• The Release and Opti<strong>on</strong> keys will be preserved.<br />
• Automatic restart of the system.<br />
Touch<br />
1. Tap gently <strong>on</strong> the Touch screen if the unit is in sleep<br />
mode.<br />
2. Navigate to Settings ( ) > Administrator > Reset.<br />
3. Tap the Factory Reset butt<strong>on</strong>.<br />
4. The system will revert to the default factory settings and<br />
automatically restart. This will take a few minutes.<br />
API<br />
1. Start a command line interface (for example PuTTY).<br />
Enter the host name (or IP address) of the codec and set<br />
c<strong>on</strong>necti<strong>on</strong> type to SSH.<br />
2. Log in with the appropriate username and password.<br />
3. Run the following command: xCommand SystemUnit<br />
FactoryReset C<strong>on</strong>firm: Yes<br />
4. The system will revert to the default factory settings and<br />
automatically restart. This will take a few minutes.<br />
Power<br />
butt<strong>on</strong><br />
Applies to SX20/EX60/EX90<br />
Notificati<strong>on</strong> <strong>on</strong> the main screen<br />
The system will c<strong>on</strong>firm the factory reset by displaying a<br />
notificati<strong>on</strong> <strong>on</strong> the main screen when up and running again.<br />
The notificati<strong>on</strong> disappears after approximately 10 sec<strong>on</strong>ds.<br />
Basic c<strong>on</strong>figurati<strong>on</strong> after the factory reset<br />
This document do not describe the basic c<strong>on</strong>figurati<strong>on</strong> of<br />
the endpoint, such as user roles, network c<strong>on</strong>figurati<strong>on</strong>, date<br />
& time, or locati<strong>on</strong> settings, etc. You can read about these<br />
topics in the<str<strong>on</strong>g>Cisco</str<strong>on</strong>g> <str<strong>on</strong>g>TelePresence</str<strong>on</strong>g> Video Systems Getting<br />
Started Guide.<br />
WEB<br />
1. Open a web browser and enter the IP address of the<br />
video system in the address bar.<br />
2. Navigate to Maintenance > Factory Reset.<br />
3. Read the provided informati<strong>on</strong> carefully before you check<br />
the I want to reset... check box<br />
4. Click Perform a factory reset.<br />
5. The system will revert to the default factory settings and<br />
automatically restart. This will take a few minutes.<br />
Tap Settings ( ) > System Informati<strong>on</strong> <strong>on</strong> the Touch<br />
c<strong>on</strong>troller to find the system's IP address (IPv4 or IPv6).<br />
1. Power down the system by pressing gently and hold the<br />
power butt<strong>on</strong> until the system shuts down. The power<br />
LED turns off.<br />
2. Press gently and hold the power butt<strong>on</strong> for 10 sec<strong>on</strong>ds.<br />
During this period the power LED will remain off.<br />
3. Release the butt<strong>on</strong> and within four sec<strong>on</strong>ds, press twice.<br />
During this period the power LED will blink.<br />
4. The system will revert to the default factory settings and<br />
automatically restart. When up and running again the LED<br />
lights c<strong>on</strong>tinuously.<br />
If you failed to press the power butt<strong>on</strong> twice within the<br />
four sec<strong>on</strong>ds, the system will not revert to the default<br />
factory settings, and you will not see the c<strong>on</strong>firmati<strong>on</strong><br />
message. If this happens, go back to Step 1.<br />
D14996.01 <str<strong>on</strong>g>Administering</str<strong>on</strong>g> <str<strong>on</strong>g>TC</str<strong>on</strong>g>6 <str<strong>on</strong>g>Endpoints</str<strong>on</strong>g> <strong>on</strong> <strong>CUCM</strong> <strong>9.0</strong>, January 2013. www.cisco.com — Copyright © 2013 <str<strong>on</strong>g>Cisco</str<strong>on</strong>g> Systems, Inc. All rights reserved.<br />
29
<str<strong>on</strong>g>Cisco</str<strong>on</strong>g> <str<strong>on</strong>g>TelePresence</str<strong>on</strong>g> <str<strong>on</strong>g>Endpoints</str<strong>on</strong>g> running <str<strong>on</strong>g>TC</str<strong>on</strong>g>6 and <str<strong>on</strong>g>Cisco</str<strong>on</strong>g> Unified Communicati<strong>on</strong>s Manager <strong>9.0</strong><br />
Quick Reference Guide<br />
Understanding <str<strong>on</strong>g>Cisco</str<strong>on</strong>g> Discovery Protocol <strong>on</strong> the <str<strong>on</strong>g>Cisco</str<strong>on</strong>g> <str<strong>on</strong>g>TelePresence</str<strong>on</strong>g> endpoints<br />
Introducti<strong>on</strong><br />
<str<strong>on</strong>g>Cisco</str<strong>on</strong>g> Discovery Protocol (CDP) is a proprietary layer-2<br />
management protocol developed by <str<strong>on</strong>g>Cisco</str<strong>on</strong>g> in the early 1990s<br />
to provide enhanced automati<strong>on</strong> of network discovery and<br />
management. It is broadly deployed <strong>on</strong> milli<strong>on</strong>s of existing<br />
<str<strong>on</strong>g>Cisco</str<strong>on</strong>g> products and provides countless benefits to network<br />
administrators for managing router and switch interfaces. With<br />
the introducti<strong>on</strong> of IP Teleph<strong>on</strong>y in the late 1990s and early<br />
2000s, CDP was enhanced to provide additi<strong>on</strong>al automati<strong>on</strong><br />
capabilities for IP-based teleph<strong>on</strong>es, including automatic<br />
VLAN discovery, Power over Ethernet (PoE) negotiati<strong>on</strong>,<br />
Quality of Service (QoS) automati<strong>on</strong>, locati<strong>on</strong> awareness<br />
(to automate the discovery of the physical locati<strong>on</strong> of an<br />
IP teleph<strong>on</strong>e for management and emergency services<br />
purposes), Ethernet speed and duplex mismatch detecti<strong>on</strong>,<br />
and more.<br />
Note: The IETF, IEEE and TIA, in cooperati<strong>on</strong> with <str<strong>on</strong>g>Cisco</str<strong>on</strong>g><br />
and numerous other networking vendors, have since<br />
created the IEEE 802.1AB standard, known as Link-Layer<br />
Discovery Protocol (LLDP), with extensi<strong>on</strong>s developed for<br />
Media Endpoint Discovery (LLDP-MED) for voice and video<br />
endpoints. LLDP-MED will eventually subsume CDP, but this<br />
may take years to unfold due to the enormous installed-base<br />
and widespread use of CDP.<br />
History<br />
<str<strong>on</strong>g>Cisco</str<strong>on</strong>g> acquired TANDBERG in April 2010. The TANDBERG<br />
portfolio of video endpoints compliments <str<strong>on</strong>g>Cisco</str<strong>on</strong>g>’s existing<br />
Telepresence and Unified Communicati<strong>on</strong>s soluti<strong>on</strong>s. CDP<br />
support was introduced <strong>on</strong> the <str<strong>on</strong>g>Cisco</str<strong>on</strong>g> E20 in release TE4.0;<br />
<strong>on</strong> the <str<strong>on</strong>g>Cisco</str<strong>on</strong>g> <str<strong>on</strong>g>TelePresence</str<strong>on</strong>g> MX series, EX series, Codec C<br />
Series, Profile series and Quick Set C20 in release <str<strong>on</strong>g>TC</str<strong>on</strong>g>5.0.<br />
The <str<strong>on</strong>g>Cisco</str<strong>on</strong>g> <str<strong>on</strong>g>TelePresence</str<strong>on</strong>g> SX20 Quick Set is supported<br />
from release <str<strong>on</strong>g>TC</str<strong>on</strong>g>5.1. The <str<strong>on</strong>g>Cisco</str<strong>on</strong>g> <str<strong>on</strong>g>TelePresence</str<strong>on</strong>g> EX Series is<br />
supported in TE6.0.<br />
However, because there is already an installed-base of these<br />
endpoint models (prior to the <str<strong>on</strong>g>Cisco</str<strong>on</strong>g> acquisiti<strong>on</strong>) that are not<br />
running CDP, introducing CDP in a software release requires<br />
careful c<strong>on</strong>siderati<strong>on</strong> of how the new automati<strong>on</strong> functi<strong>on</strong>ality<br />
will affect that existing installed-base. Enabling CDP by<br />
default could cause undesired behavior for those existing<br />
deployments when they upgrade to a CDP-enabled release<br />
and the devices suddenly begin using VLAN automati<strong>on</strong>, so<br />
CDP is being introduced in a phased approach.<br />
Benefits provided by CDP<br />
As menti<strong>on</strong>ed in the introducti<strong>on</strong> above, CDP provides<br />
numerous automati<strong>on</strong> benefits for network administrators<br />
deploying IP-based voice and video<br />
endpoints <strong>on</strong> their networks. This<br />
secti<strong>on</strong> briefly highlights some of the<br />
most pertinent benefits for IP-based<br />
voice/video endpoints like the <str<strong>on</strong>g>Cisco</str<strong>on</strong>g><br />
<str<strong>on</strong>g>TelePresence</str<strong>on</strong>g> MX series, EX series,<br />
Codec C Series, Profile series, Quick Set<br />
C20 and SX20 Quick Set.<br />
Automatic VLAN discovery<br />
Virtual LANs (VLANs) allow a network<br />
administrator to introduce IP-based<br />
teleph<strong>on</strong>es and video terminals <strong>on</strong>to<br />
their network without the need for readdressing<br />
their existing data sub nets,<br />
or adding additi<strong>on</strong>al Ethernet ports to<br />
their switches. Leveraging the 802.1Q<br />
standard, a device such as the endpoint<br />
can tag its Ethernet frames with the VLAN<br />
ID that its traffic bel<strong>on</strong>gs to, placing its<br />
traffic into the voice /video VLAN (known<br />
as the auxiliary VLAN); while Ethernet<br />
frames sent by a PC are not tagged,<br />
and therefore end up in the data VLAN<br />
(known as the native VLAN). This allows<br />
the endpoint to be inserted in between<br />
an existing PC and the Ethernet switch<br />
to which it is attached, allowing for a<br />
single Ethernet port per user, thereby<br />
eliminating the need to add additi<strong>on</strong>al<br />
ports in the wiring closet, and allowing<br />
the endpoint to be assigned to a different<br />
Fig. 1: Without VLANs<br />
Fig. 2: With VLANs<br />
(new) IP sub net rather than c<strong>on</strong>suming IP addresses in the<br />
existing PC VLAN. VLANs also allow the network administrator<br />
to apply different security and Quality of Service (QoS) policies<br />
<strong>on</strong> a per-VLAN basis.<br />
Figures 1 and 2 illustrate these c<strong>on</strong>cepts.<br />
Without CDP (or LLDP-MED), the user must manually c<strong>on</strong>figure<br />
each endpoint with the 802.1Q VLAN ID it should use. CDP<br />
automates this task, allowing the Ethernet switch to advertise<br />
to the endpoint the ID of the VLAN it should bel<strong>on</strong>g to.<br />
D14996.01 <str<strong>on</strong>g>Administering</str<strong>on</strong>g> <str<strong>on</strong>g>TC</str<strong>on</strong>g>6 <str<strong>on</strong>g>Endpoints</str<strong>on</strong>g> <strong>on</strong> <strong>CUCM</strong> <strong>9.0</strong>, January 2013. www.cisco.com — Copyright © 2013 <str<strong>on</strong>g>Cisco</str<strong>on</strong>g> Systems, Inc. All rights reserved.<br />
30
<str<strong>on</strong>g>Cisco</str<strong>on</strong>g> <str<strong>on</strong>g>TelePresence</str<strong>on</strong>g> <str<strong>on</strong>g>Endpoints</str<strong>on</strong>g> running <str<strong>on</strong>g>TC</str<strong>on</strong>g>6 and <str<strong>on</strong>g>Cisco</str<strong>on</strong>g> Unified Communicati<strong>on</strong>s Manager <strong>9.0</strong><br />
Quick Reference Guide<br />
Automatic Quality of Service<br />
Quality of Service is essential for a well-performing<br />
network, providing preferential service to latency, jitter or<br />
loss sensitive applicati<strong>on</strong>s like voice and video; deferential<br />
service to misbehaving applicati<strong>on</strong>s such as viruses and other<br />
undesirable network traffic; and fair treatment to routine,<br />
Fig. 3: Without<br />
CDP / AutoQoS<br />
Fig. 4: With<br />
CDP / AutoQoS<br />
n<strong>on</strong>-time sensitive traffic such as e-mail or web browsing.<br />
However, QoS can be complex to c<strong>on</strong>figure and manage, and<br />
the administrator needs to be assured that the traffic entering<br />
the network is marked with the correct QoS values. For userfacing<br />
devices such as PCs, IP-based teleph<strong>on</strong>es and video<br />
terminals, the administrator must establish a demarcati<strong>on</strong><br />
point where QoS markings coming in from<br />
these devices are either not trusted—and<br />
instead overwritten to an administratively<br />
c<strong>on</strong>figured value—or trusted to set their<br />
own QoS values and the Ethernet switch<br />
will h<strong>on</strong>or those values. This demarcati<strong>on</strong><br />
point, or trust boundary, ensures that<br />
if the user accidently, or intenti<strong>on</strong>ally,<br />
tampers with the QoS values assigned<br />
to these devices, those QoS values will<br />
be remarked by the administrator as they<br />
ingress the network.<br />
CDP provides a method of automatically<br />
extending this trust boundary (at the<br />
administrators’ discreti<strong>on</strong>) so that the<br />
ph<strong>on</strong>e or video terminal can mark its<br />
packets with the desired QoS values, and<br />
the switch will trust the ph<strong>on</strong>es packets<br />
(because the administrator knows that<br />
the specific model of ph<strong>on</strong>e in questi<strong>on</strong><br />
can be trusted to behave properly and<br />
cannot be tampered with) and forwards<br />
those packets <strong>on</strong> into the network. This<br />
functi<strong>on</strong>ality is known as AutoQoS <strong>on</strong> the<br />
<str<strong>on</strong>g>Cisco</str<strong>on</strong>g> Catalyst line of Ethernet switches.<br />
Figures 3 and 4 illustrate the c<strong>on</strong>cept of<br />
AutoQoS.<br />
Further informati<strong>on</strong> about AutoQoS can be<br />
found at the following reference:<br />
• Medianet Campus QoS Design guide:<br />
http://www.cisco.com/en/US/docs/<br />
soluti<strong>on</strong>s/Enterprise/WAN_and_MAN/<br />
QoS_SRND_40/QoSCampus_40.<br />
html#wp1098057<br />
Power over Ethernet (PoE) negotiati<strong>on</strong><br />
The 802.3af standard provides for Power over Ethernet to<br />
devices such as IP-based teleph<strong>on</strong>es and video terminals.<br />
CDP provides additi<strong>on</strong>al benefit by allowing the endpoint to<br />
indicate to the Ethernet switch how much power it requires—<br />
and for the switch to advertise to the endpoint how much<br />
power is available—thereby allowing more granular level<br />
of negotiati<strong>on</strong> between the switch and the endpoint, and<br />
allowing the Ethernet switch to more closely track its available<br />
power budget. Note that PoE is currently not used by the<br />
<str<strong>on</strong>g>Cisco</str<strong>on</strong>g> <str<strong>on</strong>g>TelePresence</str<strong>on</strong>g> endpoints, but is menti<strong>on</strong>ed here as<br />
informati<strong>on</strong>al benefit to the reader since PoE is widely used<br />
by many other models of <str<strong>on</strong>g>Cisco</str<strong>on</strong>g> Unified IP Ph<strong>on</strong>es, Wireless<br />
Access Points, surveillance cameras, and myriad other<br />
devices.<br />
Locati<strong>on</strong> awareness<br />
With the introducti<strong>on</strong> of IP-based teleph<strong>on</strong>es, a new level of<br />
mobility was afforded in that an IP endpoints could be plugged<br />
in anywhere in the network, obtain an IP address, and start<br />
making calls, reducing the costs associated with physically<br />
patching teleph<strong>on</strong>e cables when moving an employee from<br />
<strong>on</strong>e office to another. However, certain management functi<strong>on</strong>s<br />
and emergency services rely <strong>on</strong> knowing the precise<br />
locati<strong>on</strong> of a teleph<strong>on</strong>e. CDP allows for network management<br />
applicati<strong>on</strong>s to identify the physical locati<strong>on</strong> of a ph<strong>on</strong>e (by<br />
detecting what Ethernet port that ph<strong>on</strong>e is attached to, and<br />
hence, where it physically is located). This informati<strong>on</strong> is<br />
then leveraged by applicati<strong>on</strong>s such as <str<strong>on</strong>g>Cisco</str<strong>on</strong>g> Emergency<br />
Resp<strong>on</strong>der to direct teleph<strong>on</strong>e calls made to emergency<br />
services pers<strong>on</strong>nel to the correct dispatch office. There are<br />
many other real and potential uses for locati<strong>on</strong> informati<strong>on</strong>.<br />
Ethernet speed / duplex mismatch detecti<strong>on</strong><br />
Ethernet devices use the 802.3 auto negotiati<strong>on</strong> procedure<br />
to automatically negotiate their speed and duplex settings.<br />
However, a very comm<strong>on</strong> problem is that <strong>on</strong>e side or the<br />
other is accidently c<strong>on</strong>figured for the wr<strong>on</strong>g settings, resulting<br />
in packet loss. For example, the network administrator has<br />
c<strong>on</strong>figured all the Gigabit Ethernet ports <strong>on</strong> the switch for auto<br />
negotiati<strong>on</strong>, but the user accidently sets the port <strong>on</strong> his or her<br />
PC, IP ph<strong>on</strong>e or video terminal to a manually c<strong>on</strong>figured value,<br />
such as 100 Mbps / Full duplex. This can result in a mismatch<br />
D14996.01 <str<strong>on</strong>g>Administering</str<strong>on</strong>g> <str<strong>on</strong>g>TC</str<strong>on</strong>g>6 <str<strong>on</strong>g>Endpoints</str<strong>on</strong>g> <strong>on</strong> <strong>CUCM</strong> <strong>9.0</strong>, January 2013. www.cisco.com — Copyright © 2013 <str<strong>on</strong>g>Cisco</str<strong>on</strong>g> Systems, Inc. All rights reserved.<br />
31
<str<strong>on</strong>g>Cisco</str<strong>on</strong>g> <str<strong>on</strong>g>TelePresence</str<strong>on</strong>g> <str<strong>on</strong>g>Endpoints</str<strong>on</strong>g> running <str<strong>on</strong>g>TC</str<strong>on</strong>g>6 and <str<strong>on</strong>g>Cisco</str<strong>on</strong>g> Unified Communicati<strong>on</strong>s Manager <strong>9.0</strong><br />
Quick Reference Guide<br />
between the switch and the endpoint, resulting in a large<br />
percentage of loss <strong>on</strong> that interface. CDP does not automate<br />
the resoluti<strong>on</strong> of such a c<strong>on</strong>diti<strong>on</strong>, but it does detect it and<br />
cause an alarm to be generated <strong>on</strong> the switch, notifying the<br />
administrator of the c<strong>on</strong>diti<strong>on</strong> so that he or she may take steps<br />
to resolve it.<br />
Future Medianet applicati<strong>on</strong>s<br />
The above benefits of CDP have been available for years from<br />
<str<strong>on</strong>g>Cisco</str<strong>on</strong>g>. Medianet is a new c<strong>on</strong>cept aimed at further extending<br />
and automating the interacti<strong>on</strong>s between endpoints and the<br />
network in order to deliver additi<strong>on</strong>al end-to-end optimizati<strong>on</strong><br />
of multimedia traffic across an intelligent internetwork. CDP is<br />
<strong>on</strong>e protocol, am<strong>on</strong>g others, that will be leveraged by future<br />
generati<strong>on</strong>s of <str<strong>on</strong>g>Cisco</str<strong>on</strong>g> IOS Software and <str<strong>on</strong>g>Cisco</str<strong>on</strong>g> Medianetready<br />
endpoints to deliver <strong>on</strong> this visi<strong>on</strong>. Available Medianet<br />
applicati<strong>on</strong>s at the time this document was written include<br />
end-to-end tracing of the path a video sessi<strong>on</strong> takes through<br />
a network in order to pinpoint the source of packet loss,<br />
optimizing the routing of video packets over alternate paths in<br />
order to maximize the throughput of the network, enhanced<br />
Sessi<strong>on</strong> Admissi<strong>on</strong> C<strong>on</strong>trol in order to c<strong>on</strong>trol the amount of<br />
video sessi<strong>on</strong>s admitted <strong>on</strong>to the network, and more.<br />
Further informati<strong>on</strong> about Medianet, CDP and LLDP-MED can<br />
be found at the following references:<br />
• Medianet Campus QoS Design 4.0<br />
http://www.cisco.com/en/US/netsol/ns1094/index.html<br />
• Using <str<strong>on</strong>g>Cisco</str<strong>on</strong>g> Discovery Protocol (CDP)<br />
http://www.cisco.com/en/US/docs/ios/netmgmt/<br />
c<strong>on</strong>figurati<strong>on</strong>/guide/nm_cdp_discover_ps6350_TSD_<br />
Products_C<strong>on</strong>figurati<strong>on</strong>_Guide_Chapter.html<br />
• Best Practices for Catalyst 4500/4000, 5500/5000, and<br />
6500/6000 Series Switches Running CatOS C<strong>on</strong>figurati<strong>on</strong><br />
and Management<br />
http://www.cisco.com/en/US/products/hw/switches/<br />
ps663/products_tech_note09186a0080094713.<br />
shtml#cdp<br />
• LLDP-MED and <str<strong>on</strong>g>Cisco</str<strong>on</strong>g> Discovery Protocol White Paper<br />
http://www.cisco.com/en/US/technologies/tk652/tk701/<br />
technologies_white_paper0900aecd804cd46d.html<br />
CDP behavior in release <str<strong>on</strong>g>TC</str<strong>on</strong>g>5, and later<br />
The following informati<strong>on</strong> applies to <str<strong>on</strong>g>Cisco</str<strong>on</strong>g> <str<strong>on</strong>g>TelePresence</str<strong>on</strong>g> MX<br />
series, EX series, Codec C Series, Profile series and Quick<br />
Set C20 running software release <str<strong>on</strong>g>TC</str<strong>on</strong>g>5.0, and later; and<br />
<str<strong>on</strong>g>Cisco</str<strong>on</strong>g> <str<strong>on</strong>g>TelePresence</str<strong>on</strong>g> SX20 Quick Set which is supported from<br />
release <str<strong>on</strong>g>TC</str<strong>on</strong>g>5.1, and later; and EX Series supported in TE6.0.<br />
When the endpoint is booted for the first time, or after a<br />
factory reset has been d<strong>on</strong>e, the following settings are<br />
applied by default:<br />
xC<strong>on</strong>figurati<strong>on</strong> Provisi<strong>on</strong>ing Mode: Auto<br />
xC<strong>on</strong>figurati<strong>on</strong> Network 1 VLAN Voice Mode: Off<br />
The endpoint then displays the Provisi<strong>on</strong>ing Wizard screen to<br />
prompt the user for what provisi<strong>on</strong>ing mode they would like to<br />
use: VCS, Callway or <strong>CUCM</strong>.<br />
If <strong>CUCM</strong> is selected, then xC<strong>on</strong>figurati<strong>on</strong> Provisi<strong>on</strong>ing Mode<br />
is automatically set to <strong>CUCM</strong> and xC<strong>on</strong>figurati<strong>on</strong> Network<br />
1 VLAN Voice Mode is automatically changed to Auto. Also<br />
the endpoint begins utilizing CDP to automatically discover<br />
its VLAN and begins tagging its packets with the appropriate<br />
VLAN ID. The endpoint also begins including DHCP Opti<strong>on</strong><br />
150 in its DHCP requests so that it can automatically discover<br />
the address of the <str<strong>on</strong>g>Cisco</str<strong>on</strong>g> Unified CM TFTP server.<br />
If the xC<strong>on</strong>figurati<strong>on</strong> Provisi<strong>on</strong>ing Mode is set to VCS or<br />
Callway, then xC<strong>on</strong>figurati<strong>on</strong> Network 1 VLAN Voice Mode is<br />
left in its default state of Off, and the endpoint will ignore any<br />
CDP VLAN advertisements and not tag its packets with any<br />
VLAN ID. The endpoint also does not include DHCP Opti<strong>on</strong><br />
150 in its DHCP requests.<br />
For TMS/VCS customers, this behavior preserves the<br />
functi<strong>on</strong>ality they had in previous software releases of these<br />
endpoints. If CDP is desired, then it may be manually enabled<br />
by setting the xC<strong>on</strong>figurati<strong>on</strong> Network 1 VLAN Voice Mode<br />
parameter to Auto.<br />
This may be d<strong>on</strong>e through:<br />
• Touch user interface: Administrator Settings -> Network<br />
Settings -> Link Settings.<br />
• Or the On-Screen Display Menu: Settings -> Administrator<br />
Settings -> Advanced C<strong>on</strong>figurati<strong>on</strong> -> Network 1 -><br />
VLAN Voice Mode.<br />
• Or the web interface: C<strong>on</strong>figurati<strong>on</strong> -> Advanced<br />
C<strong>on</strong>figurati<strong>on</strong> -> Network 1 -> VLAN Voice Mode.<br />
• Or the API command: xC<strong>on</strong>figurati<strong>on</strong> Network 1<br />
VLAN Voice Mode.<br />
For <strong>CUCM</strong> customers, this behavior does present an extra<br />
step in the first-time boot up process, but <strong>on</strong>ce <strong>CUCM</strong> mode<br />
has been chosen in the Startup Wizard, CDP will automatically<br />
kick in and the ph<strong>on</strong>e will join the auxiliary (voice/video) VLAN.<br />
If the customer does not wish to use the CDP, then it may be<br />
manually disabled by setting the xC<strong>on</strong>figurati<strong>on</strong> Network 1<br />
VLAN Voice Mode parameter to Off.<br />
For customers who do not have a CDP-capable Ethernet<br />
switch, but wish to use 802.1Q VLANs, the xC<strong>on</strong>figurati<strong>on</strong><br />
Network 1 VLAN Voice Mode parameter may be set to<br />
Manual, and the associated xC<strong>on</strong>figurati<strong>on</strong> Network 1 VLAN<br />
Voice ID parameter may be set to the appropriate value.<br />
Once these parameters are set, the settings are saved and<br />
remain persistent through subsequent reboots. If a user later<br />
wishes to change them, they may do so by re-running the<br />
Startup Wizard, or by manually setting the parameters.<br />
D14996.01 <str<strong>on</strong>g>Administering</str<strong>on</strong>g> <str<strong>on</strong>g>TC</str<strong>on</strong>g>6 <str<strong>on</strong>g>Endpoints</str<strong>on</strong>g> <strong>on</strong> <strong>CUCM</strong> <strong>9.0</strong>, January 2013. www.cisco.com — Copyright © 2013 <str<strong>on</strong>g>Cisco</str<strong>on</strong>g> Systems, Inc. All rights reserved.<br />
32
<str<strong>on</strong>g>Cisco</str<strong>on</strong>g> <str<strong>on</strong>g>TelePresence</str<strong>on</strong>g> <str<strong>on</strong>g>Endpoints</str<strong>on</strong>g> running <str<strong>on</strong>g>TC</str<strong>on</strong>g>6 and <str<strong>on</strong>g>Cisco</str<strong>on</strong>g> Unified Communicati<strong>on</strong>s Manager <strong>9.0</strong><br />
Quick Reference Guide<br />
Upgrades to <str<strong>on</strong>g>TC</str<strong>on</strong>g>5/TE6 from a previous release<br />
For existing customers upgrading to release <str<strong>on</strong>g>TC</str<strong>on</strong>g>5.x from a<br />
previous release, the existing values for these parameters will<br />
be maintained, the Startup Wizard is not displayed, and no<br />
change in behavior will be seen by the user. Note however<br />
that the values for the xC<strong>on</strong>figurati<strong>on</strong> Network 1 VLAN Voice<br />
Mode parameter have changed. In previous releases, the<br />
valid values for this parameter were Untagged or Tagged,<br />
with Untagged being the default. From release <str<strong>on</strong>g>TC</str<strong>on</strong>g>5.0, with<br />
the introducti<strong>on</strong> of CDP support, the valid values for those<br />
parameters are now [Auto/Manual/Off]. During an upgrade,<br />
the previous values are automatically mapped to the new<br />
equivalent values.<br />
Note: Management applicati<strong>on</strong>s will need to be updated to<br />
use the new values (e.g. Off instead of Untagged, Manual<br />
instead of Tagged, or Auto) in xC<strong>on</strong>figurati<strong>on</strong> API requests.<br />
Table 1 illustrates the relati<strong>on</strong>ship between the old and new<br />
values.<br />
Note: The DHCP process is actually d<strong>on</strong>e in the background<br />
prior to the Startup Wizard being displayed. This means that<br />
during the first-time boot up, or after a factory reset, the<br />
endpoint will initially obtain a DHCP lease in the native VLAN.<br />
If VLAN Voice Mode Auto is then chosen, and CDP indicates<br />
that a VLAN should be used, the endpoint will release the<br />
address it received in the native VLAN, restart its IP stack,<br />
and re-DHCP a new address in the auxiliary VLAN. This may<br />
result in temporary usage of IP addresses in the native VLAN<br />
during the first-time boot up.<br />
Summary<br />
This document has briefly introduced the history and benefits<br />
of the <str<strong>on</strong>g>Cisco</str<strong>on</strong>g> Discovery Protocol (CDP) and its behavior <strong>on</strong> the<br />
<str<strong>on</strong>g>Cisco</str<strong>on</strong>g> <str<strong>on</strong>g>TelePresence</str<strong>on</strong>g> MX series, EX series, Codec C Series,<br />
Profile series and Quick Set C20 running software release<br />
<str<strong>on</strong>g>TC</str<strong>on</strong>g>5.0 or later; and <str<strong>on</strong>g>Cisco</str<strong>on</strong>g> <str<strong>on</strong>g>TelePresence</str<strong>on</strong>g> SX20 Quick Set which<br />
is supported from release <str<strong>on</strong>g>TC</str<strong>on</strong>g>5.1; and the EX Series supported<br />
in TE6.0.<br />
CDP is a powerful mechanism for automating the applicati<strong>on</strong><br />
of VLANs and Quality of Service for voice/video devices.<br />
Existing <str<strong>on</strong>g>Cisco</str<strong>on</strong>g> customers are encouraged to begin exploring<br />
its benefits and preparing their networks so they can begin<br />
leveraging VLANs, AutoQoS and VLAN-based security<br />
policies for their <str<strong>on</strong>g>Cisco</str<strong>on</strong>g> endpoints.<br />
Prior Releases<br />
Release<br />
<str<strong>on</strong>g>TC</str<strong>on</strong>g>5.x/TE6.0<br />
Comments<br />
Auto<br />
Auto mode was introduced in release <str<strong>on</strong>g>TC</str<strong>on</strong>g>5.0<br />
Tagged Manual Manual is the same as Tagged in prior releases<br />
Untagged Off Off is the same as Untagged in prior release<br />
Table 1: Old and New VLAN Tagging Values<br />
D14996.01 <str<strong>on</strong>g>Administering</str<strong>on</strong>g> <str<strong>on</strong>g>TC</str<strong>on</strong>g>6 <str<strong>on</strong>g>Endpoints</str<strong>on</strong>g> <strong>on</strong> <strong>CUCM</strong> <strong>9.0</strong>, January 2013. www.cisco.com — Copyright © 2013 <str<strong>on</strong>g>Cisco</str<strong>on</strong>g> Systems, Inc. All rights reserved.<br />
33
<str<strong>on</strong>g>Cisco</str<strong>on</strong>g> <str<strong>on</strong>g>TelePresence</str<strong>on</strong>g> <str<strong>on</strong>g>Endpoints</str<strong>on</strong>g> running <str<strong>on</strong>g>TC</str<strong>on</strong>g>6 and <str<strong>on</strong>g>Cisco</str<strong>on</strong>g> Unified Communicati<strong>on</strong>s Manager <strong>9.0</strong><br />
Quick Reference Guide<br />
User documentati<strong>on</strong> <strong>on</strong> the <str<strong>on</strong>g>Cisco</str<strong>on</strong>g> web site<br />
The user documentati<strong>on</strong> is found here:http://www.cisco.com/go/telepresence/docs<br />
Depending <strong>on</strong> which product you have, select the following in the right pane:<br />
EX Series:<br />
<str<strong>on</strong>g>TelePresence</str<strong>on</strong>g><br />
> <str<strong>on</strong>g>TelePresence</str<strong>on</strong>g> <str<strong>on</strong>g>Endpoints</str<strong>on</strong>g> - Pers<strong>on</strong>al<br />
> <str<strong>on</strong>g>TelePresence</str<strong>on</strong>g> Desktop<br />
> <str<strong>on</strong>g>Cisco</str<strong>on</strong>g> <str<strong>on</strong>g>TelePresence</str<strong>on</strong>g> System EX Series<br />
Or click:www.cisco.com/go/ex-docs<br />
Codec C Series:<br />
<str<strong>on</strong>g>TelePresence</str<strong>on</strong>g><br />
> <str<strong>on</strong>g>TelePresence</str<strong>on</strong>g> Soluti<strong>on</strong>s Platform<br />
> <str<strong>on</strong>g>TelePresence</str<strong>on</strong>g> Integrator Products<br />
> <str<strong>on</strong>g>Cisco</str<strong>on</strong>g> <str<strong>on</strong>g>TelePresence</str<strong>on</strong>g> System Integrator C Series<br />
Or click:www.cisco.com/go/cseries-docs<br />
Quick Set C20 and SX20 Quick Set:<br />
<str<strong>on</strong>g>TelePresence</str<strong>on</strong>g><br />
> <str<strong>on</strong>g>TelePresence</str<strong>on</strong>g> Soluti<strong>on</strong>s Platform<br />
> <str<strong>on</strong>g>TelePresence</str<strong>on</strong>g> Integrator Products<br />
> <str<strong>on</strong>g>Cisco</str<strong>on</strong>g> <str<strong>on</strong>g>TelePresence</str<strong>on</strong>g> Quick Set Series<br />
Or click:www.cisco.com/go/quickset-docs<br />
MX Series:<br />
<str<strong>on</strong>g>TelePresence</str<strong>on</strong>g><br />
> <str<strong>on</strong>g>TelePresence</str<strong>on</strong>g> <str<strong>on</strong>g>Endpoints</str<strong>on</strong>g> - Multipurpose<br />
> <str<strong>on</strong>g>Cisco</str<strong>on</strong>g> <str<strong>on</strong>g>TelePresence</str<strong>on</strong>g> MX Series<br />
Or click:www.cisco.com/go/mx-docs<br />
Profile Series:<br />
<str<strong>on</strong>g>TelePresence</str<strong>on</strong>g><br />
> <str<strong>on</strong>g>TelePresence</str<strong>on</strong>g> <str<strong>on</strong>g>Endpoints</str<strong>on</strong>g> - Multipurpose<br />
> <str<strong>on</strong>g>Cisco</str<strong>on</strong>g> <str<strong>on</strong>g>TelePresence</str<strong>on</strong>g> System Profile Series<br />
Or click:www.cisco.com/go/profile-docs<br />
<str<strong>on</strong>g>Cisco</str<strong>on</strong>g> Unified Communicati<strong>on</strong> Manager (CallManager):<br />
Voice and Unified Communicati<strong>on</strong>s<br />
> IP Teleph<strong>on</strong>y<br />
> Unified Communicati<strong>on</strong>s Platform<br />
> <str<strong>on</strong>g>Cisco</str<strong>on</strong>g> Unified Communicati<strong>on</strong>s Manager<br />
(CallManager)<br />
Or click:http://www.cisco.com/en/US/products/sw/<br />
voicesw/ps556/tsd_products_support_series_home.html<br />
Document categories<br />
The documents are organized in the following categories:<br />
User guides:<br />
Maintain and Operate > End-User Guides<br />
Quick reference guides:<br />
Maintain and Operate > End-User Guides<br />
Installati<strong>on</strong> guides:<br />
Install and Upgrade > Install and Upgrade Guides<br />
Getting started guide:<br />
Install and Upgrade > Install and Upgrade Guides<br />
Administrator guides:<br />
Maintain and Operate > Maintain and Operate Guides<br />
API reference guides:<br />
Reference Guides > Command references<br />
Physical interface guides:<br />
Maintain and Operate > End-User Guides<br />
Regulatory compliance and safety informati<strong>on</strong>:<br />
Install and Upgrade > Install and Upgrade Guides<br />
<str<strong>on</strong>g>TC</str<strong>on</strong>g> software release notes:<br />
Release and General Informati<strong>on</strong> > Release Notes<br />
<str<strong>on</strong>g>TC</str<strong>on</strong>g> software licensing informati<strong>on</strong>:<br />
Release and General Informati<strong>on</strong> > Licensing Informati<strong>on</strong><br />
Video c<strong>on</strong>ferencing room guidelines:<br />
Design > Design Guides<br />
Knowledge base articles and frequently asked questi<strong>on</strong>s:<br />
Troubleshoot and Alerts > Troubleshooting Guides<br />
CAD drawings:<br />
Reference Guides > Technical References<br />
D14996.01 <str<strong>on</strong>g>Administering</str<strong>on</strong>g> <str<strong>on</strong>g>TC</str<strong>on</strong>g>6 <str<strong>on</strong>g>Endpoints</str<strong>on</strong>g> <strong>on</strong> <strong>CUCM</strong> <strong>9.0</strong>, January 2013. www.cisco.com — Copyright © 2013 <str<strong>on</strong>g>Cisco</str<strong>on</strong>g> Systems, Inc. All rights reserved.<br />
34
<str<strong>on</strong>g>Cisco</str<strong>on</strong>g> <str<strong>on</strong>g>TelePresence</str<strong>on</strong>g> <str<strong>on</strong>g>Endpoints</str<strong>on</strong>g> running <str<strong>on</strong>g>TC</str<strong>on</strong>g>6 and <str<strong>on</strong>g>Cisco</str<strong>on</strong>g> Unified Communicati<strong>on</strong>s Manager <strong>9.0</strong><br />
Quick Reference Guide<br />
Intellectual property rights<br />
THE SPECIFICATIONS AND INFORMATION REGARDING THE<br />
PRODUCTS IN THIS MANUAL ARE SUBJECT TO CHANGE<br />
WITHOUT NOTICE. ALL STATEMENTS, INFORMATION, AND<br />
RECOMMENDATIONS IN THIS MANUAL ARE BELIEVED TO BE<br />
ACCURATE BUT ARE PRESENTED WITHOUT WARRANTY OF<br />
ANY KIND, EXPRESSED OR IMPLIED. USERS MUST TAKE FULL<br />
RESPONSIBILITY FOR THEIR APPLICATION OF ANY PRODUCTS.<br />
THE SOFTWARE LICENSE AND LIMITED WARRANTY FOR THE<br />
ACCOMPANYING PRODUCT ARE SET FORTH IN THE INFORMATION<br />
PACKET THAT SHIPPED WITH THE PRODUCT AND ARE<br />
INCORPORATED HEREIN BY THIS REFERENCE. IF YOU ARE UNABLE<br />
TO LOCATE THE SOFTWARE LICENSE OR LIMITED WARRANTY,<br />
CONTACT YOUR CISCO REPRESENTATIVE FOR A COPY.<br />
The <str<strong>on</strong>g>Cisco</str<strong>on</strong>g> implementati<strong>on</strong> of <str<strong>on</strong>g>TC</str<strong>on</strong>g>P header compressi<strong>on</strong> is an<br />
adaptati<strong>on</strong> of a program developed by the University of California,<br />
Berkeley (UCB) as part of UCB’s public domain versi<strong>on</strong> of the UNIX<br />
operating system. All rights reserved. Copyright © 1981, Regents of<br />
the University of California.<br />
NOTWITHSTANDING ANY OTHER WARRANTY HEREIN, ALL<br />
DOCUMENT FILES AND SOFTWARE OF THESE SUPPLIERS ARE<br />
PROVIDED “AS IS” WITH ALL FAULTS. CISCO AND THE ABOVE-<br />
NAMED SUPPLIERS DISCLAIM ALL WARRANTIES, EXPRESSED<br />
OR IMPLIED, INCLUDING, WITHOUT LIMITATION, THOSE OF<br />
MERCHANTABILITY, FITNESS FOR A PARTICULAR PURPOSE AND<br />
NONINFRINGEMENT OR ARISING FROM A COURSE OF DEALING,<br />
USAGE, OR TRADE PRACTICE.<br />
IN NO EVENT SHALL CISCO OR ITS SUPPLIERS BE LIABLE FOR ANY<br />
INDIRECT, SPECIAL, CONSEQUENTIAL, OR INCIDENTAL DAMAGES,<br />
INCLUDING, WITHOUT LIMITATION, LOST PROFITS OR LOSS OR<br />
DAMAGE TO DATA ARISING OUT OF THE USE OR INABILITY TO<br />
USE THIS MANUAL, EVEN IF CISCO OR ITS SUPPLIERS HAVE BEEN<br />
ADVISED OF THE POSSIBILITY OF SUCH DAMAGES.<br />
<str<strong>on</strong>g>Cisco</str<strong>on</strong>g> and the <str<strong>on</strong>g>Cisco</str<strong>on</strong>g> Logo are trademarks of <str<strong>on</strong>g>Cisco</str<strong>on</strong>g> Systems, Inc. and/<br />
or its affiliates in the U.S. and other countries. A listing of <str<strong>on</strong>g>Cisco</str<strong>on</strong>g>’s<br />
trademarks can be found at www.cisco.com/go/trademarks. Third<br />
party trademarks menti<strong>on</strong>ed are the property of their respective<br />
owners. The use of the word partner does not imply a partnership<br />
relati<strong>on</strong>ship between <str<strong>on</strong>g>Cisco</str<strong>on</strong>g> and any other company. (1005R)<br />
Any Internet Protocol (IP) addresses and ph<strong>on</strong>e numbers used in<br />
this document are not intended to be actual addresses and ph<strong>on</strong>e<br />
numbers. Any examples, command display output, network topology<br />
diagrams, and other figures included in the document are shown for<br />
illustrative purposes <strong>on</strong>ly. Any use of actual IP addresses or ph<strong>on</strong>e<br />
numbers in illustrative c<strong>on</strong>tent is unintenti<strong>on</strong>al and coincidental.<br />
TANDBERG is now a part of <str<strong>on</strong>g>Cisco</str<strong>on</strong>g>. TANDBERG® is a registered<br />
trademark bel<strong>on</strong>ging to TANDBERG ASA.<br />
<str<strong>on</strong>g>Cisco</str<strong>on</strong>g> c<strong>on</strong>tacts<br />
On our web site you will find an overview of the worldwide <str<strong>on</strong>g>Cisco</str<strong>on</strong>g> c<strong>on</strong>tacts.<br />
Go to:http://www.cisco.com/web/siteassets/c<strong>on</strong>tacts<br />
Corporate Headquarters<br />
<str<strong>on</strong>g>Cisco</str<strong>on</strong>g> Systems, Inc.<br />
170 West Tasman Dr.<br />
San Jose, CA 95134 USA<br />
D14996.01 <str<strong>on</strong>g>Administering</str<strong>on</strong>g> <str<strong>on</strong>g>TC</str<strong>on</strong>g>6 <str<strong>on</strong>g>Endpoints</str<strong>on</strong>g> <strong>on</strong> <strong>CUCM</strong> <strong>9.0</strong>, January 2013. www.cisco.com — Copyright © 2013 <str<strong>on</strong>g>Cisco</str<strong>on</strong>g> Systems, Inc. All rights reserved.<br />
35