BPA 100 G - Alan-Albrecht Service-Homepage - ALAN ...
BPA 100 G - Alan-Albrecht Service-Homepage - ALAN ...
BPA 100 G - Alan-Albrecht Service-Homepage - ALAN ...

Create successful ePaper yourself
Turn your PDF publications into a flip-book with our unique Google optimized e-Paper software.
<strong>BPA</strong> <strong>100</strong><br />
Adapter für Handfunkgeräte<br />
Zum Anschluss von Headsets<br />
<strong>Alan</strong> Electronics GmbH
Kurzanleitung gesucht? Dann gleich am Schluss der Broschüre auf Seite 14 weiterlesen !<br />
Allgemeines zum Bluetooth Adapter Set<br />
Bluetooth ® Headsets sind in vielen Varianten im Handel erhältlich. Sie alle sind von den Herstellern primär zum Anschluss<br />
an Handy’s mit Bluetooth ® Technologie vorgesehen. Der <strong>Albrecht</strong> Adapter stellt eine Lösung bereit, mit der ein<br />
handelsübliches Bluetooth ® Headset auch an Handsprechfunkgeräten, wie z.B. den <strong>ALAN</strong>- oder <strong>Albrecht</strong> PMR 446- oder<br />
Betriebsfunkgeräten benutzt werden kann.<br />
Systemvoraussetzungen<br />
Voraussetzung ist, dass das verwendete Headset das genormte Bluetooth ® Headset- Protokoll unterstützt. Neben den<br />
einfachen Bluetooth ® - Hörern und mit Bluetooth ® ausgerüsteten Motorradhelmen gibt es u.a. auch komplexere KFZ<br />
Freisprechanlagen und Navigationsgeräte, die andere Bluetooth Protokollvarianten unterstützen, wie z.B. das Handsfree-<br />
Protokoll oder Bluetooth-Master / Slave Umschaltung. Derartige Geräte müssen, um an unserem Adapter verwendet<br />
werden zu können, ggf. erst auf das Standard Headset- Protokoll umgeschaltet werden. Bitte lesen Sie die entsprechende<br />
Bedienungsanleitung oder lassen Sie sich vom Händler Ihrer Sprecheinrichtung beraten.<br />
Lieferumfang<br />
• Adapter zum Anschluß von Bluetooth ® Headsets mit eingebautem Lithium-Polymer Akku.<br />
• Steckerladegerät zum Aufladen des Adapters am 230 V Stromnetz.<br />
• Funkgeräte-Anschlusskabel zum Anschließen von Sendetaste und Adapter an das Funkgerät.<br />
• Wasserdichte Sendetaste (PTT Taste) mit Klettband zur Befestigung am Motorradlenker oder anderen geeigneten<br />
Stellen).<br />
Bitte benutzen Sie nur das mitgelieferte Zubehör!<br />
Laden Sie bitte den Adapter nur mit dem mitgelieferten Steckernetzteil oder optional erhältlichen 12 V<br />
Ladeadapter auf. Andere Netzteile oder Ladegeräte können den Adapter und den eingebauten Lithium-Polymer-<br />
Akku beschädigen. Öffnen Sie bitte nie den Adapter oder das Ladegerät und versuchen Sie nie, den Lithium<br />
Akku selbst zu wechseln oder gar zu öffnen. Falsche Handhabung von Lithium- Akkus, wie z.B. ein<br />
versehentlicher Kurzschluss kann in kürzester Zeit zur Explosion des Akkus mit Folgeschäden und<br />
gesundheitlichen Risiken führen.<br />
Aufladen des Adapters am 230 V Stromnetz<br />
Nach Anschluss des Ladesteckers werden etwa 1.5 bis 2.5 Stunden benötigt, um ein vollständig entleertes Gerät komplett<br />
zu laden. Die Leuchtdiode am Adapter informiert über den Ladevorgang. (rot = Ladung, aus =Akku voll). Wird später<br />
während des Betriebs der Akku leer, beginnt die Leuchtdiode in Abständen rot zu blinken.<br />
Ein- und Ausschalten des Adapters<br />
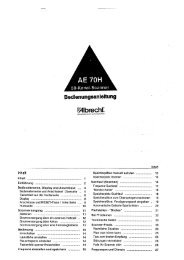
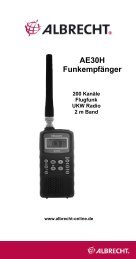
Zum Ein- und Ausschalten (sowie zum späteren Pairingvorgang) dient die große Drucktaste am Adapter.<br />
Ladebuchse<br />
Funktionstaste<br />
LED’s<br />
2<br />
• Drücken Sie ca. 3 Sekunden lang auf die Taste. Die<br />
Leuchtdiode wird dann mehrfach grün blinken. Dies<br />
bedeutet „eingeschaltet“<br />
• Drücken Sie jetzt nochmal 3 Sekunden auf den<br />
Taster, dann blinkt die LED stattdessen rot. Dies<br />
ist der ausgeschaltete Zustand<br />
Verbinden des Adapters mit einem Bluetooth ® Headset<br />
Das System aus Adapter und Headset baut eine abhörsichere Verbindung auf. Dazu müssen die beiden Geräte zunächst<br />
einmal die Informationen austauschen, die sie benötigen, um sich gegenseitig als Partnergeräte zu erkennen. Dieser<br />
Vorgang wird als „Pairing“ bezeichnet. Es ist wichtig, denn Sie möchten ja sicher nicht gerne, dass andere Bluetooth ®<br />
Geräte in Ihrer Umgebung sich versehentlich mit Ihrem Funkgerät verbinden oder umgekehrt.<br />
Zum Pairen mit einem Headset den Pairingmode bei beiden beteiligten Geräten starten: Ausgangspunkt ist<br />
ein voll aufgeladener und ausgeschalteter Adapter (wie z.B. im Lieferzustand nach dem ersten Aufladen. Im Zweifelsfall<br />
überprüfen Sie mit dem Taster den Zustand und schalten den Adapter aus.
• Drücken Sie die Taste auf dem Adapter ca. 6 Sekunden lang. Nach den ersten 3 Sekunden wird sich Ihr<br />
Adapter einschalten (grünes Blinken).<br />
• Halten Sie die Taste aber weiter gedrückt, bis nach insgesamt ca. 6 Sekunden die rote und grüne<br />
Leuchtdiode abwechselnd anfangen zu blinken.<br />
Nun ist Ihr Adapter im Pairing Mode und kann sich mit einem Headset verbinden. Sie haben nun ca. 45 Sekunden Zeit,<br />
den gleichen Vorgang auch bei Ihrem Headset zu starten.<br />
Pairing Mode beim Headset starten<br />
Beim Headset starten Sie bitte ebenfalls den Pairing Vorgang entsprechend der Bedienungsanleitung des Headsets. Bei<br />
den meisten Headsets wird der Pairing Vorgang durch schnelleres Blinken von Leuchtdioden angezeigt. Sobald zwei<br />
Geräte sich aufeinander eingestellt haben, erlischt das schnellere Blinken.<br />
Hinweis: Der Adapter <strong>BPA</strong> <strong>100</strong> erkennt beim Pairen die bei üblichen Headsets benutzten Pairing-PIN-Codes 1234, 0000<br />
oder 1111 automatisch und stellt sich darauf ein.<br />
Pairing Mode bei Navigationsgeräten:<br />
Starten Sie den Pairingvorgang mit Navigationsgeräten unbedingt zuerst am Navigationsgerät und folgen<br />
Sie den Anweisungen auf dem Navigatorbildschirm. Nicht alle Navigationsgeräte verhalten sich gegenüber unserem<br />
Adapter wie ein Headset. Der Grund ist, dass Navigatoren als Bindeglied zwischen einem Handy und dem Headset<br />
konzipiert werden. Das Handy wird mit dem Navigationsgerät verbunden, und das Navigationsgerät wiederum mit dem<br />
Headset, damit die Navigationsdurchsagen auf dem Weg zum Headset eingeblendet werden können. Unser Adapter kann<br />
z.B. mit dem Garmin Zumo anstelle eines GSM Handy’s angebunden werden, jedoch führt in diesem Fall das<br />
Navigationsgerät als Bluetooth Master den Dialog zum Pairen anstelle der Automatik im <strong>BPA</strong> <strong>100</strong> G. Im Dialog fragt<br />
Garmin Zumo nach dem PIN Code des <strong>BPA</strong> <strong>100</strong> G. Dieser ist dann mit 1234 anzugeben! Unser <strong>BPA</strong> <strong>100</strong> G schaltet sich<br />
dabei automatisch auf den angeforderten Slave Mode um und erkennt die Pairinganforderung des Navi’s automatisch.<br />
Adapter mit Funkgerät verbinden und Gesprächszustand herstellen<br />
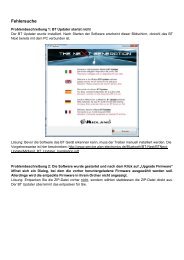
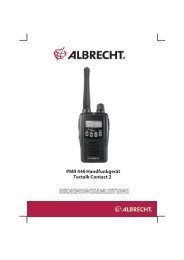
Sprechtaste<br />
Bluetooth-Adapter<br />
• Funkgerät mit Anschlusskabeln und Sprechtaste mit dem Adapter<br />
verbinden. Funkgerät einschalten und auf mittlere Lautstärke stellen.<br />
Den Adapter können Sie zwar in der Nähe des Funkgeräts platzieren,<br />
aber nicht unmittelbar neben der Antenne des Funkgeräts!<br />
• Nach dem Pairing bleibt der Adapter zunächst eingeschaltet in<br />
Bereitschaft (StandBy). Etwa alle 2 Sekunden blinkt die grüne LED kurz<br />
auf.<br />
• Schalten Sie nun das Headset ein. In der Bedienungsanleitung ist<br />
meistens die Gesprächstaste beschrieben.<br />
• Der Gesprächszustand wird durch das Headset bestimmt: Solange das<br />
Headset eingeschaltet bleibt (da die meisten Headsets nur für die<br />
Verwendung am Handy beschrieben sind, ist damit der<br />
Gesprächszustand eines Telefonats gemeint), bleibt die Verbindung<br />
zum Adapter und Funkgerät bestehen.<br />
• Durch Drücken des Gesprächsknopfs an Ihrem Bluetooth ® Headset<br />
(oder ggf. auch am <strong>BPA</strong> <strong>100</strong>G) können Sie die Verbindung zum<br />
Funkgerät einschalten. Es dauert immer einen kurzen Moment, bis die Umschaltung stattgefunden hat. Sie sehen<br />
nach kurzer Zeit am Adapter die grüne Leuchtdiode dauernd aufleuchten. Dies ist das Zeichen, dass die<br />
Verbindung hergestellt ist. Bei einigen Headsets, z.B. beim VEMAR Bluetooth ® Funkgeräte-<br />
Kabel<br />
Motorradhelm, kann die<br />
zentrale Taste auch andere Funktionen haben. In diesen Fällen können Sie auch am <strong>BPA</strong> <strong>100</strong> Adapter durch<br />
ca. ½ Sekunde Drücken des Knopfes die Verbindung starten oder auch beenden.<br />
• Stellen Sie die Hörerlautstärke durch Drücken der Lautstärketasten am Headset zunächst auf ein Minimum<br />
ein. Öffnen Sie testweise die Rauschsperre am Funkgerät (z.B. mit der Monitortaste). Wenn Sie das Rauschen<br />
hören, regulieren Sie am Headset und ggf. am Funkgerät die gewünschte Lautstärke ein.<br />
• Zum Sprechen über den Funkweg drücken Sie die PTT Taste an der Funkgeräteseite (die Sie z.B.<br />
bei Motorrädern am Lenker befestigt haben) und sprechen Sie über das Headset. Zum Empfang<br />
lassen Sie die Taste wieder los. Schalten Sie nichts am Headset um!<br />
• Erst wenn Sie den Funk nicht mehr benötigen, sollten Sie die Übertragung am Headset abschalten.<br />
Nach Gebrauch können Sie dann auch den Adapter wieder ausschalten.<br />
3
Wichtige Hinweise zum Funkbetrieb:<br />
Anders als beim Telefonieren mit dem Handy muss beim Funkbetrieb das Headset dauernd (d.h. also auch bei<br />
Empfangsbereitschaft!) eingeschaltet bleiben. Es bleibt also gewissermaßen immer im Gesprächszustand.<br />
Nur so sind Sie auch über Funk jederzeit anrufbar! Die PTT Taste ist beim Sprechfunk notwendig, da hier im<br />
Gegensatz zum Handy zwischen Senden und Empfang abgewechselt wird. Betrieb mit automatischer Sprachsteuerung<br />
können wir beim Motorradfunk nur bei Stadtverkehr oder langsamer Fahrt empfehlen, da die unvermeidbaren<br />
Fahrgeräusche bei höheren Geschwindigkeiten unweigerlich zu Fehlsteuerungen beim Sender führen und Sie damit<br />
unwissentlich den Sprechkanal blockieren können. Für andere Anwendungen bei geringeren Umgebungsgeräuschen ist<br />
VOX Steuerung möglich, jedoch benötigen Sie dazu einen Voxadapter (das ist ein Kurzschluss-Stecker, als<br />
Sonderzubehör lieferbar) anstelle der mitgelieferten PTT Taste.<br />
Vergessen Sie nicht, vor Gebrauch Adapter und Headset aufzuladen. Auch wenn der Adapter ausgeschaltet ist, fließt ein<br />
geringer Entladestrom- wie bei allen Lithium-Akkus und kann in wenigen Tagen den Akku entladen.<br />
Zurücksetzen bei Fehlfunktionen oder Ummelden des Headsets auf ein anderes Gerät<br />
Sollte aus nicht erklärlichen Gründen einmal ein Pairingvorgang versagt haben oder keine Verbindung mehr herstellbar<br />
sein, dann schalten Sie bitte Adapter und Headset bzw. Navigator aus und wieder ein. Hilft das nicht, starten Sie einen<br />
neuen Pairingvorgang. Das gleiche machen Sie bitte, wenn Sie zwischendurch das Headset z.B. an einem Handy anstelle<br />
des Funkgeräts benutzen möchten (Ausnahme: Multi Pairing Headsets benötigen kein neues Pairing beim Wechsel).<br />
Anschlussbedingungen für Funkgeräte<br />
Technische Daten<br />
• Duo Klinkensteckerbuchse für Mikrofon (2.5 mm) und Lautsprecher (3.5 mm)<br />
• Es sind nur Funkgeräte verwendbar, die keine DC gekoppelte NF Endstufe mit Brückenschaltung<br />
verwenden. Die <strong>ALAN</strong> Funkgeräte erfüllen alle diese Forderung.<br />
• Funkgeräte mit 2.5 mm Stereostecker benötigen zusätzlich den Adapter 29254, da bei Direktanschluss<br />
des Bluetooth- Adapters nur eingeschränkter VOX Betrieb ohne PTT möglich ist!<br />
Übertragungssystem Spread-Spectrum Bluetooth ® V.2.0, Class 2 mit CSR Chipset<br />
Frequenzbereich 2402 bis 2480 MHz<br />
Kanalzahl 79 mit je 1 MHz Bandbreite<br />
Sendeleistung kleiner als + 4 dBm (2.5 mW), automatisch geregelt<br />
Modulation digitale Verschlüsselung, FHSS, GMSK, 1 Mbit/s<br />
Kanalbelegung Frequency Hopping 625 µs Zeitschlitz<br />
Reichweite max. ca. 10 m<br />
Betriebszeiten Eingeschaltet (StandBy) max. ca. <strong>100</strong> Std<br />
Gesprächszeit max. ca. 7 Stunden<br />
Audio-Prozessing PCM Codec<br />
Stromversorgung Hochleistungs Lithium Polymer Akku 300 mAh<br />
Netz-Ladegerät Schaltnetzteil mit automatischer Abschaltung bei voll geladenem Akku<br />
Angewendete Europäische Normen EN 300 328-2 V 1.6.1; EN 301 489-01 V 1.6.1<br />
EN 301 489-17 V 1.2.1 ; EN 60950 + A1, A2, A3, A4, A11<br />
CE Kennzeichnung /Konformität Das Gerät erfüllt die o.a. Normen und ist mit dem CE Zeichen<br />
gekennzeichnet. Die Benutzung dieses Geräts ist nach neuesten EU<br />
Richtlinien in allen EU und EWR Staaten als „Class 1“ Gerät allgemein<br />
freigegeben. Bitte beachten Sie trotzdem evtl. Einschränkungen, die immer<br />
noch in einigen Ländern für die angeschlossenen Funkgeräte gelten! Den<br />
jeweils neuesten Stand von Konformitätserklärung und Gerätepapieren finden<br />
Sie u.a. auf unserer <strong>Service</strong>seite unter http://www.alan-albrecht.info<br />
Sicherheitshinweis Obwohl die Sendeleistung von Bluetooth Systemen weit unter (bis zu Faktor<br />
<strong>100</strong>0) den Strahlungsleistungen von Mobiltelefonen (Handys) liegt und<br />
allgemein als unbedenklich angesehen wird, sind in sensiblen Bereichen, wie<br />
medizinischen Einrichtungen oder in Flugzeugen Beeinflussungen anderer<br />
elektronischer Geräte nicht auszuschließen. Daher müssen alle Funkanlagen,<br />
auch Bluetooth Geräte in solchen Bereichen ausgeschaltet bleiben bzw. dürfen<br />
nur nach Rücksprache betrieben werden. Die gleichen Einschränkungen gelten<br />
auch für den Betrieb der mit dem Bluetooth Adapter verbundenen Funkgeräte!<br />
Hinweise zum Recycling nach dem Elektrogerätegesetz<br />
Dieses Gerät entspricht der neuen europäischen RoHS Richtlinie. Sollte das Gerät eines Tages defekt werden oder nicht mehr gebraucht<br />
werden, dann darf es nicht mehr über den Hausmüll entsorgt werden, sondern muss bei den extra für Elektronikschrott eingerichteten<br />
kommunalen Sammelstellen abgegeben werden (für Endverbraucher kostenfrei). Sie unterstützen uns damit beim Recycling wertvoller Rohstoffe<br />
und leisten gleichzeitig einen Beitrag zum Umweltschutz!<br />
© <strong>Alan</strong> Electronics GmbH (September 2007)<br />
Technische Hotline: 0900 1234 222 (gebührenpflichtig 0.69 Euro/Minute aus dem deutschen Festnetz<br />
1.49 Euro/Minute aus deutschen Mobilfunknetzen)<br />
Reparaturen/ Ersatzteile: 06103 9481 22<br />
Fax: 06103 9481 60<br />
e- Mail: service@alan-electronics.de<br />
<strong>Service</strong> -Webseite: http://www.alan-albrecht.info<br />
4
<strong>BPA</strong> <strong>100</strong> G<br />
Adapter for 2 Way Handheld Radios<br />
for Connection of Headsets<br />
<strong>Alan</strong> Electronics GmbH<br />
5
Quick start needed? Please continue on page 15<br />
General remarks<br />
Many kinds of Bluetooth Headsets are available on the market. They all are designed for use together with cellular phones<br />
with Bluetooth ® technology. The <strong>Albrecht</strong> Adapter <strong>BPA</strong> <strong>100</strong> G is a unique solution, which allows to connect any standard<br />
Bluetooth ® headset for private and professional 2-way radios, like <strong>ALAN</strong> PMR 446 or commercial hand held radios. The<br />
adapter can also be connected to car or bike navigators instead of a Bluetooth cellular phone.<br />
System Requirements<br />
The headset must support the Bluetooth ® Standard Headset Protocol. Besides standard headsets and Bluetooth ® motor<br />
bike helmets there are also some Bluetooth ® handsfree kits or navigation units on the market, which support different<br />
Bluetooth protocol variations, like the Bluetooth ® Handsfree Protocol or master-slave switching. Because this is<br />
different from the Headset protocol, such more sophisticated handsfree systems must be able to be adapted by software<br />
switching to the headset protocol, otherwise they cannot be used with the <strong>Albrecht</strong> adapter. Please read the instruction<br />
manuals or better consult the distributor of the headset/ handsfree set.<br />
Package includes<br />
• Adapter with integrated Bluetooth V. 2.0 CSR chipset and rechargeable Li-polymer battery.<br />
• 230 V charger to charge the adapter from 230 V AC.<br />
• Radio Connecting Cable to connect the PTT key and the adapter to the 2-way handheld radio.<br />
• Waterproof Push-To-Talk Key (PTT) with velcro magic tape for fast mounting to handle bar (motor bike) or other<br />
suitable places).<br />
Note: Please use only our recommended or supplied accessoriy items!<br />
Please use only the supplied accessories. Operate the Bluetooth ® adapter only in connection with the specially<br />
designed wall charger or approved original DC adapter for your vehicle, other chargers may damage the device<br />
or the Li-Ion battery inside. Never open the adapter, the charging device or try to change or even open the<br />
lithium battery by yourself! Any manipulation at the Li-Ion battery, such as short circuits etc, may cause fire or<br />
even explosion and severe injuries to persons.<br />
Charging the Adapter with 230 V AC<br />
Charging starts the moment the wall charger is connected with the adapter. 1.5 to 2.5 hours are being needed to fully<br />
charge a completely empty adapter.The LED indicator light gives you information of the state of charging. (red = charging,<br />
off = battery full). When the battery becomes empty during use, the red LED will start flashing from time to time.<br />
Switching On and Off<br />
There is a single multi-purpose function button on the adapter, which is used for ON-OFF and pairing as well.<br />
charging<br />
socket<br />
Function key<br />
LED’s<br />
6<br />
• Press button for at least 3 seconds. The green LD<br />
will flash several times to show “on” position<br />
(StandBy mode).<br />
• Press again the button for 3 seconds, now the red<br />
LED will flash several times. This is the “off” position.<br />
Connecting the Adapter with a Bluetooth ® Headset<br />
Your system of adapter and headset can establish a connection that protects you from eaves-dropping. To do so the<br />
system needs information to identify your Bluetooth ® headset as its exclusive partner. This procedure is called „pairing“.<br />
This is very important because you don`t want any other Bluetooth ® headsets in your vicinity to coincidentally be<br />
connected with your radio or vice versa.<br />
You have to start this pairing process with fully charged adapter and headset. It is necessary to switch the adapter off<br />
before pairing. If You are not sure, switch the adapter off by the already described procedure.<br />
For the headset side, please read about the pairing process in the instruction manual of the headset.<br />
• Press the function key of the adapter for at least 6 seconds. After the first 3 seconds You will observe that<br />
the adapter switches on (green LED is flashing).<br />
• Do not release the button, keep it pressed for another 3 seconds. Finally You will see an alternating<br />
flashing of the red and green LED’s.
Now Your adapter has entered the pairing mode and is searching for other Bluetooth ® devices nearby, like Your headset.<br />
You will have about 45 seconds time to start the appropriate pairing procedure at the Headset, too.<br />
Starting Pairing Mode of Headset<br />
The pairing mode of the Headset is described in the user manual of Your headset. Please follow the user instructions.<br />
Most headsets show the pairing mode by a faster flashing of LED’s. As soon as both devices have found each other, the<br />
fast flashing will stop. Both systems remain automatically in their standby modes.<br />
Note: A unique software function allows pairing with all standard pairing codes known from Bluetooth ® headsets (1234,<br />
1111 and 0000 as well). It is not necessary to enter any pairing PIN code if a headset is paired.<br />
Pairing with Navigation Systems<br />
Start pairing procedure always at Navigation system and follow the instructions on the screen.<br />
Navigation systems may use different pairing procedures, because a navigation system stands between a GSM phone (or<br />
our adapter <strong>BPA</strong> <strong>100</strong> G) and the Bluetooth headset, because the navigation system must insert the navigation instructions<br />
into the audio path between cellular phone (resp. <strong>BPA</strong> <strong>100</strong> G) and Headset. A navigation system (for example Garmin<br />
Zumo) may request to manage the pairing procedure as a Bluetooth-Master unit via it’s touchscreen. In this case you are<br />
requested to enter the <strong>BPA</strong> <strong>100</strong> G pairing code into the navigator. If the navigation system should request, simply enter<br />
1234 . In case of the Garmin ZUMO You will not need to bring Your <strong>BPA</strong> <strong>100</strong> G into the pairing mode, it will start<br />
automatically by command from the ZUMO.<br />
Connecting the 2 way Radio and starting Conversation Mode<br />
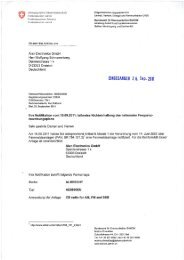
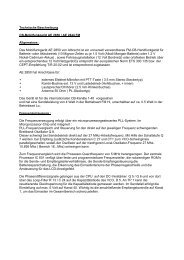
• Connect the radio cable to the 2 way radio’s 2.5/3.5 mm<br />
mic/earphone sockets. Connect adapter and PTT button as indicated.<br />
PTT-Button<br />
Switch radio on and adjust to medium volume. Please avoid to place<br />
the adapter too near to the radio’s antenna!<br />
Bluetooth-Adapter<br />
Radio-Cable<br />
• After pairing the adapter is in standby mode (green LED is flashing<br />
every 2 seconds).<br />
• Switch the headset from standby mode to “Call” or “Talk”. In the user<br />
manual this is described as starting a phone conversation. In cases,<br />
where the headset knobs may have other functions (like VEMAR<br />
Bluetooth ® helmet) You may also use the central knob on the <strong>BPA</strong><br />
<strong>100</strong> instead of the “Talk” button on the headset for start and stop.<br />
Starting and stopping the communication link will be done at the<br />
headset side (or on the <strong>BPA</strong> <strong>100</strong> side). As long as you need the radio<br />
communication (including the receive periods!) the headset must stay<br />
in the „Talk“ or „Call“ position, whatever the user manual describes.<br />
Please note that the user manual describes the telephone<br />
conversation and not a 2-way radio conversation.<br />
• Start the connection to your 2-way radio by using the Talk / Call button of the Bluetooth ® headset. (or the<br />
central button of the <strong>BPA</strong> <strong>100</strong>) It will always take a small moment, until You can see that the communication link<br />
is established. You will see the green LED on the <strong>BPA</strong> <strong>100</strong> adapter side permanently on. This demonstrates,<br />
that connection is successful.<br />
• Adjust the headset volume at first to minimum to avoid any risk of acoustical shock. Open the squelch of the<br />
radio for testing (or press the monitor button). You will hear the white noise from the 2 way radio. You may now<br />
adjust the volume at the headset according to your needs. Do not adjust the volume of the radio too loud, this<br />
may provide distortion.<br />
• To talk via radio press the PTT key on the radio’s side (which You have probably mounted at the handle bar of<br />
a motor bike or at other suitable places) and talk via your headset.<br />
• To receive again, you release the PTT key again. Please do not switch anything at the headset side!<br />
• If you do not want to listen any more to Your radio channel, you should disconnect the connection from the<br />
headset side only (Talk or Call button). The adapter at the radio side will then automatically switch back to<br />
standby mode.<br />
• Please switch both devices completely off, when you do not need them.<br />
Important notes explaining different characteristics of radio and cellular phone<br />
When using cellular phones, you only need to use the Talk/Call button of your headset when you start a phone call or<br />
answer a phone call. In receive mode of a two-way-radio, you must ensure, that at any time, incoming audio from other<br />
stations can be transmitted to the headset side. So the headset side must always remain switched into Talk/Call mode, or<br />
7
you cannot hear what happens on the radio channel!<br />
A PTT key is necessary in 2-way-radio communications, because many users share a common channel- different from<br />
cellular phone, where a duplex connection to your partner is established during the conversation. We cannot recommend<br />
to use automatic voice operation (VOX) in motor bike communications at higher speed, because the engine and<br />
surrounding noise can cause unwanted triggering of your transmitter. This will create interference and can block the use of<br />
the channel for other users without that you may notice this! Depending on the helmet manufacturer, special Bluetooth ®<br />
motor bike helmets may have noise cancelled microphones which can allow use of VOX circuits even at higher speeds.<br />
You will need to test this!<br />
VOX operation may be possible for other applications in lower noise environment. In this case you will need an optional<br />
available VOX adapter (this is a blind plug instead of the PTT button)<br />
Do not forget to charge both adapter and headset before each use. Even if the adapter is switched off, a small leakage<br />
current will discharge Li-Ion batteries slowly, but continuously. This is common to all devices with Li-Ion batteries.<br />
Reset and / or pairing with other devices<br />
It may happen that a pairing procedure was not successful. In that case switch both units off and on again. If this dos not<br />
help, start a new pairing procedure. Normally both devices save their pairing information in a non volatile memory, so you<br />
do not need to repeat the procedure before next use, just switch on- that’s it.<br />
If you should need to use the headset for another device, like cellular phone, you must normally repeat the pairing when<br />
returning to the 2-way-radio adapter. Some headsets on the market allow multi-pairing functions. in that case no repeated<br />
pairing is necessary when returning o the radio.<br />
Interface requirements for 2-Way-Radios<br />
• Double audio jacks for mic (2.5 mm) und speaker /phone (3.5 mm)<br />
• Only radios can be used which have conventional grounded audio outputs. DC coupled bridge amplifier<br />
outputs cannot work with our adapter. All <strong>ALAN</strong> and many other radios can be used.<br />
• For radios with a single 2.5 mm stereo audio socket, you will need our additional adapter plug 29254,<br />
because direct connection of the Bluetooth ® adapter into the Mic socket allows only restricted VOX<br />
operation without PTT.<br />
Technical Data<br />
Wireless transmission system Spread-Spectrum Bluetooth R Standard V 2.0, Class 2<br />
Frequency range 2402 to 2480 MHz<br />
Channels 79 with 1 Mhz bandwidth per channel<br />
Radiated transmission power (ERP) less than + 4 dBm (2.5 mW), with automatic power control<br />
Modulation digital encryption, FHSS, GMSK, 1 Mbit/s<br />
Channel occupancy system frequency hopping 625 µs time slot<br />
Maximum communication distance approx. 10 m<br />
Operating time switched on (StandBy) max. appr. <strong>100</strong> hours<br />
talk time max. appr. 6 hours<br />
Audio-processing PCM Codec<br />
Adaptor power supply high power lithium polymere battery 300 mAh<br />
Charging system 230 V switching power supply charger with automatic full battery detecting<br />
Applied European Standards EN 300 328-2 V 1.6.1; EN 301 489-01 V 1.6.1<br />
EN 301 489-17 V 1.2.1 ; EN 60950 + A1, A2, A3, A4, A11<br />
CE Marking & Conformity Declaration<br />
Safety notes<br />
This unit fullfills the above mentioned European Standards and is marked with<br />
CE. According to the latest European Regulations, this Bluetooth R device is a<br />
class 1 equipment which can be used without restrictions in all EU and<br />
associated countries which apply the R&TTE directive. Please be aware that<br />
other restrictions may still be in force for the 2 way radio connected with Your<br />
Bluetooth adapter. Our latest issue of Conformity Declaration and product<br />
documentation can be downloaded from our service homepage under<br />
http://www.alan-albrecht.info<br />
While the transmitting power of Bluetooth R Systems is far below (up to a<br />
factor of <strong>100</strong>0) the radiated power levels of hand held GSM phones and is<br />
generally not regarded as dangerous, interference effects between radio<br />
transmitters and other electronic devices cannot be excluded in sensitive<br />
environments, like medical centers, and airplanes. Operators may request that<br />
Bluetooth R devices must remain switched off in such areas. The same<br />
restrictions apply for the radios connected with the Bluetooth device.<br />
Recycling information<br />
This product is RoHS conform. According to latest European regulations, it is no more allowed to dispose electronic items into the normal<br />
household trash. Collecting and recycling facilities have been installed in all communities, where You can dispose no more used electronic items<br />
free of charge. Doing this, You can contribute to the industry’s recycling policy and environment protection!<br />
© <strong>Alan</strong> Electronics GmbH (September 2007)<br />
Repair inquiries: (+49) (0) 6103 9481 22<br />
<strong>Service</strong>-Fax: (+49) (0) 6103 9481 60<br />
e- Mail: service@alan-electronics.de<br />
<strong>Service</strong> Download http://www.alan-albrecht.info<br />
8
<strong>BPA</strong> <strong>100</strong> G<br />
Adattatore Bluetooth 2pin per ricetrasmettitori<br />
9
Il <strong>BPA</strong> <strong>100</strong> G è un adattatore Bluetooth ® che permette l’utilizzo di un auricolare wireless, compatibile con lo<br />
standard Bluetooth, con i ricetrasmettitori <strong>ALAN</strong> o MIDLAND con connettore microfono/auricolare a 2 pin.<br />
L’adattatore può anche essere collegato a navigatori o ad altri dispositivi audio con presa jack 2,5mm stereo.<br />
Requisiti<br />
Il <strong>BPA</strong><strong>100</strong> G supporta solo il protocollo standard Headset Bluetooth ® in modalità sia Master che Slave<br />
(principale e secondario).<br />
Questo protocollo è normalmente supportato da tutti i dispositivi Bluetooth ® in commercio, quali caschi o<br />
navigatori GPS.<br />
Verificate quale protocollo supporta il vostro dispositivo.<br />
Contenuto<br />
• Adattatore con chipset Bluetooth ® con batteria ricaricabile Li-Ion<br />
• Caricatore 230V<br />
• Cavo connessione radio per collegare il tasto PTT e l’adattatore al ricetrasmettitore<br />
• Tasto PTT (impermeabile) completo di velcro per montaggio sul manubrio della moto o in altri punti<br />
Nota: utilizzare solamente gli accessori originali <strong>ALAN</strong> o MIDLAND!<br />
Utilizzate solamente gli accessori in dotazione. Utilizzate l’adattatore Bluetooth ® esclusivamente con il proprio<br />
caricatore da muro o con quello originale utilizzato per il vostro veicolo. Altri caricatori potrebbero danneggiare<br />
il <strong>BPA</strong> <strong>100</strong> G o la sua batteria Li-Ion.<br />
Non aprite mai l’adattatore, il caricatore o la batteria Li-Ion e non cambiatela mai. Queste operazioni possono<br />
causare cortocircuiti, esplosioni o danni alle persone.<br />
Ricarica dell’adattatore<br />
La ricarica inizia nel momento in cui il caricatore da muro è collegato all’adattatore. Una ricarica completa<br />
dell’adattatore richiede 1,5/2,5 ore. Il led informa sullo stato della carica (rosso = in carica; led spento =<br />
ricarica completa). Quando la batteria si sta scaricando, il led rosso inizia a lampeggiare.<br />
Accensione/spegnimento<br />
Presa di<br />
ricarica<br />
Sull’adattatore c’è un unico tasto multifunzione che accende e spegne il<br />
<strong>BPA</strong><strong>100</strong>.<br />
Tasto<br />
multifunzione<br />
LED<br />
• Premete il tasto per almeno 3 secondi. Il LED verde<br />
lampeggerà più volte ad indicare la posizione ‘on’<br />
(acceso).<br />
• Premetelo di nuovo per 3 secondi. Ora lampeggerà il<br />
LED rosso più volte che indica lo spegnimento del<br />
dispositivo.<br />
Collegamento dell’adattatore al dispositivo Bluetooth ®<br />
Questo sistema stabilisce una connessione tra l’adattatore e l’auricolare che permette agli interlocutori di<br />
parlare via radio senza essere sentiti da altri. Per fare ciò, l’apparato necessita di informazioni per identificare<br />
e riconoscere l’auricolare Bluetooth ® . Questa procedura è definita “abbinamento” ed è importante per evitare<br />
che il vostro ricetrasmettitore venga accidentalmente collegato ad altri auricolari Bluetooth ® nelle vicinanze e<br />
viceversa.<br />
Per eseguire tale collegamento, l’auricolare Bluetooth ® e l’adattatore devono essere carichi, pronti da<br />
utilizzare ed in modalità abbinamento. L’adattatore deve essere spento. Per quanto riguarda l’auricolare,<br />
leggete l’apposito paragrafo nel suo manuale d’uso.<br />
10
• Tenete premuto il tasto Funzioni per almeno 6 secondi. Dopo 3 secondi, l’adattatore si accende (il led<br />
verde lampeggia)<br />
• Non rilasciate il tasto e tenetelo premuto per altri 3 secondi. Vedrete il led lampeggiare<br />
alternativamente di rosso e verde.<br />
Ora l’auricolare è in modalità Abbinamento e ricerca i dispositivi Bluetooth ® nelle vicinanze, tipo il vostro.<br />
Avete a disposizione 45 secondi per la procedura di abbinamento.<br />
Modalità di abbinamento dell’auricolare<br />
La procedura di Abbinamento dell’auricolare è descritta nel suo manuale d’uso.<br />
La maggior parte degli auricolari mostra l’attivazione dell’Abbinamento tramite il led che lampeggia<br />
velocemente: non appena entrambi i dispositivi si sono ‘abbinati’ il lampeggio smette ed entrambi rimangono<br />
in stand-by.<br />
Modalità di abbinamento ai sistemi di navigazione GPS<br />
Il <strong>BPA</strong> <strong>100</strong> G supporta la modalità di abbinamento sia in Master sia Slave, quindi può essere abbinato anche a<br />
quei dispositivi che richiedono specificatamente questa caratteristica.<br />
Per esempio il <strong>BPA</strong> <strong>100</strong> G può ora essere abbinato al navigatore GPS Garmin Zumo al posto del telefono<br />
cellulare. In questo modo è possibile collegare un ricetrasmettitore per la comunicazione tra moto e moto,<br />
mantenendo tutte le informazioni di navigazione del GPS.<br />
Il codice da digitare per un corretto abbinamento è 1234.<br />
Collegamento al ricetrasmettitore e inizio della conversazione<br />
Collegate il cavo apposito alla presa 2,5/3,5mm situata sulla radio; collegate l’adattatore e il tasto PTT come<br />
indicato nell’immagine. Accendete la radio e regolate il volume a piacimento. Nota: l’adattatore non deve<br />
essere posizionato troppo vicino all’antenna della radio!<br />
Tasto PTT<br />
Bluetooth<br />
Radio<br />
• Dopo la procedura di Abbinamento, l’adattatore è in stand-by<br />
(il led verde lampeggia ogni 2 secondi)<br />
• Con l’auricolare in stand-by, selezionate la modalità “Call” o<br />
“Talk”. Attenzione: le indicazioni che trovate nel manuale<br />
dell’auricolare fanno riferimento a conversazioni telefoniche e<br />
non a trasmissioni via radio.<br />
• L’inizio e il termine della conversazione avviene<br />
nell’auricolare, che deve rimanere in modalità “Call” o “Talk”<br />
sia in caso di ricezione sia in trasmissione.<br />
• Per iniziare la conversazione tramite il vostro<br />
ricetrasmettitore utilizzate il tasto Talk/Call dell’auricolare<br />
Bluetooth ® . La connessione tra l’apparato e l’auricolare<br />
richiede un attimo e vi accorgerete che è avvenuta quando il<br />
LED verde dell’adattatore è acceso.<br />
• Regolare il volume dell’auricolare ad un livello ottimale. Aprite lo squelch della radio per prova (o<br />
premete il tasto Monitor, se la radio è provvista).<br />
• Per trasmettere via radio premete il tasto PTT sulla radio (o quello montato sul manubrio della moto o<br />
altrove) e parlate tramite l’auricolare.<br />
• Per ricevere, rilasciate il PTT.<br />
• Se non volete parlare/ricevere, dovete interrompere la connessione dall’auricolare (tasto Call o Talk).<br />
L’adattatore collegato alla radio passa automaticamente alla modalità stand-by.<br />
• Spegnete completamente i dispositivi quando non li utilizzate.<br />
11
Informazioni importanti sulle caratteristiche diverse tra ricetrasmettitori e telefoni cellulari<br />
Quando si utilizza un telefono cellulare, per iniziare o terminare la conversazione si utilizza solamente il tasto<br />
Talk/Call dell’auricolare Bluetooth ® .<br />
In una conversazione via radio dovete assicurarvi che le chiamate in entrata siano trasmesse all’auricolare,<br />
che allora deve sempre essere impostata nella modalità Talk/Call.<br />
Il tasto PTT è necessario nelle comunicazioni via radio perché vari utenti sono sintonizzati sullo stesso canale;<br />
nelle telefonate invece la connessione duplex avviene durante la conversazione.<br />
Sconsigliamo l’attivazione della funzione VOX durante gli spostamenti in moto perché i rumori esterni e del<br />
motore causano forti disturbi e interferenze che bloccano continuamente il canale in uso!<br />
La funzione VOX è molto utile ma è preferibile attivarla in condizioni meno rumorose. In questo caso è<br />
necessario un adattatore VOX opzionale.<br />
Ricordatevi di caricare sia l’adattatore sia l’auricolare prima dell’utilizzo. Anche se spenti, la carica diminuisce<br />
lentamente.<br />
Reset e Abbinamento con altri dispositivi<br />
A volte la procedura di abbinamento non riesce correttamente: in questi casi è sufficiente spegnere i<br />
dispositivi e riaccenderli. Se ciò non è efficace, ripetere la procedura.<br />
Se dovete abbinare l’auricolare con altri dispositivi, tipo telefono cellulare, è necessaria un’altra procedura di<br />
Abbinamento quando si ritorna ad utilizzare il ricetrasmettitore. Esistono anche auricolari che hanno la<br />
possibilità di Abbinamento con più dispositivi.<br />
Requisiti per il collegamento con un ricetrasmettitore<br />
• Jack doppio per microfono (2,5mm) e altoparlante/telefono (3,5mm)<br />
• Col <strong>BPA</strong><strong>100</strong> si possono utilizzare solamente ricetrasmettitori con banda audio convenzionale.<br />
Tutti i nostri ricetrasmettitori sono compatibili con <strong>BPA</strong><strong>100</strong>.<br />
• Per gli apparati con presa audio singola 2,5mm è necessario un altro adattatore (29254).<br />
12
Dati tecnici e Dichiarazione di conformità<br />
Caratteristiche Tecniche<br />
Sistema di trasmissione wireless Spread-Spectrum Bluetooth ® Standard v2.0, Classe 2<br />
Frequenza da 2402 a 2480 MHz<br />
Canali 79 con 1 Mhz lunghezza di banda per canale<br />
Radiated transmission power (ERP) inferiore a + 4 dBm (2.5 mW), con controllo automatico della<br />
potenza<br />
Modulazione digital encryption, FHSS, GMSK, 1 Mbit/s<br />
Sistema occupazione canale frequency hopping 625 µs time slot<br />
Distanza max di comunicazione circa 10 m<br />
Tempo operativo acceso (StandBy) max. circa <strong>100</strong> ore<br />
Tempo di conversazione max. 7 ore circa<br />
Audio-processing PCM Codec<br />
Alimentazione adattatore Batteria al litio polimero ad elevata potenza 300 mAh<br />
Sistema di carica caricatore switching con alimentazione 230 V con controllo<br />
automatico di ricarica completa<br />
Conforme ai seguenti Standard Europei EN 300 328 V 1.6.1; EN 301 489-01 V 1.6.1<br />
EN 301 489-17 V 1.2.1 ; EN 60950 + A1, A2, A3, A4, A11<br />
Marcatura CE & Dichiarazione di conformità Il <strong>BPA</strong><strong>100</strong> è conforme agli standard europei ed è marcato CE.<br />
Secondo le più recenti Direttive Europee, questo dispositivo<br />
Bluetooth ® è un apparato Classe 1 che può essere utilizzato<br />
senza nessuna restrizione in tutta Europa e in quei paesi che<br />
applicano la direttiva R&TTE. Bisogna invece controllare le<br />
eventuali restrizioni di un ricetrasmettitore collegato con<br />
<strong>BPA</strong><strong>100</strong>. La Dichiarazione di conformità e la documentazione<br />
relativa a questo prodotto si trova sul sito web<br />
http://www.alan-albrecht.info<br />
Sicurezza L’utilizzo di dispositivi Bluetooth ® non è considerato<br />
pericoloso in quanto il livello di energia a radio frequenza<br />
(RF) emesso non è elevato. Non si esclude tuttavia la<br />
possibilità di interferenze tra trasmettitori radio o altri<br />
dispositivi elettronici, soprattutto in ambienti particolari come<br />
centri medici o aeroplani. In questi casi si consiglia di<br />
spegnere il dispositivo Bluetooth ®. . Le stesse restrizioni si<br />
applicano agli apparati collegati a dispositivi Bluetooth ® .<br />
INFORMAZIONE AGLI UTENTI<br />
Ai sensi dell’art. 13 del decreto legislativo 25 luglio 2005, n.151 “Attuazione delle Direttive 2002/95/CE,<br />
2002/96/CE e 2003/108/CE, relative alla riduzione dell’uso di sostanze pericolose nelle apparecchiature<br />
elettriche ed elettroniche, nonché allo smaltimento dei rifiuti”.<br />
ÿ Il simbolo del cassonetto barrato riportato sull’apparecchiature indica che il prodotto alla fine della propria<br />
vita utile deve essere raccolto separatamente dagli altri rifiuti. L’utente dovrà, pertanto, conferire<br />
l’apparecchiatura giunta a fine vita agli idonei centri di raccolta differenziata dei rifiuti elettronici ed<br />
elettrotecnici, oppure riconsegnarla al rivenditore al momento dell’acquisto di una nuova apparecchiatura di<br />
tipo equivalente, in ragione di uno a uno. L’adeguata raccolta differenziata per l’avvio successivo<br />
dell’apparecchiatura dimessa al riciclaggio, al trattamento e allo smaltimento ambientalmente compatibile<br />
contribuisce ad evitare possibili effetti negativi sull’ambiente e sulla salute e favorisce il riciclo dei materiali di cui è<br />
composta l’apparecchiatura. Lo smaltimento abusivo del prodotto da parte dell’utente comporta l’applicazione delle<br />
sanzioni amministrative di cui al dlgs. n.22/1997 (articolo 50 e seguenti).<br />
13
Schnell-Anleitung zum Pairen mit Motorradhelmen und - Funkanlagen:<br />
Ihr <strong>BPA</strong> <strong>100</strong> G ist mit unserer neuen Software ausgerüstet, die sich mit allen üblichen Bluetooth ® Headsets<br />
und auch Navigationsgeräten verbinden ( =pairen) läßt (diese können einen der PIN Codes 1234, 1111 oder<br />
0000 haben). Die Codeanpassung erfolgt automatisch. Bei Bluetooth-Navigationsgeräten, die nach dem <strong>BPA</strong><br />
<strong>100</strong> PIN Code fragen, ist 1234 im Navigationsgerät einzugeben.<br />
Bereits mit Bluetooth ® ausgestattete Motorradhelme bzw. Motorradhelmsets von ALBRECHT, BMW,<br />
MIDLAND und VEMAR sind mit dem <strong>BPA</strong> <strong>100</strong> G getestet . Ein einzelner Helm kann wie ein Handy mit dem<br />
<strong>BPA</strong> <strong>100</strong> gepairt werden, jedoch ist beim <strong>BPA</strong> <strong>100</strong> G keine Eingabe von PIN-Codes wie bei Telefonen<br />
notwendig!<br />
• Vor dem Pairen schalten Sie bitte alle beteiligten Geräte zunächst aus. (Beim <strong>BPA</strong> <strong>100</strong> G drücken<br />
Sie ca. 4 Sekunden lang die Taste. War z.B. das <strong>BPA</strong> <strong>100</strong> vorher eingeschaltet, blinkt die rote LED<br />
jetzt 4 x und es ist jetzt ausgeschaltet. War es vorher ausgeschaltet, blinkt die grüne LED 4 x, dann<br />
müssen Sie noch einmal 4 Sek. lang drücken, bis es 4 x rot geblinkt hat). Bei den meisten anderen<br />
Headset ist der Vorgang ähnlich.<br />
• Zum Pairen schalten Sie bitte den Helm bzw. das Helmset oder den Navigator in den Pairing Mode<br />
nach der jeweiligen Anleitung. Bei den meisten Helmsets wird der Pairing Mode durch schnelles<br />
Blinken angezeigt.<br />
• Beim Vemar Helm erreichen Sie diese Einstellung bei vorher ausgeschaltetem Helm durch<br />
mindestens 10 Sekunden langes Drücken der zentralen Taste, bis die LED schnell blinkt. Sie<br />
haben jetzt 20 Sekunden Zeit zum Pairen mit dem <strong>BPA</strong> <strong>100</strong><br />
• Beim BMW Helm schalten Sie entsprechend Seite 13 (Pairen mit Handy’s) der BMW Anleitung mit 2<br />
Sec Drücken auf Select/on/Off den Helm ein, dann drücken Siekurz auf die + Taste und Sie haben 3<br />
0 Sekunden Zeit zum Pairen mit dem <strong>BPA</strong> <strong>100</strong>.<br />
• Beim <strong>Albrecht</strong> Rider / Midland BT Intercom das (Fahrer-)Headset zunächst ausschalten. Dann die<br />
zentrale Taste gedrückt halten, bis rote und blaue LEDs abwechselnd in schneller Folge blinken. Sie haben<br />
nun max. 2 Minuten Zeit, das <strong>BPA</strong> <strong>100</strong> mit dem Helmset zu pairen.<br />
• Nun schalten Sie auch das <strong>BPA</strong> <strong>100</strong> in den Pairing mode: <strong>BPA</strong> <strong>100</strong> wieder einschalten (wieder Taste<br />
länger Taste drücken), aber nicht schon loslassen, wenn die LDE 4 x grün blinkt! Taste weitere ca. 4<br />
bis 6 Sekunden gedrückt halten, bis die LED’s beide abwechselnd grün und rot blinken.<br />
• Das Pairen geschieht jetzt automatisch und nach wenigen Sekunden sollte das Blinken beim <strong>BPA</strong> <strong>100</strong><br />
stoppen<br />
• Beim Pairen mit einem Bluetooth Navigationsgerät (z.B. Garmin Zumo) kann das Navigationsgerät<br />
die Master-Funktion einnehmen und vom <strong>BPA</strong> <strong>100</strong> einen Slave PIN Code abfragen. Hier bitte den<br />
Pairing Mode zuerst nur am Navigationsgerät starten und den Anweisungen folgen. Erst nach<br />
Aufforderung entweder einfach nur 1234 als Code eingeben oder je nach Navigator, dann erst den<br />
normalen Pairing Mode beim <strong>BPA</strong> <strong>100</strong> G starten.<br />
Starten Sie jetzt die Verbindung mit dem Talk / oder Startknopf am Headset. Bei einigen Headsets (z.B.<br />
VEMAR Helm und BMW Helm) haben die Tasten am Helm andere Funktionen als üblicherweise im Bluetooth<br />
Protokoll vorgesehen. In diesem Fall starten und beenden Sie bitte die Audioverbindung am <strong>BPA</strong> <strong>100</strong><br />
(zentrale Taste ca. ½ Sekunde lang drücken) anstelle am Headset / Helm. Beim Motorradfunk bleibt muß<br />
der Bluetooth Helm die ganze Zeit über im Gesprächszustand bleiben, denn anders als beim Handy kann<br />
jederzeit eine Durchsage kommen, während beim Handy erst nach dem Klingelzeichen die Verbindung<br />
gestartet werden muß. Im Gesprächszustand ist die grüne LED des <strong>BPA</strong> <strong>100</strong> dauernd eingeschaltet.<br />
Beachten Sie bitte, dass nur ein einzelner Helm mit <strong>BPA</strong> <strong>100</strong> am PMR Funk gleichzeitig teilnehmen kann.<br />
Beim MIDLAND BT Intercom ist das der Fahrerhelm. Der Beifahrerhelm kann dann im Gespräch über den<br />
Konferenzmode hinzugeschaltet werden.<br />
Hinweise zur speziellen Navi- Version des <strong>BPA</strong> <strong>100</strong><br />
Für die Verwendung als Audio- Adapter an Navigationsgeräten ohne Bluetooth benötigen Sie die in der Anleitung<br />
beschriebenen Anschlusskabel nicht. Diese Teile werden in dieser Spezialversion auch nicht mitgeliefert. Der Adapter<br />
wird direkt in den Lautsprecherausgang des Navigationsgeräts gesteckt. Bitte stellen Sie vor Anschluss die Lautstärke des<br />
Navigationsgeräts höchstens auf einen mittleren Wert und nehmen Sie die weitere Lautstärkeanpassung am Headset vor!<br />
Bei zu großer Lautstärke am Navigerät kann die Wiedergabe verzerren.<br />
14
Quick-Start: How to connect the <strong>BPA</strong> <strong>100</strong>G with Bluetooth ® Motor Bike Helmets<br />
Your <strong>BPA</strong> <strong>100</strong> G comes already with our unique software, which allows pairing with all known Bluetooth ®<br />
Headset models under the pairing PIN codes 1234, 1111 or 0000 as well. The PIN code is automatically<br />
adopted. Bluetooth ® Helmets or Helmet headsets like ALBRECHT, BMW, MIDLAND and VEMAR have been<br />
successfully tested with the <strong>BPA</strong> <strong>100</strong> G and can be paired like a cellular phone with <strong>BPA</strong> <strong>100</strong> G. The only<br />
difference is, that <strong>BPA</strong> <strong>100</strong>G does not request any PIN code for headset pairing. For pairing with Bluetooth<br />
Navigators (instead of a cellular phone) navigators may request a pairing code for <strong>BPA</strong> <strong>100</strong> G.<br />
• Switch off all items before starting the pairing procedure. You can check the <strong>BPA</strong> <strong>100</strong> by pressing the<br />
knob about 4 seconds. If it was on before, it will flash 4 x red to show that it is now switched off. If it<br />
was off before, it will now flash 4 x green to show that it is on now. In that case please press again 4<br />
seconds to make sure that it is off now (4x red flashing).<br />
• Switch the helmet’s Bluetooth ® set into the pairing mode according to the helmet set’s user manual.<br />
Most Bluetooth ® sets show the pairing mode by fast flashing or dual colour flashing of the control<br />
LED(s).<br />
• You reach the pairing mode of the VEMAR helmet by pressing the central knob for at least 10<br />
seconds, until the LED starts flashing rapidly. Make sure that the helmet was off before starting the<br />
procedure. You have now about 20 seconds time to start the pairing of <strong>BPA</strong> <strong>100</strong>.<br />
• For the BMW helmet, follow the instructions on page 41 (pairing with a cellular phone) of the user<br />
manual. Press the Select/on/off Knob for at least 2 seconds,<br />
Then press the + button . Now You have 30 seconds time to pair with the <strong>BPA</strong> <strong>100</strong>.<br />
• For the <strong>Albrecht</strong> Rider or MIDLAND BT Intercom, please make sure that it is off before. Press the<br />
central knob of the (driver’s-) headset until both, the red and the blue LED’s start flashing. Release the<br />
knob, You will have about 2 minutes time to start the procedure with the <strong>BPA</strong> <strong>100</strong> now.<br />
• Now start pairing with <strong>BPA</strong> <strong>100</strong> G. Keep the button pressed about 8-10 seconds. After the first 4<br />
seconds it will flash 4 x green. Do not release the button now, keep it further pressed until both LED’s<br />
start flashing rapidly. Release button.<br />
• After pairing is successful, the flashing will finish.<br />
• If You pair a <strong>BPA</strong><strong>100</strong>G instead of a cellular phone to a Bluetooth navigator, the Pairing process<br />
must be started at the Navigator and only on request at the <strong>BPA</strong> <strong>100</strong> G. Navigators like Garmin<br />
Zumo, may act as Master device and find <strong>BPA</strong><strong>100</strong>G automatically and request only a slave pairing<br />
code from <strong>BPA</strong> <strong>100</strong> G. In such cases please enter 1234 as pairing code into the navigator<br />
touchscreen. The pairing process at <strong>BPA</strong><strong>100</strong> G will in this case start automatically!<br />
You can now start the communication link by pressing the Talk (or Start/ Stop) button. Some Headsets<br />
(like the VEMAR and BMW Bluetooth ® motor bike helmet) may use key functions different from the standard<br />
Bluetooth ® headset protocol. In such cases it is possible to start and to stop the communication link at the<br />
<strong>BPA</strong> <strong>100</strong> instead at the headset. Just press the central knob at the <strong>BPA</strong> <strong>100</strong> for about ½ second to start or to<br />
stop the audio connection. The connection is established when the green LED is on continuously. Please<br />
note that motor bike PMR446 radio communication is different from cellular phone communication. While the<br />
cellular communication is started from standby by incoming calls, it is necessary that for PMR communications<br />
the Bluetooth ® connections remains active during the whole time period. Otherwise it is not possible to hear<br />
the short conversation periods over the PMR radio. Please note that only one single helmet can<br />
communicate with PMR 446 via <strong>BPA</strong> <strong>100</strong> at the same time. If You use the MIDLAND BT Intercom, You will<br />
pair the <strong>BPA</strong> <strong>100</strong> with the driver’s headset. The passenger’s headset can be added to the communication later<br />
by using the conference mode.<br />
Annex to the user manual of the Navi Version of <strong>BPA</strong> <strong>100</strong><br />
For use as audio adapter for non-Bluetooth navigation sets the additional cable set mentioned in the user manual will not<br />
be used (these parts are also not supplied with this special version). Please insert the <strong>BPA</strong> <strong>100</strong> plug directly into the audio<br />
output socket of the navigation set. Adjust the volume of the navigation set to not more than a medium value, otherwise<br />
the audio can be distorted! Fine adjustment of audio volume should then be made at the headset!<br />
15
Appendice al manuale d’uso <strong>BPA</strong> <strong>100</strong> G<br />
Accorgimenti per l’utilizzo del <strong>BPA</strong><strong>100</strong> con altri dispositivi Bluetooth<br />
Il <strong>BPA</strong> <strong>100</strong> G è provvisto di software in grado di abbinare i vari modelli di dispositivi Bluetooth tramite i codici<br />
PIN di abbinamento 1234, 1111 o 0000.<br />
Il codice PIN è inserito automaticamente. I caschi Bluetooth o i dispositivi per caschi come ALBRECHT, BMW,<br />
MIDLAND, e VEMAR sono stati testati con successo con il <strong>BPA</strong> <strong>100</strong> G. L’abbinamento a questi dispositivi<br />
avviene esattamente come un normale abbinamento al cellulare Bluetooth, con l’unica differenza che non è<br />
necessario inserire alcun codice pin.<br />
Può essere necessario inserire il codice PIN, se richiesto, come per esempio su alcuni navigatori GPS. In<br />
questo caso il codice corretto da inserire è 1234.<br />
• Spegnete i dispositivi prima di iniziare la procedura di abbinamento. Per essere sicuri che il <strong>BPA</strong> <strong>100</strong> è<br />
spento, premete il tasto per circa 4 secondi. Se era acceso, lampeggerà rosso 4 volte per confermare che ora<br />
si è spento. Al contrario, lampeggerà verde 4 volte per indicare che ora è acceso. in questo caso, premete<br />
nuovamente il tasto per spegnerlo.<br />
Attivazione della procedura di abbinamento con il <strong>BPA</strong> <strong>100</strong> G:<br />
Tenete premuto il tasto per 8-10 secondi. Dopo i primi 4, il led lampeggia di verde. Continuate a premerlo<br />
finchè entrambi i led lampeggiano rapidamente; ora rilasciate il tasto .<br />
• Una volta terminato l’abbinamento, il dispositivo smette di lampeggiare.<br />
Per iniziare la comunicazione, premete il tasto Talk (o Start/ Stop). La connessione è attivata quando il led<br />
è verde fisso.<br />
Attivazione della procedura di abbinamento su altri dispositivi Bluetooth<br />
• Per abbinare il dispositivo Bluetooth ad un casco, seguite le istruzioni descritte nel manuale d’uso del casco<br />
stesso. Nella maggior parte dei casi, l’abbinamento è confermato dal lampeggiare dei led.<br />
• Per la modalità di abbinamento sui caschi VEMAR, controllate prima che il casco sia spento, poi premete il<br />
tasto centrale per almeno 10 secondi finchè il led lampeggia velocemente.. Ora avete 20 secondi per iniziare<br />
la procedura di abbinamento con il <strong>BPA</strong> <strong>100</strong> G.<br />
• Per i caschi BMW , seguite le istruzioni relative all’abbinamento con un telefono cellulare nel manuale d’uso.<br />
Premete il tasto Select/on/off per almeno 2 secondi. Successivamente premete il tasto +; ora avete 30<br />
secondi per eseguire l’abbinamento al <strong>BPA</strong> <strong>100</strong> G.<br />
• Per l’<strong>Albrecht</strong> Rider o Midland BT Intercom (dispositivo pilota), assicuratevi innanzitutto che sia spento.<br />
Tenete premete il tasto centrale finche i led rosso e blu iniziano a lampeggiare.<br />
Rilasciate il tasto. Avete circa 2 minuti per iniziare l’abbinamento con il <strong>BPA</strong> <strong>100</strong> G.<br />
Se si utilizza il <strong>BPA</strong><strong>100</strong> G per la comunicazione via radio PMR446, va tenuto presente che la modalità di<br />
comunicazione è diversa da quella del cellulare, infatti il cellulare attiva la comunicazione quando arriva la<br />
chiamata, con le radio PMR 446 la comunicazione Bluetooth è sempre attiva.<br />
Attenzione la comunicazione Bluetooth permette la comunicazione ad un solo dispositivo Bluetooth alla volta.<br />
Appendice al manuale d’uso versione Navi<br />
Per utilizzo solo come adattatore audio (per navigatori GPS) non sono necessari i cavi in dotazione.<br />
La versione Navi, nata specificatamente per questo uso, non comprende nessun cavo aggiuntivo.<br />
© September 2007 <strong>Alan</strong> Electronics GmbH<br />
CTE international s.r.l.<br />
www.cte.it<br />
www.midlandradio.eu<br />
16