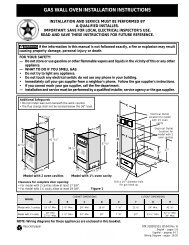
Split Type Room Air Conditioner Installation Manual - Friedrich Air ...
Split Type Room Air Conditioner Installation Manual - Friedrich Air ...
Split Type Room Air Conditioner Installation Manual - Friedrich Air ...

Create successful ePaper yourself
Turn your PDF publications into a flip-book with our unique Google optimized e-Paper software.
TEST RUNNING<br />
●<br />
●<br />
●<br />
●<br />
Perform test operation and check items 1 and 2 below.<br />
For the test operation method, refer to the operating manual.<br />
The outdoor unit, may not operate, depending on the room temperature. In this case, press the test run button on the remote control unit<br />
while the air conditioner is running, (Point the transmitter section of the remote control unit toward the air conditioner and press the test run<br />
button with the tip of a ball-point pen, etc.)<br />
To end test operation, press the remote control unit START/STOP button.<br />
(When the air conditioner is run by pressing the test run button, the OPERATION indicator lamp and TIMER indicator lamp will simultaneously<br />
flash slowly.)<br />
1. INDOOR UNIT<br />
(1) Is operation of each button on the remote control unit normal?<br />
(2) Does each lamp light normally?<br />
(3) Do the air flow-direction louver operate normally?<br />
(4) Is the drain normal?<br />
2. OUTDOOR UNIT<br />
(1) Is there any abnormal noise and vibration during operation?<br />
(2) Will noise, wind, or drain water from the unit disturb the neighbors?<br />
(3) Is there any gas leakage?<br />
POWER<br />
WARNING<br />
(1) The rated voltage of this product is 208/230 V AC<br />
60 Hz.<br />
(2) Before turning on the power, check if the voltage<br />
is within the 208 V-10% to 230V+10% range.<br />
(3) Always use a special branch circuit and install a<br />
special receptacle to supply power to the room<br />
air conditioner.<br />
(4) Use a circuit breaker and receptacle matched to<br />
the capacity of the air conditioner.<br />
(5) Do not extend the power cord.<br />
(6) Perform wiring work in accordance with standards<br />
so that the air conditioner can be operated<br />
safely and positively.<br />
(7) Install a leakage circuit breaker in accordance with<br />
the related laws and regulations and electric company<br />
standards.<br />
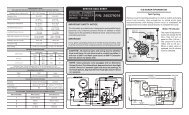
Transmitter section<br />
Test run button<br />
Fig. 18<br />
CAUTION<br />
(1) The power source capacity must be the sum of<br />
the air conditioner current and the current of other<br />
electrical appliances. When the current contracted<br />
capacity is insufficient, change the contracted capacity.<br />
(2) When the voltage is low and the air conditioner is<br />
difficult to start, contact the power company the<br />
voltage raised.<br />
CUSTOMER GUIDANCE<br />
Explain the following to the customer in accordance with the operating<br />
manual:<br />
(1) Starting and stopping method, operation switching, temperature<br />
adjustment, timer, air flow switching, and other remote control unit<br />
operations.<br />
(2) <strong>Air</strong> filter removal and cleaning, and how to use the air louvers.<br />
(3) Give the operating and installation manuals to the customer.<br />
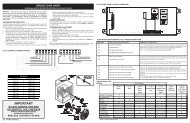
The method of adjusting inter-unit wire harness<br />
To connect inter-unit wire harness to the terminal correctly, please<br />
refer to Fig. 19 to adjust the length of the part of Inter-unit Wire<br />
harness ahead from conduit holder.<br />
Fig. 19<br />
5-1/2" (140mm) 15/16" (25mm)<br />
14AWG<br />
EARTH WIRE<br />
15/16" (25mm)<br />
4-3/16" (105mm)<br />
(1:1)<br />
CONDUIT PLATE<br />
PUMP DOWN OPERATION (FORCED COOLING OPERATION)<br />
To avoid discharging refrigerant into the atmosphere at the time of relocation or disposal, recover refrigerant by doing the cooling operation or<br />
forced cooling operation according to the following procedure. (When the cooling operation cannot start in winter, and so on, start the forced<br />
cooling operation.)<br />
(1) Do the air purging of the charge hose by connecting the charging hose of gauge manifold to the charging port of 3 way valve and opening the<br />
low-pressure valve slightly.<br />
(2) Close the valve stem of 2 way valve completely.<br />
(3) Start the cooling operation or following forced cooling operation.<br />
When using the remote control unit<br />
Press the TEST RUN button after starting the cooling operation by the remote control unit.<br />
The operation indicator lamp and timer indicator lamp will begin to flash simultaneously during test run.<br />
When using the MANUAL AUTO button of the indoor unit (The remote control unit is lost, and so on.)<br />
Keep on pressing the MANUAL AUTO button of the indoor unit for more than 10 seconds.<br />
(The forced cooling operation cannot start if the MANUAL AUTO button is not kept on pressing for more than 10 seconds.)<br />
(4) Close the valve stem of 3 way valve when the reading on the compound pressure gage becomes 0.05~0 MPa (0.5~0 kg/cm 2 ).<br />
(5) Stop the operation.<br />
• Press the START/STOP button of the remote control unit to stop the operation.<br />
• Press the MANUAL AUTO button when stopping the operation from indoor unit side.<br />
(It is not necessary to press on keeping for more than 10 seconds.)<br />
CONDUIT CONNECTOR<br />
CAUTION<br />
During the pump-down operation, make sure that the compressor is turned off before you remove the refrigerant piping.<br />
Do not remove the connection pipe while the compressor is in operation with 2 way or 3 way valve open. This may cause abnormal<br />
pressure in the refrigeration cycle that leads to breakage and even injury.