SHIPLAP DURAPLATE LOWER HORIZONTAL PANEL SPLICE ...
SHIPLAP DURAPLATE LOWER HORIZONTAL PANEL SPLICE ...
SHIPLAP DURAPLATE LOWER HORIZONTAL PANEL SPLICE ...

Create successful ePaper yourself
Turn your PDF publications into a flip-book with our unique Google optimized e-Paper software.
®<br />
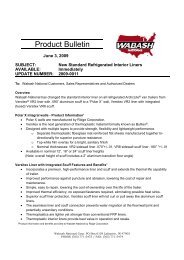
Shiplap DuraPlate Lower Horizontal Panel Splice<br />
Installing the Inside Extrusion<br />
1. Clean up any sharp edges along the cut skin surface using a file or<br />
disc sander.<br />
2. Starting at the front corner, place the first section of extrusion (E7963120)<br />
up tight against the upper cut edge of the inside wall. Secure it in place<br />
using a #10 sheet metal screw 1- 1 /2" in length placed every 12" to 15"<br />
along the top flange. The bottom flange can be tacked after the lower wall<br />
panel has been set into place. Since the extrusion is 26 ft. long, it helps to<br />
use Vise-Grips ® Locking C-Clamps to hold it into place while tacking.<br />
3. Continue to attach the extrusion to the top portion of side wall until both<br />
26-ft. sections are tacked in place. Caulk the end butt joints of each piece<br />
before mating the ends permanently.<br />
4. Have a person on the outside break off the metal screw points flush with<br />
the side panel surface before attempting to add the exterior extrusion. It<br />
may be necessary to grind off the screw tips to ensure they do not<br />
protrude more than 1 /16".<br />
#10 SHEET<br />
METAL SCREWS<br />
TO HOLD<br />
EXTRUSION<br />
Figure 9, Installing Extrusion<br />
11