

instruction book - Janome
instruction book - Janome
instruction book - Janome

Create successful ePaper yourself
Turn your PDF publications into a flip-book with our unique Google optimized e-Paper software.
4<br />
10<br />
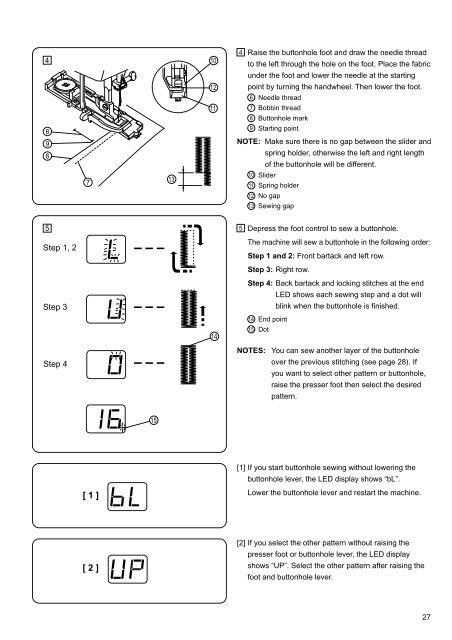
4<br />
Raise the buttonhole foot and draw the needle thread<br />
to the left through the hole on the foot. Place the fabric<br />
under the foot and lower the needle at the starting<br />
12<br />
point by turning the handwheel. Then lower the foot.<br />
6<br />
Needle thread<br />
11<br />
7<br />
Bobbin thread<br />
8<br />
Buttonhole mark<br />
8<br />
9<br />
6<br />
9 Starting point<br />
NOTE: Make sure there is no gap between the slider and<br />
spring holder, otherwise the left and right length<br />
of the buttonhole will be different.<br />
7<br />
13<br />
10<br />
11<br />
Slider<br />
Spring holder<br />
12<br />
No gap<br />
13<br />
Sewing gap<br />
5<br />
Step 1, 2<br />
5<br />
Depress the foot control to sew a buttonhole.<br />
The machine will sew a buttonhole in the following order:<br />
Step 1 and 2: Front bartack and left row.<br />
Step 3: Right row.<br />
Step 3<br />
14<br />
Step 4: Back bartack and locking stitches at the end<br />
LED shows each sewing step and a dot will<br />
blink when the buttonhole is finished.<br />
14 End point<br />
15 Dot<br />
Step 4<br />
NOTES:<br />
You can sew another layer of the buttonhole<br />
over the previous stitching (see page 28). If<br />
you want to select other pattern or buttonhole,<br />
raise the presser foot then select the desired<br />
pattern.<br />
15<br />
[1] If you start buttonhole sewing without lowering the<br />
buttonhole lever, the LED display shows “bL”.<br />
[ 1 ]<br />
Lower the buttonhole lever and restart the machine.<br />
[ 2 ]<br />
[2] If you select the other pattern without raising the<br />
presser foot or buttonhole lever, the LED display<br />
shows “UP”. Select the other pattern after raising the<br />
foot and buttonhole lever.<br />
27


