

instruction book - Janome
instruction book - Janome
instruction book - Janome

You also want an ePaper? Increase the reach of your titles
YUMPU automatically turns print PDFs into web optimized ePapers that Google loves.
1<br />
16<br />
Sensor<br />
2<br />
0<br />
3<br />
Auto<br />
9<br />
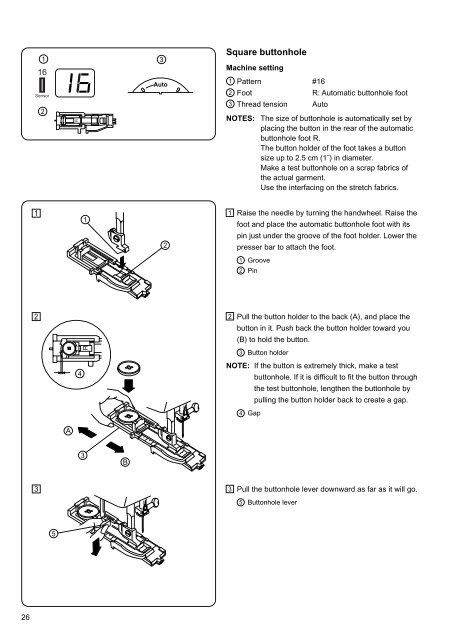
Square buttonhole<br />
Machine setting<br />
1 Pattern #16<br />
2 Foot<br />
R: Automatic buttonhole foot<br />
3 Thread tension Auto<br />
NOTES:<br />
The size of buttonhole is automatically set by<br />
placing the button in the rear of the automatic<br />
buttonhole foot R.<br />
The button holder of the foot takes a button<br />
size up to 2.5 cm (1˝) in diameter.<br />
Make a test buttonhole on a scrap fabrics of<br />
the actual garment.<br />
Use the interfacing on the stretch fabrics.<br />
1<br />
1<br />
1<br />
Raise the needle by turning the handwheel. Raise the<br />
foot and place the automatic buttonhole foot with its<br />
2<br />
pin just under the groove of the foot holder. Lower the<br />
presser bar to attach the foot.<br />
1<br />
2<br />
Groove<br />
Pin<br />
2<br />
2<br />
Pull the button holder to the back (A), and place the<br />
button in it. Push back the button holder toward you<br />
(B) to hold the button.<br />
4<br />
3 Button holder<br />
NOTE: If the button is extremely thick, make a test<br />
buttonhole. If it is difficult to fit the button through<br />
the test buttonhole, lengthen the buttonhole by<br />
pulling the button holder back to create a gap.<br />
4<br />
Gap<br />
A<br />
3<br />
B<br />
3<br />
3<br />
Pull the buttonhole lever downward as far as it will go.<br />
5<br />
Buttonhole lever<br />
5<br />
26


