

Mar/Apr 2010 - O Scale Trains Magazine Online
Mar/Apr 2010 - O Scale Trains Magazine Online
Mar/Apr 2010 - O Scale Trains Magazine Online

You also want an ePaper? Increase the reach of your titles
YUMPU automatically turns print PDFs into web optimized ePapers that Google loves.
O<br />
MAGAZINE<br />
<strong>Scale</strong><br />
<strong>Trains</strong><br />
Celebrating<br />
the art of<br />
1:48 modeling<br />
<strong>Mar</strong>/<strong>Apr</strong> <strong>2010</strong> u Issue #49<br />
US $6 .95 • Can $8 .95<br />
Display until <strong>Apr</strong>il 30, <strong>2010</strong>
WHEEL FLANGE REFILL<br />
CAUTION:<br />
HANDBRAKE WHEEL MUST BE IN<br />
THE FULLY COUNTER CLOCKWISE<br />
POSITION TO PREVENT BRAKE<br />
SHOE DAMAGE<br />
pre-order announCement from atLas!<br />
atLas trainman ® o dash 8-40CW LoComotive<br />
www.atlastrainman.com/Locomotives/tmodash8CW.htm<br />
noW avaiLabLe in 2-raiL goLd!<br />
CSX*<br />
BNSF<br />
Santa FE<br />
Union Pacific “wings”<br />
*CSX Licensed Product<br />
Products bearing Union Pacific (UP) are made under trademark license from Union Pacific Railroad Company.<br />
Available in 3-Rail (Conventional or TMCC), 2-Rail [DC/DCC or Gold (DCC/QSI ® Sound)], <strong>Scale</strong> dimensions, Ditch lights, Directional LED lighting,<br />
Santa Fe and BNSF locos feature a “gull-wing” cab, Separately-applied wire grab irons and handrail stanchions, Prototypical painting and lettering<br />
Additional TMCC Features: Lionel ® TrainMaster ® Command Equipped featuring RailSounds digital sound system<br />
QSI ® Features: (2-Rail Gold Series Locomotives Only): Authentic diesel engine sounds, Coupler impact sounds when operated with DCC,<br />
Squealing brakes, Helper mode that mutes the whistle and bell for double heading, and more!<br />
visit our Website for a CompLete shipping sCheduLe!<br />
To find an Atlas dealer, go to http://locator.atlasrr.com Get a copy of Atlas’ Catalogs at your LHS or visit www.atlaso.com<br />
Atlas O, LLC • 378 Florence Avenue • Hillside, NJ 07205 • www.atlaso.com
Celebrating<br />
the art of<br />
1:48 modeling<br />
Issue #49<br />
<strong>Mar</strong>ch/<strong>Apr</strong>il <strong>2010</strong><br />
Ted Byrne<br />
Carey Hinch<br />
Vol. 9 - No. 2<br />
Editor-in-Chief/Publisher<br />
Joe Giannovario<br />
jag@oscalemag.com<br />
Art Director<br />
Jaini Giannovario<br />
jaini@oscalemag.com<br />
Managing Editor<br />
Mike Cougill<br />
editor@oscalemag.com<br />
Advertising Manager<br />
Jeb Kriigel<br />
jeb@oscalemag.com<br />
Customer<br />
Service<br />
Spike Beagle<br />
Complaints<br />
L’il Bear<br />
Contributors<br />
Gene Clements<br />
<strong>Mar</strong>tin Brechbiel<br />
Subscription Rates: 6 issues<br />
US - Periodical Class Delivery<br />
US - First Class Delivery (1 year only)<br />
Canada/Mexico<br />
Overseas<br />
US$35<br />
US$45<br />
US$55<br />
US$80<br />
Visa, MC, AMEX & Discover accepted. Call 610-363-7117 during<br />
Eastern time business hours. Dealers contact Kalmbach<br />
Publishing, 800-558-1544 ext 818 or email tss@kalmbach.com<br />
Advertisers call for info.<br />
www.oscalemag.com • ©<strong>2010</strong> All Rights Reserved<br />
Printed in the U.S.A.<br />
O <strong>Scale</strong> <strong>Trains</strong> <strong>Magazine</strong>, ISSN 1536-9528, USPS 24457, is<br />
published bi-monthly in January, <strong>Mar</strong>ch, May, July, September<br />
and November by OST <strong>Magazine</strong>, PO Box 289, Exton<br />
PA 19341-0289. Subscription rates: US Periodical Mail,<br />
$35 per year, US First Class Mail, $45 per year; Canada or<br />
Mexico, $55 per year; Overseas, $80 per year. Postage paid<br />
at West Chester, Pa., and additional mailing offices. POST-<br />
MASTER send address changes to O <strong>Scale</strong> <strong>Trains</strong> <strong>Magazine</strong>,<br />
PO Box 289, Exton PA 19341-0289.<br />
Contributors: O <strong>Scale</strong> <strong>Trains</strong> welcomes your feature articles,<br />
photos, and drawings. Such material should be sent to the above<br />
address for possible publication. If we accept, you will be notified<br />
immediately. For more information concerning article preparation<br />
guidelines, please send an SASE to the above address and<br />
request our “Guide For Authors” or visit our website at: www.<br />
oscalemag.com.<br />
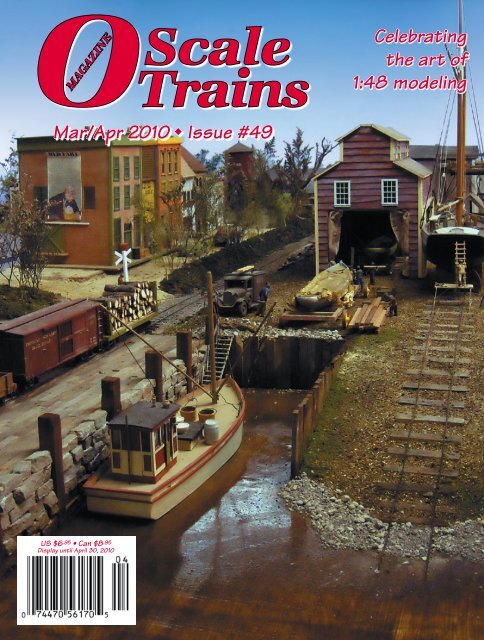
Cover: It might be a lazy summer’s day in Still Pond, but Cerrone’s<br />
Boat Yard is humming with activity. This scene and the<br />
centerspread are from Stephen Fisher’s Deep Run Railroad which<br />
is profiled starting on page 4 of this issue.<br />
O <strong>Scale</strong><br />
<strong>Trains</strong><br />
Features<br />
4 The Deep Run Railroad — Stephen Fisher<br />
Visit a serious On30 railroad with a touch of whimsy.<br />
21 Building A Center Cab Diesel - Part 2 — Capt. Tom Mix<br />
In this installment Tom begins construction of the diesel’s unique trucks.<br />
27 Make A Quick Tank — Joe Giannovario<br />
A visit to a big-box home improvement stores results in a nice looking<br />
storage tank that can literally be built in minutes.<br />
30 Starting Over - Part 2 — Joe Giannovario<br />
Evolution of the track plan.<br />
33 Scratch And Bash A P&LE Double Sheathed Box Car — Tom Houle<br />
He’s at it again! Tom starts with one thing and ends up with another.<br />
58 Volume 7 Index<br />
60 <strong>2010</strong> O <strong>Scale</strong> National — Neil Chichizola<br />
Neil Chichizola’s SP layout is open for the convention.<br />
Departments<br />
11 The Art of Prototype Modeling — Mike Cougill<br />
12 Neville’s Workshop —<br />
17 The Modern Image — Gene Clements<br />
19 Traction Action — <strong>Mar</strong>tin Brechbiel<br />
45 Modelers’ Showcase<br />
46 Product News & Reviews<br />
54 Reader Feedback<br />
64 Buy-Sell-Trade Ads<br />
64 Events Listing<br />
65 Advertiser Index<br />
66 Observations — Joe Giannovario<br />
MAGAZINE<br />
Centerspread: Deep Run Shay #5 has spotted the stone train<br />
and will pick it up later for the long journey “up county” to the barge<br />
at Betterton on Stephen Fisher’s Deep Run Railroad.<br />
<strong>Mar</strong>/<strong>Apr</strong> ’10 - O <strong>Scale</strong> <strong>Trains</strong> • 3
The Deep Run Railroad<br />
Stephen Fisher, a.k.a. the <strong>Mar</strong>yland Rail Baron<br />
It’s a quiet but hot day at the Chestertown yards and maintenance shops.<br />
The locos are simmering, and the crews are too.<br />
The year isn’t important; let’s say it’s between 1900 and<br />
1929. Life is slow with fishing, crabbing, and oysters plentiful.<br />
The folks from Baltimore come over for the summer to<br />
enjoy the cool breezes, swimming, great food, and even better,<br />
the Southern hospitality.<br />
The Deep Run Railroad is a sleepy kind of neighbor, it runs<br />
when needed. There is some passenger service but mostly it<br />
hauls freight. The equipment is starting to show it’s age, and<br />
most of the locos have been bought from some other railroad.<br />
There is talk about the new logging extension that is being<br />
built. It goes to the edge of the Piedmont Plateau up near Rising<br />
Sun. There are also rumors that the Pennsylvania Railroad<br />
might be buying the DRRR and making it standard gauge but<br />
those rumors had been heard before. The railroad has its roots<br />
in Chestertown with a small railyard and engine facilities.<br />
There’s also a machine shop, freight house, and a foundry,<br />
and the old man.<br />
Eyeballing a stranger poking around the yard, he saunters<br />
over to see who it is.<br />
“Well, howdy, you ain’t from around here are you?” asks<br />
the old man.<br />
“Naw. Just visitin’.” The young stranger replied.<br />
“Like trains do ya? Me too. So let me tell you about this<br />
here railroad. Better yet, jump on this here jitter bug and let’s<br />
take a ride.”<br />
The two men climbed aboard and took off towards Kennedyville.<br />
All along the way the old man kept up a running<br />
commentary about the sights.<br />
“Now we just need to keep going a bit ‘cause that up there<br />
is Kennedyville with its sawmill and fledgling community.<br />
For the moment, it’s but a wide spot in the road. The Kennedy<br />
4 • O <strong>Scale</strong> <strong>Trains</strong> - <strong>Mar</strong>/<strong>Apr</strong> ’10<br />
brothers founded it back in the late 1800s. Just a mill and<br />
store, but some day maybe they will become somethin’.” As<br />
they moved along the line and approaching Still Pond, the<br />
old man continued his narrative:<br />
“Not only is Still Pond a shipping point by water and rail<br />
but they also have a thriving boatyard there, run by this shipwright<br />
named Garry Cerrone. The boatyard keeps a lot of the<br />
men in town working and the town also has the distinction of<br />
having invited women to vote a full four years ahead of the<br />
women of the rest of the country. As I understand it, now that<br />
the women are happy so are the men. Go figure that!”<br />
Moving on towards the thriving community of <strong>Mar</strong>ydale<br />
with its own station and freight house; the conversation got<br />
especially colorful.<br />
Yes sir‘ree, Bob, <strong>Mar</strong>ydale is home of the famous ‘Thongman’<br />
whom it seems is a legend in these parts. Sometimes<br />
one can spot him in his yellow and green thong outfit looking<br />
at the pretty girls sunbathing or skinny-dipping in the creek.<br />
He’s interesting, but not dangerous and he gives the locals a<br />
laugh now and then.”<br />
On the outskirts of town there’s a cattle yard where they<br />
ship out their beef cattle.<br />
“Talk about stink,” the old man said. Then he continued:<br />
“The guy that owns it says, ‘It’s the smell of money.’”<br />
The next stop is Deep Run, home of the Kenly Creek<br />
Lumber Company, which is owned and operated by a Mr.<br />
Van Horn III . The old man noted that the owner wasn’t seen<br />
around much since his corporate office is over on the Western<br />
shore. Pointing to a large trestle in the distance he said:<br />
“Ya see that trestle way over there? That’s the logging extension<br />
that takes off from the main line and heads up through
Drawn for O <strong>Scale</strong> <strong>Trains</strong> <strong>Magazine</strong> by Carey Hinch<br />
<strong>Mar</strong>/<strong>Apr</strong> ’10 - O <strong>Scale</strong> <strong>Trains</strong> • 5
Delaware and back into <strong>Mar</strong>yland. Yea, the other end is up<br />
near Rising Sun, <strong>Mar</strong>yland. This new railroad, the Meadow<br />
Mountain Lumber Railroad, hauls logs back to the Kenly<br />
Creek Lumber Company. They also have a stone quarry<br />
operation going on and have to bring the stone train down to<br />
Betterton once a week to meet the barge and have their stone<br />
hauled over to the other shore.”<br />
Approaching another bridge the old tour guide mentions<br />
how expensive the construction was. “Now here is where<br />
things get interesting and expensive. The railroad has to<br />
cross over the Corsica River, which is fairly large and a lot of<br />
money was spent to build a large rock and earth fill to support<br />
the roadbed. We were told the bottom was too soft to<br />
support pilings for a trestle.”<br />
Rolling on to High Point, he observed how pretty the<br />
scenery is, and as the name implies, it’s the highest point in<br />
the county at 35 feet above sea level. High Point is mostly<br />
farming but there is a garage/repair shop run by some young<br />
guy named Jeff Gelner, “Who I hear is one smart guy.” said<br />
the old man. Continuing, he says: “I was told that he can fix<br />
anything, including those new gas buggies that have started<br />
to make an appearance in the county. Heck, you give me a<br />
good horse anytime. They can out work one of them new<br />
fangled things any day, and they don’t get stuck in the mud.<br />
Those folks also have themselves a factory where they are<br />
making machinery for different companies and it is mostly<br />
shipped out on the railroad.”<br />
The next stop is Rock Hall. “They’re a bunch of roughnecks,<br />
but they’re good folks’ who would help you at a drop<br />
of a hat. They ship out a lot of vegetables and fruit and they<br />
get in all kinds of stuff. They also do a lot of fishing and crabbing<br />
and that goes over to the other side as well. Those folks<br />
have all kind of canneries and seafood houses along with<br />
shipping companies. Like I said, they’re a bunch, yes sir. Why<br />
did you know they shoot fireworks off on the 4 th of July? Great<br />
show they put on, yes sir!”<br />
“Well, I guess that’s about it. All we have to do is cross<br />
over the Chester River on the big swing bridge and head back<br />
into Chestertown. If y’all head over that a way the railroad<br />
goes to Betterton, where there is a large amusement park and<br />
hotels for the chicken neckers, oops I’m sorry. I meant to say<br />
Baltimore folks. From Betterton the railroad goes through<br />
the community of Worton, where the Wisenheimer Brewery<br />
is located. This brewery produces some of the finest beers<br />
and ales on the shore, and if you get there when old man<br />
Wolschon is in a good mood, he will give you a taste or two.<br />
There is rail barge and freighter service located at Betterton<br />
and much of the libation products are shipped from there.<br />
They also get lumber in for all of the beer crates and barrels.<br />
You could say those are some of the mellowest folks you will<br />
ever meet. Thanks for stopping in; things are sleepy here and<br />
it’s nice to talk.” With that the tour was over and the young<br />
stranger went on his way thinking to himself how he’d like to<br />
get back this way someday soon.<br />
About My Railroad<br />
This version of the Deep Run RR is the culmination of<br />
many versions and is probably the last one that I will build<br />
due to my age and also because I am so happy with this version.<br />
So what has gone into this railroad to make it worthwhile<br />
for me? I have always believed in a few design rules:<br />
1: It must be simple in its track plan. It is a single mainline<br />
6 • O <strong>Scale</strong> <strong>Trains</strong> - <strong>Mar</strong>/<strong>Apr</strong> ’10<br />
There is plenty of work going on at the Kennedyville sawmill and, from the<br />
looks of the flatcar the local has just been through.<br />
Some of the town ladies are walking to the General Store and it looks like<br />
they have garnered a parade.<br />
Cerrone’s Boat Yard seems to be busy. It looks like the crew is trying to<br />
finish repairs on one of the many Bay boats.<br />
with passing sidings and stub end sidings where businesses are.<br />
2: The control system is DCC. I wanted it to be easy to run,<br />
yet fun, with some challenge to it.<br />
Because I like to model the Eastern Shore of <strong>Mar</strong>yland,<br />
which is somewhat flat, the railroad follows the same type of<br />
grades. Therefore, the railroad is of 1x4 frame construction<br />
with a plywood subbase with Homasote on top. It follows
the perimeter of the basement with a series of islands. Track<br />
work and turnouts are mostly handlaid. The exceptions are<br />
the areas of Rock Hall and High Point. These two areas are<br />
Peco On30 flextrack and turnouts glued to 1” foam board<br />
over plywood. The rest of the railroad is handlaid with code<br />
100 rail and either BK turnout kits or Fast Tracks scratchbuilt<br />
turnouts, all on Mt. Albert On30 ties. As for the throw mechanisms,<br />
I have either used a double pole slide switch mounted<br />
above the layout, with a safety thumbtack mounted on top to<br />
emulate a high level switch stand or a modified BIC pen that<br />
pushes against a microswitch mounted under the layout. You<br />
can read an article written by my friend and fellow operator<br />
Dave Renard in Railroad Model Craftsman, May 2007 issue,<br />
page 67, on how he did this.<br />
One of the greatest improvements to model railroading<br />
was the invention of DCC. I use the Lenz/Atlas DCC system<br />
that is interfaced with five power blocks to segment the railroad<br />
electrically. This way when a short occurs the entire<br />
railroad doesn’t go down. I like the Lenz; it is easy for a<br />
new person to operate, and it has all of the features that are<br />
required for the DRRR. In conjunction with the DCC we have<br />
a computer generated switch list that was developed in part<br />
by Geren Mortenson and another person who is not part of<br />
our group. This was a major step in operating the railroad and<br />
one that I objected to at first but was glad when I accepted it.<br />
It has certainly added the fun back into operations.<br />
I have about 30 years of experience modeling in On2½ as<br />
we called it in the past, but now simply refer to it as On30.<br />
During those early years we had the first On30 modules and<br />
carried them all over the place preaching the virtues of On30:<br />
“Large scale modeling for the cost of HO.” I still have the<br />
scratchbuilt structures that graced those modules and many<br />
of the scratchbuilt freight cars as well as a few kitbashed<br />
locos. Today with the advent of Bachmann’s On30 line I don’t<br />
kitbash locos very much but my best friend, Garry Cerrone,<br />
has continued to do them for both of us and they do regular<br />
duty on the Deep Run. I hope to have an article later in the<br />
year on how I am lowering Bachmann frames to scratchbuild<br />
freight cars.<br />
Even though the majority of the work on the railroad is<br />
mine, there have been others that have invested their time,<br />
efforts, and talents to make the Deep Run what it is today. I<br />
have told you about Garry and Dave. Geren does all of the<br />
DCC work. Two friends in Michigan, Dan Wolschon and<br />
Dave Kunz, did all of the masters and cast up the Wisenheimer<br />
brewery as a gift for me. Whenever you start naming<br />
folks you know someone is going be left out but I will try to<br />
get it right and hope for the best.<br />
Our operating group is large and diversified not only by<br />
age and where we live, but also that many of us are retired.<br />
There is one common thread - our love of trains and our<br />
friendships. The way we operate our railroad starts with the<br />
switching list that, once generated, is handed to the Yardmaster<br />
at Chestertown, Steve Sherrill, and the Yardmaster at the<br />
saw mill in Deep Run, Ed Stone. These two locations have<br />
to have trains built and they need to notify the dispatcher,<br />
GW Henderson, who calls the crews all by way of hand held<br />
radios. A road or local crew must call into the dispatcher<br />
to receive clearance to the next location. Some day we will<br />
have operating ball signals that will be controlled from the<br />
dispatcher’s panel. Because the lift out bridge is installed<br />
The Village of Still Pond looks to be as busy as it ever gets.<br />
The local is pulling into <strong>Mar</strong>ydale station and it looks like a couple of<br />
strangers are getting ready to board.<br />
A loaded reefer is sitting at the <strong>Mar</strong>ydale Cattle Company siding waiting<br />
for pick up.<br />
during operations, we have two or three roving brakemen to<br />
assist in coupling, uncoupling, and throwing turnout points.<br />
These tasks usually fall to Bob Vanzant, Jim Barcus, and Les<br />
Davis. The rest of the crew: Dan Gillenwater, Doug O’Dell,<br />
Dwight Varnes, <strong>Mar</strong>k Friend, Jim Evans, Rick Baier, Roy Dietz,<br />
and Shawn Heath is responsible for local and road trains.<br />
Along with these folks, the following people are also<br />
part of the team, but with some added responsibilities. Alan<br />
<strong>Mar</strong>/<strong>Apr</strong> ’10 - O <strong>Scale</strong> <strong>Trains</strong> • 7
Looks like the “old man” is taking the jitterbug out for a spin.<br />
It looks like Ted is working on that old truck again, while the fellows “help”<br />
by supervising him.<br />
From the looks of all the cut lumber on the loading dock at the mill, Mr. Van<br />
Horn III must have increased production.<br />
Meadow Mountain Lumber Company Forney # 56 is hauling the freight into<br />
Rock Hall after crossing the Chester River swing bridge.<br />
The train must be close for everyone is getting ready to get on board to<br />
head to the big town of Rock Hall.<br />
The main industry in High Point is Heath Machinery. It’s what keeps the<br />
town afloat, besides farming.<br />
8 • O <strong>Scale</strong> <strong>Trains</strong> - <strong>Mar</strong>/<strong>Apr</strong> ’10
The local passenger train has stopped at Betterton to pick up a few folks. It<br />
has always been a mystery why the station was known as Deep Run.<br />
Anderson helps in building repairs, Dallas Mallerich is the<br />
owner of Boulder Valley Models (John Willock and I are<br />
building his On30 railroad). <strong>Mar</strong>tin Van Horn III is our historian,<br />
and John Weigel is the guy that supplies us with all of<br />
those green Bachmann boxes. Many of you will be familiar<br />
with some of these names due to their involvement in the<br />
hobby in some way or the other.<br />
Finally, scenery and detail are a large part of what makes<br />
the Deep Run Railroad plausible. The scenery starts with real<br />
dirt and then layers of reused ground foam, floral oasis, and<br />
plant material, followed by hand-made trees, commercial<br />
trees, and our favorite stand-by: weeds and sedums.<br />
The railroad has gone through several trials and tribula-<br />
Looks like the local is pushing a cut of cars onto the barge.<br />
tions recently. First, the train room had to be dismantled<br />
due to flooding from abnormal rains just before the NMRA<br />
convention and open house tour back in 2006. Then, it was<br />
moved to the Eastern Shore of <strong>Mar</strong>yland in the later part of<br />
2006 and 95% of the railroad was rebuilt to fit the format of<br />
the new room. I also took the opportunity to back date the<br />
railroad, which proved to be a modeling challenge.<br />
So there you have it. A story about this little backwater railroad<br />
and the people that inhabit the land and how it has all<br />
come together over 30 years. So until next time hoping that<br />
your rails are parallel and your trains are on time, keep on<br />
railroading.<br />
u<br />
Prototype photo courtesy of Hundman Publishing. Similar to PSC #17565-1<br />
O <strong>Scale</strong> Brass Models - Limited Production<br />
The C&O H-7 and H-7a 2-8-8-2s are in the works with our premier builder Boo-Rim<br />
Precision Co. of Korea. Models are scheduled for November <strong>2010</strong> delivery. Every<br />
possible detail and innovative idea will be incorporated in these models. They will<br />
feature dual motor system and all ball bearing drive to assure smooth running.<br />
Models will be available both factory painted and unpainted. Production is limited to<br />
50 units total between 5 versions. Don’t miss out! See a PSC dealer and order your<br />
handcrafted brass model today!<br />
Visit our website www.precisionscaleco.com for complete listing.<br />
Precision <strong>Scale</strong> Co. Inc.<br />
2383 Meridian Road, Victor, MT 59875<br />
Email: psc@ixi.net<br />
<strong>Mar</strong>/<strong>Apr</strong> ’10 - O <strong>Scale</strong> <strong>Trains</strong> • 9
When does my<br />
subscription expire?<br />
Your subscription expiration<br />
is now printed on your<br />
mailing label!<br />
East Gary<br />
Car Co.<br />
Dept OST<br />
3828 St. Joseph Ct<br />
Lake Station IN 46405<br />
They’re Back!<br />
Former Indianapolis Car Company sides<br />
are now available from new tooling.<br />
Parts #100 & #200<br />
$3.00 each<br />
Orders under $50 please add $4.50 for postage and<br />
handling. SASE for updated list.<br />
NEW from SILFLOR ® ,<br />
Buffalo Grass Tufts... These new tufts have young<br />
seasonal tone grasses growing at the base with last years<br />
longer dead and dry growth sprouting from the center.<br />
Tufts are mounted on an invisible base using the secret<br />
SILFLOR ® process that causes the tuft to stand up and<br />
feather outward. Tufts may be placed individually or<br />
peeled off in random clusters.<br />
175 Sheffield Dr, #100, Delmont PA 15626 • 724-468-3106<br />
Order On-Line: www.scenicexpress.com<br />
BF&M<br />
Baldwin Forge & Machine<br />
Box 5, Baldwin MD 21013<br />
How can we help you? Custom machine<br />
work, 3-R to 2-R conversions for steam,<br />
diesel or electric. Driver castings<br />
machined. General repairs to O <strong>Scale</strong> locomotives.<br />
Call Joe, evenings 7 to 9 PM.<br />
410-592-5275 or rrjjf@aol.com<br />
Stevenson Preservation Lines<br />
O Gauge Kits and Parts from past<br />
Master Modelers<br />
Catalog 2005 Price: $3.00<br />
Baldwin Model Locomotive Works<br />
Lobaugh<br />
Adams & Sons<br />
Lenoir<br />
Kansas City Kit<br />
Hines Lines<br />
Alexander<br />
Pearce Tool Co.<br />
Bob Stevenson, 2326 230th St. Ames, IA 50014<br />
http://RailsUnlimited.ribbonrail.com/<br />
email: railsunl@sbcglobal.net<br />
“We take time to give you full service”<br />
Unique O <strong>Scale</strong> models • Urethane cars; 40’ & 50’ boxcars,<br />
reefers, stock cars, milk cars, pickle car & circus cars.<br />
Full Service O <strong>Scale</strong> Dealer • Kits, DCC & Sound Supplies<br />
Books: new & out of print • Darkroom Services • Railroad Photos<br />
Model Railroad Sales & Service<br />
NEW! Wagontop Boxcar & Gons for PRR and SAL<br />
Ted Schnepf<br />
126 Will Scarlet<br />
Elgin Il 60120-9524 847-697-5353 or 847-697-5366<br />
10 • O <strong>Scale</strong> <strong>Trains</strong> - <strong>Mar</strong>/<strong>Apr</strong> ’10
The Art of Prototype<br />
Modeling<br />
Michael Cougill<br />
Two Photographs<br />
Consider the two photos presented here. One has a happy<br />
outcome; the other less so, but still positive. The photo of<br />
the Wabash boxcars (Photo 1) is the happier outcome of<br />
the two. As I’ve mentioned before I was able to document<br />
these four cars thoroughly in both pictures and written notes<br />
with dimensions. The photo of the abandoned mill building<br />
(Photo 2) is another situation though. It is only one of four<br />
photos that I have of the building. To my<br />
knowledge, no others exist showing the<br />
place in better days. There’s still a positive<br />
outcome here in that I was able to learn<br />
something about the building’s history and<br />
overall dimensions through research at the<br />
Franklin County Historical Society and the<br />
Brookville, Indiana, Public Library.<br />
This brings me to the heart of the column<br />
for this issue: If there is a car or building<br />
you been meaning to document for a<br />
future modeling project; Go and take the<br />
photos today. Put the magazine down for a<br />
while and, if feasible, go do it now!<br />
Last year I went down to Brookville to<br />
photograph the remains of the old Robert’s<br />
Mill more thoroughly, only to discover that<br />
it was finally gone forever. The only thing<br />
left is the foundation. Needless to say, I was a bit disappointed<br />
and irritated with myself that I hadn’t done it much sooner.<br />
Hopefully, a lesson has been learned. The positive side to the<br />
situation is that I do have some basic numbers and ideas to<br />
go by for an upcoming model of the place, but I really enjoy<br />
a project much more when I have plenty of info to draw from.<br />
Having the basic building specs is good, but my knowledge<br />
of the framing member sizes and their construction is<br />
going to be pure speculation based one some poor quality<br />
photographs. For this project, I wanted to do something faithful<br />
and as close to the prototype as possible, and my lack of<br />
knowledge leaves many questions unanswered. For example:<br />
What was the missing addition like? How many doors or<br />
windows, if any, did it have? I infer from my photos that it<br />
was a single story with a gable roof but that’s all I can reasonably<br />
assume. Was the building’s framing balloon framed or<br />
platform? Research indicated there was a large holding tank<br />
for liquid molasses that was used in the feed blending operations.<br />
Where was that located, inside or outside?<br />
For some modelers a handful of poor photos are better<br />
than no photos at all, and for them, it would be plenty to<br />
work from. For now, there are some choices to make. I could<br />
shelve the whole project in the hope of finding more information,<br />
or I could go ahead with what I have and just live<br />
with it. I guess having an imperfect model is better than a big<br />
empty space on the layout, so that’s the plan. I hope you’ve<br />
put off reading this until after you’ve downloaded and organized<br />
all those photos I told you to shoot earlier.<br />
Best regards,<br />
Mike<br />
u<br />
2<br />
1<br />
<strong>Mar</strong>/<strong>Apr</strong> ’10 - O <strong>Scale</strong> <strong>Trains</strong> • 11
New Staging Area for<br />
the BRHRR<br />
Text and photos by Neville Rossiter<br />
Drawings by Bruce Temperley<br />
One of the problems with a large industrial layout like<br />
the Bayridge Harbor Rail Road (BRHRR) is that it requires<br />
a large number of freight cars to operate it realistically.<br />
This in turn means that you need some kind of staging<br />
area that can transfer cars on and off the layout efficiently.<br />
Over the years my good friend Bruce Temperley and<br />
myself have tried many ways of setting up a staging area<br />
in a limited space. One example was illustrated in my<br />
Workshop column in OST #21, July/August 2005. After<br />
years of operation we decided that nothing was working<br />
to our satisfaction. So after looking at endless articles<br />
and different ideas, we decided to use a transverse table<br />
system complete with storage area for up to 86 cars not<br />
including the table. The area we had to work in was 115<br />
inches long by 33 inches wide.<br />
This is not a step-by-step how-to-build-it, but maybe<br />
it will just inspire fellow operators that a successful staging<br />
and storage area can be built in a small space with<br />
limited skills. There are many variations to this. We are<br />
just illustrating the system that works for us. We have had<br />
it installed now for two years and found it to be perfect<br />
for the BRHRR. It actually does work. I have included two<br />
CAD drawings by Bruce Temperley along with a series of<br />
photographs that I snapped while building. u<br />
Figure 1: An isometric view of the complete staging unit.<br />
Here is the basic frame for the traverser storage unit.<br />
Figure 2: Plan and elevation of the complete staging unit.<br />
12 • O <strong>Scale</strong> <strong>Trains</strong> - <strong>Mar</strong>/<strong>Apr</strong> ’10
The extension of the layout bridges over to the traverser storage unit. The<br />
top level is the car traverser.<br />
This is a view of the finished scene. The barge permits access to the<br />
traverser table.<br />
The storage drawers are fitted with guides to hold rolling stock. Track<br />
could also be used here. The ends of the drawers have foam rubber<br />
bumper strips to protect couplers.<br />
The unit is complete and ready for operations. As you can see it holds<br />
quite a bit of rolling stock.<br />
11 Years in business specializing in DCC & Sound!<br />
Battery & Track Powered<br />
O • On30 • On3 • Fn3 • G • #1<br />
6997 CR 5, Ridgway CO 81432 • 970-626-3733<br />
www.rgsrrhobbies.com<br />
<strong>Mar</strong>/<strong>Apr</strong> ’10 - O <strong>Scale</strong> <strong>Trains</strong> • 13
P&D Hobby<br />
Shop<br />
31280 Groesbeck, Fraser, MI 48026<br />
Voice: 586-296-6116 • Fax: 586-296-5642<br />
Open Mon-Fri 10-8 • Sat 10-6, Sun 12-5<br />
www.pdhobbyshop.com<br />
For All Your O <strong>Scale</strong> Needs<br />
Power/Repower Kits for Red<br />
Caboose GPs from $160.<br />
P&D F Units<br />
Powered A Units - $289<br />
Call Now!<br />
Grade Crossing Signal Set<br />
Grade Crossing Signal Set<br />
CS-2 Grade Crossing Signal Set includes:<br />
CS-2A Signal CS-2 Grade with Crossing flat cap Signal and basic Set includes: mast support<br />
CS-2B CS-2A Signal Signal with with bell flat cap cap and junction basic mast box support support<br />
AWS-1 Advanced Warning Signs (X2)<br />
CS-2B Signal with bell cap and junction box support<br />
WPS-1 Whistle Post Signs (X2)<br />
AWS-1 Advanced Warning Signs (X2)<br />
GCF-1 Flasher/Detector<br />
WPS-1 Whistle Post Signs (X2)<br />
$69.95 plus $6.95 S/H in the continental U.S.<br />
GCF-1 Flasher/Detector<br />
Custom $69.95 Signals plus $6.95 S/H in www.customsignals.com<br />
the continental U.S.<br />
27 Gellatly Drive<br />
(877) 523-3236<br />
Wappingers Custom Falls, Signals NY 12590www.customsignals.com<br />
phone/fax<br />
27 Gellatly Drive<br />
(877) 523-3236<br />
Wappingers Falls, NY 12590<br />
phone/fax<br />
O<strong>Trains</strong><br />
<strong>Scale</strong><br />
Subscription Rates: 6 issues<br />
US - Periodical Class Delivery<br />
US$35<br />
US - First Class Delivery (1 year only) US$45<br />
Canada/Mexico<br />
US$55<br />
Overseas<br />
US$80<br />
PO Box 289,<br />
Exton PA 19341-0289.<br />
voice: 610-363-7117 • fax 610-363-7357<br />
• Office hours are Mon. - Thurs. 10:00 am to 5:00 pm. Leave a message and someone will call you back. Closed Fri. thru Sun.<br />
• Back issues available are: 32, 40, 41, 44, 45, 46, 47 & 48 @$6.95 ea. Include $5.00 postage for every 5 copies.<br />
• Subscriptions which start with the current issue already on the street will be charged $2 extra for postage. Subscriptions and back issues<br />
can be ordered at our website. Check our website for free downloadable PDFs of early issues.<br />
• OST is published in January, <strong>Mar</strong>ch, May, July, September & November. Issues usually arrive by the second week of the issue month.<br />
If your issue is not delivered by the end of the month, call and we will replace it.<br />
• Your subscription expiration date is now printed on the mailing label.<br />
14 • O <strong>Scale</strong> <strong>Trains</strong> - <strong>Mar</strong>/<strong>Apr</strong> ’10
PRR CONGRESSIONAL LTD.<br />
FEB <strong>2010</strong><br />
PRODUCTION SAMPLE<br />
Made in Korea, this all brass, PRR GG-1(Smooth Sided #4908-#4913) in 2 Rail O <strong>Scale</strong> will be<br />
here in February. With cab interior detail and working pantographs (manual), this powerful GG-1 is<br />
made to pull the GGD 12 Car Congressional Limited train described below. Less than 50 engines<br />
and sets of cars will be produced in 2 Rail. Many sets have already been reserved, so don’t delay.<br />
ALSO IN BRUNSWICK GREEN.<br />
Old Rivets” in 4 Schemes available in Feb.<br />
Original (Shown), 1935 5- Stripe, 1952 5-<br />
Stripe, 1976 Bi-Centennial (Big Little<br />
Railroad Shop). Only a<br />
few remain.<br />
So call or email<br />
Today.<br />
$999.95 MSRP<br />
THIRD RAIL DIVISION OF SUNSET MODELS INC.<br />
22 Beta Court · San Ramon, CA 94583 · 925-820-7701 · fax to 925-820-7709 · www.3rdrail.com<br />
FULL LENGTH SCALE CONGRESSIONAL LIMITED CARS IN ALUMINUM<br />
Get the RIGHT cars for the RIGHT Locomotive. Designed to match the 3rd Rail (GG-1 Smooth Sided), these GGD<br />
Aluminum cars will be the first Aluminum cars to have scale length, scale window arrangements, scale interiors with<br />
lots of “Little People” and LED lighting, frictionless needle point axles. These cars will be lighter than previous GGD<br />
Aluminum Cars.<br />
Available in three 4 car sets. Order all 3 sets for a total of 12 cars.<br />
Estimated retail price is $150 / Car.<br />
- Set 1 (observation, coffee shop, kitchen, diner)<br />
- Set 2 (parlor, conference-parlor, 2 coaches)<br />
- Set 3 (3 coaches, parlor)<br />
Made to reservations, contact your dealer or either Sunset Models or GGD to order. Coming <strong>2010</strong>.<br />
RESERVE ENGINE AND CARS FROM EITHER 3RD RAIL OR GGD!<br />
GOLDEN GATE DEPOT LLC<br />
231 MARKET PLACE, SUITE 223, SAN RAMON, CA 94583<br />
www.goldengatedepot.com<br />
<strong>Mar</strong>/<strong>Apr</strong> ’10 - O <strong>Scale</strong> <strong>Trains</strong> • 15
Been thinking of Better Detailed Models?<br />
Interested in more detail on your models? At some point modelers realize<br />
that scale wheels, track parts and truck components do make a difference.<br />
Extra! Extra! Read All About It!<br />
$19.95<br />
plus p&h<br />
Protocraft is a company designed to take<br />
you to a new level of 1/4” scale modeling that you will<br />
find satisfying: Proto:48 - “The O <strong>Scale</strong> of the Future”<br />
Providing products for the Finescale market in 1/4” scale AAR engineering standards since 1994.<br />
Two new O <strong>Scale</strong> publications.<br />
Learn all you need to know<br />
about O <strong>Scale</strong> in the 21st<br />
century. We cover: Operations,<br />
Track & Trackplanning,<br />
Locomotives, Rolling Stock,<br />
Scenery & Structures and we<br />
cover the specialty topics of<br />
Narrow Gauge, Traction,<br />
P48/Finescale and the<br />
latest in Command<br />
Control Systems.<br />
Plus we give you<br />
our exclusive Source<br />
lists to help you find<br />
everything you need<br />
to enjoy modern O<br />
<strong>Scale</strong>. The 2nd Edition<br />
Guide is completely rewritten and<br />
revised with all new color photos and upto-date<br />
Source lists. No O <strong>Scale</strong>r should be<br />
without a copy of this invaluable guide.<br />
For too long O <strong>Scale</strong><br />
modelers have had to contend<br />
with layout books and<br />
trackplanning articles geared<br />
to HO or other scales. Pieces<br />
of The Puzzle changes that<br />
by giving design tips and<br />
techniques directed to the<br />
unique needs of O <strong>Scale</strong>.<br />
This 48 page book also<br />
includes a PDF format<br />
photo CD featuring the<br />
book’s photos in full<br />
color along with a<br />
bonus chapter of<br />
extra material and<br />
photos not included in the<br />
printed copy. Pieces of The Puzzle<br />
will get you off to a good start if you are new<br />
to O <strong>Scale</strong>, P48 or just thinking of finally<br />
starting that new layout.<br />
Over 26,000<br />
wheelsets sold<br />
the Grabowski wheel by<br />
Protocraft<br />
SEE OUR CATALOG AT: www.protocraft.com<br />
$14.95<br />
plus p&h<br />
To order A Guide To Modern O <strong>Scale</strong>, 2nd Ed. in the U.S., send<br />
check or money order for $19.95 plus $5 p&h to O <strong>Scale</strong> <strong>Trains</strong><br />
<strong>Magazine</strong>, PO Box 289, Exton PA 19341. Pennsylvania residents must<br />
add 6% Sales Tax. Outside the U.S. or if you wish to pay by credit<br />
card, please go to www.oscalemag.com and purchase through the<br />
website shopping cart.<br />
To order Pieces of the Puzzle in the U.S., send check or money order<br />
for $14.95 plus $3 p&h to Cougill Studios, PO Box 1402, Richmond<br />
IN 47375. Indiana residents must add 7% Sales Tax. Outside the U.S.<br />
or if you wish to pay by credit card, please go to www.oscalemag.com<br />
and purchase through the website shopping cart.<br />
16 • O <strong>Scale</strong> <strong>Trains</strong> - <strong>Mar</strong>/<strong>Apr</strong> ’10
Model A Prototype Train<br />
Its 11:59 a.m. as we report to work at the yard office in<br />
Birmingham, called for a J-BIRRDR1-23A. The crew knows<br />
from the J prefix this is some type of a High-Wide load that<br />
can move only in special train service. Once we have the<br />
wheel report and other necessary paperwork in hand, only<br />
then do we know what we will be moving.<br />
The special load is a large transformer built by General<br />
Electric that measures 24 feet long, 17 feet tall and 13 feet<br />
wide with a loaded weight of 430+ tons, on a depressed center<br />
flatcar (Photo 1). Clearance and movement requirements<br />
state the load must travel with an empty car on both sides.<br />
The car transporting this load is a KRL 12-axle heavy-duty<br />
1<br />
2<br />
3<br />
articulated flatcar. The required idler cars are a NYC 52 foot<br />
gondola and an 89 foot PTTX flat (Photo 2). While an idler<br />
car is usually used to provide clearance for a load that overhangs<br />
the end of a car, in this case the idler cars are used<br />
to provide weight separation from the engine and load to<br />
comply with bridge tonnage restrictions along with additional<br />
braking and an unrestricted view of the load so the crew can<br />
monitor the car during transit.<br />
Since this train originated in Jacksonville, FL, the BNSF<br />
received it as a run-through from CSX destined for Red Rock,<br />
OK, via Kansas City. The inbound locomotive, a CSX 8-40C,<br />
#7529 (Photo 3) was to continue on as the power for the<br />
train. The only service in Birmingham was the exchange of<br />
the end-of-train (E.O.T.) device and an Initial Terminal Brake<br />
Test by the car department.<br />
A telephone conversation with the dispatcher prior to<br />
departure confirmed she was aware of the train’s restrictions.<br />
Once on the road, operational requirements restricted the<br />
train to a maximum mainline speed of 45 mph with a 10<br />
mph maximum speed through the controlled sidings. At 300<br />
feet long and weighing 520 tons, not counting the engine’s<br />
weight, this train was a handful since it reacted immediately<br />
to any change in the track profile which required an immediate<br />
response from the throttle jockey to maintain proper<br />
control. The trip was uneventful but long. At 10:15 p.m. we<br />
stopped on the Shelby main at Memphis and “swapped off”<br />
with the outbound crew who would take the train on north.<br />
This column and photos describe how the prototype<br />
moves a special shipment of this type. How you choose to<br />
model this scenario is your option. For the modern era a diesel,<br />
a depressed center heavy-duty flatcar plus two idler cars<br />
and battery powered LED rear end device would complete<br />
the train. Keep in mind your idler cars should have low sides<br />
so they do not restrict your engine crew from viewing the<br />
load as it is being moved. If you model a steam era version,<br />
substitute a caboose for the E.O.T.<br />
I do not recall a commercial 12 axle depressed center flatcar<br />
being available at this time, but feel free to enlighten me<br />
if you are aware of one. MTH does have an 8-axle articulated<br />
depressed center flat available in 3-Rail that could be converted<br />
to 2-Rail. You could leave it stock or possibly bash it<br />
into a 12-axle version like the prototype KRL car.<br />
The photos were all taken while we were in the siding<br />
waiting to make a meet. In the photos you can see details<br />
than I have not covered, so look them over closely. This train<br />
can be modeled in any scale by a modeler of any skill level<br />
with products off the shelf.<br />
u<br />
<strong>Mar</strong>/<strong>Apr</strong> ’10 - O <strong>Scale</strong> <strong>Trains</strong> • 17
18 • O <strong>Scale</strong> <strong>Trains</strong> - <strong>Mar</strong>/<strong>Apr</strong> ’10
Well, when last here I was in part bemoaning the current<br />
lack of kits for traction freight cars and taking a brief<br />
look into the past at what had been available, and then<br />
noting that there were a few options that remained available.<br />
Most notable amongst these are a traction flatcar and<br />
stock trailer from MidWest Train Hobby and the trolley cars<br />
from LaBelle. That rather brief list leads me forward down<br />
the pathway where we will go in this column; we’re just<br />
going to have some fun and quickly toss together some relatively<br />
generic scratchbuilt traction freight flats. And, since<br />
the flatcar literally is the underlying basis for all other cars,<br />
we’ll be able to move onwards from this point to tackle a<br />
more complicated car after getting this warm-up exercise<br />
under our belts.<br />
I’m going to complicate this build right out of the box.<br />
We can start with some 1/16” basswood sheet and cut<br />
from that a blank of 8’ wide by 38’ long. <strong>Mar</strong>k a centerline<br />
down the length and 4’ in from each end. Set your compass<br />
point there and scribe a half-circle with a 4’ radius.<br />
Cut, carve, sand, or shape both ends to a half-circle. Now,<br />
here’s where I complicate your existence – laminate some<br />
0.040” sheet lead onto that 1/16” thick curved end blank.<br />
Yes, I know you probably don’t have that in your shop or<br />
have any way of finding some, but you can buy sheet lead<br />
from scientific supply houses.<br />
Generally, you can hide your favorite means of weighting<br />
down a car from inside the car, but flatcars have limited<br />
options for discretely adding weight. Use some 0.040”<br />
brass, or just skip this entirely and just use some 3/32”<br />
sheet basswood at the starting point. You can use epoxy<br />
or your favorite adhesive for the lamination step; I like to<br />
use Walther’s Goo. On top of the sheet lead (or your 3/32”<br />
basswood blank), put down some 1/4” spaced 1/32” thick<br />
scribed siding. At this point you should have something<br />
that looks like what’s in Photo 1; top to bottom (a) an all<br />
wood blank template (handy for future reference!), (b) an<br />
exposed lead sheet laminated onto a 1/16” blank, and (c)<br />
a 1/16” basswood, 0.040” lead, and 1/32” scribed siding<br />
sandwich. Don’t eat it and wash your hands when handling<br />
lead! Either route you take, we should all meet up<br />
with something looking like c in Photo 1.<br />
Now, mark a centerline down the length of the scribed<br />
siding and 5’ in from each end draw a line across – that is<br />
the outside edge of where your body bolsters will go on<br />
the underbody. I use my own resin cast bolsters cut down<br />
to 8’ wide. You can make your own from wood or styrene,<br />
or buy and cut down some plastic ones from Precision<br />
<strong>Scale</strong>, or buy wooden ones from Ye Old Huff’n’Puff, or<br />
even contact me for some of mine. You’ll also need some<br />
stripwood: 1/4”x1/16”, 3/8”x1/16”, 5/32”x1/16”, and some<br />
O scale 2”x16” or 1/2” wide 0.020 styrene (Photo 2). That<br />
last “or” pertains to the fact that I’m actually building 2<br />
variations of a traction flatcar at the same time.<br />
First thing we need to do is install the car bolsters – 5’<br />
in from the ends. It helps to drill and tap them for 4/40<br />
screws before gluing them down – trust me on that point.<br />
The 1/4”x1/16” board goes wide section down centered<br />
in between the bolsters. The 5/32”x1/16” will be fitted up<br />
against that center board to form the hollow center sill.<br />
The 3/8”x1/16” boards will go in between the bolsters<br />
flush along the outside edges of the body. Now, I think we<br />
should pause here before proceeding further, but looking<br />
at Photo 3, I think you can see where we will be going<br />
with the O <strong>Scale</strong> 2”x16” or 1/2” wide 0.020 styrene and<br />
some scrap 5/32”x1/16”. Next column we’ll wrap these<br />
cars up and then move on to something a more challenging<br />
(FUN!).<br />
u<br />
<strong>Mar</strong>/<strong>Apr</strong> ’10 - O <strong>Scale</strong> <strong>Trains</strong> • 19<br />
1<br />
2<br />
3
Hate Sawmills with Nothin’ Inside ?<br />
The O <strong>Scale</strong> Slatyfork Sawmill Interior kit includes all the machinery needed (carriages, rollers, band<br />
saws, swing saws, and edgers shown below) for a double band saw mill and a transfer table that is not<br />
available separately. In addition, a group of workers are in the kit, and there will be loads of details<br />
for the sawfiler's floor including extra saw blades, tools, hoists, benches, and clutter.<br />
#18301 O <strong>Scale</strong> Complete Interior Kit $ 429.95<br />
5' Band Saw<br />
The saw includes a scale 8'<br />
square base. The band saw<br />
stands about nine scale feet<br />
above the base and extends<br />
a scale four feet below. A<br />
metal blade is included.<br />
#18302 O <strong>Scale</strong> $ 39.95<br />
The Machinery below is Available as Individual Kits<br />
Log Carriage & Track<br />
A cable pulled the carriage from each end and went below the floor to<br />
the winch drums. The log carriage & track has a footprint of a scale 71'<br />
x 7'. The scale 20' carriage is positionable on the track. The kit includes<br />
the rail & spikes.<br />
#18306 O <strong>Scale</strong> $ 59.95<br />
Swing Saw<br />
The swing saw has a footprint of a scale<br />
16' x 6'. It can be built with the saw on the<br />
left or right end of the rollers.<br />
#18305 O <strong>Scale</strong> $ 49.95<br />
Edger<br />
The edger and rollers have a footprint<br />
of a scale 37' x 6'. The lost-wax brass<br />
rollers are a scale 4' wide.<br />
#18303 O <strong>Scale</strong> $ 49.95<br />
304-823-3729<br />
Rollers<br />
The frames have a scale footprint of<br />
26' x 3.5'. The lost-wax brass rollers<br />
are a scale 30" wide. There are two<br />
sets of rollers.<br />
#18304 O <strong>Scale</strong> $ 29.95<br />
All the above are also coming in HO and S <strong>Scale</strong>s!<br />
www.btsrr.com<br />
Shipping - $5.00/order in the US<br />
All <strong>Scale</strong> Catalog - $5.00<br />
Celebrating 30 Years of Service since 1979
Building a Center Cab Diesel<br />
Part Two: Building the trucks<br />
Capt. Tom Mix, USMC Ret.<br />
The first things to consider if building this engine are the<br />
trucks. If it can’t move on its own, it doesn’t pay to spend the<br />
time building a frame with a nice looking cab and hoods.<br />
Photo 1 shows a completed truck.<br />
Milling The Main Components<br />
When machining several components of the same size<br />
I like to solder pieces of rough-cut brass together of the<br />
approximate length, height and thickness, and do all the<br />
milling at once. This is faster for machining multiple parts. In<br />
addition, they will finish to the exact same size.<br />
Using 1/8” thick C360 brass cut 4 pieces (scale dimensions<br />
now) 14’ long and 3’ high and solder them together. Those<br />
dimensions are oversized and will be machined to the correct<br />
size. When cool enough to handle, clamp this assembly in a<br />
vise and mill a smooth flat surface on top. This will be your<br />
base line for all measurements.<br />
For these 7-foot wheelbase Commonwealth trucks, the<br />
first mark will be the centerline. Use a machinist’s square to<br />
scribe the line on top, and down the front and back of the<br />
soldered assembly. The finished height of the sideframe is 2<br />
feet and that is the next milling operation. After milling the<br />
height, measure from left and right of the scribed centerline<br />
3’ 6” to get the journal centers. The journal openings are 9”<br />
wide by 18” high. In the prototype drawing there is a portion<br />
on top of the journal slot that is three inches wider overall.<br />
This is one of those minor “detail” situations that you may or<br />
may not choose to do. The equalizers hide much of that extra<br />
opening. I milled it in as I had a 1/16” mill on hand but it was<br />
done after the individual sideframes were separated. Mill out<br />
the journal slots and then mark out the overall truck outline<br />
including the top extensions, which will be bent into a curve<br />
to support the brake hangers. From the journal centerline,<br />
these will be about 3 feet long.<br />
Depending on the mills you have on hand, it is possible to<br />
use a 1/4” mill to make the curves on each side of the journal<br />
slots near the top. However, hand filing will have to be done<br />
to finish. The top of each frame is depressed in the center. The<br />
frame’s topside height between the journal slots is only 6”.<br />
This is another one of those “detail” situations. That 6” may<br />
look too small for strength but in reality, it’s not. When building<br />
an accurate model, avoid oversizing the visible components<br />
for strength. It will make the model appear clunky.<br />
When the assembly’s machining and filing is finished, it’s<br />
1<br />
time to separate the individual frames. One of the accessories<br />
I have with my resistance-soldering unit is a grounding<br />
plate. This is simply the bottom of an old iron I took apart<br />
and bolted upside down on my desk (See Photo 6). Place the<br />
assembly on the plate, set the soldering unit on high heat and<br />
use a thin knife blade to separate the individual sideframes.<br />
All paint stores have black colored sandpaper of different grit.<br />
I use a lot of 400 and 600 grit to polish and remove excess<br />
solder. With a sheet of 400 grit flat on your desk, use your<br />
fingers to hold each side frame and rub off the solder and any<br />
mill markings.<br />
Now comes a decision. I don’t know how thick these<br />
frames were on the prototype. I have a 3/4 view top-down<br />
photo showing one truck before installation and it appears<br />
that the sideframes were a bit less than 6 inches thick. The<br />
extended ends of each frame have to be bent into a curve<br />
for the brake hangers. Hard brass may fracture if bent too<br />
sharp. It can be heated for bending but I did not want to<br />
soften the whole sideframe. I was reluctant to try bending the<br />
1/8“ brass stock and have it fracture and ruin all that work;<br />
so here is what I did. I made a holder with a 1/8” x 1” flat<br />
bar stock about 6” long with a 1/4” X 1/2” brass bar screwed<br />
and soldered on the bottom to form a “T”. When this plate is<br />
clamped in a vise, the surface is lightly milled to ensure it is<br />
completely flat. Then all four of the side frames are soldered<br />
on and then milled to approximately 4½ to 5” thick (Photo 2).<br />
I made a quick jig for bending (Photo 3). This piece of brass<br />
had a milled square in the center that precisely fit the journal<br />
2<br />
3<br />
<strong>Mar</strong>/<strong>Apr</strong> ’10 - O <strong>Scale</strong> <strong>Trains</strong> • 21
slot. One edge of the block was rounded with a file (not too<br />
sharp) that would be the gauge for the frame’s end curve.<br />
Using a torch, I heated the extensions on each sideframe<br />
almost to cherry red. The sideframe with the gauge block was<br />
fastened into a vice with the extension pointing up. Use a<br />
piece of paper or thin styrene against the surface of the frame<br />
to keep from marring. When tightened use a small hammer to<br />
tap bend the end, matching the curve on the block. Reverse<br />
the frame in the block and repeat. No fractures and now the<br />
side frames were 10’ 8” long at the curve point. Note also<br />
that the holes for the safety chains have been drilled in the<br />
sideframes.<br />
Detailing<br />
Now comes the detailing. These trucks will require equalizers<br />
(one each on the inside and outside of each frame for a<br />
total of 8), brake cylinders and levers, roller bearing journals,<br />
safety chain rings, journal wear plates (total 16) and a strap<br />
journal keeper (total 4). The bottom of the journal slots will<br />
have to be drilled for 00-90 hex head screws. This was one<br />
reason I didn’t want the whole sideframe heated to a cherry<br />
red because heating also softens brass and makes it tough to<br />
drill and tap. You can see in Photo 4 how the bottom of each<br />
4<br />
5<br />
6<br />
journal slot was scribed with calipers to center each hole on<br />
all the slots. Clamp the frames in the vise and align a pointed<br />
rod (this one happens to be one of my rivet punchers) over<br />
the cross marks. When aligned, use light pressure on the drill/<br />
mill lever and spin the chuck by hand to make a small indentation.<br />
Small drills must have a guide to start or they will<br />
wander. With this setting, use a #63 bit, drilling deep enough<br />
to tap 00-90. Do this for each journal slot. Photo 5 shows<br />
the assembly of the journal keepers and the jig for soldering<br />
while Photo 6 shows how the soldering was done on my<br />
grounding plate. Note that this type of solder joint is not very<br />
strong but it will work just fine after attachment to the side<br />
frames.<br />
Now the wear plates on each side of the journal slots<br />
should be made and soldered on. Mine are made from nickel<br />
silver so that it appears as steel. The prototype drawing shows<br />
these to have curves where they attach to the sideframes. I<br />
filed the curves but couldn’t get them equal; so I made them<br />
straight. This, too, is one of those details that you may not<br />
want to bother with.<br />
You have seen the small rectangular pieces (1/32” x 1/8”)<br />
attached on the bottom of the sideframe’s centers (See Photo<br />
5). This is part of the leaf spring assembly. These pieces are<br />
22 • O <strong>Scale</strong> <strong>Trains</strong> - <strong>Mar</strong>/<strong>Apr</strong> ’10<br />
also for mounting the bolsters, which will come later. Note<br />
the pin extending down. This pin fits into a hole drilled down<br />
through the frame center and not only helps to secure the<br />
piece to the frame but that extension is for fitting into a hole<br />
drilled in the leaf spring casting to keep the spring centered.<br />
And this is where I made a mistake. I cut the pin too short.<br />
When the engine is standing with the weight on the trucks that<br />
pin works as it’s supposed to. But when I pick up the engine,<br />
the wheels and gear boxes drop down enough to fall away<br />
from the pin, making a couple of the pins miss the hole when<br />
replacing the engine on the tracks. So I have to fiddle with the<br />
trucks to get it into the hole. Make yours a tad longer.<br />
The equalizers are carved out much the same as the side<br />
frames. Use 8 pieces of 1/32” thick brass rough-cut into a<br />
scale 2’ x 8’ and soldered together for milling like the sideframes.<br />
Mill the clump so that it is 7’ 8” long and 20” high.<br />
I used a scanner to make copies of the truck’s drawing and<br />
then cut out two of the equalizer outlines and glued them on<br />
both sides of the clump (Photo 7). An important part of this<br />
assembly is to use a punch to carefully and lightly tap a dimple<br />
on the center of the rods that hold the spring’s end brackets.<br />
Drill a 0.040” hole starting from both sides of the clump.<br />
Drill a little at a time until the holes meet near the center.<br />
If you try to drill all the way through from only one side, I<br />
guarantee that the hole will be off coming out the other side.<br />
Then mill and file to the shape of the equalizers. It will help<br />
to use a scribe to outline the glued on paper guides because<br />
they will wear off. The spring casting, PSH-4360, will have to<br />
be thinned by filing on one side to fit between the equalizers.<br />
Make them the same thickness as your side frames. Photos
7<br />
8<br />
show that these equalizers had a strengthening thickness<br />
at the cross pin area. I used pieces cut from 1/64” by 3/32”<br />
strips to represent this.<br />
Making The Journals<br />
The “roller bearing” journals are next. These are machined<br />
from 1/4”square C360 brass stock. This requires a four-jaw<br />
chuck on your lathe. Only have a three-jaw? Try this. Find a<br />
thick walled brass tube that a 1/4” square rod will fit into. Cut<br />
a piece about one or two inches long, split the tube lengthwise,<br />
and when the square rod is inserted into the split tube it<br />
can be tightened in the three-jawed chuck. Make sure the split<br />
is between jaws. With a length of rod clamped in the chuck,<br />
machine the end surface smooth. Using a tailstock drill chuck,<br />
countersink a starting hole and drill to whatever size your<br />
particular axle ends are. Drill this hole as deep as you can<br />
because when you cut off a section for the journal bearing,<br />
and then face off for the next journal, the axle hole is already<br />
there. Since the drill is still in the tailstock, you can bore deeper<br />
again. Do this 8 times. While you are set up for this part,<br />
make a couple more bearings just in case a mistake is made as<br />
you progress along. My journals are each 1foot long (1/4”) but<br />
yours may be different. For example, NWSL has a number of<br />
wheelsets with different sizes, and shapes of axle ends.<br />
Slots on two sides of each journal must be milled to fit<br />
the thickness of the sideframe. It is important that these slots<br />
be exactly the same depth so that the blocks are accurately<br />
centered in the sideframe’s journal openings and slide up and<br />
down without a lot of slop. Set up your mill vice with a piece<br />
of brass that is even for each journal block to rest on when<br />
the jaws are tightened. The inside top portion of the journal<br />
block must have enough protruding surface for the equalizer<br />
to ride on plus more outside to fit both the equalizer and the<br />
roller bearing details. So your slots probably won’t be centered<br />
on the sides of the journal block. The block is tightened<br />
in the X-Y table vice, the mill (hopefully the same size as the<br />
thickness of your sideframes) set for the first pass. (See Photo<br />
8 for this setup.) Make the first pass, turn the block over to<br />
the opposite side and remove the same amount of material.<br />
Check how close the slots are now to the depth needed to fit.<br />
Remember there are two passes of the mill, which keeps that<br />
axle hole centered. When you are close to the fit you may be<br />
only removing fuzz so to speak. When the journal block will<br />
slide up and down in the sideframe easily without sloppiness,<br />
your settings are correct for the rest of the journal blocks. Do<br />
each one with that same setting.<br />
Study Photo 9 to see my interpretation of what this diesel’s<br />
roller bearing journals looked like. It is only a representation,<br />
as the available photos and the drawing are not very clear.<br />
9<br />
Note the outside-machined round surface, which is about<br />
2 scale inches thick. The equalizers must rest on the square<br />
portion of the journal. The small center square piece is a 1/8”<br />
C360 square bar machined with a round stub that will just fit<br />
into that axle hole. Cut the round stub off leaving a short section<br />
of square, machine the next stub, (you left the tool setting<br />
in place?) and make 8 of these. Then chuck each piece by the<br />
<strong>Mar</strong>/<strong>Apr</strong> ’10 - O <strong>Scale</strong> <strong>Trains</strong> • 23
ound stub, set your lathe’s cross slide tool bit close enough<br />
to machine that square portion to about 2 scale inches thick.<br />
Keep that setting and do all eight. With the last one still in<br />
the chuck, use a small center drill to just mark the center and<br />
drill a #70 hole for a short piece of .028 wire. These are soldered<br />
in place after you cut off part of that stub.<br />
Note that the square center matches the journal square.<br />
The length of the axle end must fit most of the way into the<br />
journal so the stub can’t be too long. Next drill four holes for<br />
nut/bolt castings at each corner of the small square. I have a<br />
divider attachment for the lathe and used that. But if you are<br />
careful you can make an indentation with a scribe at each<br />
corner and use that as a starter point. I’m not sure but that<br />
protruding section on the bottom of the center looks like it<br />
might be a place to fill an oil cup. I milled mine from 1/8”<br />
stock with a notch to fit, then soldered on the bottom. Then I<br />
chucked each journal and machined up to the previously cut<br />
circle to give the oil cup a round bottom. Hope you can see<br />
that in the photo.<br />
Bolster And Brake Gear<br />
The side and top photos of the truck shows the layout of<br />
the brake rigging and the shape of the bolster. The shape of<br />
this bolster will depend on what kind of gearboxes and connecting<br />
shafts you will be using. Mine are from P&D Hobby<br />
but NWSL also has their own style of gearboxes and drives.<br />
The bolster’s final shape, in addition to clearing the drive<br />
components, must have the bottom of the engine frame setting<br />
at 3’ 8” above the railhead when setting on the completed<br />
trucks. My bolsters were milled from one piece of brass<br />
and made heavier than necessary for weight. They also will<br />
carry the wheel wiper mountings for left side pick-up.<br />
The brake cylinders are made from 1/4” thick tubing<br />
machined to a scale 8” wide and 11” long. Solid 1/4” C360<br />
rod was machined to fit into the tubing with the ends longer<br />
for machining the front portion of the cylinder carrying the<br />
piston rod. The stub that will slide into the tubing is made a<br />
tad longer for mounting in the lathe’s chuck. Note the parts of<br />
the cylinders in Photo 10 prior to finishing. The end carrying<br />
the piston rod will need to be drilled. Note in Photo 11 how<br />
a cylinder end is chucked by the stub and machined to the<br />
proper thickness using the same method as the 1/8” square<br />
bearing center. When you have the correct thickness the same<br />
setting can be used for all four ends. This same technique will<br />
be used for the four piston rod ends too.<br />
24 • O <strong>Scale</strong> <strong>Trains</strong> - <strong>Mar</strong>/<strong>Apr</strong> ’10<br />
10<br />
11<br />
When the eight end pieces are done, chuck each one by<br />
the very end of the stub and saw off the end with just enough<br />
left to fit into the tube. Before soldering the ends in place,<br />
drill a tiny hole in the center of the tube to let the flux’s<br />
hot gas exit. The support extension under the brake cylinder<br />
extends 6” out from the sideframe center. I extended it<br />
even longer towards the truck center, which made it both a<br />
strengthener and in the correct position for soldering the bolster<br />
to the sideframes.<br />
My P48 bolsters are 6’ 2” long, which is the distance<br />
between the sideframes (Make them wider if using traditional<br />
O <strong>Scale</strong> track). I made a stripwood jig to place the sideframe<br />
journal slots exactly 7’ apart and square with each other. The<br />
jig helps to ensure that the bottoms of the sideframes are level<br />
with each other too. <strong>Mar</strong>k out the centers of your sideframes<br />
and the outside center ends of the bolsters. The top of the bolster<br />
ends is exactly level with the top center of the sideframes.<br />
The extension from the brake cylinder mounting can be used<br />
to spring clamp the bolsters to the sideframes. When all is<br />
square and even, solder them together. The brake cylinders<br />
are then mounted squarely on the centerline of the sideframe.<br />
Note the cylinders on both trucks are pointed towards the<br />
locomotive’s center.<br />
The “casting” that holds the brake lever has a cut out<br />
where it comes over the rising portion of the sideframe just<br />
before the journal. This “casting” is another method I use to<br />
make several parts the same size. Photo 12 shows the four<br />
parts being milled on a ”sacrificial” plate: a piece of rectangular<br />
brass 1/8” X 1” a couple of inches long with a 1/4” X<br />
1/2” rectangular bar screwed and soldered on the bottom for<br />
mounting in a vise. It looks like a “T” from the end. A small<br />
amount of the surface is milled flat where the parts to be<br />
shaped are soldered. The milled surface also sets in a ridge,<br />
which is exactly square with the mill chuck and X-Y table.<br />
Therefore, your pieces soldered to the surface will be square<br />
with the mill too. I call this plate “sacrificial” because I use<br />
each one many times for milling parts and after a while it
12<br />
13<br />
becomes thin and unusable. The remnants of the plate are<br />
milled off the holding piece that is used for clamping in the<br />
vise and another rectangular piece of brass stock is screwed<br />
and soldered on for the next project. The layout of the brake<br />
rigging can be seen in Photo 13.<br />
Part Three will finish the trucks with the gearboxes and<br />
drive mounted and the beginning of the engine frame. u<br />
(Editor’s note. The e-mail address for Protocraft in Part<br />
One of the series should have been: norm@protocraft.com)<br />
JD’s <strong>Trains</strong> Exclusive Custom Runs<br />
Coming Spring <strong>2010</strong>: Golden Gate Depot 80’ Coaches<br />
in SIX new roadnames: C&NW, Great Northern (Green),<br />
Nickel Plate Road, Rock Island, Seaboard & Southern<br />
Each car will be painted Pullman Green with a black roof and underframe,<br />
all lettering will pad printed in metallic gold. Photos of<br />
each road are posted at www.jdstrains.com. Reserve today - only<br />
10 sets will be made per road. Just $475/4 Car Set (2 & 3 Rail)<br />
DID YOU KNOW? JD’s <strong>Trains</strong> offers competitive prices on<br />
Sunset/3rd Rail, Atlas O, Golden Gate Depot, Weaver & Z-Stuff<br />
products. Come see us at the Chicago <strong>Mar</strong>ch Meet!<br />
JD’s <strong>Trains</strong>, Inc. 9648 Olive Blvd #384 St. Louis, MO 63132<br />
Phone: 314-409-4451, Email: info@jdstrains.com<br />
Secure ordering at www.jdstrains.com JD’s <strong>Trains</strong><br />
Etched brass numbers SP-style, MSRP: $15.<br />
finally a<br />
TOUGH<br />
sUper GlUe.<br />
More brass numbers coming soon!<br />
Field parts for your interlocking tower: pipe<br />
carriers, crank stands and cranks. Visit our<br />
web site for details.<br />
© 2009 Gorilla Glue Company<br />
The Irish<br />
Tracklayer<br />
2682 W. Palo Alto Ave<br />
Fresno CA 93771<br />
www.irishtracklayer.com<br />
fOr THe TOUGHesT jObs On planeT earTH ®<br />
1-800-966-3458 Made in U.S.A.<br />
<strong>Mar</strong>/<strong>Apr</strong> ’10 - O <strong>Scale</strong> <strong>Trains</strong> • 25
CHICAGO “O” SCALE MEET<br />
<strong>Mar</strong>ch 12-14 th , <strong>2010</strong><br />
NEW LOCATION!!!<br />
Westin Lombard Yorktown Center<br />
Show registration – write or email<br />
70 Yorktown Center MARCH MEET – 2636 Hallquist Ave.<br />
Lombard, Illinois 60148 Red Wing, MN 55066 (630) 745-7600<br />
1-800-937-8461 Ask for the Chicago O <strong>Scale</strong> Rate WWW.MARCHMEET.NET<br />
BUY, SELL, TRADE, CLINICS, LAYOUT TOURS & MORE!<br />
Considered the best O <strong>Scale</strong> show of the year------Limited tables available--------Register early for your preprinted badge<br />
26 • O <strong>Scale</strong> <strong>Trains</strong> - <strong>Mar</strong>/<strong>Apr</strong> ’10
Make A Quick Tank<br />
Joe Giannovario<br />
I was walking through my local big-box home improvement<br />
store not too long ago when I spied a bin full of ABS<br />
pipe couplings. These pipe couplings are about 2.7” in<br />
diameter and 2.9” long. I thought that a pair of these glued<br />
together would make a quick and easy to build steel tank.<br />
Here’s what I did.<br />
The couplings don’t fit together as-is so I made four tabs<br />
from 0.040” sheet styrene and glued them to the inside of<br />
one of the couplings (Photo 1). Next I glued the second coupling<br />
onto the first (Photo 2). I used Tenax because the couplings<br />
are ABS plastic.<br />
Now I had a tube which I glued to a square piece of<br />
0.040” styrene (Photo 3).When the joint had set I trimmed the<br />
edges of the square to the diameter of the tube.<br />
Next I scribed panel lines along the tank sides with a<br />
straight edge and the back of a razor knife. The couplings are<br />
conveniently divided horizontally so I just made a series of<br />
staggered vertical lines on each section. When this was done<br />
I painted the tank silver (Photo 4).<br />
Voila! A nice sized O <strong>Scale</strong> tank (approx. 10’ in diameter<br />
and 23’ high) in about 20 minutes (mostly waiting for the<br />
paint to dry). If I were to do this over I might add rivets using<br />
Archer Wet Transfer resin rivets [www.archertransfers.com].<br />
If you have not yet seen these, they are way cool resin rivets<br />
on decal paper. For a more modern tank use the Archer weld<br />
beads instead of scribing panel lines.<br />
u<br />
1<br />
2 3<br />
4<br />
<strong>Mar</strong>/<strong>Apr</strong> ’10 - O <strong>Scale</strong> <strong>Trains</strong> • 27
Buy⁄Sell⁄Trade<br />
AOCC*<br />
Gem PRR B6 0-6-0, C/P or N/P, OB ...................... $575.00<br />
WSM PRR J1a, 2-10-4, C/P, OB ........................$1,550.00<br />
WSM PRR M1, 4-8-2, C/P, Nice, OB .....................$1,150.00<br />
USH NYC J3a De-Streamlined 4-6-4 w/Centipede tender,<br />
C/P Ex, OB. ........................................$1,275.00<br />
Williams “Crown” PRR 0-6-0 B6sb, F/P, OB ............... $525.00<br />
USH PRR M1a, 4-8-2, C/P, OB .........................$1,175.00<br />
MG NYC J3a, C/P, NOB From Tony Ambrose ............$1,395.00<br />
USH NYC S1b, 4-8-4, C/P, OB ..........................$1,250.00<br />
MG PRR J, 2-10-4, C/P, Icken Gears, NOB ...............$1,895.00<br />
USH NYC H10, 2-8-2, Mint, N/P, NOB ...................$1,275.00<br />
USH PRR L1, 2-8-2, N/P, LN, NOB ......................$1,175.00<br />
Gem PRR A5 0-4-0, C/P, NOB ........................... $475.00<br />
Atlas EMD GP9, F/P UP, OB ............................ $250.00<br />
OM N&W C630 High Hood, FM Trucks, New, OB. ........$1,195.00<br />
OM NKP GP35 N/P, LN, OB ............................ $950.00<br />
Jim Hackworth<br />
MODEL TRAINS<br />
(and Subsidiary JH Consulting)<br />
2631 Edgevale Road, Columbus OH 43221-1113<br />
Phone: 614-4514517 Fax: 6144514557<br />
Email: jhmtrains@msn.com • Web: www.jhmtrains.com<br />
Consignments<br />
AOCC*<br />
USH B&O C16a, 0-4-0, C/P, OB.......................................................$675.00<br />
PRB #4461P Dow 3-dome Tank, F/P, White OB, new....................$285.00<br />
OM PRR PAPB Set, Late Run, F/P, New......................................$2,875.00<br />
OM #0445 C39-8, C/P, OB..............................................................$1,195.00<br />
OM NKP War Caboose, C/P, Wtd, OB............................................$295.00<br />
CB J&L Tank car, C/P, OB...............................................................$295.00<br />
<strong>Scale</strong> Mod Ind Roundhouse Kit.........................................................$159.00<br />
PRB Sealand Gunderson D. Stack set, F/P, LN, OB....................$1,525.00<br />
PRb APL Blue Thrall D. Stack set, F/P, LN, OB..........................$1,575.00<br />
RY Models (Yoder) Brass C&O Woodside Caboose LN, OB........$375.00<br />
USH PRR N5 Caboose, New w/Trucks, N/P, OB.............................$250.00<br />
OM PS2-CD Covered Hopper, C/P ATSF, OB, LN........................$319.00<br />
PRB SP Gunderson D.Stack Set, LN, OB......................................$1,495.00<br />
Sunnyside PRR N5c Caboose, N/P, OB ...........................................$309.00<br />
MG PRR N8 Caboose, N/P, NOB......................................................$250.00<br />
Alco PRR N6a, C/P or N/P........................................................each $225.00<br />
Layaway Available<br />
28 • O <strong>Scale</strong> <strong>Trains</strong> - <strong>Mar</strong>/<strong>Apr</strong> ’10<br />
*All Offers Cordially Considered<br />
LSASE for Complete List<br />
Shipping Cost Based On Location<br />
Ohio Residents Add 6.75% Sales Tax<br />
Estates⁄Liquidations<br />
Collection Reductions
Sumpter<br />
Valley<br />
Depot<br />
135 NW Greeley Avenue,<br />
Bend OR 97701<br />
● Specializing in O <strong>Scale</strong> 2-rail<br />
model trains since 1985<br />
● We buy or consign brass model<br />
collections<br />
● Model reservations gladly<br />
accepted<br />
● Prompt, courteous service<br />
Check our website for latest<br />
O <strong>Scale</strong> Listings<br />
www.sumptervalley.com<br />
trainman@callatg.com<br />
Tel: 541/382-3413<br />
Fax:541/389-7237<br />
Hours:<br />
Mon. thru Fri 8:30 AM - 5PM<br />
and sometimes on Saturdays<br />
VALLEY<br />
MODEL TRAINS<br />
PO BOX 1251, Wappingers Falls, N.Y. 12590<br />
Credit Card Orders Welcome<br />
Order/Info(845)297-3866 Fax(845)298-7746<br />
American Model Builders O <strong>Scale</strong> Laser Kits<br />
Dimensions: 9-3/4 x 4-3/4 x 4-1/2"<br />
Dock Adds 2" to Length<br />
484<br />
484 Elevated Warehouse Kit O.......................79.95 67.98<br />
489<br />
6 x 4-1/4 x 6"<br />
489 Loft Barn Kit O.............................................42.98 36.55<br />
479 Long-Bell Lumber skid shacks 2/ O42.98 36.55<br />
Crow River Products Resin and Metal Kits.....<br />
308<br />
Footprint with<br />
loading dock<br />
3" X 10"<br />
Use in the yard,<br />
on a dock or<br />
industry.<br />
308 Fixed Boom Crane O.....................65.00 58.50<br />
Includes utility tank<br />
shown on right - For use<br />
with Derricks, Clam-<br />
Shell Derricks or as<br />
Logging Donkeys<br />
479 - 2 per pack<br />
323<br />
4 x 3 x 2-3/4"<br />
O111<br />
323 3-Drum Steam Hoisting Engine O .....80.00 73.60<br />
O111 Utility Tank O....1 ¼”L X 2 ½”H ........net 8.00<br />
Main Street Heritage Resin Kits.....<br />
505<br />
5 x 9-1/2" w/ boardwalk<br />
5-1/2 x 8" w/ sidwalks<br />
505 The Weekly Record O ...................66.95 61.60<br />
503 Bill's Place O..................................62.95 57.90<br />
Evergreen Hill Design O Laser Cut kits<br />
Footprint: 9" deep (including both decks) 11" wide<br />
(including stairs) 8" high (including fire barrels)<br />
2007 Dollar Bros Motor Express Kit O<br />
503<br />
2007 Dollar Bros Motor Express Kit O 169.95 144.50<br />
lots of detail 2005<br />
Includes<br />
parts<br />
pool table,<br />
cues, balls, 2011<br />
stove, radio<br />
2005 30's Gas Station O (4 x 6.25”) ......59.95 50.99<br />
2011 Pool Hall with table O (5.25 x 6”)..69.95 59.50<br />
Add $8.00 S&H in 48 States • Others pay actual<br />
postage cost • N.Y. residents add 8.25% sales tax.<br />
(prices are subject to change w/o notice)<br />
www.valleymodeltrains.com<br />
Now order online! valleymodeltrains.com Visit our website to see hundreds of HO and O <strong>Scale</strong> Craftsman Kits valleymodeltrains.com Now order online!<br />
The Public Delivery Track<br />
Custom Run Items<br />
Atlas..SP 2 bay hopper car, large lettering...$65<br />
SP and SINCLAIR 8K tank cars..$63 ea<br />
MILW and RI "MDT" steel reefers..$55 ea<br />
52' mill gondolas..WP, SN, Erie, DLW, SP, Rdg..$45 ea<br />
SP double sheathed box cars & flat cars...reserve<br />
Golden Gate...Sleepers..Erie, DLW, SF, MILW..$119<br />
Coaches..PRSL, RG, Erie, DLW, MILW..$109-$119<br />
Head end cars..Erie, DLW, MILW, NYC...$119<br />
Weaver...50' flat w/trailer..UP, Erie, SP, SF..reserve<br />
RPO & Baggage..Erie, CNJ, SF, PRSL..$75-$90<br />
Locomotives<br />
Atlas..U-23, GP-15, RSD's, Dash-8, RS-3..$159-$299<br />
RS-1's, GP 7/9, F-3's..$399-$449. SW's..$199-$359<br />
GP-35's, SD-35's, SD-40's, D8-40b's..$329-$449<br />
Alco Century's..PRR, EL, CN, ACL, L&N, BRC..$349-$449<br />
3rd rail, Sunset..Greenbrier..$999. O-1..$899<br />
SP Mogul..$749-$849. AM-2 $1499. MT-4..$1095<br />
Wvr/Wms brass..PRR K4, A5, B6, others..call<br />
Weaver..SD-40, C628/630, E-8, Sharks..$199-$399<br />
MTH..Premier and Railking <strong>Scale</strong> diesels..$199-$429<br />
K-line..GP-38..CNJ. RS3..Rdg, NYC, WM, SP, PE<br />
E's..NYC, SP, CN; F's..PRR, NYC, Amtk....$249-$429<br />
Passenger & Head End<br />
Golden Gate..70' Bag, RPO. 80' Combine..$119<br />
Sleepers..Pullman, PRR, NW, SP, NYC..$ 109<br />
Coaches..LIRR, PRR, C&O, CP, Reading..$100-$109<br />
Aluminum streamliners..NYC, SP, SF, PRR..call<br />
Atlas..Industrial Rail..SF, GN, PRR, PRSL..$49<br />
New 60' coach, Comb, Bag., RPO..8 roads....$65<br />
Horizon cars..Amtk, NJT, Septa, Condot, MNR..$85-$95<br />
CALIF ZEPHYR 80' domes and sleepers..$129<br />
MTH sets..Amtk, UP, NYC, CZ, others..$249-$329<br />
Weaver..60' baggage or RPO..PRSL, Erie, CNJ<br />
SF, PRR, NYC, NH, UP, CN, N&W, B&M..$60-$90<br />
Box Cars<br />
Pecos River..B&O, Erie, NYC, SF, SP, T&P..$35-$45<br />
Atlas..40' Woodside..40+ roads!!!...$55-$65<br />
40' Steel..Rebuilts, or AAR..20+ roads..$49-$55<br />
40' & 50' Trainman, 1970's (refurbished)..$30-$40<br />
X-29's..$50-$62. HyCubes..60'..$69. 40'..$35<br />
50'..Siide or plug door..$55-$60 60' auto parts..$55<br />
Weaver..40' PS-1, 50' modern, Steelside, Outside braced<br />
40+ roads..Old ones our speciality..$25-$40<br />
Refrigerator Cars<br />
Weaver/Crown..30+ roadnames in stock..$25-$40<br />
57' Mechanical..15+ roads..no sound..$35, sound..$50<br />
Atlas..53' xprs..$65. 40' steel..$49-$59<br />
36' & 40' woodside..oldies, newies, custom..$55-$125<br />
40' plug door..Trainman, 1970's refurbished..$30-$35<br />
K-line..Woodside..same detail as Atlas..$45-$60<br />
Covered Hoppers<br />
Weaver PS-2 & AC-2..old & new..30+ roads..$25-$40<br />
Centerflow or Grain..old and new..25 roads..$25-$40<br />
Atlas..3 bay PS-2..$35. ACF 2 bay..$55-$65<br />
New Trinity 5161..$66-$70 Cylindrical 40'..$45-$55<br />
Airslides and PS4427's....20+ roads......$45-$55<br />
Hopper Cars<br />
Atlas..3 bay..WM, SOU, BN, NH, Rdg, RG..$35<br />
Ore cars..CN, UP, DMIR..$25. H21a 4 bay..$50-$58<br />
2 bay. usra or Panel side..10+ roads...$50-$60<br />
Weaver..2, 3, 4-bay..30+ different roads....$25-$40<br />
Tank Cars<br />
Weaver...40' & 50', new & old, 20+ roads...$27-$35<br />
Atlas..33K..Propane, Delta, CNTX, Union Tex..$52<br />
17K..Trusweet, ADM, GATX, SHPX, Stauffer, more..$65<br />
8K..Navy Gas, Woburn, Staley, Taylor, more..$55-$59<br />
11K..SHPX, UTLX, Dow, 20+ roads..$55-$59<br />
Flat Cars, Stock Cars<br />
Atlas..Double stacks..$129-$289. Pulp flats..$49<br />
Front runner..$45. 89' flats..$60-$65. Trailers..$29-$35<br />
Trainman 50' flat w/pipe load and stock cars..$30-$35<br />
Wvr..40' & 50' flat cars, Stock cars..20+ roads..$25-$40<br />
Gondolas<br />
Atlas..52'..15+ roads..$30-$35. 40' composite..$55<br />
Wvr..LV, RI, SF, UP, NW, Rdg, B&M, MEC, PRR..$29<br />
Atlas Track..2 rail, 3 rail, 3 rail steel<br />
Industrial Rail .. Locos . cars . trolleys . sets . track<br />
Dealers..request our wholesale list<br />
www.PublicDeliveryTrack.com<br />
e-mail us: pdtrains@earthlink.net<br />
Drexel Hill, PA • Paso Robles, CA<br />
610-259-4945 • 805-226-0320<br />
<strong>Mar</strong>/<strong>Apr</strong> ’10 - O <strong>Scale</strong> <strong>Trains</strong> • 29
Starting Over<br />
Part 2 — A plan evolves<br />
Joe Giannovario<br />
Let’s review the ”Givens” from last issue:<br />
1. The new layout will be based on a prototype: the Abingdon<br />
Branch of the N&W.<br />
2. The minimum radius will be 44”.<br />
3. No track will be closer to the walls than 6” from the centerline.<br />
This will help make sure there is room for scenery and<br />
my hand if I need to get to a derailed car.<br />
4. No benchwork will be deeper than 30” unless there is<br />
access to it from 3 sides (no more step stools).<br />
5. The benchwork will be between 36” and 48” high, give<br />
or take a couple inches.<br />
6. The maximum train length will be 96”.<br />
7. Room space is 14’ wide by 22’ long with access at the<br />
right end of the room.<br />
8. My workbench has to fit under the new layout.<br />
Now the ”Druthers”<br />
9. The layout will be double-deck with a 4% grade.<br />
10. I will model two time periods: 1948 and 1968.<br />
11. Use Atlas O track and switches.<br />
The benchwork design is shown below.<br />
From Alvarado the track continues to climb until it reaches<br />
Damascus on the lower wall. Damascus is a major stop on the<br />
branch with many industries to serve. I’ll start the grade at the<br />
left end of Damascus although in reality, the grade decreased<br />
from Abingdon to Damascus but if I’m going to get two levels<br />
in here the grade has to start early at Abingdon. To facilitate<br />
operations the track will split near the end of the Alvarado<br />
module and one line will go to Damascus while the other<br />
continues to climb toward White Top, the summit.<br />
Okay, based on the concepts outlined above, here is the<br />
first crack at a track plan for the space.<br />
3"<br />
4"<br />
5"<br />
2"<br />
6"<br />
1"<br />
44.8r<br />
Beaver<br />
48r<br />
28" wide<br />
lower deck<br />
0"<br />
43r<br />
7"<br />
45.2r<br />
Alvarado<br />
34" aisle<br />
47r<br />
0"<br />
Std Oil Depot<br />
Abingdon<br />
Ash<br />
Smthprt Xtrct<br />
Tobacco Whse.<br />
43" min Rad.<br />
48" or larger where possible.<br />
3.7% grade<br />
Max train length = 8 feet<br />
Bristol<br />
Frt Sta.<br />
Frt Sta.<br />
Stock Pens<br />
Damascus<br />
Coal<br />
8" 9" 10" 11" 12"<br />
Sand<br />
42" aisle<br />
Water<br />
23" aisle<br />
13"<br />
Pass Sta<br />
0"<br />
14"<br />
Water Tank<br />
Inbound<br />
Whlse Produce<br />
Abingdon Branch — Lower level Bristol to Damascus<br />
15"<br />
Outbound<br />
50r<br />
45r<br />
16"<br />
49.5r<br />
17"<br />
20"<br />
White Top<br />
20"<br />
48r<br />
20"<br />
Alvarado<br />
Ash<br />
Bristol<br />
Coal<br />
Sand<br />
19"<br />
Creek<br />
Jnct<br />
Water<br />
18"<br />
Beaver<br />
Inbound<br />
Outbound<br />
17"<br />
Smthprt Xtrct<br />
DH Hrdwd Flr<br />
50r<br />
Frt Sta.<br />
Damascus<br />
0"<br />
16"<br />
11"<br />
12" 13" 14"<br />
15"<br />
I bought Empire Express, which will run on a Mac, to help<br />
design the track plan. It’s not much more than a simple drawing<br />
program tweaked for drawing curves easily. For real design<br />
power you need to use 3rd PlanIt or CADRail both of which<br />
are Windows based only.<br />
So, now I start doodling track plans. Obviously, this is going<br />
to be a point-to-point layout. My plan started at Bristol, Virginia,<br />
(actually Bristol is bisected by Virginia and Tennessee)<br />
where the N&W had engine facilities for the locomotives that<br />
ran over the Abingdon branch. That central island will become<br />
Bristol with a roundhouse and other service facilities.<br />
Leaving Bristol to the right, the track curves around counter-clockwise<br />
to the upper portion of the benchwork that<br />
represents Abingdon itself. The track from Bristol to Abingdon<br />
would be level, i.e., no grade. Continuing around the room<br />
counter-clockwise to Damascus, there are a multitude of<br />
trestles on the branch many of which still exist on the bike<br />
trail. I wanted a trestle feature on the lefthand wall, which I’ll<br />
call Alvarado.<br />
30 • O <strong>Scale</strong> <strong>Trains</strong> - <strong>Mar</strong>/<strong>Apr</strong> ’10<br />
Abingdon Branch — Upper level Damascus to White Top<br />
The track is all Atlas O flextrack. The turnouts are all #5.<br />
In order to make the plan work I had to cheat and make one<br />
curve (lower left corner) a 43” radius.<br />
I shared the design with several friends and other modelers<br />
to solicit feedback. Brian Scace and I played with making it a<br />
Nodal design (See the Track Planning chapter in the Second<br />
Edition Guide to Modern O <strong>Scale</strong> for a discussion of Nodal<br />
designs). I also discussed how to construct the double deck<br />
with several people including how to light the lower deck.<br />
I contacted Clark Thorp who had helped me design the<br />
original layout and gave him my track plan to redraw in<br />
3rdPlanIt. It was Clark who informed me that I had not drawn<br />
the room correctly based on the space plan I had given him 5<br />
years ago. Oops! Back to the drawing board.<br />
Clark did a great job fitting the plan above into the correct<br />
space and tweaking the design so it would fit my ”givens”.<br />
Compare this lower level plan (top next page) from Clark’s
3rdPlanIt to the lower level plan I drew in Empire Express. See<br />
that bump out in the lower wall? That’s a problem maker. I<br />
also realized that carrying the track over top of Bristol would<br />
be a real issue both mechanically (how do I support it?) and<br />
scenically (how do I disguise it?). Plus, the track and services<br />
at Bristol look really crowded. I was falling into the same trap<br />
as before of trying to cram too much track into the available<br />
space.<br />
It was time to rethink the plan and simplify, simplify, simplify!<br />
I dropped the idea of a two level design. I decided to<br />
start the layout at Abingdon rather than Bristol. I also decided<br />
that the scenery would be the dominant feature and the track<br />
would wander through it. So it was back to the drawing program<br />
and ...<br />
<br />
<br />
Abingdon Branch — Redrawn lower level using 3rd PlanIt<br />
<br />
<br />
<br />
<br />
<br />
<br />
<br />
the Abingdon branch without at least one trestle!<br />
With this plan in hand I started considering how to build<br />
the benchwork. I thought of building the benchwork again<br />
myself. I also investigated two manufacturers of modular<br />
benchwork: Mianne [www.miannebenchwork.com] and Sievers<br />
[www.sieversbenchwork.com]. Both of those would have<br />
worked out well but I would have had to customize them further<br />
to accommodate my under-the-layout workbench and the<br />
10 inch drop for the Creek Junction trestle.<br />
Maybe there was another option? I met Tom Thorpe maybe<br />
5 or 6 years ago at a local train meet where he was displaying<br />
his custom curved benchwork. [tomthorpecurvedbenchwork.<br />
com] If you’ve never seen his benchwork let me tell you it’s<br />
more like fine furniture than benchwork. Even better, Tom<br />
lives not too far from me so I called him to discuss the project.<br />
He made a proposal and I accepted.<br />
As it turned out, having Tom come to the house to build<br />
the benchwork was a huge benefit in more ways than just<br />
getting exactly what I wanted/needed. Tom is an idea guy. He<br />
generated innumerable questions and ideas while we worked<br />
together and several of his suggestions were incorporated into<br />
the final plan shown below.<br />
132"r<br />
Flooring Whse.<br />
67/52'r<br />
Std Oil Depot<br />
Frt Sta.<br />
Frt Sta.<br />
Water Tank<br />
Stock Pens<br />
Tobacco Whse.<br />
Pass Sta<br />
Abingdon<br />
79/52"r<br />
Damascus<br />
45"r<br />
Smthprt Xtrct<br />
52"r<br />
48"r<br />
Flooring Whse.<br />
Frt Sta.<br />
Stock Pens<br />
Smthprt Xtrct<br />
Creek<br />
Junction<br />
48"r<br />
Damascus<br />
48"r<br />
45"r<br />
Furn. Whse.<br />
Whitetop<br />
Whitetop<br />
Depot<br />
74"r<br />
Creek<br />
Junction<br />
48"r<br />
45"r<br />
Std Oil Depot<br />
Water Tank<br />
Frt Sta.<br />
Whitetop<br />
Whitetop<br />
Depot<br />
Tobacco Whse.<br />
Pass Sta<br />
Abingdon<br />
Abingdon Branch — Seventh revision<br />
Seven iterations later I had the design shown above. There<br />
are several significant features to this plan. The progression<br />
around the layout is now Abingdon to Damascus to Creek<br />
Junction to Whitetop (Yes, I know. It is spelled both ways,<br />
White Top and Whitetop. It is now officially Whitetop). I<br />
found a way to trick the drawing program into giving me a<br />
curved switch... well, two curved switches of 45” and 48”<br />
radii. I also planned a turntable at Whitetop on a drop leaf to<br />
provide clearance to walk into and out of the layout.<br />
The other feature that is important is one that you cannot<br />
see in this flat plan. That trestle at Creek Junction runs over a<br />
10 inch drop in the benchwork to provide the scenery necessary<br />
to support the trestle. I just could not envision building<br />
45"r<br />
48"r<br />
20 x 65<br />
Abingdon Branch — Revision eight<br />
There are several major revisions here, all based on suggestions<br />
Tom made. The first was to skew the tracks running<br />
through Damascus and Whitetop so they were not parallel to<br />
the benchwork. Another was the use of wye turnouts, which<br />
I had not considered. One more was the incorporation of<br />
a large radius curve through Creek Junction. The last (and<br />
most helpful) was to widen the benchwork at the right end of<br />
Whitetop to fit the turntable within the benchwork rather than<br />
have it hang off the end on the drop leaf. This really opens up<br />
the entry to the layout. I added two more curved turnouts on<br />
each end of Damascus.<br />
So, that’s the final-final plan. It does require four custom<br />
built curved switches which I had made by Old Pullman. Wait<br />
until you see the size of those 48”/44” curved switches! In<br />
future articles I will discuss why the track arrangement is what<br />
it is and why those buildings are there.<br />
u<br />
Next time... the build begins.<br />
<strong>Mar</strong>/<strong>Apr</strong> ’10 - O <strong>Scale</strong> <strong>Trains</strong> • 31
Custom Building, Repair & Painting Services Available Buy-Sell-Trade, Consignments-Appraisals, eBay Sales<br />
Website: www.alleghenyscale.com • Email: oscale@alleghenyscale.com<br />
470 Schooley’s Mountain Road, Suite 8-117, Hackettstown, New Jersey 07840 • Voice - (908) 684-2070 • Fax - (908) 684-8911<br />
Steam<br />
SS/3rd AT&SF "1950" Class 2-8-0 FP L/N, 2-Rail, Oil Tender, Lights, Road No. 1950 ......$695<br />
PRB AT&SF Hudson 4-6-4 CP EX, Original 1930 Version, Pro Paint, Lights, No. 3450 ..$825<br />
Weaver AT&SF Hudson "Blue Goose" FP New, 2-Rail, Road No. 3460 ............................ $1,095<br />
Max Gray AT&SF Pacific 4-6-2 CP EX, Pro Paint, Pittman Can Motor, Road No. 3437 ..$825<br />
OVL C&O F-19 4-6-2 CP EX, Pro Paint, Road No. 494, "George Washington"............... $1,595<br />
C&LS C&O H6 2-6-6-2 FP New, 12 VB Tender, Road No. 1477 ............................................ $3,795<br />
Kohs C&O H8 Allegheny 2-6-6-6 FP New, Weathered, Road No. 1628 ..........................$5,895<br />
USH C&O K4 2-8-4 Kanawha UP L/N, Can Motor, KTM Japan, Great Runner ...............$1,195<br />
WSM C&O T1 2-10-4 UP L/N, Can Motor, KTM Japan .............................................................$1,795<br />
PSC CB&Q S4a 4-6-4 FP Mint, PSC 17161-1, Road No. 4002, Upgraded ......................... $2,595<br />
PSC D&RGW L-76 2-6-6-2 FP Mint, PSC 17171-1, Black Boiler, Road No. 3351 .............. $2,495<br />
Key D&RGW L-105 4-6-6-4 FP New, Postwar Mod. Ver., Black Boiler, No. 3700 .......... $3,695<br />
PSC D&RGW L-131 2-8-8-2 FP L/N, PSC No. 16857-1, Black Boiler, No. 3600 .................$3,895<br />
PSC D&RGW L-131 2-8-8-2 FP L/N, PSC No. 16857-2, Green Boiler, No. 3607 ............... $3,795<br />
PSC D&RGW M-68 4-8-4 FP New, PSC No. 17247-4, Green Boiler, Road No. 1804 ....$2,895<br />
Max Gray Erie K5 4-6-2 UP New, Unassembled, Spoked Drivers - 1 of 10 Built..........$2,695<br />
Custom Brass Little River 2-4-4-2 UP L/N, Can Motor, Test Run ........................................$1,795<br />
USH L&N M1 "Big Emma" 2-8-4 CP L/N, Pro Paint, Road No. 1970 ....................................$1,195<br />
OVL NYC J1e Hudson 4-6-4 CP L/N, Pro Paint, Cockerham Drive, Road No. 5336 ....$2,295<br />
Kohs. NYC J3a Hudson 4-6-4 FP New, Scullin Disk Drivers, Road No. 5425 ................. $3,795<br />
WSM NYC J3a Hudson 4-6-4 CP L/N, Pro Paint, Original Version, Road No. 5405 .... $1,095<br />
WSM NYC J3a Hudson 4-6-4 CP L/N, Pro Paint, Original Version, Road No. 5414 ..... $1,095<br />
WSM NYC J3a Hudson 4-6-4 CP L/N, Pro Paint, Fully Streamlined, Road No. 5447 .$2,295<br />
WSM NYC J3a Hudson 4-6-4 CP L/N, Pro Paint, Mod Streamlng, PT-4, No. 5451 ......$2,295<br />
USH NYC J3a Destreamlined Hudson 4-6-4 CP EX, PT-4 Tender, Road No. 5447 ...... $1,095<br />
Key NYC K3q 4-6-2 FP New, Single Window Cab, Road No. 4675 ....................................$2,250<br />
PSC NYC S1b Crown Niagara 4-8-4 CP New, Pro Paint, Road No. 6021, Exquisite .....$4,095<br />
Sunset N&W Class J 4-8-4 CP L/N, Pro Paint, Coal, Lights, Road No. 600......................$1,195<br />
PSC N&W Class S1a 0-8-0 UP L/N, PSC No. 15699, Road Nos. 200-244 .......................... $1,595<br />
OVL NP Z8 2-6-6-4 CP EX, Coal Version, Weathered, Road No. 5130 .............................$2,295<br />
Gem/Heike PRR A5s 0-4-0 CP L/N, Compl. Rebuild, 1 of a Kind, Road. No. 94 ...........$2,895<br />
SS 3rd-Heike PRR E6s 4-4-2 CP L/N, Compl. Rebuild, 1 of a Kind, No. 1092 ................. $2,695<br />
Sunset-Heike PRR H9s 2-8-0 CP L/N, Compl. Rebuild, 1 of a Kind, No. 1145 ............... $2,595<br />
Key PRR H10 2-8-0 FP L/N, Pro Details, Weathering, Road No. 8014 ............................... $2,495<br />
OVL PRR HH1 2-8-8-2 CP New, OMI No. 139, 1 of 10 Produced ......................................... $2,595<br />
USH PRR I1sa 2-10-0 UP New, Late Run, New Correct Steel Driver Tires ....................... $1,295<br />
Key PRR J1a 2-10-4 FP L/N,210F84 Tender w/Antenna, Road No. 6498 ......................... $2,795<br />
WSM PRR J1a 2-10-4 UP New, 210F84 Tender w/Custom Antenna, ............................... $1,695<br />
Kohs. PRR K4 4-6-2 Prewar Version FP New, 130P75 Tender, Road No. 3863 ...............$4,195<br />
PSC/Heike PRR K4s 4-6-2 Postwar Ver. CP L/N, Compl. Rebuild, 1 of a Kind ............... $2,795<br />
WSM PRR M1 4-8-2 UP New, Last Run, Full Backhead .......................................................... $1,495<br />
Max Gray PRR M1a 4-8-2 UP Mint, Late Run, 210P75 Tender .................................................$995<br />
OVL PRR M1b 4-8-2 FP Mint, 210p75 Tender w/Antenna, No. 6753 .................................$2,295<br />
Max Gray PRR N1s 2-10-2 CP New, McCafferty Paint and Weathering ........................... $1,695<br />
WSM PRR Q2 4-4-6-4 UP New, KTM Japan ................................................................................ $1,995<br />
SS/3rd PRR S1 Duplex 6-4-4-6 FP L/N, Deskirted, Lightly Weathered, No. 6100 ........$1,195<br />
OVL P&LE A2 2-8-4 FP New, W/Decals, OMI 0159 ................................................................... $1,995<br />
OVL RDG T1 4-8-4 UP Mint, W/Decals, OMI 0150 ................................................................... $1,595<br />
Weaver/Heike RDG G2sa 4-6-2 CP L/N, Compl. Rebuild, Exceptional, No. 112 .......... $2,495<br />
PSC SP AC-9 2-8-8-4 FP New, Coal Version, Road No. 3800 ................................................$3,295<br />
PSC SP F-4 2-10-2 FP L/N, PSC No. 16915-1, Postwar, Road No. 3679 ...............................$1,795<br />
PSC #17347-1 SP GS-4 4-8-4 Postwar Version FP New,, Black, Road No. 4436 ............$2,695<br />
PSC # 15839-1 SP MT-4 Crown 4-8-2 FP New, Gray Boiler, No Skyline, Ser. 4 of 9...... $2,495<br />
SS/3rd SP MT-4 4-8-2 FP New, 2-Rail, Daylight Scheme, Skyline, Road No. 4352 ...... $1,495<br />
PSC SRR PS-4 4-6-2 FP New, PSC No. 16467-1, Green/Black, Road No. 1401 ............... $1,695<br />
USH SRR USRA 0-8-0 CP L/N, Pro Paint, Green & Gold, Road No. 6531 .............................$795<br />
Sunset SRR USRA Lt 2-8-2 CP EX, Pro Paint, Black Boiler, Can Motor, Road #6296 ........$995<br />
OVL SP&S Z-8 4-6-6-4 UP New, OMI No. 0167, Oil Version, Road Nos. 910-911 .......... $2,695<br />
Sunset UP Early Challenger 4-6-6-4 CP EX, Cockerham Drive, Pro Paint, #3939 .......$2,395<br />
Sunset UP "9000" Class 4-12-2 UP New, Postwar Version ....................................................$1,195<br />
USH UP C Class 2-8-0 CP EX, Can Motor, Oil Tender, Road No. 329 .....................................$795<br />
PFM UP C-57 Class 2-8-0 FP L/N, Lights, Road No. 739, Samhongsa .............................. $1,595<br />
Key UP FEF-2 Oil Version FP L/N, TT Gray, Silver Stripes, Road No. 825, Rare .............. $2,495<br />
USH UP FEF-3 4-8-4 CP EX, Pro Paint, 2 Tone Gray, Oil Version, Can Motor .....................$995<br />
SS/3rd UP MK Class 2-8-2 FP Mint, Never Unwrapped, Short Vanderbilt, No. 2260.....$795<br />
USH UP TTT Class 2-10-2 CP EX, J. White Drive, Lt. Weathering, Road No. 5078 ........ $1,895<br />
USH UP TTT Class 2-10-2 - Custom Rebuild CP EX, BL FWH, Sweeney Stack,<br />
Larger Tender, Road #5305.....................................................................................................$2,195<br />
C&LS WM M-2 4-6-6-4 FP L/N, Hinged Smokebox Front, Road No. 1208 .....................$3,195<br />
WSM WM 3 Truck Heavy Shay UP L/N, Late Run, Can Motor, Full Backhead ..............$2,095<br />
Diesel<br />
OVL ALCO FA-1/FB-1 Units UP New, OMI Nos. 0356/0356/0358, Per Unit .........................$595<br />
Car Works B&M ALCO S-1 Switcher CP EX, w/DCC and Sound, Road No. 1161 ..............$650<br />
PSC B&M EMD SW-1 Phase 1 CP EX, Low Stack, Black w/Red Nose Stripes, No. 1112 ..$625<br />
OVL EMD E8 A/B Units UP L/N, OMI Nos. 0304/0305, Per Unit .............................................$595<br />
OVL EMD F3 A/B Units UP New, OMI Nos. 0292/0293, Per Unit ............................................$625<br />
Oriental EMD GP-9 Phase III UP New, Samhongsa Korea ........................................................$825<br />
OVL # 0393-0397 PRR ALCO FA-2/FB-2 - A-B Units CP New, w/Antennas, Twr Drive $1,595<br />
OVL PRR ALCO DL600B High Hood UP New, w/Ant., OMI No. 0201A, 2 Available ........$695<br />
OVL PRR BLW RF-16 Shark A-B-A Units UP Mint, OMI Nos. 0425, 0426, 0425 .............. $2,995<br />
SS/3rd #M402/M405 PRSL RDC-1 - Two Units FP New, 2-Rail, Pwr & Dummy Units .....$795<br />
Atlas O P&LE GP7 Units FP L/N, 2 Rail DCC/Sound, Powered and Dummy Units ..........$575<br />
Atlas O SRR F3 Phase 1 A/B/A Units FP L/N, 2 Rail DCC/Sound, Freight Scheme ..........$895<br />
OVL UP ALCO PA-1 UP New, OMI No. 0322, 2 Available ...........................................................$750<br />
Hallmark UP FT A-B Units CP EX, Yellow/Gray, Lights, Crew, Road Nos. 516/516B ........$795<br />
OVL UP Standard Turbine, Mint, OMI No. 0354, Round Tender ........................................$2,695<br />
Atlas O Gold WM F3 Phase 1 A/B Units CP L/N, Fireball Scheme, Nos. 51A/B ...............$695<br />
Kohs PRR GG1, Brunswick 5 Stripe, New, Clarendon, Fixed Coupler, Rd #4840, Rare $4,995<br />
Kohs. PRR GG1 Tuscan 5 Stripe, New, Clarendon, Drop Coupler, Road No. 4911 .......$5,195<br />
Rolling Stock<br />
PSC GN HWT Empire Builder 9 Car Set FP New, PSC No. 16981 .........................................$7,595<br />
PSC Harriman 72' 72-D-3 Diner UP New, PSC No. 15477 .........................................................$425<br />
Custom Brass PRR B60 Baggage Car CP EX, CNJB No. 702-O.................................................$295<br />
SS/3rd PRR BM54, P54 Commuter Cars, FP New, 2 Rail, Bag, Comb, Coaches, each ....$250<br />
SS/3rd PRR B60, P70, Baggage, Coaches FP New, 2 Rail, Price Each ...................................$275<br />
P. Co. PRR X-42 Mail Storage Car CP New, Pro Paint, Shadow Keystone, Rd #2541 .......$350<br />
PSC REA Steel 50' Expr Reefer CP L/N, Late Version, PSC No. 15519, Lg. REA Herald ...$295<br />
OVL GPEX 47' Pfaudler Steel Milk Car UP New, OMI No. 0700 ...............................................$295<br />
Div. Point N&W CF & CH Class Cabooses FP New, Several Versions Available ................$395<br />
W&R NP 24' Wood Caboose FP L/N, 2nd Run, Version 3, Interior, Road No. 1644.........$435<br />
OVL Palace Poultry Car UP L/N, OMI No. 0055, W/Trucks .......................................................$575<br />
Kohs PRR N5c Cabin Car New, Version 2, "Buy War Bonds", No. 477009, 1 of 10 ..........$675<br />
RY Models PRR GLca Fishbelly Twin Hopper UP New, AB Brakes ........................................$275<br />
OVL UP CA-1 Wood Caboose UP New, OMI No. 0797 ...............................................................$225<br />
Kohs. VGN Class C10-1 Caboose FP New, Road No. 309 ..........................................................$595<br />
C&LS WM "NE" Steel Caboose FP L/N, Round Heralds, 2 Versions Available ..................$435<br />
Int’l, Harriman 65,000 Gal. Water Tank UP New, Model No. IH-03, W/Spout...................$395<br />
Various Craftsman Structure Kits UP T. Yorke, Stoney Creek, Others ..................................Call<br />
Various Freight Cars, Brass, RTR, Kits Pac Ltd, PSC, USH, Intermountain, Atlas, etc. .....Call<br />
32 • O <strong>Scale</strong> <strong>Trains</strong> - <strong>Mar</strong>/<strong>Apr</strong> ’10
Scratch and Bash a P&LE Double-Sheathed Box Car<br />
Tom Houle<br />
For years, I’ve wanted to add at least one, if not several, double-sheathed<br />
boxcars to my early Fifties era CNW/Soo branchline.<br />
They would look great mixed into my steel box car fleet. One day<br />
while sorting through my unbuilt kits, I ran across an All Nation<br />
#3500 undecorated 40’ reefer kit. It struck me it would be relatively<br />
easy to convert this kit into a double-sheathed boxcar. In its<br />
simplest terms, it involves skinning the basic wooden AN car with<br />
Evergreen car siding and adding a pair of sliding doors.<br />
So, why convert a pristine and now defunct kit into a doublesheathed<br />
boxcar? Well, I already have a nice reefer block on the<br />
layout; in fact, too many for my 40’ icehouse to efficiently handle.<br />
Additionally, I suspect there are plenty of these All Nation reefers<br />
available at eBay, O <strong>Scale</strong> shows, and under peoples’ benches.<br />
Walthers reefer kits can also be used. The overall dimensions and<br />
construction are nearly identical to the AN kits. Lacking a kit, you<br />
could easily scratchbuild the basic structure from either wood or<br />
styrene and then proceed as I did with my kit. To this end, I have<br />
provided drawings for the basic carbody components.<br />
I realize that Atlas has brought out a nifty series of doublesheathed<br />
cars. However, these cars have corrugated steel ends.<br />
I went ahead with my kitbash because: (1) I prefer not to open<br />
boxes and place cars on the layout; (2) I wanted wooden ends<br />
because they simplified the kitbash; (3) I happened to find the<br />
perfect prototype in my reference library; and (4) TMR distributing<br />
has the correct dry transfer lettering and NYC heralds (formerly<br />
CDS) for this car. Odd Ball Decals sells a Minneapolis and St.<br />
Louis set of decals for a double-sheathed boxcar, and I might have<br />
used them, but I was unable to determine if the M&StL car had<br />
the requisite wood ends.<br />
I found the prototype Pittsburgh & Lake Erie car on pp. 266<br />
– 267 in Train Shed Cyclopedia No. 35 Freight Cars (Part 1)<br />
published by Newton K. Gregg. This car was built by the Pressed<br />
Steel Car Company. Comprehensive drawings and a photo are<br />
provided on the two pages. Curiously, a diligent follow-up search<br />
on the Internet and e-mails to the P&LE Historical Society and<br />
P&LE Yahoo Group didn’t turn up any additional photos or other<br />
information on this car. It appears to have dropped off the face of<br />
the earth, which led me to wonder if I am the proud creator and<br />
owner of the only extant model of this car in any scale anywhere.<br />
I noted the P&LE car is two scale feet shorter than the 40’ AN<br />
car. I decided to overlook that discrepancy and stay with the AN<br />
dimensions. I made up for this by replacing the non-scale slab<br />
underframe with a built up and correctly recessed underframe per<br />
the Train Shed Cyclopedia drawings. Let’s begin construction there.<br />
Underframe Assembly<br />
The AN car consists of a 1/4” thick basswood floor, ends and<br />
two lengths of milled roof (Photo 1). The floor in my kit had developed<br />
a curl or warp that could not be straightened so I replaced it.<br />
I skinned one side of the floor with Evergreen <strong>Scale</strong> Models<br />
0.020” x 0.100” V-groove styrene. I used slow-setting CA glue to<br />
attach it to the basswood. The V-grooving simulates the underbody’s<br />
exposed flooring (Photo 2). As shown in the underframe<br />
drawing, I laid out the lengthwise stringers, crossmembers, and<br />
bolster locations on the styrene. Since the car is slightly longer<br />
than the P&LE prototype, I used the white metal AN bolsters and<br />
located their centers per the kit’s dimension. This is shown on the<br />
underframe drawing.<br />
Since the floor is going to be recessed, the AN bolsters will<br />
need to be trimmed lengthwise to match the width of the floor. The<br />
recessed floor necessitated increasing the height of the bolsters<br />
continued on page 36<br />
<strong>Mar</strong>/<strong>Apr</strong> ’10 - O <strong>Scale</strong> <strong>Trains</strong> • 33<br />
1
34 • O <strong>Scale</strong> <strong>Trains</strong> - <strong>Mar</strong>/<strong>Apr</strong> ’10
<strong>Mar</strong>/<strong>Apr</strong> ’10 - O <strong>Scale</strong> <strong>Trains</strong> • 35
2<br />
3<br />
by 0.140”. I laminated 0.040” x 0.375” and 0.100” x 0.375”<br />
styrene strips and glued them to the bolsters with CA glue. Then,<br />
I glued the bolsters to the underframe with Testors liquid plastic<br />
cement (Photos 3-4).<br />
As shown in the underframe drawing, the four 0.080” square<br />
stringers and 0.040” x 0.080” sidesills are attached next. Note<br />
they run from end to end. Next, I added 0.020” x 0.100” styrene<br />
strips to the tops of the stringers and sidesills at each crossmember’s<br />
location to simulate the flanges (Photos 5-6). The 0.060” x<br />
0.250” centersill alignment strip goes in next. You can see this<br />
detail in Fig. 2. Make sure the strip is aligned down the centerline<br />
of the underframe. The two centersills are cut from 0.040”<br />
sheet per the drawing. I added Keil-Line #4866 0.050” wide rivet<br />
stripping to the lower edges of the sills. I added 0.020” x 0.100”<br />
flanges to both sills before I attached the sills to the car.<br />
As shown in Fig. 2, the centersills butt up to the alignment<br />
strip. This ensures the sills are securely attached and run straight<br />
and true. They should fit snugly between the bolsters (Photo 7).<br />
7<br />
4<br />
5<br />
6<br />
Cut ten crossmembers from 0.040” sheet, glue them to the<br />
underframe and attach 0.020” x 0.100” flanges (Photo 8). Alternately,<br />
and it might be easier, the flanges could be glued to the<br />
crossmembers before attaching them to the underframe.<br />
I built up the coupler mounting pads by filling in the spaces<br />
between the two innermost stringers with 0.080” thick sheet.<br />
Then, I glued 0.100” x ½” wide strips over these. The ½” wide<br />
strips extend from the bolsters to the ends of the underframe. The<br />
addition of four 0.020” x 0.100” angle braces to the corners of<br />
the underframe completes the assembly (Photo 9). (Note: due to<br />
recessing the underframe into the car body, I had to add a 1/8” x<br />
1/4” basswood strip to the bottoms of the car ends. This is shown<br />
in the end drawing.)<br />
Carbody Assembly<br />
I began assembly of the carbody by carefully marking the floor<br />
location on the inside faces of the car ends. This line is 0.475”<br />
up from the bottom (see Fig. 1). Next, I glued one end to the<br />
assembled underframe. I used slow-setting CA glue and epoxy<br />
to build my car. When you glue the underframe to the car end,<br />
make sure the top of the floor of the underframe is exactly aligned<br />
8<br />
36 • O <strong>Scale</strong> <strong>Trains</strong> - <strong>Mar</strong>/<strong>Apr</strong> ’10
9 10<br />
with the 0.475” line on the interior face of the car end. Using a<br />
small square, make sure the end is square to the floor. Repeat the<br />
process for the other end. I ran another bead of thin CA into the<br />
joints after the slow-setting glue had kicked.<br />
If you’re using CA to attach the parts, consider using a kicker<br />
or accelerator. Kicker comes in pump bottles and spray cans and<br />
accelerates the curing of the CA. There’s a myth that using kicker<br />
makes the joints brittle. It just ain’t true. What it does is make<br />
assembly a heckuva lot faster. White or yellow glue or epoxy<br />
works just as well for those who don’t like CA glue.<br />
Before adding the two car sides, you might want to add<br />
weight - lead sheet, washers, etc. - to the interior floor. Without<br />
any weights, my finished car came in between 10 and 11 oz, and<br />
I’m happy with that. Do check the fit of your car sides before you<br />
attach them to the ends and floor. Mine were 3/32” too long. I<br />
had to trim them before I glued them to the ends and floor (Photo<br />
10). Roof sections are next.<br />
The AN roof halves are designed to drop in between the sides<br />
and ends. The milled edges overhang the ends and sides. As<br />
shown in Photo 11, I glued the roof sections in place with white<br />
glue and held them tightly with masking tape while the glue set.<br />
I used a lot of tape because white glue can cause the basswood<br />
to warp as it absorbs the glue. When the joints were cured, I<br />
trimmed away the roof overhangs so that they were flush with the<br />
faces of the sides and ends (Photo 12).<br />
I gave the entire basswood car body a good block sanding and<br />
then attached Evergreen #2067 0.020” x 3-1/4” car siding, first to<br />
the car ends and then to the car sides (Photo 13). I used five-minute<br />
epoxy to attach the siding and I don’t recommend it. It takes<br />
time to spread it thin enough and meanwhile the epoxy starts to<br />
cure. Next time, I’ll use 30-minute epoxy. I cut the ends and sides<br />
a little wide and long, and then trimmed them after the epoxy had<br />
set. I held them in place with masking tape while the epoxy cured.<br />
Next, I laid out the grab irons, end braces, brake platform and<br />
staff, door, and door guide locations (see Fig. 3). I added 0.060” x<br />
0.125” upper door guides and built up the doors from a laminate<br />
of 0.020” car siding and plain 0.020” sheet and trim strips (See<br />
Fig. 3 for dimensions and details).<br />
As shown in Photo 14, I skinned the basswood roof with<br />
0.020” plain styrene. Before I attached the styrene, I laid out the<br />
roof’s centerline and rib locations. Then I scribed and folded the<br />
styrene so the roof skin went on in one piece. This process kept<br />
those pesky rib lines squared up.<br />
With the roof skin in place, I attached the doors, the 0.040”<br />
square door stops and the 0.020” x 0.060” upper fascia trim; along<br />
with the 0.015” x 0.060” corner braces, and 0.010” x 0.030”<br />
door rub strips and the lower door guides. I used Chooch #215<br />
door parts for the upper hangers and latches. The corner steps are<br />
0.032” brass wire. I bent the upper ends of the steps and inserted<br />
them into holes drilled into the car sides. They are held in place<br />
11<br />
12<br />
13<br />
<strong>Mar</strong>/<strong>Apr</strong> ’10 - O <strong>Scale</strong> <strong>Trains</strong> • 37
with CA (see Fig. 3 for placement and dimensions of these details).<br />
The 1/2” roof walk supports are next (Photo 15). I made mine<br />
from 0.060” square styrene. I cut lengths 18-1/2” scale inches<br />
long, then in the center of each support I made a cut half way<br />
through. Now, the supports can be bent to match the contour of<br />
the roof. Using Testors liquid plastic cement, I glued each support<br />
in place as shown in Fig. 4. When the cement had cured, I used a<br />
10” flat file to gently file the supports until they were dead flat the<br />
length of the car. There is a cross-sectional view of this process in<br />
Fig. 4. It’s really much easier to do than describe.<br />
The roof ribs were added next using 0.020” x 0.030” strips. I<br />
cut the ribs an inch or so long to facilitate holding them in place<br />
while applying Testors liquid cement with a small brush. They are<br />
trimmed after the cement cures.<br />
As shown in Fig 4, the running boards are 0.020” x 0.156”<br />
styrene strip. First, attach the two outer boards to the supports and<br />
then center the middle board. I left my boards long and when the<br />
glue had cured. I set the car upside down and cut the ends to the<br />
correct 5/32” overhang at each end.<br />
The end platforms consist of two 0.040” square support strips<br />
spaced 9/16” apart with 0.020” x 0.125” strips cut 9/16” long. I<br />
added right angle grabs to both end platforms made from 0.020”<br />
brass wire.<br />
As shown in Photo 17 and on the cross-sectional end view<br />
detail drawing in Fig 3, I added a .015” x .250” x 1/2” styrene<br />
shim to the bottom of the car end to bring it flush with the coupler<br />
pad. I used the white metal end sills that came with the AN<br />
reefer kit as they are very close to the P&LE end sills.<br />
Unfortunately, these end sills were designed for use with solid<br />
couplers long before Kadee® couplers were a reality. I had to<br />
carefully cut a 1/2” wide coupler box opening with a Zona saw<br />
and files to allow the couple boxes to come through the lower<br />
half of the sills. If you’re rolling your own car, I have included a<br />
drawing that illustrates how to make the sills from 0.250” styrene<br />
channel and Precision <strong>Scale</strong> #4043 poling pockets. This might<br />
actually be easier to do than cutting and filing openings into the<br />
AN center sills.<br />
Note the end sills extend below the bottoms of the car ends.<br />
The car end drawing indicates where to align the tops of the center<br />
sills to the car ends. I attached the white metal sills to the car<br />
ends with slow-setting CA glue.<br />
The wire grabs are next. I drilled all of the holes in the ends<br />
and sides with a pin vise and a #74 drill bit (Photo 18). The holes<br />
are centered 3/8” apart for Tichy/CMA #2001 drop grabs. Note<br />
there are no ladders - only grabs. On the doors, I used Intermountain<br />
plastic grabs or you could also make your own from 0.020”<br />
brass wire or use Tichy/CMA straight grabs.<br />
I elected to use an Intermountain brake platform and supports<br />
in lieu of the AN parts. I drilled 0.030” holes into the car end to<br />
align with the posts on the IM platform and supports. The brake<br />
platform’s location is shown in Fig. 3. The brake staff is 0.032”<br />
brass wire that extends 1/4” above the roof with the AN brake<br />
wheel mounted to it. I through-drilled the white metal end sill to<br />
accept the brake staff. The staff is retained just below the roof with<br />
a U-shaped 0.015” brass wire. The wire ends are glued into holes<br />
in the car end.<br />
With the exception of trucks and couplers, which will be<br />
installed after painting and lettering, this completes the car assembly.<br />
I gave my car a light coat of Ace Hardware sandable auto<br />
primer (Photo 19). I’ve used this primer for a while now. It’s reasonably<br />
priced and really snuggles down nicely into the cracks.<br />
I sprayed the car with <strong>Scale</strong>coat #10136 spray can Box Car<br />
Red. This paint cures to a nice sheen, which is perfect for either<br />
decals or dry transfers. My car is lettered with a mix of dry trans-<br />
38 • O <strong>Scale</strong> <strong>Trains</strong> - <strong>Mar</strong>/<strong>Apr</strong> ’10<br />
fers (lettering only) and decals (heralds). I purchased CDS Pittsburgh<br />
& Lake Erie #762 dry transfers from TMR Distributing in<br />
Canada. You can reach their website at: [http://www.tmrdistributing.com].<br />
I used Champ decals for the NYC heralds.<br />
I would have used the CDS heralds, but I ran into trouble<br />
transferring the black and then the white dry transfer heralds onto<br />
the car. The black backgrounds and white lettering for these heralds<br />
are printed on separate dry transfers. I found it impossible<br />
to register the white outline and lettering of the herald with the<br />
black film already rubbed onto the car. The problem is the dry<br />
transfer backing paper is translucent and I simply could not make<br />
out the black outline well enough through the backing paper to<br />
accurately register the white overlay and hold it in place while I<br />
rubbed the white onto the black. Fortunately, Champ Decals has<br />
14<br />
15<br />
16
17<br />
19<br />
20<br />
18<br />
- 126 0.020 x 0.125<br />
- 164 0.80 x 0.080<br />
- 101 0.010 x 0.030<br />
- 112 0.015 x 0.040<br />
- 113 0.015 x 0.060<br />
- 144 0.040 x 0.080<br />
- 125 0.020 x 0.100<br />
- 159 0.060 x 0.250<br />
- 127 0.020 x 0.156<br />
- 153 0.060 x 0.060<br />
the correct NYC lines heralds for this car: Champ set #OH-156.<br />
As Shakespeare quothe, “All’s well that ends well.”<br />
My Pittsburgh & Lake Erie car is now in service moving goods<br />
from its Lake Erie terminus to my upper Midwest customers along<br />
Lake Michigan’s shore (Photo 20).<br />
u<br />
Prototype Reference<br />
Train Shed Cyclopedia No. 35 Freight Cars (Part 1) PP. 266-<br />
267 Newton K. Gregg<br />
Bill of Materials<br />
Evergreen <strong>Scale</strong> Models Styrene<br />
- 2067 0.020” x 3-1/4” car siding<br />
- 2100 0.020 x .100 V-groove siding<br />
- 9040 0.040” sheet<br />
- 9030 0.020” sheet<br />
- 0.015 x 0.250 strip<br />
- 123 0.020 x 0.060<br />
Northeastern <strong>Scale</strong> Lumber<br />
- 4046 1/8” x 1/4” basswood strip<br />
Keil-Line<br />
- 4866 .050” wide rivet strip<br />
Tichy/CMA<br />
- 2001 drop grab irons<br />
Chooch Ultra <strong>Scale</strong><br />
- 215 Camel door hardware<br />
Kadee<br />
- 804 couplers<br />
Athearn<br />
- 90801 Bettendorf trucks<br />
K & S<br />
- 1596 0.020” brass wire<br />
- 1602 0.032” brass wire<br />
Paint & Decals<br />
- Ace Hardware Sandable Auto Primer (spray can)<br />
- <strong>Scale</strong>coat 10136 Box Car Red (spray can)<br />
- Testors 1260 Dull Cote (spray can)<br />
- TMR Distributing CDS 762 P&LE box car dry transfers<br />
[www.tmrdistributing.com]<br />
- Champ Decals OH-156 B&W NYC Lines herald set<br />
<strong>Mar</strong>/<strong>Apr</strong> ’10 - O <strong>Scale</strong> <strong>Trains</strong> • 39
40 • O <strong>Scale</strong> <strong>Trains</strong> - <strong>Mar</strong>/<strong>Apr</strong> ’10<br />
Figure 1 — Not to <strong>Scale</strong>
Figure 2 — Not to <strong>Scale</strong><br />
<strong>Mar</strong>/<strong>Apr</strong> ’10 - O <strong>Scale</strong> <strong>Trains</strong> • 41
42 • O <strong>Scale</strong> <strong>Trains</strong> - <strong>Mar</strong>/<strong>Apr</strong> ’10<br />
Figure 3 — Not to <strong>Scale</strong>
Figure 4 — Not to <strong>Scale</strong><br />
<strong>Mar</strong>/<strong>Apr</strong> ’10 - O <strong>Scale</strong> <strong>Trains</strong> • 43
SMR TRAINS<br />
Virginia & Truckee<br />
In stock now!<br />
Photo by Get Real Productions<br />
Your source for:<br />
Motive power, rolling stock<br />
and structure plans<br />
(since 1975)<br />
Quik-Signs sign sets<br />
<strong>Scale</strong> industry directory<br />
Paper Creek Models<br />
Send $2.00 for catalog<br />
Underground Railway Press<br />
P.O. Box 814OS<br />
Brevard, NC 28712-0814<br />
44 • O <strong>Scale</strong> <strong>Trains</strong> - <strong>Mar</strong>/<strong>Apr</strong> ’10<br />
Tell our advertisers<br />
that you saw their<br />
ad in O <strong>Scale</strong> <strong>Trains</strong><br />
<strong>Magazine</strong>. We’d<br />
appreciate it!<br />
Model Building Services<br />
Models built by Stu Gralnik<br />
264 <strong>Mar</strong>ret Rd • Lexington MA 02421<br />
Ph: 781-860-0554<br />
stu@modelbuildingservices.com<br />
Coal Mine by<br />
K&P Brick<br />
and Building<br />
Assembled buildings from any manufacturer’s kit.<br />
Kitbashed, painted and detailed...“Just Like Real!”<br />
www.modelbuildingservices.com
Mix Pix<br />
Capt. Tom Mix sent these photos<br />
and some words about one of his<br />
current projects.<br />
We thought you’d enjoy seeing<br />
more of his work.<br />
CB&Q R4 2-6-2<br />
I have come further along with the<br />
2-6-2. More small details are yet to<br />
be done but the next project on this<br />
loco is the brakes. They should be<br />
close to the drivers as prototypical<br />
and removable for maintenance and<br />
painting. I have to watch for electrical<br />
shorts though when getting those<br />
brake shoes close to the drivers on the<br />
left side.<br />
You can see more of Tom’s work at<br />
the Proto48 website:<br />
http://www.proto48.org/<br />
<strong>Mar</strong>/<strong>Apr</strong> ’10 - O <strong>Scale</strong> <strong>Trains</strong> • 45
NEWS: New convention car announced for <strong>2010</strong> O <strong>Scale</strong><br />
National.<br />
The<br />
previously<br />
announced<br />
Chateau <strong>Mar</strong>tin<br />
wine car will<br />
not be available<br />
as the <strong>2010</strong><br />
convention car. There will now be three cars available at the<br />
convention. One is a special run for the convention. The other<br />
two were special run cars for previous O <strong>Scale</strong> West meets.<br />
The new special run car is the Atlas O Trainman 53 foot 6<br />
inch gondola. The Atlas O Trainman car is an upgraded version<br />
of the former Altas/Roco gondola. That car was based upon<br />
the PRR G31 series gondolas. AC&F built clones of the cars for<br />
other roads including the SP who bought 50 and then 300. The<br />
first lot of 50 cars were delivered in black paint; the remaining<br />
300 were delivered in SP red/brown freight car color. The convention<br />
will have 80 of the black cars in two road numbers and<br />
44 of the red cars in two road numbers; all cars will be 2-rail.<br />
These cars will be priced at $50 each. The Atlas O artwork for<br />
the car is shown above. The illustration depicts a 3-rail car; the<br />
convention car will be an RTR 2-rail car. RTR 3-rail cars will be<br />
available from Petersen Supply.<br />
NEWS: Resin kit for Southern Radio Receiver Cars; MSRP: $99.99<br />
plus postage<br />
Dave Friedlander, davidjfriedlander@gmail.com or 919-218-5888<br />
In 1966, Berwick Forge and Foundry built 50 radio receiver<br />
cars (RRC) for the Southern Railway. Until their retirement by<br />
Norfolk Southern (NS) in 1996, they were MU’d to midtrain<br />
locomotive consists on long freights. A unit in the lead consist<br />
would use Locotrol to synchronize speed, and other signals, to<br />
the midtrain locomotives via the RRC. Before they were scrapped<br />
in 2003, Jim King, of Smoky Mountain Model Works, handmeasured<br />
one of these cars and Dave Friedlander is now offering<br />
a cast urethane kit to build an RRC.<br />
Designed with CAD for precision, the kit includes a 2-piece<br />
urethane casting (body and underframe), all necessary detail<br />
NEWS: Custom painted Atlas O tank car and 2-bay hopper;<br />
MSRP: See text<br />
The Public Delivery Track, PO Box 2637, Paso Robles, CA 93447<br />
pdtrains@earthlink.net • www.PublicDeliveryTrack.com<br />
Sinclair 8000 gallon tank car: Sinclair in the 1950s had the<br />
largest tank car fleet in the US with 7000 cars. This version was<br />
the most common lettering<br />
scheme. The tank car fleet was<br />
sold to GATX in the 1960s.<br />
This car is super detailed, with<br />
separately applied handrails,<br />
diecast sprung trucks, full<br />
brake gear and very sharp,<br />
accurate lettering.<br />
Southern Pacific 8000 gallon fuel service tank car: Headquartered<br />
in 1950s oil rich<br />
California, SP had a fleet of<br />
tank cars to get diesel fuel to<br />
engine facilities. It was very<br />
common to see a few SP tank<br />
NEWS: On30 <strong>2010</strong> Annual; MSRP: $14.95 US/Canada plus S&H<br />
Carstens Publishing, 108 Phil Hardin Rd, Newton, NJ 07860<br />
888-526-5365 • www.on30annual.com<br />
Carstens Publications, Inc., is<br />
pleased to announce the release of the<br />
On30 Annual <strong>2010</strong>. This new annual<br />
marks the fifth anniversary of this innovative<br />
publication, and is geared specifically<br />
for the On30 narrow gauge<br />
modeler. Written by veteran On30<br />
modelers, this new publication contains<br />
a wealth of modeling information and<br />
inspiration. The On30 Annual <strong>2010</strong><br />
retails for $14.95 US & Canada and 19.95 Foreign (Plus S/H,<br />
please see website or call for details) and is available at hobby<br />
shops, or can be ordered online at [carstensbookstore.com] or<br />
by calling toll free (US & Canada) 1-888-526-5365.<br />
The On30 Annual <strong>2010</strong> takes you on a tour of several<br />
beautiful layouts and includes a track plan designed specifically<br />
for an On30 client by MMR Bill Miller, the White Pine<br />
Mining and Lumber Co. Railway. This issue features a number<br />
of scratchbuilding and construction projects including: how to<br />
build a Barnhart log loader; a new and innovative technique<br />
for building stone structures; how to build an operating gallows<br />
turntable, and more.<br />
parts, a steel<br />
weight, decals,<br />
Weaver diecast<br />
trucks, Kadee<br />
couplers, and<br />
step-by-step<br />
instructions with<br />
color photos. Kits are $99.99 plus postage and completely finished<br />
models are $175 plus postage. Models finished in NS livery<br />
are $12 extra. Kits are available in both 2-Rail and 3-Rail.<br />
Dave can be contacted by email at davidjfriedlander@gmail.<br />
com, by phone at 919-218-5888 or through his website [http://<br />
www4.ncsu.edu/~djfriedl/SRRKit.html]. Photos at the website<br />
show all the available paint schemes and truck/coupler options.<br />
cars at any diesel facility or layover yard, where engines were<br />
refueled. These cars are super detailed, with separately applied<br />
handrails, diecast sprung trucks, full brake gear and very sharp,<br />
accurate lettering.<br />
Tank cars prices: $62.95 for 3-rail; $67.95 for 2-rail. Four<br />
road numbers available.<br />
Southern Pacific 2 bay hopper car: SP has always had a<br />
large aggregate business, and a large fleet of 2-bay hopper<br />
cars. There are still hopper cars lettered SOUTHERN PACIFIC<br />
in rock train service today.<br />
This car is the 1955 hopper<br />
car scheme with the large lettering<br />
and SP logo. The model<br />
has opening hopper bottoms,<br />
separately applied handrails,<br />
diecast sprung trucks, full brake<br />
gear and very sharp, accurate lettering. Price: $65.95 for 3-rail,<br />
$70.95 for 2-rail. Available in 2 road numbers<br />
46 • O <strong>Scale</strong> <strong>Trains</strong> - <strong>Mar</strong>/<strong>Apr</strong> ’10
Review: MTH # 20-2822-2 GE ES44AC Diesel; MSRP: $449.95<br />
M.T.H. Electric <strong>Trains</strong>, 7020 Columbia Gateway Drive,<br />
Columbia MD 21046<br />
410-381-2580 • www.railking.com<br />
Reviewed by Gene Clements<br />
The Prototype<br />
Produced by General Electric as its answer to the Environmental<br />
Protection Agency’s exhaust emission standards<br />
that took effect on January 1, 2005, this locomotive series<br />
is commonly referred to as the “GEVO” or Evolution Series.<br />
The first production models went to the Union Pacific, Burlington<br />
Northern Santa Fe and Norfolk Southern which opted<br />
for the DC transmission units.<br />
While similar in carbody design to the AC4400, the radiator<br />
section has the most visible changes. The radiator wing<br />
is much larger and longer extending several feet further into<br />
the carbody where it overhangs the walkways at the rear of<br />
the long hood. The roof of the radiator is divided into two<br />
parts, the rear two thirds is the radiator section while the<br />
front third houses the new heat exchanger fans. Also new<br />
for this series is the power plant, a 12 cylinder diesel engine<br />
rated at 4400-hp that is more fuel efficient and reduces<br />
emissions by 40% from the previous 16 cylinder engine. The<br />
wide North American style cab has multiple window and<br />
cab arrangements available for each railroad’s version. Our<br />
BNSF units came with similar cab arrangements but different<br />
control stand configurations as the orders arrived. The<br />
BNSF units are replacing older SD40-2 EMD locomotives,<br />
which are being retired and the new units are receiving road<br />
numbers from that series as they become available.<br />
The Model<br />
As I stated in the MTH 8-40C review (OST #43,<br />
<strong>Mar</strong>./<strong>Apr</strong>. 2009) this is not the MTH 2-Rail locomotive<br />
from the 1990s. Although this locomotive has a<br />
plastic body shell and metal frame used before, the<br />
quality and detail is much improved. Twin vertical<br />
can motors power the model, while the cast metal<br />
fuel tank houses the speaker for the sound system.<br />
<strong>Scale</strong> plans found in the November 2004 issue<br />
of Model Railroader were used to check measurements.<br />
The unit is a scale 73’ 6” over the face of the<br />
Kadee® #806 couplers, and is a scale 10’ wide and<br />
stands 15’ 6” from the rail top to the roof of the cab.<br />
It comes factory equipped with Proto-Sound 2.0,<br />
a variable intensity smoke unit, operating headlights,<br />
flashing ditch lights, scale wheels and permanently<br />
attached front and rear pilots. The unit is also<br />
available in 3-Rail and un-powered versions. Other<br />
road names include CSX and Canadian National in<br />
the ES44DC version. The ES44AC is also available in<br />
NS, KCS, CP, UP and GE Demonstrator in 3-Rail and<br />
un-powered version as well as the 2/3-Rail unit with<br />
scale wheelsets.<br />
Fidelity & Compatibility<br />
This review unit is painted and lettered in the<br />
latest BNSF “Swoosh” scheme. Since the BNSF<br />
removed the locomotive numbering system from<br />
its special instructions, all I can say is the number<br />
appears to be that of a unit placed in service within the last<br />
couple of years. The paintwork is sharp and crisp down to<br />
the warning placards on the long hood.<br />
Grabirons, stanchions and safety railings all appear to be<br />
installed per prototype photos. Additional details included<br />
coupler lift levers, m.u. hoses and crew. The pilots are cast<br />
to accept Kadee #806 couplers & boxes, which are attached<br />
by two machine screws per box that are supplied with the<br />
engine. After installation, the couplers checked out at the<br />
correct height and required no adjustment. An included<br />
snowplow also attaches to the front pilot in the same manner.<br />
The trip pin on the front coupler has to be modified<br />
slightly since it strikes the top of the plow and forces the<br />
front pilot slightly upwards.<br />
A word or two about sound under the Fidelity heading,<br />
while the ES44 is equipped with a new 12 cylinder power<br />
plant, its still a GE with that distinct “Burble Sound”. Most<br />
noticeable is a more profound electrical whine especially at<br />
#7 or #8 throttle than in previous models.<br />
Performance<br />
I tested the unit on a conventional DC system using a<br />
Starr Tech “Hogger” 10 amp. power supply and throttle.<br />
Applying power, the sound system activates and you go<br />
through startup at 4 volts. At 5 to 6 volts the headlights illuminate<br />
to a constant brightness and at 7 volts plus the unit<br />
will start to move. At standard operating speed on my layout<br />
the unit drew 12 volts while I was at 50% throttle, and at<br />
80% plus throttle this unit will really move and trip the overspeed<br />
control at 72 smph plus.<br />
Once the sound system goes through startup, the prime<br />
mover revs up with the increase of power, likewise it<br />
<strong>Mar</strong>/<strong>Apr</strong> ’10 - O <strong>Scale</strong> <strong>Trains</strong> • 47
throttles down as power is decreased until you stop and<br />
the sound system returns to idle. Once stopped with the<br />
throttle off, the battery backup keeps the sound system in<br />
idle for about 15-20 seconds until the system cycles through<br />
shutdown and turns off. The sound system is not playable or<br />
adjustable in conventional DC mode, with the exception of<br />
the volume control located underneath the radiator housing.<br />
Since MTH’s DCS system is proprietary you will need to use<br />
it to control and enjoy the full effects of the sound.<br />
Weighing in excess of 6-1/2 pounds with twin motors<br />
and 6 powered axles the ES44AC has some real pulling<br />
power. In testing on level track the engine reached 22 ozs.<br />
of drawbar pull prior to wheel slip. It easily handled a 24<br />
car weighted train around the layout that normally requires<br />
two Geeps.<br />
I ran the ES44AC with an MTH SD70ACE and other conventional<br />
DC diesels without onboard electronics. Mu’d<br />
with the 70ACE, the two ran together as a team but the electronics<br />
seemed to compete with each other. Operating with<br />
non-electronic units these engines tended to push or pull the<br />
ES44AC simply because of the electronics power requirements.<br />
Operating it as a single unit or with a dummy yielded<br />
Review: The Station Scene; MSRP: $225, plus postage<br />
Stoney Creek Designs, 4100 Hunters Run Blvd., Reading,<br />
PA 19606 • www.stoneycreekdesigns.com<br />
Reviewed by Joe Giannovario<br />
Background<br />
Roger Malinowski has written numerous articles for<br />
the Narrow Gauge And Short Line Gazette, has built a few<br />
notable layouts and has done design work for other manufacturers.<br />
In 1994 he decided to manufacture his own product<br />
line, designing and building quality O <strong>Scale</strong> structure<br />
kits under the name of Stoney Creek Designs. Roger’s kits are<br />
always released first at the National Narrow Gauge Convention.<br />
His kit for 2009 was called the Station Scene and consisted<br />
of three structures: a depot, a passenger car converted<br />
to a work shed, and an outhouse/coal bin. Roger models in<br />
On30 so his kits tend to be smaller than one might expect for<br />
O <strong>Scale</strong> and that’s a good thing.<br />
The Kits<br />
The Station Scene is actually three kits in one box and<br />
each can be built separately. The station has a footprint of<br />
11-3/4” x 5”, the work shed is 7-1/2” x 3”, and the outhouse/<br />
coal bin is 5” x 2-1/2”. These are all quite reasonable sizes<br />
and will fit nearly any O <strong>Scale</strong> layout.<br />
Highly detailed instructions are provided for each kit as<br />
well as a CD with PDFs of the instructions and hi-res photos<br />
of each construction step for the three structures. The kits<br />
consist of precision laser-cut wood parts plus castings. Everything<br />
you need is included except glue and paint, for which<br />
Roger makes some very specific recommendations.<br />
Building The Kits<br />
These kits almost fall together themselves. There are a few<br />
little tricky parts like laminating the inner and outer walls<br />
with contact cement but there’s nothing here that will cause<br />
you any problems with assembly. Typical modelers’ tools like<br />
good results. After performing the m.u. tests and a “Brain<br />
Cramp”, it occurred to me that DC locomotives have always<br />
needed to be tweaked and fine tuned and sometimes have<br />
their pickup system modified to perform well together. In all<br />
fairness, optimal performance would be achieved with an<br />
MTH DCS system which was not available to me for testing.<br />
Conclusions<br />
MTH has been listening to the requests from O <strong>Scale</strong><br />
diesel modelers. For those of you like me, who own MTH<br />
2-Rail diesels, you will be impressed by their attention to<br />
detail and efforts to improve their products. While not the<br />
quality level of a brass model, the detail and correctness of<br />
these plastic models is much improved. As was rumored,<br />
I am curious about MTH’s plans to have DCC compatible<br />
locomotives out in <strong>2010</strong>. I am still looking forward to those<br />
products because my current plan is a DCC conversion of<br />
the ES44AC and SD70ACE in the very near future. This DCC<br />
conversion is a separate story within itself. Once completed,<br />
I’ll pass on my experiences and results.<br />
a razor knife, some files<br />
and sandpaper are really<br />
all that are required.<br />
One of the things<br />
I liked most was the<br />
painting and weathering<br />
suggestions. Often,<br />
this is left up to the<br />
modeler with little or<br />
no guidance. This does<br />
slow down construction<br />
somewhat but the<br />
end result is worth the<br />
effort. Of course, you<br />
are free to choose your<br />
own color scheme but<br />
I’d still follow Roger’s<br />
weathering suggestions.<br />
I’ve not finished the<br />
station yet and I’m considering<br />
a modification<br />
that would make<br />
the station walls one<br />
continuous piece. I’ll<br />
let you know later how<br />
that works out.<br />
As each kit is separate I’m using them in separate areas of<br />
the new OST layout rather than together as Roger designed<br />
them. That’s another nice thing about this design.<br />
Conclusion<br />
Roger’s kits are limited production and sell out quickly<br />
although the Station Scene is still available in late November<br />
as I write this. Contact Roger through his website to see if the<br />
kit is still available now. His <strong>2010</strong> kit is called the Scrap Yard.<br />
You can see it and place a reservation at his website.<br />
48 • O <strong>Scale</strong> <strong>Trains</strong> - <strong>Mar</strong>/<strong>Apr</strong> ’10
Review: N&W Y6b; MSRP: $1799, plus shipping<br />
Sunset Models, 22 Beta Ct, San Ramon CA 94583<br />
800-373-7245 • www.3rdrail.com<br />
Reviewed by Joe Giannovario<br />
Background<br />
The N&W Y6b is one of those legendary steam engines<br />
that everyone recognizes. It’s been made in N, HO and O<br />
<strong>Scale</strong> several times.<br />
During World War I the U.S. Government took over<br />
the railroads via the United States Railway Administration<br />
(USRA). The USRA set up a design committee to develop a<br />
set of ”standard” locomotives to use during the war. The delegate<br />
from the N&W Railway brought a full set of blueprints<br />
for the Class Y2, 2-8-8-2 which was used for the basis of the<br />
USRA 2-8-8-2, and the N&W took delivery of 45 USRA 2-8-<br />
8-2s.<br />
Not content to sit on its laurels the N&W continued to<br />
develop the 2-8-8-2 design through Y4, Y5 and Y6 designs.<br />
The Y6 was further refined and designated as Y6a and<br />
Y6b. The Y6b is considered the ultimate N&W drag freight<br />
engine. A fully modernized Y6b was capable of developing<br />
166,000 lbs. of tractive force. Compare that to a UP Big<br />
Boy’s 135,375 lbs. of tractive effort. Y6s regularly pulled<br />
coal drags at speeds up to 50 mph. They were the ”pocket<br />
battleships” of steam. See the list of references for more<br />
detailed information about the N&W Y class locomotives.<br />
The Model<br />
Sunset has produced an exceptionally fine model of the<br />
Y6b in both 2-Rail and 3-Rail versions. The model is constructed<br />
of brass with rolled, machined and lost wax detail<br />
parts. Of particular note is the valve gear, which is more<br />
finely detailed than normally found on locomotives at this<br />
price point. I also noted that the mechanical lubricators<br />
were properly connected to the valve gear, something which<br />
is often incorrect or left out entirely. Another nice touch are<br />
running boards with drain holes rather than the diamond<br />
plate we’ve been used to for so many years. Last but not<br />
least is another nice new touch for Sunset, plastic brake<br />
hangers and shoes with attached sanding lines. What a great<br />
idea!<br />
The model I tested is painted, lettered and lighted and<br />
has several sliding hatches, opening doors and something<br />
new for Sunset, cab ”wing” windows, a nice detail. The<br />
locomotive has a single large can motor powering Sunset’s<br />
”quiet drive” belt and pulley system down to the gearboxes.<br />
I had a problem with the front gearbox. When it was<br />
assembled the front screw was driven in so tightly it cracked<br />
the gearbox cover allowing the worm to come away from<br />
the worm gear. It sounded like a coffee grinder. An email to<br />
Sunset brought a replacement cover in the post and I was<br />
back in business in no time.<br />
Fidelity<br />
I measured the Sunset model against plans in the Model<br />
Railroader Locomotive Cyclopedia, Vol. 1 (in HO <strong>Scale</strong>) and<br />
in Norfolk & Western Steam (The last 25 years) by Rosenberg<br />
and Archer (in S <strong>Scale</strong>). With a few minor exceptions, it<br />
is accurate to within 2-3 scale inches in every major dimension.<br />
I did notice an extra scale foot in the distance from the<br />
first driver to the lead truck and a several extra inches in the<br />
distance from the last driver to the trailing truck, yet they<br />
managed to keep the overall length of the locomotive correct.<br />
The locomotive width and height are also correct. The<br />
tender wheelbase seems a bit off by several inches but the<br />
tender itself is dead on the money.<br />
The finish is a semi-gloss black which looks nice. The<br />
smokebox front is graphited which is okay but the smokebox<br />
access area behind the stack is also graphited and that<br />
looks really odd. I can’t say it’s wrong, just odd.<br />
I examined as many photos of Y6bs as I could find in<br />
my library and online to validate the various details. I was<br />
initially convinced the front porch railings were done incorrectly.<br />
However, I was able to confirm that all the major<br />
details are correct.<br />
Sunset, like many other manufacturers, illuminates the<br />
class lamps, in this case with green lights. In reality, the<br />
class lamps would not be lit in most normal operations, so<br />
there should be a way to turn them off.<br />
Compatibility<br />
I checked the drivers with a digital caliper and found<br />
the tires measure 0.175” thick. This is reflective of the old<br />
NMRA standard. The new standard is based on a 0.145”<br />
tire. However, all drivers and wheelsets passed the NMRA<br />
<strong>Mar</strong>/<strong>Apr</strong> ’10 - O <strong>Scale</strong> <strong>Trains</strong> • 49
check gauge test. I ran the model through a 48” curve and a<br />
No. 5 crossover with no problems.<br />
The front pilot has a dummy coupler, which will mate<br />
with a Kadee. The tender comes equipped with a Kadee<br />
coupler set to the correct height.<br />
Performance<br />
All testing was performed with an MRC ControlMaster<br />
20 outfitted with both Volt and Amp meters. I also measured<br />
drawbar pull.<br />
Best slow speed performance was achieved at 1.8 V and<br />
800 mA. The locomotive ran smoothly at 4 scale miles per<br />
hour. As this a drag freight engine and not a switcher, this is<br />
excellent performance. I noted that the engine would start to<br />
move at 1.5V but I could not sustain a smooth speed.<br />
Maximum power draw was 2 Amps at 4 V with the drivers<br />
slipping. That is only 8 Watts of power. The pull meter<br />
showed a tractive effort of 24 ounces. I used my N&W G1<br />
2-8-0 as the baseline as it is the lightest and least powerful<br />
engine I own. Its tractive effort at slip is 10 ounces.<br />
At all speeds the locomotive ran smoothly and almost<br />
silently. If there had been sound onboard, you wouldn’t<br />
have heard the drive train at all.<br />
The locomotive weighs about 7 pounds. I added several<br />
tungsten weights (close to 8 ounces) on top of the boiler<br />
while performing the slip test and did not see any appreciable<br />
increase in tractive force so I would conclude the<br />
locomotive is weighted correctly as-is.<br />
Conclusions<br />
Aside from the gearbox cover I did have one other issue<br />
with this engine to which I was alerted by another modeler.<br />
After I had installed the new gearbox cover, which necessitated<br />
turning the locomotive upside down, I noticed that a<br />
combination lever on the front engine had come loose from<br />
its valve rod (see the close-up photo). The combination lever<br />
has a hole in it and the valve rod clevis has a pair of pins<br />
(trunnions) that fit into the hole from either side. The clevis<br />
must be squeezed closed to capture the combination lever. I<br />
managed to refit the parts with a bit of fussing and a pair of<br />
tweezers.<br />
I checked<br />
the other<br />
three<br />
joints and<br />
they were<br />
all tight. If<br />
I had run<br />
the engine<br />
with the<br />
loose<br />
combination<br />
lever,<br />
it could<br />
have<br />
caused<br />
the running<br />
gear<br />
to bind up so check your fittings before you run the engine.<br />
There are a few minor disappointments. Those lighted<br />
class lamps are really annoying. For a steam locomotive<br />
so historically important it is a shame not to include some<br />
detailed information about its development.<br />
Regardless, this is probably the finest steam locomotive<br />
Sunset has yet produced. The fine detail on the running gear<br />
is outstanding. I used to say that the N&W K3 4-8-2 that<br />
Sunset produced almost 10 years ago was my best running<br />
locomotive. That has now been replaced by this Sunset Y6b.<br />
It’s running performance is superb. It will make a fine candidate<br />
for a DCC with sound installation.<br />
References<br />
Classic Power #3A: USRA 2-8-8-2 Series, by Tom<br />
Dressler & Ed King, published by NJ International (no date).<br />
Norfolk & Western Steam (The last 25 years), by Rosenberg<br />
& Archer, published by Quadrant Press 1973.<br />
Review: NYC 36’ Wooden Box Car kit; MSRP: $125<br />
Mullet River Model Works, 118 Hudson Ct, Plymouth WI<br />
53073<br />
920-892-8159 • www.mulletrivermodelworks.com<br />
Reviewed by Joe Giannovario<br />
50 • O <strong>Scale</strong> <strong>Trains</strong> - <strong>Mar</strong>/<strong>Apr</strong> ’10<br />
Background<br />
In 1901 the American Railroad Association adopted<br />
dimensions for a “standard” boxcar. The car’s inside dimensions<br />
were to be 8’ 6” wide and 8’ tall. They were never able<br />
to agree on the length. The eastern railroads wanted to stay<br />
with 36’ cars because all the doors in freight houses were<br />
on 36’ centers. The width and the height were established to<br />
clear the New York Central, Pennsylvania, and Baltimore &<br />
Ohio clearances. The idea was to have a free roaming car and<br />
to eventually lead to a common car design. Also at this time<br />
steel was being used more in car construction.<br />
The New York Central version of this car had a steel frame<br />
with a wood body. These cars evolved from an all-wood car<br />
developed in 1902 to meet the “standard boxcar” dimensions.<br />
In 1910 the steel underframe was designed and the<br />
wood body was applied over it. In 1912 the steel Murphy<br />
ends were added to the cars built between 1912 and 1917.<br />
All the New York Central’s affiliated lines had these cars. In<br />
the 1920s this design evolved into an all steel car, while the<br />
wood-sided cars lasted into the early 1950s.<br />
The Model<br />
This kit is a model of a New York Central lines 36’, 80,000<br />
lbs. capacity boxcar. The model features a laser-cut wood<br />
body with interior scribing on the walls and floor. The roof<br />
is made with wood carlines and purlins like the prototype.<br />
A wooden subroof with scribing is covered by a plastic<br />
roof to look like the Murphy steel roof. The underframe is a<br />
full-length 0.010” brass etching that has the rivet locations<br />
marked for easy embossing and which can be shortened for<br />
your choice of couplers with pockets. Trucks and couplers<br />
are not included, however, this kit is available with decals for<br />
NYC&HR (#403207), B&A (#403208), Big Four (#403209),<br />
P&LE (#403210) and LS&MS (#403211).<br />
Building The Kit<br />
Mullet River kits are not for the faint of heart. This kit will
challenge your modeling skills but the result will be worth it.<br />
The instructions tell you to build the boxcar body first. This is<br />
the easy part. I chose to build the underframe first. This is the<br />
challenging part.<br />
The underframe is made up of flat brass etchings. Many of<br />
the parts have divots etched into one side to indicate where<br />
you need to make rivet impressions. The instructions say<br />
“take your rivet tool” and impress the rivets. What they really<br />
want you to do is use a rivet press and die to make the rivet<br />
impressions. If you don’t have a rivet press you can do what<br />
I did and make a rivet tool from a “sharps” sewing needle in<br />
a pin vise. Make sure you blunt the tip of the needle or else<br />
it will pierce the thin brass. I hand pressed the rivets over a<br />
piece of soft wood. These won’t look as good as if you used a<br />
press and die but they will be covered in paint and mostly out<br />
of sight once completed. It took me close to 3 hours to press<br />
all the rivets. If you do the rivets by hand, do not clip all the<br />
parts off the etching tree as they’ll be easier to handle. If you<br />
do use a press and die, you will have to cut the parts loose to<br />
get them into the press. Making the rivets isn’t difficult; it’s just<br />
tedious.<br />
The next part is the real challenge—folding up the brass<br />
parts. All the fold lines are etched into each part and you just<br />
need to remember that the lines all go to the inside of the<br />
fold.<br />
I did the trickiest piece first, the side sills. These flat<br />
pieces need to be folded into a ”z” shape. I used a Panavise<br />
with brand new nylon jaws, a straightedge and my fingers.<br />
I clamped the sill in the vise on one end and made the fold<br />
with my fingers. I then slid the piece further long, reclamped<br />
and folded again, continuing until I had the entire 9” length<br />
folded. Once I had the whole thing folded on one side I<br />
pressed it flat against the vise jaws with a straight edge.<br />
Now, flip the sill over and fold in the other direction.<br />
It’s going to look grotesque until you get the whole length<br />
folded and then it just sort of straightens itself out. Keep<br />
checking the straightness with your straightedge.<br />
You could buy a commercial bending jig but unless<br />
you plan to build a lot of these it’s probably not worth it. You<br />
could also make a bending jig from two pieces of flat bar<br />
stock that you clamp together.<br />
Once all the pieces are folded, it’s time to solder the<br />
frame together. A wooden fixture is provided to facilitate<br />
assembly. Unfortunately, there are no photos with the instructions<br />
to guide the assembly and all of the parts are called out<br />
with their correct prototypical names. So, if you don’t know<br />
what a bolster diaphragm is, you’re in trouble. I’ve spoken<br />
with Glenn Guerra of Mullet River about this and he will be<br />
posting construction photos at the Mullet River website. He<br />
will also be posting a clinic about working with brass etchings.<br />
Because the parts are so delicate, you will want to use a<br />
resistance-soldering unit for assembly. Glenn recommends<br />
that you tin the part with a regular iron first and then use the<br />
resistance unit to tack solder it in place. If you don’t have a<br />
resistance unit you can kludge one up from a Weller gun by<br />
cutting off the end of the copper tip so you have two prongs.<br />
As a last resort, you could CA all the parts together.<br />
Conclusion<br />
I have to be honest here. The photos shown here were<br />
supplied by Mullet River because there was just no way I<br />
could get the car built in time for publication. To do this kit<br />
justice, it cannot be rushed. This is going to take maybe 20<br />
hours to build since I’ve never done a soldered frame before.<br />
Overall, the kit is a masterpiece that will rival any brass<br />
import you’ve ever seen. It’s greatest failing is the instructions.<br />
Fortunately, Glenn Guerra is a great guy to talk to and he<br />
will happily answer any questions you might have about the<br />
assembly. Give him a call or email him.<br />
If you are looking for a challenge that will expand your<br />
modeling skills, take a look at a Mullet River boxcar kit.<br />
<strong>Mar</strong>/<strong>Apr</strong> ’10 - O <strong>Scale</strong> <strong>Trains</strong> • 51
Review: Protocraft’s AAR Type E <strong>Scale</strong> operating couplers<br />
#PC-1076; MSRP: $62.50/ five pairs<br />
Protocraft 18498 Half Moon Street, Unit 203<br />
Sonoma, CA 95476-4835<br />
707-935-7011 • www.protocraft.com<br />
Reviewed by Mike Cougill<br />
Back in the Jan/Feb 2009 issue of OST I wrote in my column<br />
that I wished someone would produce a scale operating<br />
coupler that married the faithful prototype appearance of a<br />
San Juan coupler to the bulletproof operation found in Kadee<br />
couplers. Norm Buckhart of Protocraft has answered the call<br />
with his newly redesigned Type E operating scale couplers.<br />
Type E coupler designs were a modification of the existing<br />
Type D couplers and came into use during the 1930s.<br />
Dimensionally, the two were virtually identical except for the<br />
coupler shaft. The Type E coupler shank’s dimensions were<br />
increased from 5” x 7” to 6-1/4” x 8”.<br />
Protocraft’s new couplers were made from master patterns<br />
made by the late Bill Clouser. From a posting on the P48<br />
Yahoo Group, Norm provided the following information:<br />
“The design used by Bill Clouser follows the plans almost<br />
exactly for the ARA Type E coupler as depicted on page 889<br />
of the 1931 Car Builder’s Cyclopedia. The coupler body measures<br />
12” from the knuckle pin to the rear of the lift pin casting<br />
and is 12.5” tall. The knuckle measures 11” tall (Sharon’s<br />
measures 9” tall).” Norm also noted that Bill Clouser made<br />
some additional changes to the design as a concession to the<br />
realities of model railroading, such as slightly narrowing the<br />
coupler’s shank in order to accommodate existing model’s car<br />
bodies and coupler boxes commonly used at the time.<br />
These brass coupler kits feature a self-centering coupler<br />
shank and spring action that replicates the draft motion of the<br />
1<br />
prototype; a brass coupler box<br />
with mounting screws, along<br />
with brass train line air cocks,<br />
two lengths of flexible tubing<br />
for the airhoses and brass glad<br />
hand castings (Photo 1).<br />
The face of the knuckle<br />
castings will need to cleaned<br />
up with a small file to remove<br />
the flash left over from cutting<br />
the casting sprue off. Be<br />
certain to exam the coupler<br />
knuckle castings as the ones<br />
I received were deformed.<br />
I didn’t pay much attention to this until I tried to couple<br />
them together and couldn’t because the deformed castings<br />
wouldn’t close and lock properly. A conversation with Norm<br />
via e-mail diagnosed the problem and he sent two replacement<br />
knuckles, which solved the problem. Norm apparently<br />
had a defective casting mold that he has now stopped using<br />
for production runs of the couplers. Anyone who has the<br />
deformed knuckle castings can get a replacement part by<br />
contacting Protocraft. The supplied instructions are very clear<br />
and cover the assembly process in detail. The modeler is cautioned<br />
not to remove too much material or to file the indentations<br />
on the lift pins as doing so may affect the coupler’s<br />
operation.<br />
To assemble the knuckles to the coupler body, you insert<br />
the escutchion pins through the holes. I had to drill out the<br />
holes in the coupler body and the knuckles with a #63 drill<br />
bit in a pin vise. The brass is soft and easily drilled by hand<br />
pressure using a drop of hair clipper oil as a lubricant. You are<br />
instructed to nip off the excess pin length and peen the cut<br />
end over in order to secure it from falling out. I found this was<br />
simple to do with a small ball peen hammer by placing the<br />
coupler assembly on the anvil portion of my bench vise. A<br />
few light taps was all it took to peen the soft brass. Take care<br />
not to restrict the motion of the knuckle by getting things too<br />
tight.<br />
Assembling the completed coupler to its box and attaching<br />
it to the carbody is as easy working with the familiar Kadee<br />
brand. The Protocraft boxes have the same mounting hole<br />
pattern, so there are no surprises here. You may have to do a<br />
bit of light touch up to the inside of the box and the coupler<br />
shank surfaces for smooth centering operation.<br />
The instructions also give guidance for forming working lift<br />
bars (cut levers) for both bottom and top operating designs.<br />
Additionally, the Protocraft couplers are designed for magnetic<br />
uncoupling by inserting a small piece of steel in the lift<br />
pin’s slots. Norm recommends using a small section of paper<br />
clip for this, and Protocraft has a magnetic uncoupling wand<br />
to lift the pins once they are fitted with the steel inserts.<br />
I put the samples through some very unscientific testing<br />
and found the operation was very reliable, for both coupling<br />
and uncoupling. Uncoupling a car only requires one knuckle<br />
to be opened. I mounted a pair on each end of two fifty-foot<br />
freight cars (see Photos 2 and 3) and I didn’t have any issues<br />
with coupler swing or binding on my tight 36” radius curve.<br />
(See the additional photos from my online review posted<br />
under Mike’s Projects on the OST blog.) I also noted that<br />
these couplers would mate with Kadee’s even though the<br />
literature from Protocraft<br />
says they won’t.<br />
The instructions<br />
also note that they<br />
will mate with the<br />
San Juan delrin coupler<br />
and some PSC<br />
non-working brass<br />
couplers. However,<br />
I would suggest that<br />
a modeler standardize<br />
on one brand or<br />
another for more satisfying<br />
operations.<br />
My layout was<br />
designed for switching<br />
from the start<br />
and manual uncoupling<br />
was part of that<br />
2<br />
3<br />
plan from Day 1. At sixty dollars plus for five pairs, they might<br />
be a bit pricey for those with many cars to convert, but if you<br />
are just starting out in O <strong>Scale</strong> or have a small roster of equipment,<br />
these couplers are hard to beat. Protocraft has won me<br />
over as a convert.<br />
52 • O <strong>Scale</strong> <strong>Trains</strong> - <strong>Mar</strong>/<strong>Apr</strong> ’10
Review: Wood Bent Trestle Kit #TJK-4DSO; MSRP: $89.65<br />
Black Bear Construction Co., PO Box 26911, Austin, TX 78755<br />
512-467-8400 • www.blackbearcc.com<br />
Reviewed by Joe Giannovario<br />
1<br />
If you study the Abingdon Branch of the N&W one of the<br />
first things you will notice is the unusual number of trestles<br />
and bridges. There are 108 over the 70-mile run, which has<br />
got to be some sort of record. The majority of these are timber<br />
trestles, so I knew I had to build at least one trestle for<br />
the new OST layout (see Starting Over - Part 2 in this issue).<br />
The thought of scratchbuilding a timber trestle was intimidating<br />
until I found the website for the Black Bear Construction<br />
Company. They offer trestle-building kits in a variety of<br />
configurations that contain everything you need to construct<br />
the trestle. What makes their kits special are two things: the<br />
construction jig that comes with the kit, and the Mt. Albert<br />
stripwood in 24” lengths.<br />
Black Bear offers 4, 5, 6, and 8 leg bent designs in O<br />
<strong>Scale</strong> for both narrow and standard gauge. I chose a 4-leg<br />
standard gauge design based on a photo I found of an<br />
N&W trestle under construction. Photo 1 shows the kit<br />
as received. I also ordered the optional Nut-Bolt-Washer<br />
(NBW) casting kit ($10.00) shown.<br />
You start a trestle bent by cutting the bent’s legs to the<br />
correct angle using the bottom edge of the jig (Photo 2). You<br />
then flip the legs over and glue them to the top cap of the<br />
bent. The length of the cap is measured at the top of the jig<br />
so it is just a matter of measure and chop. I used a gel-based<br />
CA to glue all the wood together so I would not have to wait<br />
for the glue to dry. Once you determine how tall your bent<br />
needs to be you trim the leg length, again using the jig to<br />
hold the legs at the correct angle.<br />
When that is done, you use the jig to measure the horizontal<br />
cross braces and CA those in place on one side, flip<br />
the bent over and do the other side. The last bit of assembly<br />
is to add the diagonal braces on both sides. It takes more<br />
time to sort out the different pieces of stripwood needed<br />
than to do the assembly.<br />
Photo 3 shows a completed bent before staining and<br />
before adding the NBW castings. It took me about 20 minutes<br />
to make the first bent. The rest took about 10 minutes<br />
each. Drilling the bents for the NBW castings and inserting<br />
the castings took the most time of all the steps but the end<br />
result is worth it. I will provide a more detailed description<br />
of how I installed the trestle in a future installment of Starting<br />
Over.<br />
The kit provides enough material to build 7 bents (about<br />
a 30” long trestle) and you can buy more wood from Black<br />
Bear if you need to make a longer trestle. The instructions<br />
were pretty straightforward and the jig makes building a<br />
trestle a snap. I am extremely pleased with the results.<br />
Black Bear also makes wooden arch, truss and deck<br />
bridge kits with assembly jigs. You can also buy just materials<br />
packs or assembly jigs alone for any of their kits. Check<br />
out their website for all the details.<br />
3<br />
2<br />
<strong>Mar</strong>/<strong>Apr</strong> ’10 - O <strong>Scale</strong> <strong>Trains</strong> • 53
Standards Times Three: 1<br />
There has been a lot of talk about wheel profile and<br />
track gauge in the magazine the lately and I have read<br />
these articles with interest. They have made me think<br />
about just what kind of modeler I am and about my real<br />
desires as a modeler.<br />
So here is the question: What is a P48 modeler and<br />
am I one? I think I can say yes! What do I mean? To<br />
me the track gauge and the wheels is the major issue. I<br />
just can’t do the 5’ gauge thing nor can I do typical O<br />
scale wheels and I have a very hard time with non-scale<br />
couplers. So from that stand point I’m definitely a P48<br />
modeler.<br />
Where I feel I deviate from the typical P48 modeler<br />
is in the fact that I do not have to build a model after<br />
a specific prototype but can build a freelance model<br />
as long as it follow prototype practices. My logging<br />
caboose in <strong>Mar</strong>/<strong>Apr</strong> 2009 issue and my flatcar in the<br />
Sept/Oct 2009 issue are examples those type of models.<br />
Many have the idea that in order to be a P48 modeler<br />
one is limited to only prototype specific models. I<br />
don’t believe that to be true. Don’t get me wrong I do<br />
build models of specific prototypes and these are built<br />
as true to the prototype as possible and I enjoy those<br />
challenges. But I find the freedom of building a freelance<br />
model just as challenging. Actually in some ways<br />
more, as that kind of modeling requires designing as<br />
well as building.<br />
Bottom Line: I feel that using correct wheels and<br />
track gauge is the most important aspect of finescale<br />
and specifically P48 modeling whether it’s a prototype<br />
specific model or a freelance one. Thank for some interesting<br />
articles that gave me some food for thought.<br />
Bill Davis<br />
Mike replies: Bill touches on a point that needs to be<br />
clarified further. Does P48 modeling only involve building<br />
models of specific prototypes? The answer is: No.<br />
Many have this impression of P48 and nothing could be<br />
further from the truth. And while some might want to<br />
extend the definition to all aspects of modeling, something<br />
I have been guilty of myself, P48 only defines the<br />
track and wheel standards.<br />
...And A 2...<br />
Appreciate your thoughts regarding standards. I am<br />
a member of a national-international standards board-<br />
IEEE/ANSI, and have been for over 20 years. (There are<br />
some great modelers there also.)<br />
One must remember that a standard is a dynamic<br />
thing, not static. Things and products change, so standards<br />
must adapt. We use a 5-year sunset rule: reaffirm<br />
it or lose it. Any standard over five years old should be<br />
reviewed. Good for the NMRA also. They should follow<br />
the same guidelines.<br />
I have adapted products that follow Gary’s proposed<br />
54 • O <strong>Scale</strong> <strong>Trains</strong> - <strong>Mar</strong>/<strong>Apr</strong> ’10<br />
standards years ago. I started with .115 wheel sets. They<br />
looked great but ran very poorly due to existing track<br />
standards. I then migrated to .145 wheel sets, the best<br />
compromise I could find. Looks pretty good, runs fine.<br />
Thanks to the good folks at NWSL for making all<br />
the products available. Thank you for the push. Best to<br />
Gary.<br />
Jesse Patton, Spicewood, TX<br />
...And A 3<br />
In the current issue of O <strong>Scale</strong> <strong>Trains</strong> <strong>Magazine</strong> you<br />
ponder about the history behind the selection of 1:48<br />
rather then 1:45 for American O <strong>Scale</strong>. Let me suggest<br />
an answer. Back in the early days of the hobby, there<br />
were no scale rulers available and the closest was the<br />
triangular rule used by draftsmen. The 1/4” to the foot<br />
scale was close so modelers used it.<br />
As for P48 flextrack. If Ed Duddy’s dies would work<br />
with code 125 rail, I for one would purchase a couple<br />
of hundred feet of it. While handlaid track is easier to<br />
replicate specific configurations of track, handlaying<br />
hidden track or a staging yard appears to me to be an<br />
experience similar to a visit to the dentist. Thanks for a<br />
very good magazine.<br />
Lawton Maner, Williamsburg, VA<br />
Prototype Prefab Switches<br />
Author Gene Clements, in his article concerning prefabricated<br />
turnouts and track panels is correct in thinking<br />
that the prototype got the idea for prefabricated<br />
turnouts from model railroading. Although it wasn’t the<br />
prototype railroads that used the idea but the design<br />
came out of The Bethlehem Steel Company’s Frog and<br />
Switch Division.<br />
My father-in law, R. M. Frey, was Chief Engineer for<br />
that Division. He was in my basement one day and I<br />
was working with an Atlas prefab turnout (probably<br />
about 1972 as I didn’t move to O <strong>Scale</strong> until1974). He<br />
picked up that turnout, kept rolling it over and looking<br />
at it and finally put it down. He didn’t say much<br />
but I could tell from his expression that the wheels<br />
were turning. Several months later he invited me into<br />
their shop floor and there lay a turnout in three pieces,<br />
each separated by about a foot. Also sitting there was<br />
a specially modified gondola car into which they were<br />
preparing to load the turnout. I believe this was the first<br />
prefabricated turnout shipped to a customer. Sorry to<br />
say I don’t know which railroad was the customer? (I’d<br />
like to think it was the PRR!)<br />
“Dad” Frey received the patent for both the turnout<br />
and the modified gondola both of which were assigned<br />
to Bethlehem Steel and for which he was paid One<br />
Dollar each.<br />
Dad Frey was an unsung hero to those of us who<br />
love track work. He was an AREA Member and much<br />
of the design for the rebuilding of Penn Station, Union<br />
Station in DC and the various yards, station, and track
work for BART was accomplished under his supervision.<br />
Thanks Gene for a great article.<br />
George Eschbach, East Berlin, PA<br />
Gene replies: Thank you very much for your comments<br />
concerning your father-in-law Mr. R.M. Frey and<br />
his work at Bethlehem Steel. I know in times past I have<br />
seen the track gangs build complete turnouts in place<br />
close to their installation site from what appeared to be<br />
kits and ribbon rail. I often thought a company such as<br />
Bethlehem Steel provided these kits.<br />
Change in the railroad industry is certain. Turnouts<br />
being shop built by the railroad or a private company,<br />
shipped to the installation site, assembled and then<br />
installed with a minimum down time for the track itself<br />
reflect this. Again thanks for you comment; I hope you<br />
continue to enjoy O <strong>Scale</strong> <strong>Trains</strong> <strong>Magazine</strong> as much as<br />
we do in presenting the articles to the reader.<br />
Hard Coal<br />
I truly appreciate seeing Captain Tom Mix’s magnificent<br />
brass work in the magazine. For a long time I have<br />
admired his high level of craftsmanship whenever I see<br />
it in print. I’m looking forward to learning more about<br />
working with brass from his series.<br />
Also, I appreciate Mr. Ed Burnett’s comments on my<br />
B&O coal dump trestle article. Perhaps I should have<br />
indicated in the article that I am a “Northeasterner”<br />
born and raised, where hard coal was the norm for<br />
home and small business use. Agreed, other areas of<br />
the USA likely did not have the same access to this fuel<br />
and used what was locally available. I apologize for<br />
showing such bias in how coal was marketed, being<br />
only familiar with what I experienced living on Staten<br />
Island many decades ago.<br />
One thing about which Mr. Bennett (or anyone else)<br />
may help me know more. I grew up during the 1940s<br />
and 50s in a family-owned bakery that used a large,<br />
coal fired, brick arch oven. I can’t think of how soft<br />
coal could be used in one like it, since the draft of our<br />
oven’s fire passed directly over the items being baked<br />
from the firebed in one corner, to the chimney diametrically<br />
opposite. Smoke and gas were minimal with<br />
anthracite. Even at that, we had to wait a while after<br />
putting coal on the fire. Using an ashpit blower through<br />
the firebed helped the fire clear faster to provide clean,<br />
even, direct heat for baking the bread, rolls, cakes, pies<br />
and pastries.<br />
Was a baker’s oven that used soft coal designed differently?<br />
Perhaps it had a firebed underneath the oven<br />
floor instead of beside it? Ever curious and with thanks<br />
in advance,<br />
Ed Bommer, OK<br />
Mix Is Tops<br />
I’m a subscriber out here on the west coast and, by<br />
golly, yesterday your fine publication arrived. Thank<br />
you so much. I must have read it through two or more<br />
times and, as with each issue, I keep finding myself<br />
wanting to contact you so I can extend my warmest<br />
thanks for all you and Mike are doing for our hobby. I<br />
love everything in each issue, all of it and as a “trying<br />
to be” P48er... well of course all the P48 stuff keeps me<br />
hooked in.<br />
But then with this issue to have the new series with<br />
the “master” Tom Mix. This is the greatest for me. I am<br />
trying really hard to build the simplest of models, to<br />
improve my basic skills. I guess I aspire to heights quite<br />
beyond my current skills and then I buy a brass model<br />
and it is feat sometimes just to figure out how to unpack<br />
and repack the damn thing. It was done by someone<br />
with skills unknown to me and is somehow harder than<br />
any scratchbuilt project. Strangely, I love all this challenge<br />
and, odder yet, I seem to like this thing I do with<br />
all these almost un-seeable tiny little parts that go flying<br />
out of the tweezer’s grip just at the wrong moment,<br />
sending me crawling all around on the floor (some<br />
times for hours) mumbling and grump-ling. Then to see<br />
what Tom does (and others) I am reinvigorated to keep<br />
on modeling. I guess if I never get the knack of the repack<br />
thing I suppose I might have to leave those models<br />
out where I can keep my eye on them, where they draw<br />
me back to my workbench for lot more very satisfying<br />
modeling hours.<br />
Maybe my skills will grow, and maybe not, but nothing<br />
will deter my love for this hobby. It wouldn’t be the<br />
great hobby that it is without the part you are doing to<br />
keep us all so informed. My most solid thank you and<br />
appreciation,<br />
Alan Vivanco, Wenatchee, WA<br />
Novelty vs. B&B?<br />
Much thanx for another excellent issue of O <strong>Scale</strong><br />
<strong>Trains</strong> <strong>Magazine</strong>. I particularly liked the articles about<br />
the G&D engine house and the N&M freight house<br />
(OST#48). Its good to see how simple materials used to<br />
build a typical railroad structure combine to produce a<br />
realistic effect.<br />
Concerning the notes about building the freight<br />
house, the text mentions using commercial board and<br />
batten siding for the structure. Should that not be novelty<br />
siding rather than board and batten? Either way,<br />
the structure would be a dynamite addition to any railroad<br />
scene.<br />
Thank you for publishing the scale drawings of the<br />
N&M freight house. The drawings, along with the<br />
photos of the prototype, make it possible for modelers<br />
to print their own cardstock ”kit” similar to the G&D<br />
enginehouse offering, opening up an inexpensive way<br />
to add structures to their layout.<br />
Casey Sterbenz, Crofton, MD<br />
<strong>Mar</strong>/<strong>Apr</strong> ’10 - O <strong>Scale</strong> <strong>Trains</strong> • 55
56 • O <strong>Scale</strong> <strong>Trains</strong> - <strong>Mar</strong>/<strong>Apr</strong> ’10
TWIN WHISTLE SIGN & KIT CO.<br />
31 Turnberry Dr., Arden, NC 28704 (828) 684-6785<br />
12.5”l x 4.5”w x 4”h<br />
Buy Directly from our e-store!<br />
WWW. TWINWHISTLE.COM<br />
ASSEMBLED<br />
BUILDINGS ARE<br />
AVAILABLE!<br />
Kit: $69.95<br />
Laser-Cut Body<br />
2 Billboards<br />
2 Gas Pumps<br />
1 1934 Guitar<br />
1 Rocking Chair<br />
Many Castings<br />
Assorted Graphics<br />
e-mail:<br />
twinwhistle@hotmail.com<br />
<strong>2010</strong> O SCALE NATIONAL CONVENTION<br />
Why Attend? Up to 300 trading tables of 2-rail O scale items, about 40 home and club layouts open, banquet, California<br />
State Railroad Museum tour, contests, clinics, convention cars, O scale layouts on site, videos. Fly to a major<br />
western city and drive a DYI Grand Tour between there and the convention, visiting model and real railroads, museums,<br />
national parks, and other attractions. Complete information is on the web site (see below). Convention sponsored<br />
and managed by O <strong>Scale</strong> West.<br />
Where:<br />
Santa Clara, California (San Francisco area)<br />
When: June 30 - July 3, <strong>2010</strong><br />
Location: Hyatt Regency Santa Clara<br />
Room rate: $109 plus tax for 1 - 4 occupancy, Regency rooms $145 + tax<br />
Registration: $35, $40 after <strong>Apr</strong>il 30, registration includes spouse and children under 18<br />
Table Rentals: 30" x 72" tables are $45, $50 after <strong>Apr</strong>il 30, electrical hook-ups are free<br />
Banquet: Friday July 2, $50 per plate including gratuity and tax, sign up by June 20<br />
Tour:<br />
Wednesday June 30, California State Railroad Museum in Sacramento, $60 per person includes round<br />
trip train ride between Santa Clara and Sacramento, museum admission, sign up by June 1<br />
Overall Schedule:<br />
June 27-July 4:<br />
June 30:<br />
July 1-3:<br />
July 4-on<br />
Web Site:<br />
E-mail:<br />
Telephone:<br />
layout visits<br />
register, set up, layout visits, videos, clinics, museum tour<br />
register, sales/exhibits, contests, layouts, clinics<br />
layout visits<br />
www.<strong>2010</strong>oscalenational.com<br />
info@<strong>2010</strong>oscalenational.com<br />
650-329-0424 please call between 9AM and 8PM Pacific time<br />
The registration form can be downloaded from the web site. To receive a paper form, send an LSSAE with 1 oz. of<br />
postage to: Registration Form, <strong>2010</strong> O <strong>Scale</strong> National, 876 Boyce Avenue, Palo Alto, CA 94301-3003.<br />
<strong>Mar</strong>/<strong>Apr</strong> ’10 - O <strong>Scale</strong> <strong>Trains</strong> • 57
Index for O <strong>Scale</strong> <strong>Trains</strong> <strong>Magazine</strong>: Volume 7<br />
Jan 2008 to Dec 2008<br />
Sorted by Author<br />
Author Title Issue # Page<br />
Becker, Dirk Tillamook Spruce Company: an On30 Logging RR OST #37 10<br />
Bommer, Edward F Fine Tuning the Golden gate Depot B&O Pullman OST #38 21<br />
Brechbiel, <strong>Mar</strong>tin Building Clugston’s Store - Pt I OST #36 11<br />
Brechbiel, <strong>Mar</strong>tin Trolley Snowplow for the CG&W OST #41 9<br />
Brechbiel & Reutling Building a Simple Wooden Trestle OST #37 18<br />
Brothers, Gerald Sweeper/Track Cleaner OST #38 52<br />
Brown, Ben Building a Portable End-of-Train Device OST #41 17<br />
Brown, Ben Chemung Northern Story OST #36 4<br />
Byrne, Ted Miniature LED Lights by Richmond Controls OST #39 53<br />
Byrne, Ted Powering Up (col): Block Detection in O <strong>Scale</strong> OST #40 15<br />
Byrne, Ted Powering Up (col): Short Story about Short Circuits OST #36 47<br />
Clements, Gene Alco C630 Diesel by Atlas O LLC Gold Series OST #38 61<br />
Clements, Gene Crossing Signals: Model CS-2 by Custom Signals OST #40 56<br />
Clements, Gene K-Line Bombardier Commuter Car 2-Rail Conversion OST #41 39<br />
Clements, Gene MILW Rib Sided Caboose by Weaver OST #39 50<br />
Clements, Gene Modern Image (col): Feeding the Red Birds OST #40 31<br />
Clements, Gene Modern Image (col): Power by the Hour OST #37 39<br />
Clements, Gene Modern Image (col): Railroad Flatcars OST #38 27<br />
Clements, Gene Modern Image (col): Red-Yellow-Green What does it mean? OST #41 25<br />
Clements, Gene Modern Image (col): Researching the Prototype OST #39 27<br />
Clements, Gene Modern Image (col): Specialty <strong>Trains</strong> OST #36 34<br />
Clements, Gene Modern Loads for the Weaver Flatcar OST #38 29<br />
Clements, Gene Railroad Never Sleeps (The) OST #40 55<br />
Clements, Gene Sound decoder & Programmer by QSI Quantum OST #36 52<br />
Clements & Mix Universal Sound Decoders for O <strong>Scale</strong> OST #40 53<br />
Cougill, Michael ACF 50’ Boxcars by Atlas O LLC Trainman Series OST #38 57<br />
Cougill, Michael Review: Advanced Terrain Modeling OST #41 51<br />
Cougill, Michael Review: Airslide 40’ Covered Hopper OST #38 58<br />
Cougill, Michael Art of Finescale (col): Getting Started in P48 OST #37 15<br />
Cougill, Michael Art of Finescale (col): Keeping Track OST #36 18<br />
Cougill, Michael Art of Finescale (col): Measuring Up OST #41 15<br />
Cougill, Michael Art of Finescale (col): Modeling Roads OST #38 9<br />
Cougill, Michael Art of Finescale (col): Odd Couple & Scratchbuilding OST #40 13<br />
Cougill, Michael Art of Finescale (col): Trees OST #39 7<br />
Cougill, Michael DCC Wireless Dynamis Systrem by Bachmann OST #40 61<br />
Cougill, Michael Review: Interior kits for Atlas/Intermountain Boxcars OST #36 53<br />
Cougill, Michael Pieces of the Puzzle-Conclusion (Pt 3) OST #39 37<br />
Cougill, Michael Pieces of the Puzzle-Pt 1 OST #37 42<br />
Cougill, Michael Pieces of the Puzzle-Pt 2 OST #38 42<br />
Cougill, Michael Simple Styrene Cutter OST #37 60<br />
Cougill, Michael Weathering Stains by Dr. Ben OST #40 57<br />
Deimling, Gene Scratchbuilding with Prototype Drawings OST #41 45<br />
Divizio, Rich Weathering an O <strong>Scale</strong> (Covered) Hopper OST #40 4<br />
Elms, Greg Review: Trainman Bay Window Caboose OST #39 51<br />
Giannovario, Joe Review: CPR Empress H-1b 4-6-4 by Weaver Models OST #37 58<br />
Giannovario, Joe Convert the MTH Woodside Passenger Car to 2-Rail OST #39 9<br />
Giannovario, Joe Review: EMD F2 & F3 Diesels by Atlas O OST #41 54<br />
Giannovario, Joe Review: EMD MP15DC Diesel Locomotive by Atlas O OST #40 60<br />
Giannovario, Joe Images of the Past-Art & Artistry of Dan & Armando Vargas OST #37 4<br />
Giannovario, Joe Much Ado About Corners - Pt 1: The Factory OST #41 4<br />
Giannovario, Joe Review: N&W/VGN Wood & Steel Cabooses by Kohs OST #36 54<br />
Giannovario, Joe Observations (col): 3-Rail <strong>Scale</strong> vs 2-Rail scale vs Toys OST #36 70<br />
Giannovario, Joe Observations (col): In Defense of Manufacturers OST #37 70<br />
Giannovario, Joe Observations (col): More on kit building OST #39 62<br />
Giannovario, Joe Observations (col): Return of the Kit? OST #38 70<br />
Giannovario, Joe Observations (col): Standards, Standards? OST #40 70<br />
Giannovario, Joe Observations (col): I Get It (3 Rail <strong>Scale</strong>) OST #41 66<br />
Giannovario, Joe Review: Practical Guide to Digital Command Control OST #41 55<br />
Giannovario, Joe Review: PRR K4s #3768 Streamlined by MTH OST #37 59<br />
Giannovario, Joe Review: Russian Decapod 2-10-0 by MTH OST #41 56<br />
58 • O <strong>Scale</strong> <strong>Trains</strong> - <strong>Mar</strong>/<strong>Apr</strong> ’10<br />
Giannovario, Joe Review: SP AM-2 4-6-6-2 by Sunset 3rd Rail OST #38 59<br />
Giannovario, Joe Review: Typhoon Track Cleaning Car by Aztec Mfg Co OST #41 52<br />
Giannovario, Joe Review: USRA 40’ Single-Sheathed Boxcar OST #40 58<br />
Giannovario, Joe Review: White WC22 Dump truck 1:50 OST #36 51<br />
Giannovario, Joe Review: Wood-sided Passenger Set OST #39 52<br />
Giannovario, Joe Review: Treeline Background #R017 by SceniKing OST #40 59<br />
Gribler, Ron Two Quick Projects-1: Steel Key Stock for Car Weights OST #39 22<br />
Gribler, Ron Two Quick Projects-2: Wabash Gondola OST #39 22<br />
Grosser, Ray MTH DCS to DCC Conversion OST #40 17<br />
Grosser, Ray Soo Line Door-and-a-half Boxcar OST #36 22<br />
Grosser, Ray Spiff UP Your P&D Tower Drive OST #37 17<br />
Grosser, Ray Spring Loaded Power Pickup OST #39 13<br />
Grosser, Ray & Renee Applying a Stucco Finish OST #41 22<br />
Grosser, Ray & Renee Scratchbuilding Grandma’s and Grandpa’s House OST #38 10<br />
Hill, Jim Anniversary Billboard Reefer 4-Pack by Atlas O LLC OST #38 60<br />
Hirailer, Hobo D Confessions of a HiRailer (col): Coming to Terms with O <strong>Scale</strong> OST #37 29<br />
Hirailer, Hobo D Confessions of a HiRailer (col): End of the Line OST #39 25<br />
Hirailer, Hobo D Confessions of a HiRailer (col): In Living Color OST #38 25<br />
Hirailer, Hobo D Confessions of a HiRailer (col): Sticky Business OST #36 25<br />
Houle, Tom Building an Adirondack Car & Foundry Box Cab OST #37 49<br />
Jogwich, Bernd Everywhere West! A Modular Layout from Germany OST #38 4<br />
Keck, Harv Review: DCC-equipped On30 4-4-0 by Bachmann OST #39 49<br />
Kendall, William Introduction to Soldering OST #40 49<br />
Kline, Larry Postwar AAR Boxcars OST #36 31<br />
Lavezzi, Bob In Search of the Second Phoebe Snow OST #37 62<br />
Leverknight, Bob Budget Piece of Brass OST #41 27<br />
Levitsky, Myron Sweeper Suggestions OST #41 30<br />
Madonna Jr, Richard Panel-Side 55-ton Hopper by Atlas O LLC OST #40 55<br />
Mathews, J W More on SP Caboose Review OST #37 32<br />
Miller, Rod Custom builder Jerry White OST #36 42<br />
Mix, Tom Working/Shifting Valve Gear OST #39 17<br />
Morrill, Charlie Boxcar-to-Caboose Conversion OST #40 41<br />
Nance, Jim About Those Woodside Cars OST #41 30<br />
Parker, Roger C Favorite New RR Books of the Past Few Years OST #37 23<br />
Parker, Roger C Review: Railroads of Pennsylvania by Solomon OST #41 53<br />
Parker, Roger C Traction Action (col): Info for Boston Traction Modelers OST #38 19<br />
Parker, Roger C Traction Action (col): Learning from the Loop OST #39 20<br />
Parker, Roger C Traction Action (col): P&N #5600; Aroostook Valley OST #36 20<br />
Parker, Roger C Traction Action (col): Visit with Bill Brandt OST #40 26<br />
Parker, Roger C Traction Action (col): What to do with your excess models OST #41 20<br />
Peterson, Eric G More on Standards OST #41 32<br />
Pitogo, Mike DCS Commander control unit by MTH Electric <strong>Trains</strong> OST #40 62<br />
Purin, Charles C Toivo’s Garage: Kitbashing Clever Models Quonset Hut OST #38 17<br />
Reutling, Ed Build a GATX Whale Belly Covered Hopper OST #39 41<br />
Roberts, John Home Layouts & Clinics at East Wind ‘08 OST #37 64<br />
Roberts, John Layouts planned at East Wind ‘08 OST #38 64<br />
Roberts, John Schedule of Events at East Wind ‘08 OST #39 45<br />
Romano, Andy Custom Backgrounds for Train Layouts OST #38 46<br />
Romano, Andy Running O <strong>Scale</strong> <strong>Trains</strong> with On-Board Power OST #37 25<br />
Rossiter, Neville Bay Ridge Harbor RR Cab Control System OST #36 27<br />
Rossiter, Neville Steel Rails OST #39 4<br />
Rossiter, Neville Workshop (col): Brick Pillars OST #38 33<br />
Rossiter, Neville Workshop (col): Flour Unloading Facility OST #40 45<br />
Rossiter, Neville Workshop (col): Paint Caddy OST #39 29<br />
Scace, Brian Easements for the Learning Curve (col): Scace’s Laws OST #36 9<br />
Scace, Brian Review: EMD SD-40 by Atlas O LLC OST #36 55<br />
Scace, Brian Lionel PS-4 TOFC Flat Cvsn by Norm’s O <strong>Scale</strong> OST #36 53<br />
Scace, Brian Tricks N Tips (col): Replacement Diesel Drive Components OST #38 15<br />
Staff 2008 (O <strong>Scale</strong> Nat’l) Convention Highlights OST #40 38<br />
Staff 2008 Chicago <strong>Mar</strong>ch Meet Contest Results OST #38 62<br />
Staff 2009 O <strong>Scale</strong> Convention OST #41 59<br />
Staff O <strong>Scale</strong> West 2008 Contest Photos OST #39 54
Sorted by Title<br />
Title Author Issue # Page<br />
2008 (O <strong>Scale</strong> Nat’l) Convention Highlights Staff OST #40 38<br />
2008 Chicago <strong>Mar</strong>ch Meet Contest Results Staff OST #38 62<br />
2009 O <strong>Scale</strong> Convention Staff OST #41 59<br />
About Those Woodside Cars Nance, Jim OST #41 30<br />
ACF 50’ Boxcars by Atlas O Cougill, Michael OST #38 57<br />
Advanced Terrain Modeling Cougill, Michael OST #41 51<br />
Airslide 40’ Covered Hopper by Atlas O Cougill, Michael OST #38 58<br />
Alco C630 Diesel by Atlas O LLC Gold Series Clements, Gene OST #38 61<br />
Anniversary Billboard Reefer 4-Pack Hill, Jim OST #38 60<br />
Applying a Stucco Finish Grosser, Ray & Renee OST #41 22<br />
Art of Finescale (col): Getting Started in P48 Cougill, Michael OST #37 15<br />
Art of Finescale (col): Keeping Track Cougill, Michael OST #36 18<br />
Art of Finescale (col): Measuring Up Cougill, Michael OST #41 15<br />
Art of Finescale (col): Modeling Roads Cougill, Michael OST #38 9<br />
Art of Finescale (col): Odd Couple & Scratchbuilding Cougill, Michael OST #40 13<br />
Art of Finescale (col): Trees Cougill, Michael OST #39 7<br />
Bay Ridge Harbor RR Cab Control System Rossiter, Neville OST #36 27<br />
Bay Window Caboose; 2R Trainman Series Elms, Greg OST #39 51<br />
Boxcar-to-Caboose Conversion Morrill, Charlie OST #40 41<br />
Budget Piece of Brass Leverknight, Bob OST #41 27<br />
Build a GATX Whale Belly Covered Hopper Reutling, Ed OST #39 41<br />
Building a Portable End-of-Train Device Brown, Ben OST #41 17<br />
Building a Simple Wooden Trestle Brechbiel & Reutling OST #37 18<br />
Building an Adirondack Car & Foundry Box Cab Houle, Tom OST #37 49<br />
Building Clugston’s Store - Pt I Brechbiel, <strong>Mar</strong>tin OST #36 11<br />
CPR Empress H-1b 4-6-4 by Weaver Models Giannovario, Joe OST #37 58<br />
Chemung Northern Story Brown, Ben OST #36 4<br />
Coming to Terms with O <strong>Scale</strong> Hirailer, Hobo D OST #37 29<br />
Confessions of a HiRailer (col): End of the Line Hirailer, Hobo D OST #39 25<br />
Confessions of a HiRailer (col): In Living Color Hirailer, Hobo D OST #38 25<br />
Confessions of a HiRailer (col): Sticky Business Hirailer, Hobo D OST #36 25<br />
Convert the MTH Woodside Passenger Car to 2-Rail Giannovario, Joe OST #39 9<br />
Crossing Signals: Model CS-2 by Custom Signals Clements, Gene OST #40 56<br />
Custom Backgrounds for Train Layouts Romano, Andy OST #38 46<br />
Custom builder Jerry White Miller, Rod OST #36 42<br />
DCC Wireless Dynamis Systrem by Bachmann Cougill, Michael OST #40 61<br />
DCC-equipped On30 4-4-0 by Bachmann Keck, Harv OST #39 49<br />
DCS Commander by MTH Electric <strong>Trains</strong> Pitogo, Mike OST #40 62<br />
Easements for the Learning Crv (col): Scace’s Laws Scace, Brian OST #36 9<br />
EMD F2 & F3 Diesels by Atlas O LLC Giannovario, Joe OST #41 54<br />
EMD MP15DC Diesel Locomotive by Atlas O LLC Giannovario, Joe OST #40 60<br />
EMD SD-40 by Atlas O LLC Scace, Brian OST #36 55<br />
Everywhere West! A Modular Layout from Germany Jogwich, Bernd OST #38 4<br />
Favorite New RR Books of the Past Few Years Parker, Roger C OST #37 24<br />
Fine Tuning the Golden gate Depot B&O Pullman Bommer, Edward F OST #38 21<br />
Home Layouts & Clinics at East Wind ‘08 Roberts, John OST #37 64<br />
Images of the Past-Art & Artistry of Dan & Armando Vargas<br />
Giannovario, Joe OST #37 4<br />
In Search of the Second Phoebe Snow Lavezzi, Bob OST #37 62<br />
Interior kits for Atlas/Intermountain Boxcars Cougill, Michael OST #36 53<br />
Introduction to Soldering Kendall, William OST #40 49<br />
K-Line Bombardier Commuter Car 2-Rail Conversion Clements, Gene OST #41 39<br />
Layouts planned at East Wind ‘08 Roberts, John OST #38 64<br />
Lionel PS-4 TOFC Flat Cvsn by Norm’s O <strong>Scale</strong> Scace, Brian OST #36 53<br />
MILW Rib Sided Caboose by Weaver Clements, Gene OST #39 50<br />
Miniature LED Lights by Richmond Controls Byrne, Ted OST #39 53<br />
Modern Image (col): Feeding the Red Birds Clements, Gene OST #40 31<br />
Modern Image (col): Power by the Hour Clements, Gene OST #37 39<br />
Modern Image (col): Railroad Flatcars Clements, Gene OST #38 27<br />
Modern Image (col): Red-Yellow-Green Clements, Gene OST #41 25<br />
Modern Image (col): Researching the Prototype Clements, Gene OST #39 27<br />
Modern Image (col): Specialty <strong>Trains</strong> Clements, Gene OST #36 34<br />
Modern Loads for the Weaver Flatcar Clements, Gene OST #38 29<br />
More on SP Caboose Review Mathews, J W OST #37 32<br />
More on Standards Peterson, Eric G OST #41 32<br />
MTH DCS to DCC Conversion Grosser, Ray OST #40 17<br />
Much Ado About Corners - Pt 1: The Factory Giannovario, Joe OST #41 4<br />
N&W/VGN Wood & Steel Cabooses by Kohs Giannovario, Joe OST #36 54<br />
O <strong>Scale</strong> West 2008 Contest Photos Staff OST #39 54<br />
Observations (col): 3-Rail vs 2-Rail vs Toys Giannovario, Joe OST #36 70<br />
Observations (col): In Defense of Manufacturers Giannovario, Joe OST #37 70<br />
Observations (col): Return of the Kit? Giannovario, Joe OST #38 70<br />
Observations (col): More on kit building Giannovario, Joe OST #39 62<br />
Observations (col): Standards, Standards? Giannovario, Joe OST #40 70<br />
Observations (col): I Get It (3 Rail <strong>Scale</strong>) Giannovario, Joe OST #41 66<br />
Panel-Side 55-ton Hopper by Atlas O LLC Madonna Jr, Richard OST #40 55<br />
Pieces of the Puzzle-Conclusion (Pt 3) Cougill, Michael OST #39 37<br />
Pieces of the Puzzle-Pt 1 Cougill, Michael OST #37 42<br />
Pieces of the Puzzle-Pt 2 Cougill, Michael OST #38 42<br />
Postwar AAR Boxcars Kline, Larry OST #36 31<br />
Powering Up (col): Block Detection in O <strong>Scale</strong> Byrne, Ted OST #40 15<br />
Powering Up (col): Short Story about Short Circuits Byrne, Ted OST #36 47<br />
Practical Guide to Digital Command Control Giannovario, Joe OST #41 55<br />
PRR K4s #3768 Streamlined 4-6-2 Giannovario, Joe OST #37 59<br />
Railroad Never Sleeps (The) Clements, Gene OST #40 55<br />
Railroads of Pennsylvania by Solomon Parker, Roger C OST #41 53<br />
Running O <strong>Scale</strong> <strong>Trains</strong> with On-Board Power Romano, Andy OST #37 25<br />
Russian Decapod 2-10-0 by MTH Electric <strong>Trains</strong> Giannovario, Joe OST #41 56<br />
Schedule of Events at East Wind ‘08 Roberts, John OST #39 45<br />
Scratchbuilding Grandma’s and Grandpa’s House Grosser, Ray & Renee OST #38 10<br />
Scratchbuilding with Prototype Drawings Deimling, Gene OST #41 45<br />
Simple Styrene Cutter Cougill, Michael OST #37 60<br />
Soo Line Door-and-a-half Boxcar Grosser, Ray OST #36 22<br />
Sound decoder & Programmer by QSI Quantum Clements, Gene OST #36 52<br />
SP AM-2 4-6-6-2 by Sunset 3rd Rail Giannovario, Joe OST #38 59<br />
Spiff UP Your P&D Tower Drive Grosser, Ray OST #37 17<br />
Spring Loaded Power Pickup Grosser, Ray OST #39 13<br />
Steel Rails Rossiter, Neville OST #39 4<br />
Sweeper Suggestions Levitsky, Myron OST #41 30<br />
Sweeper/Track Cleaner Brothers, Gerald OST #38 52<br />
Tillamook Spruce Company: an On30 Logging RR Becker, Dirk OST #37 10<br />
Toivo’s Garage: Kitbashing Clever’s Quonset Hut Purin, Charles C OST #38 17<br />
Traction Action (col): Info Boston Traction Modelers Parker, Roger C OST #38 19<br />
Traction Action (col): Learning from the Loop Parker, Roger C OST #39 20<br />
Traction Action (col): P&N #5600; Aroostook Valley Parker, Roger C OST #36 20<br />
Traction Action (col): Visit with Bill Brandt Parker, Roger C OST #40 26<br />
Traction Action (col): What to do with your xs models Parker, Roger C OST #41 20<br />
Treeline Background #R017 by SceniKing Giannovario OST #40 59<br />
Tricks N Tips (col): Replacement Diesel Drive Scace, Brian OST #38 15<br />
Trolley Snowplow for the CG&W Brechbiel, <strong>Mar</strong>tin OST #41 9<br />
Two Quick Projects-1: Steel Key Stock Car Weights Gribler, Ron OST #39 22<br />
Two Quick Projects-2: Wabash Gondola Gribler, Ron OST #39 22<br />
Typhoon Track Cleaning Car by Aztec Mfg Co Giannovario, Joe OST #41 52<br />
Universal Sound Decoders for O <strong>Scale</strong> Clements & Mix OST #40 53<br />
USRA 40’ Single-Sheathed Boxcar by MTH Giannovario, Joe OST #40 58<br />
Weathering an O <strong>Scale</strong> (Covered) Hopper Divizio, Rich OST #40 4<br />
Weathering Stains by Dr. Ben Cougill, Michael OST #40 57<br />
White WC22 Dump truck 1:50 scale by SpecCast Giannovario, Joe OST #36 51<br />
Wood-sided Passenger Set by MTH Giannovario, Joe OST #39 52<br />
Working/Shifting Valve Gear Mix, Tom OST #39 17<br />
Workshop (col): Brick Pillars Rossiter, Neville OST #38 33<br />
Workshop (col): Flour Unloading Facility Rossiter, Neville OST #40 45<br />
Workshop (col): Paint Caddy Rossiter, Neville OST #39 29<br />
Visit www.oscalemag.com and click on the “Free Downloads”<br />
link to find our All-Time Article Index and our All-Time Review<br />
Index.<br />
<strong>Mar</strong>/<strong>Apr</strong> ’10 - O <strong>Scale</strong> <strong>Trains</strong> • 59
Neil Chichizola’s Layout<br />
60 • O <strong>Scale</strong> <strong>Trains</strong> - <strong>Mar</strong>/<strong>Apr</strong> ’10<br />
<strong>2010</strong> O <strong>Scale</strong><br />
National<br />
Convention<br />
Why Attend? Up to 300 trading tables, clinics, tour of the California State Railroad Museum, videos, convention car, contests, six O modular layouts<br />
on site, about 40 home and club layouts open for visiting ,fly into/out of a major western city and drive a Grand Tour between there to and/or from the<br />
convention By and visit J. Neil dozens model Chichizola<br />
and real railroads, national parks, and other attractions. Convention sponsored and managed by O <strong>Scale</strong> West.<br />
Where:<br />
Railroads,<br />
Santa Clara,<br />
and<br />
California<br />
the<br />
(San<br />
Southern<br />
Francisco Bay<br />
Pacific<br />
Area)<br />
in particular,<br />
captured me in the mid-1940s when steam<br />
layout.<br />
When: June 30 - July 3, <strong>2010</strong><br />
Location: Hyatt Regency Santa Clara. Room rate: $109 plus tax for 1 - 4 occupancy<br />
Registration: ran all $35, day, $40 every after May day, 31, registration up and includes down spouse the and San children Francisco<br />
under 18<br />
Table Rental:<br />
Peninsula<br />
30" x 72" tables<br />
and<br />
are$45,<br />
the<br />
$50<br />
entire<br />
after May<br />
S.P.<br />
31. Electrical<br />
system.<br />
hook-ups<br />
There<br />
are free<br />
Banquet: Fri. July 2, $50 per plate including gratuity and tax, sign up by June 20<br />
was something about the mass and scale of railroads<br />
that www.<strong>2010</strong>oscalenational.com<br />
I couldn’t resist or get enough of!<br />
Tour: Wed. June 30, California State Railroad Museum, Sacto., $60 per person, incl train to/from Sacto. and admission, sign up by June 1<br />
Web Site:<br />
E-mail: After info@<strong>2010</strong>oscalenational.com<br />
being involved in HO <strong>Scale</strong> for years, I<br />
Telephone: 650-329-0424, please call between 9AM and 8PM Pacific time<br />
was bitten by the O <strong>Scale</strong> bug in Bob DuPont’s<br />
Peninsula Hobbies around 1991. The rest is history<br />
now.<br />
After collecting O <strong>Scale</strong> equipment and<br />
buildings for a number of years, I decided it was<br />
time to build a layout. I knew I would not have<br />
a huge amount of room to do a railroad, but I<br />
found just enough space to run trains and do<br />
some switching at industries. After constructing<br />
the room, I got the benchwork up and started<br />
laying track according to my plan. I decided to<br />
use Old Pullman flextrack and their handlaid<br />
switches with manuel throws. This kept things<br />
simple and gave me more time to construct<br />
buildings and rolling stock.<br />
Once the railroad was up and running well,<br />
it was time for scenery. I had known Dan and<br />
Armando Vargas of Images of The Past for a number<br />
of years. They told me to contact them when<br />
I was ready for scenery and they would take it<br />
from there. What a trip it was transforming an<br />
around-the-room railroad into a series of scenes.<br />
Now trains appear to be coming from somewhere<br />
and continuing on to somewhere else.<br />
The Vargas Brothers did their magic and transformed<br />
my railroad into another world. I am still<br />
discovering details around the layout two years<br />
later. We now have lights in buildings and streets,<br />
automobiles and trucks placed around, and<br />
people all over going about life. The trains are the<br />
stars, but the details are the supporting cast.<br />
I like to keep things simple, so I am using an<br />
Aristocraft radio control system to run two separate<br />
trains and a third cab to operate the yard<br />
tracks. The one thing we lack is sound because<br />
of the cost of installing it in all the locomotives.<br />
Motive power consists of both steam and<br />
diesel locomotives, all S.P. of course. Some<br />
are brass imports, some built from brass kits<br />
and upgraded, and some are old chestnuts like<br />
Lobaugh and <strong>Scale</strong> Craft that were upgraded.<br />
Many of the locomotives are weathered.<br />
Rolling stock is a mix of brass, wood and<br />
metal, and plastic. Some are imports, but most<br />
are scratchbuilt, kitbashed or kit built. Passenger<br />
trains consist of one heavy weight train, plus a<br />
Daylight Train courtesy of Lou Cross and Curley<br />
Bellaver, and a Lark Train courtesy of Lou<br />
A free newsletter with registration information will be available on the website for download after February 1, <strong>2010</strong>. To receive a hardcopy, send an<br />
LSSAE with 2oz. of postage to: <strong>2010</strong> O <strong>Scale</strong> National, 876 Boyce Avenue, Palo Alto, CA 94301-3003.<br />
Cross, B.C. Models and Curley Bellaver. These passenger trains have been a<br />
fascinating and time consuming project, but add the finishing touch to the<br />
I still continue to build and upgrade equipment. There is always some<br />
little thing to add to the layout and maintenance, though not frequent, also<br />
has to be done. I do have metal wheelsets on everything, which tends to<br />
keep the track quite clean. O <strong>Scale</strong> trains are heavy and do tend to move<br />
things around a bit. It is especially nice to be able to enter the room, duck<br />
under the railroad truss bridge, flip on the power and just run trains whenever<br />
you feel like it.<br />
Neil’s layout is one of over 30 local layouts that will be open for visiting<br />
during the <strong>2010</strong> O <strong>Scale</strong> National Convention. To make it possible for first<br />
time visitors to see many of them, they will be open from Sunday June 27<br />
through Sunday July 4.<br />
For more information about the layouts and the convention please visit<br />
the convention website at [www.<strong>2010</strong>oscalenational.com].<br />
u<br />
T-31 2354 makes a local run from the south end of the yard.<br />
Alco RSD-5 enters the main line at Vargas Junction headed for the yard.
Jus <strong>Trains</strong><br />
Info (302) 453-0465<br />
Orders (888) 453-9742<br />
*Mon-Fri 9-6 *<br />
Fax Orders (302) 368-6447<br />
215 Newark Shopping Center<br />
Newark, DE 19711<br />
Most Orders over $200 Free Ship<br />
Store open 7 days a week<br />
MC VISA DISCOVER<br />
Sunset/Third Rail<br />
No Deposit on Reservations<br />
CNW H-1 4-8-4 1245<br />
NYC. PLE H-10 2-8-2 1245<br />
Santa Fe 2900 Class 4-8-4 1345<br />
Virginian 2-10-10-2, EOB 1899<br />
UP FEF 3 Versions 1199<br />
In-Stock 2 or 3 Rail<br />
NYC J3a Super Hudson 1245<br />
SP 4-6-0 M-6, M-9 Mogul DEAL!<br />
CP 4-4-4 Jubilee TMCC 999<br />
2-10-4 “Colorado” 2 Heaters Call<br />
DMIR, B&LE, CB&Q DEAL!<br />
1938 Dreyfuss Hudson EOB 1175<br />
SP AM-2 Cab Forward, EOB 1675<br />
PRR O-1 2-Unit Electric, TMCC 899<br />
Golden Gate Depot<br />
IN-STOCK<br />
NYC 21” 6-pk 575 2-Pk 259<br />
P70 20” Coach 4-Pk 399<br />
LIRR, PRSL, PRR 12#<br />
Heavyweight 20” 4-Pk 399<br />
PRR 20” Head-End Set 359<br />
Pullman 12-1 Sleeper 109<br />
PRR & Pullman<br />
Coaling Tower $195<br />
Reserve<br />
21” SP Daylt Alum 5-Pk 575<br />
SP Articulated Diner Set 575<br />
20” Diner/Observation 2-Pk 249<br />
Weaver Models 2009<br />
REA or B&O Express Troop<br />
2 or 3 R $70 3/$200 3#<br />
MR 4-6-4 J6a Baltic, 2# 999<br />
Troop Sleeper 6# 85<br />
Troop Kitchen 4# 85<br />
Troop Hospital 4# 85<br />
Any 6 for 489 Delivered<br />
MOW Troop Cars 50 2/$95<br />
Monon, N&W, CB&Q, C&O,<br />
GTW,Erie,WM,L&N,Lack<br />
Wartime Gondola $25 or 4/$90 4#<br />
N&W, MEC, Sou, LN, B&M<br />
New Haven I-5 TMCC/EOB 999<br />
80’ Alum 5-Car $549<br />
PRR, NYC, NP, GN, L&N,<br />
AK. CNJ, CN, GTW, N&W<br />
UP Gray, SLSW, KCS, LV 4-Pk 299<br />
K-Line Circus ’09<br />
18” Heavyweight Car 89<br />
#70 CT, Advert x2, Obs x 2<br />
21688 18” Heavywt Coach 2Pk 177<br />
Gold Unit Replica Tractor Set 38<br />
Combo Flat w/Boxcar & wagon 45<br />
Wood Gondola w/Cicus Equipment 48<br />
22250 Dining Dept Billboard Reefer 65<br />
Combo Flat/Stock Car w/Wagon 38<br />
<strong>Scale</strong> Dining Woodside Reefer 59<br />
K-Line 2009 Product<br />
Broadway Lmt 18” 4-Pk 425<br />
Broadway Lmt 18” 2-Pk 222<br />
Southern FM Trainmaster 359<br />
Southern 18” Alum 4-Pk 425<br />
Southern 18” Alum 2-Pk 222<br />
<strong>Scale</strong> Smoking Caboose 59<br />
MR, Southern<br />
21” Alum 2-Pk 259 Coach 132<br />
Milw Rd, Grt Northern<br />
18” Aluminum Business Car 119<br />
NYC, SF Black Mesa<br />
<strong>Scale</strong><br />
21667 Red River Co. Boxcab 78<br />
21639 Pan Am Railways Boxcar 37<br />
21640 UP Modern Steel Reefer 35<br />
21643 PRR Die Cast Gondola 48<br />
PRR 16 Wheel Flat w/Transform 62<br />
21645 SP 43’ Alum Mod Hopper 59<br />
22414 Linde Box w/Alum Tank 47<br />
22447 Wabash DC 2-Bay Hopper 42<br />
Rutland Milk Car w/Platform 111<br />
Mtn View Creamery Milk Depot 87<br />
Gargraves<br />
O Gauge<br />
37” Flex Tin $5.55 Cs 50 259<br />
37” Flex Stainless Phantom Case 305<br />
42, 72, 100” Tin Switch Man 34 Rem 53<br />
Above w/DZ-2500 TMCC $59<br />
RC Uncplr #107 $23 Op. #108 $28<br />
Gantry Crane Track $20 Stainless $22<br />
90 Degree Crossing $19 DVD 9<br />
Now with Wood Ties<br />
Circle 032/ $39 042/ $45 054/ $59<br />
063/ $62 072/ $67 080/ $85<br />
089/ $90 096/ $92 106/$99<br />
Call on DZ Products<br />
Transformers<br />
Lionel ZW 425 180W Brick 75<br />
MTH Z-4000 385 Z-1000 Brick 59<br />
DCS System 255 Legacy #990 299<br />
TMCC Cab-1 68 Command Base 68<br />
TMCC Command Set 125<br />
TPC 400 165 TPC 300 124<br />
Williams <strong>Trains</strong><br />
Golden Memories<br />
F-3 AA $239 ABA $335<br />
Wab,IC,B&O,MR,Sou,NH,RG,CP<br />
WP, SF Red/Sil, SF Blk/Red, TS, NYC<br />
15” Aluminum 4-Pk 229 2-Pk 119<br />
GG-1 Girls Freight Set 335<br />
Steam Girls Freight Set 379<br />
GG-1 Girl’s Passenger Set 335<br />
18” Alum Animal Car 102 2-Pk 199 1520W F-3 Texas Special Set 285<br />
1464W UP 50 th Anniversary Set 320<br />
2-car add-on $80 Full Set $395<br />
PRR GG-1 Congressional Set 410<br />
18” Aluminum Coach or Shop Car 119<br />
2-car add-on $115 Full Set $515<br />
15” Aluminum Advertising Car 85<br />
N&W 4-8-4 J Class Steam 259<br />
GG-1 179 PRR x 4<br />
NW-2 C&O, SF, Seabd 155<br />
FA-1 AA 225 B 80 ABA 299<br />
B&O, LV, L&N, NYC, PRR, RI,<br />
SF,WM,LNE,GN<br />
PA-1 AA 225 B 80 ABA 299<br />
SF, PRR, RG, UP, D&H, NYC, CP<br />
F-7 AA 205 B 70 ABA 269<br />
Am, ACL, B&O, Burl, C&O, GN,<br />
Lack, NH, PRR, UP<br />
Shark AA 219 B 75 ABA 289<br />
B&O, D&H, PRR x 2, NYC, Demo<br />
E-7 AA 245 B 105 ABA 345<br />
ACL, B&O, Burl, C&O, NYC, UP,<br />
Prr Tuscan, Sou, MR, Tex Spec<br />
Dash 9 Power 149 BNSF, CSX,<br />
NS, SF, UP, CNW, Amtrak, Con, SP<br />
GP38 139 Dmy 80 BNSF, Chessie,<br />
NH, NS, SF, GT, AK, GM&O, DTI, PC<br />
BL-2 Powered 139 BAR, B&M,<br />
C&O,C&EI,GMDemo,FEC,Monon,<br />
RI Red/Black, WM-Fire, MP<br />
FM Trainmaster 155 CP, JC,<br />
MR, NYC,Rdg,SP,Wabash,N&W<br />
NW-2 155 B&O, Con, LV, NYC,<br />
PRR,UP,MR,GN,Monon,JC<br />
U33C Power 149 CSX, D&H, MR<br />
SF, SP, UP, NH, PRR, Reading, WP<br />
SD90 Power 149 BNSF, CSX,<br />
Demo, NS, BN, Con, Amtrak, SF<br />
UP,MP,CNW,MKT,RG,SP,WP<br />
Genesis Power & Dmy 219<br />
Die Cast <strong>Scale</strong> Hudson 369<br />
NYC, B&O, GN, SF, JC, CP<br />
GG-1 <strong>Scale</strong> Electric 255<br />
PRR x 5, PC, CR<br />
EF-4 Rectifier 165 NH, CR,<br />
N&W, VGN x 2, PRR Blk<br />
72’ (18”) Streamline 4-Pk 195<br />
72’ Madison 4-Pk 239 2-Pk 120<br />
60’Amfleet3-Pk 155 Amtrak x 2<br />
2009 Lionel Product<br />
Vision Line<br />
PRR 0-8-8-0 CC2s Steam 1399<br />
SF 2-10-10-2 Steam 1799<br />
Buy both PRR & SF get $300<br />
GE ES44AC Evol Hybrid 699<br />
Die-Cast Shell<br />
UP 3GS21B Genset Switch 539<br />
Die-Cast, 3 smoke units<br />
Buy both diesels get $50<br />
Op. Wind Turbine 3-Pk 185<br />
Ethanol Tank 3-Pk, Sound 216<br />
Ethanol Tank 3-Pk 152<br />
PRR Op. Stock Car Sound 120<br />
Can National Coal Train 639<br />
Stourbridge Lion Set 385<br />
Anthracite Coal 2-Car 95<br />
Wabash FM, Legacy 415<br />
N&W GP7, Legacy 419<br />
NH EF-4 Rectifier TMCC 315<br />
SF SD-40, TMCC 323<br />
Rotary Dump w/Conveyor 499<br />
50,000 Gallon Water Tank 113<br />
Sunoco Industrial Tank 52<br />
Standard O<br />
UP Bathtub Gondola 3-Pk 139<br />
Husky 2-Pk Maersk, UP 159<br />
CA-4 Heritage Caboose 70<br />
DRG, SP, CNW<br />
Northeast Cab N&W, Wab 67<br />
SF Wedge Plow Flatcar 67<br />
SF Idler Flatcar w/Load 56<br />
ATSF Water Tank Tank 52<br />
SF Tool Car 60<br />
WP Heritage 60’ Box 63<br />
Freight $60 SF Tool , N&W 3-Bay<br />
DRGW DS Box, DT&I Reefer,<br />
DRGW 40’ Flat, B&M Coke Flat<br />
Katy or MP Heritage Hopper 60<br />
Wabash PS-4 Piggyback Flat 73<br />
In-Stock<br />
Mikado WP, UP, SF, MR 699<br />
TMCC, Railsounds, Odys<br />
2-8-0 Rdg, NYC, B&O, WM 389<br />
TMCC, Railsounds, Fat Boy, Cruise<br />
UP FEF w/Legacy Grey only 989<br />
NYC F-12e 4-6-0 Ten Wheeler 575
MTH 2009 Vol II<br />
2 or 3 Rail Steam<br />
MTH 2009 Vol II<br />
Diesels Power 359 Dmy 169<br />
MTH<br />
UP M10000 Diesel Passenger 649<br />
M1000 Coach $85 2#<br />
2008 DAP<br />
Atlas 2-Rail<br />
NYC 4-4-0 Empire State 639<br />
Pass Set $222<br />
Orient Express 2-3-1 Pac. 999<br />
Black, Green, Brown re-run<br />
NYC Mohawk 2 or 3 Rail 999<br />
L-3a, 3b, 3c L-4a, 4b<br />
L-4a Mohawk Freight Set 1079<br />
DMIR 2-8-8-4 Yellowstone 1299<br />
Yellowstone Freight Set 1399<br />
4-6-0 Camelback Steam 819<br />
JC, NYO&W, Reading<br />
Princess Coronation Steam 1079<br />
London, Midland, & Scot, British<br />
LMS 4-Car 365 Bag/Pass 95<br />
GP38-2 B&M, BN, CP, D&H<br />
Alco PA ABA 639 ABBA 755<br />
Southern, DRG, UP B 139<br />
FT ABA 639 ABBA 755<br />
Erie, NYOW, Seaboard, MoPac<br />
F40PH 3-R Power 389 Dmy 169<br />
Alaska, Amtrak, CAR, VIA<br />
Premier Passenger Cars 5-Pk 335<br />
2-Pk 137 Full Vista 77 RPO 77<br />
GP-7 359 Dmy 169 BAR, Erie<br />
R-11 Subway 4-Car 449 2-Pk 175<br />
N&W J Passenger Set 1079<br />
2-Car 137 RPO 77 Vista 77<br />
N&W J Express Mail Set 1079<br />
NH East Wind EP-3 Pass Set 819<br />
Zephyr 4-Unit Sets 2 types 649<br />
FEC SD70M-2 Twin-Stack 649<br />
UP SD70ACe Twin Stack Set 649<br />
Maersk GP-60M Twin-stack 649<br />
Amtrak Superliners 335/172<br />
Sharknose AB $488 A 145<br />
NYC, PRR, B&O<br />
KCS 5pk 335 2pk 137 Vista 75<br />
Santa Fe 2-10-0 Decapod 899<br />
Railking<br />
<strong>Scale</strong> Diesels Pwr 259 Dmy 129<br />
FM<br />
VGN, Chessie, JC, SP<br />
2111 Reading GP-35, DC 3# 250<br />
2113 Savannah & Atlanta 250<br />
2114 WM GP-35, DC 250<br />
2115 NKP GP-35, DC 250<br />
GP-35 also in PRR, CNW, GA<br />
RS-11 LV, Conrail, NH, SP<br />
VO1000 Autotrain, PRR, NKP, CNW<br />
MP15DC Am, NS, G&W, BNSF<br />
F-3 ABA 425 B&O, MR, Wab, WP<br />
2235 MR Hiawatha Power B 250<br />
2-10-0 Russian Decapod 899<br />
Erie, Pitt Shaw& N, W. Md<br />
4-6-4 Royal Hudson 899<br />
BC, Southern, CP-Royal Tour<br />
GP-9 359 Dmy 169 C&O, UP<br />
NJ Transit ALP46 399 Dmy 189<br />
0-6-0 USRA Steam 519<br />
Erie, VGN 2-8-8-8-2 Triplex 1299<br />
N&W 4-8-4J-Class 999 2 #’s<br />
Diesels 2 or 3 Rail<br />
NJ Transit ALP44 389 Dmy 169<br />
PRR Modified P5a $489<br />
PRR FF-1 $599<br />
B&O GE I/R Box Cab 399<br />
SW-1 259 JC, RI, C&O, GN<br />
Brill Trolley w/PS2.0 199<br />
NYT, Pitt, Phila Sub Trans, MTA<br />
SW-1 Switcher 259 CNW, MR,<br />
<strong>Scale</strong> Diesels Pwr 259 Dmy 129<br />
GP-7 GN, L&N<br />
7890 Ann Arbor RS-1, DC 299<br />
Other RS-1: NH, RI, C&O<br />
7805 Jersey Central SD-35 275<br />
3GS21B Genset 389 <strong>Scale</strong> 399<br />
CSX, BNSF, NS, Army, UP, NRE<br />
Diesels 389 Dmy 169 <strong>Scale</strong> 399<br />
ES44DC KCS, CSX, CN, NS<br />
SD70Mac AK, BNSF, CSX<br />
AEM-7 Electric 389 Dmy 169<br />
Amtrak x 3, MARC, Septa<br />
Amfleet 4-Passenger 277 2-Pk 142<br />
Septa, MARC, Amtrak x 2<br />
EP-3 Electric 739 NH x 3<br />
4-6-4 Royal Hudson 899<br />
BC, Southern, CP-Royal Tour<br />
60’ Flat w/Trash Containers 57<br />
East Carbon x2, Gen. Am., Joe Trans<br />
European<br />
GP-9 Buff & Pitt, CN<br />
RS-3 Erie, LV, NH, SP&S<br />
FP45 Maersk,MRL,SF,MR<br />
7822 CSX SD-35, DC 275<br />
7823 Penn Central SD-35, DC 275<br />
Dash 8, DC Und, UP, BC, SP 299<br />
Dummy for above 195<br />
Dash-8W CN, CSX, SF, UP<br />
Dash 8<br />
Conrail, CSX x 2, UP<br />
U30C Chessie, MR, PRR, SP<br />
GP-35 PRR, NYC, GN, AK, GMO<br />
C&O M-1 Stm Turbine Pass Set 899<br />
SD45 MR,GNx2,SF,UP<br />
SD70ACe<br />
SD70M-2<br />
BHP Billiton, KCS, UP<br />
NS, CN<br />
ES44AC 399 385 169<br />
Demo, CP, UP<br />
Specialty Set<br />
Am. Freedom PA Passenger 599<br />
GE Evolution Hybrid Set 449/479<br />
GN 2-8-8-2 R-2 Freight Set 1399<br />
NYC J1e Hudson Passenger 999<br />
CNW E-4 Streamlined Pass 999<br />
SP Cab Forward Freight Set 1389<br />
Erie Triplex Freight Set 1389<br />
PRR P5a Beer Train Set 819<br />
AA16 NOHAB 3-R 399 2-R 449<br />
GN, Denmark, GM Demo, Norway,<br />
Belgium, Luxembourg, Hungary<br />
TRAXX F140 AC2 399 2R 449<br />
Demo, SBB Cargo, Veolia, Europe<br />
64’ 19 th Century Coach 76<br />
LIRR, B&O 3-Pk 225<br />
2009 Dealer Appreciation<br />
Limited Quantities<br />
UP DDA40X Diesel Loco 649<br />
UP Pass 5pk 335 2pk 137 Vista 40<br />
BMT 2500 Subway 3-Car 399/269<br />
R40 Subway 4-Car 445 2-Car 175 Engineering Version Orient 999<br />
VO1000 Power<br />
259 NP, UP,<br />
Burl, Patapsco & Black Rivers<br />
2008 Vol II RailKing<br />
<strong>Scale</strong> Size Diesel 255 Dmy 129<br />
C628 D&H, LV, N&W, SF<br />
RailKing – <strong>Scale</strong> Size<br />
0-8-0 Steam Switcher 359<br />
IC, Sou, NYC, NKP, NP, PLE<br />
GP-9 USCG, FEC, PRR, SP 255<br />
MP-15AC CP, CSX, MR, UP 255<br />
RS-11 DW&P, NYC, NP, PRR 255<br />
R142A MTA Sub 5-pk 369 2-pk 125<br />
<strong>Scale</strong>Trax -INSTOCK<br />
10” 3.00 O31 or O54 Curve 3.00<br />
O72 3.75 O80 4.45 1 ¾” 4-Pk 7.75<br />
30” Rigid or Flex 8.65 ITAD $23<br />
90, 45 or 22.5 Xing 16 Op. Track 16<br />
Remote Switch O31, O54 or O72 $38<br />
Switch #4 $44 #6 $51 Bumper 13<br />
7840 BNSF Patch Job -8, DC 299<br />
7841 BNSF Patch Job Dmy 195<br />
7848 GE Demo Dash 8, DC 299<br />
GP60M SF, DC 299<br />
All Atlas Rolling<br />
Stock $25-$40<br />
20-3279-2N&W Class A 2-6-6-4 1150<br />
K-Line 2-R Shay $499<br />
Lackawanna, PLC<br />
www.justrains.com
Just <strong>Trains</strong> TM Free Shipping over $200 on all Korber Orders (888) 453-9742 Made in USA www.justrains.com<br />
302 One Stall Diesel Shed w/Shop 69<br />
901 Action Machinery 6 x 8 25<br />
917 Gen Lt & Power Sub Station 32<br />
959 Midland Supply 8x6 35<br />
304 3-Stall Roundhouse, 30”D 189<br />
304A Xtra Stall or 304B Extender 45<br />
902 Jaybar Company 6 x 8 27<br />
921 JLC Manufacturing 65<br />
960 John’s Cutlery 6x8 25<br />
305 Sandhouse, 16 x 6 45<br />
966 Lehigh Engineering 6 x 8 25<br />
903 Skyline Steel 6 x 8 25<br />
950 American Flag Co. 14x9 69<br />
306 2-Stall Diesel Shed 25 x 11 69<br />
306A Extender 12.5 x 11 27<br />
905 Blackshear Refrig. Transport 59<br />
967 Shoe Co. 7 skylts 20 x 9 x 11 69<br />
307 3-Stall Trolley Barn 23 x 11 95<br />
953 Joe’s Pickle Factory 14 x 9 69<br />
968 Freight Terminal 8 x 15 49<br />
308 Quincy Mining Co. 47<br />
908 Shanahan Freight 20 x 8 x 9H 75<br />
954 Buck Island Canning 8 x 12 59<br />
969 Gen Lt & Pwr Office 6x13x12 65<br />
310 Mitchell Textile Co. 39<br />
911 Perfect Tool Co. 8 x 16 55<br />
955 RJK Tool&Die 9x14 55<br />
P56 Cut Stone P81 Random Stone 10<br />
3115 Grain Silo, 7 x 34 x 22 H 135<br />
912 Roller Bearing Co. 9 x 28 89<br />
P83 Concrete 10 P57 Double 13<br />
957 Lewis & Sons Machine Shop 25<br />
915 Quaker Foods 9 x 12 49<br />
D929 Roof Top Water Tank D30 12<br />
315 Grain Silo, 7 x 19 x 22 H 85<br />
956 James Company 13 x 8 x 9H 55<br />
320 3-Stall Roundhouse 26” Deep 159<br />
916 General Light & Power 48”L 175<br />
958 Mill Works 11 x 7 w/Tower 49<br />
New Modular System Kit 74.95<br />
Unlimited configurations 24 walls<br />
Just <strong>Trains</strong> (888) 453-9742
Buy–Sell–Trade Events<br />
Buy-Sell-Trade ads are $5 for 30 words plus your address information. Additional words are $0.25 each. Subscribers are permitted one<br />
free ad per subscription cycle . All B-S-T ads are prepaid. You may send ads by postal service with a check or money order. Ads sent by<br />
email or called in must use a credit card. See our contact info on page 2.<br />
THE O SCALE KINGS are looking for new<br />
members. The present members are good<br />
but we need more good members. Send<br />
LSASE for “O <strong>Scale</strong> <strong>Trains</strong> Shows” flyer<br />
and “Projects List” flyer to Bob Retallack,<br />
Dept. OST, 2224 Adner Ct, Columbus, OH<br />
43220.<br />
WANTED: Small N&W custom-built or<br />
scratchbuilt steam. Especially looking for<br />
N&W 4-8-0 by Bill Lenoir. Also 2-8-0, 4-6-0.<br />
Also looking for N&W brass parts, e.g., pilot,<br />
cylinders, domes, tenders, etc. Contact Joe<br />
Giannovario, jag@oscalemag.com or call<br />
610-363-7117.<br />
WANTED: Ambroid special run 50’ Milw.<br />
boxcars, Hallmark comp gons, Sunset WWII<br />
emergency boxcars, PRB WWII comp gons,<br />
Lobaugh 50’ reefers, WWII era boxcars what<br />
have you? Mail only. Jim Seacrest, PO Box<br />
6397, Lincoln, NE 68506-0397<br />
FOR SALE: Brass and die-cast parts for All<br />
Nation/Babbitt steam locomotives, frames,<br />
drivers, rods, valve gear, boilers, cabs,<br />
tenders, and details. Also restoration and<br />
repairs available. Some complete kits available<br />
on a limited basis. Some older kits and<br />
built up kits also available on a limited basis.<br />
Write and include $1 for a catalog. Babbitt<br />
Railway Supply Co., 715 Barger St, Mayfield<br />
To ensure your event listing makes it into the proper issue, please note the following deadlines for publication:<br />
Jan/ Feb issue: November 1 of the prior year. <strong>Mar</strong>ch/<strong>Apr</strong>il issue: Jan. 1. May/June issue: <strong>Mar</strong>ch 1. July/August issue: May 1.<br />
Sept. /Oct. issue: July 1. Nov. /Dec. issue: Sept. 1<br />
<strong>Mar</strong>ch <strong>2010</strong><br />
6: Merchantville NJ<br />
Cherry Valley Model RR Club is hosting their<br />
semi-annual swap meet and open house<br />
from 9 AM to noon. 2 rail O scale items<br />
from local dealers and modelers are available<br />
for sale. The club layout will be open<br />
at noon with an operating session. The meet<br />
will be held at Grace Church, 7 E. Maple<br />
Ave, Merchantville, NJ 08109. Table cost:<br />
$20 for first table (incl. 1 admission), $15<br />
ea. add’l. table. Admission: $5 (spouse and<br />
children free). For information contact John<br />
Dunn Sr. 1-609-432-2871 or email Contact<br />
jdunn8888@hotmail.com<br />
12-14: Lombard IL<br />
Midwest <strong>Mar</strong>ch Meet <strong>2010</strong>. New location!<br />
Westin Lombard Yorktown Center, 70<br />
Yorktown Center, Lombard IL 60148. Call<br />
800-937-8461 and ask for the Chicago O<br />
<strong>Scale</strong> room rate. Show registration write to<br />
<strong>Mar</strong>ch Meet, 2636 Hallquist Ave, Red Wing<br />
MN 55066 or call 630-745-7600. By email<br />
contact meetinfo@aol.com.<br />
KY 42066. Call 270-247-0303 between 8<br />
am and 8 pm CST, or email [boyceyates@<br />
bellsouth.net].<br />
FOR SALE: New Sunset 2-Rail engines:<br />
2-Rail UP Big Boy, $1500; 2-Rail UP<br />
Challenger $1500, 2-rail UP 4-12-2 $1500,<br />
2-Rail B&O EM1 2-8-8-4, $1500. Email:<br />
woodsbymarius@msn.com, or call 505-<br />
898-6956.<br />
WANTED: Steam/Diesel era, DM&IR, Soo<br />
Line, DSS&A. Frt., pass., MoW, cabooses,<br />
NO ORE CARS. Joe Fischer pass. & head<br />
end cars. What have you? Mail contact<br />
only. Jim Seacrest, PO Box 6397, Lincoln,<br />
NE 68506-0397<br />
WANTED: LTD AMT Steam/Diesel era GN,<br />
NP, C&NW, CM&O engines, passenger<br />
cars, freight cars, MoW, cabooses, What<br />
have you? Mail only please. Jim Seacrest,<br />
PO Box 6397, Lincoln NE 68506.<br />
FOR SALE: FtD.D.M.& S. decal sets. Will<br />
do 2 locos and several cars. $18.50 per<br />
set. Call Mike at 515-353-4292 or email<br />
bluffcreektrains@wccta.net.<br />
FOR SALE: Berlyn 20-ton gantry crane,<br />
$700; GN 4-8-2 FP, $750; CB RS-1 CP GN,<br />
$500; Sunset NYC S1b FP, $850; PSC PRR<br />
K4a FP, $900; PSC NYC 4-6-0 FP, $900;<br />
June <strong>2010</strong><br />
30th to July 3rd: Santa Clara CA<br />
The <strong>2010</strong> O <strong>Scale</strong> National is being held<br />
in lieu of the <strong>2010</strong> O <strong>Scale</strong> West. The hotel<br />
room rate is $109/night plus 10% room tax,<br />
for up to 4 people in the room. Registration<br />
is $35, $40 After <strong>Apr</strong>il 30, <strong>2010</strong>. Vendor<br />
tables (72”) are $45, $50 after <strong>Apr</strong>il 30,<br />
<strong>2010</strong>. A banquet will be held at 7:30 PM<br />
Friday outside the hotel. For more details,<br />
contact the O <strong>Scale</strong> National Convention,<br />
c/o 876 Boyce Ave., Palo Alto, CA 94301-<br />
3003 or call Rod Miller at 650-329-0424<br />
between 9:00 AM Pacific Time and 9:00 PM<br />
Pacific Time. Email: rod@rodmiller.com.<br />
July <strong>2010</strong><br />
10: Merchantville NJ<br />
Cherry Valley Model RR Club Open House<br />
Cherry Valley Open House during the Merchantville<br />
Antique Car Show, 1 PM to 7 PM.<br />
At Grace Episcopal Church, 7 E Maple Ave.<br />
No admission but donations accepted. Contact<br />
jdunn8888@hotmail.com<br />
Weaver VO-1000, $200; PSC PRR 0-6-0<br />
FP, $975; Sunset NYC J-1e 4-6-4 FP, $875.<br />
Phone 423-772-4401, or write. Norm<br />
Reaume, 129 Hamby Rd, Roan Mt, TN<br />
37687<br />
FOR SALE: Kohs GG1, Dark Green, 5<br />
stripe, Gold Leaf, Clarendon, Fixed coupler<br />
#4821, TRO, beautiful condition, $2950;<br />
Westside Santa Fe Mikado, mechanically<br />
rebuilt by Gary Schrader, $1100. Bill<br />
Pierson, 133 Wheatland Rd, Lewisberry, PA<br />
17339-9408<br />
FOR SALE: Thinning fleet, 50’ Weaver<br />
freight cars, slightly weathered with Kadees<br />
and trucks, $19.95 each. Lake County<br />
Illinois pick-up. Call Bill 847-816-7707.<br />
FOR SALE: Sunset UP 4-4-2, new, $599.<br />
Call 650-759-9054 or mail to James J<br />
Herdrich, 3220 Upper Lock Ave, Belmont,<br />
CA 94002-1317<br />
FOR SALE: 3 Atlas N&W High Hood GP-<br />
35s, #207, #207 & #213. Mint, never run.<br />
$275 each plus shipping and insurance.<br />
Email to ekelly18@verizon.net or call Ed<br />
Kelly at 302-234-2089.<br />
11-18: Milwaukee WI<br />
NMRA National Convention & 75th Anniv.<br />
The National Model Railroad Association<br />
(NMRA) will be celebrating its 75th birthday<br />
in <strong>2010</strong>. As part of the festivities the National<br />
Convention will be held in Milwaukee<br />
Wisconsin, the birthplace of the NMRA.<br />
We are planning a, rip roaring Midwestern,<br />
good time for all, both model railroader and<br />
general interest attendee alike. Dates for the<br />
convention are Sunday July 11th to Sunday<br />
July 18th. On Sunday the 11th, we are going<br />
to kick off the week with a Beer and Brat<br />
Fest (a Milwaukee favorite) at Zeidler Union<br />
Square Park, just a stone’s throw away from<br />
the convention site and hotel. Contact Ken<br />
Jaglinski, Vice-Chair. Contact mjaglinski@<br />
wi.rr.com<br />
August <strong>2010</strong><br />
7: Strasburg PA<br />
Strasburg Train Show Two-rail swap meet at<br />
the Strasburg Fire Co., 203 W. Franklin St., 9<br />
AM to 1 PM. Admission $5 (Wives/Children/<br />
Active Military w/ID, FREE).Tables: $25 first<br />
one, $20 each additional table. Great food,<br />
modular layout, clinics. Call John Dunn,<br />
609-432-2871. Contact jdunn8888@hotmail.<br />
com<br />
64 • O <strong>Scale</strong> <strong>Trains</strong> - <strong>Mar</strong>/<strong>Apr</strong> ’10
<strong>2010</strong> O <strong>Scale</strong> National 57<br />
AAA Turntables 16<br />
Allegheny <strong>Scale</strong> Models 32<br />
Atlas O<br />
IFC<br />
Bachmann 18<br />
Baldwin Forge & Machine 10<br />
BTS 20<br />
Bullfrog Snot 10<br />
Chicago O <strong>Scale</strong> Meet 26<br />
Custom Signals 14<br />
East Gary Car Co. 10<br />
Get Real Productions 65<br />
Gorilla Glue 25<br />
Guide to Modern O <strong>Scale</strong> 16<br />
Hackworth Model <strong>Trains</strong> 28<br />
Just <strong>Trains</strong> 61, 62, 63<br />
JV Models 10<br />
Keil-Line 10<br />
Key Model Imports 14<br />
LaBelle Woodworking Co. 29<br />
Micro-<strong>Mar</strong>k 25<br />
Millhouse River Studios 57<br />
Model Building Services 44<br />
Model Rail Scenes 10<br />
MTH Electric <strong>Trains</strong> IBC<br />
Mullett River 27<br />
NCE Corp 28<br />
O <strong>Scale</strong> Realty 57<br />
O <strong>Scale</strong> <strong>Trains</strong> 14<br />
P&D Hobby Shop 14<br />
Public Delivery Track 29<br />
Rails Unlimited 10<br />
RGSRR Hobbies 13<br />
Scenic Express 10<br />
SceniKing 57<br />
SMARTT 56<br />
SMR <strong>Trains</strong> 44<br />
Stevenson Preservation Lines 10<br />
Sumpter Valley Depot 29<br />
Sunset⁄3rd Rail 15, BC<br />
Twin Whistle Sign & Kit 57<br />
Underground Railway Press 44<br />
UpBids.net 44<br />
Valley Model <strong>Trains</strong> 29<br />
Wasatch Model Co. 26<br />
Advertisers Index<br />
Howard Zane 10<br />
Pieces of the Puzzle 16<br />
Weaver 56<br />
Irish Tracklayer 25<br />
Precision <strong>Scale</strong> Co. 9<br />
Woodland Scenics 26<br />
JD’s <strong>Trains</strong> 25<br />
Protocraft 16<br />
<strong>Mar</strong>/<strong>Apr</strong> ’10 - O <strong>Scale</strong> <strong>Trains</strong> • 65
Joe Giannovario<br />
Nine And Still Counting!<br />
Welcome to the official start of our ninth year publishing O<br />
<strong>Scale</strong> <strong>Trains</strong> <strong>Magazine</strong>! I am very pleased to have come this far<br />
and also very pleased at the way the magazine has developed.<br />
OST is the last bastion of O <strong>Scale</strong> model building and I’m very<br />
proud of that. Most of the hobby these days is so heavily oriented<br />
toward operations that model building gets neglected.<br />
I hope that those of you who read OST but have not yet tried<br />
your hand at building something will give it a shot in <strong>2010</strong>.<br />
There is nothing more rewarding that the feeling one gets from<br />
saying “I built that.”<br />
If you are one of our readers who is building models, I ask<br />
you to consider sharing those models with us, either by sending<br />
photos, or (better yet) by sending a construction article.<br />
We always need articles as the magazine is powered by you<br />
not a paid staff of writers, photographers and illustrators. Any<br />
subject is fair game. Drop me a line; send me an email. The<br />
worst that can happen is I’ll say “no thanks” if I don’t feel the<br />
other readers will be interested.<br />
It Takes All Kinds<br />
Over the holidays I worked on the OST layout laying track<br />
and switches. As I noted in “Starting Over - Part 2” I had<br />
two curved switches custom made by Old Pullman and they<br />
require the frog to be powered. I‘ll go into the specific details<br />
why in a future article but I started looking at optical occupancy<br />
sensors and switch motors for the layout. These items<br />
have to work with DC, DCC and MTH’s DCS for them to be<br />
useful to me.<br />
I used twin coil switch machines (Hammond & Morgan)<br />
on the old layout. The H&M machines are, in my opinion, the<br />
finest twin coils ever made. Unfortunately, they are no longer<br />
made and while they worked just fine I wanted to get away<br />
from the bang-bang switch action and use something more<br />
sophisticated.<br />
Everyone will immediately think of the Circuitron Tortoise<br />
stall-motor switch machine. So did I. However, looking at<br />
some online posts about the Tortoise raised some questions<br />
about their ability to handle and switch O <strong>Scale</strong> current loads<br />
for powering frogs. I was also not impressed with their size,<br />
nor the way they mount under the switch. Finally, you cannot<br />
buy them from Circuitron online. In fact, Circuitron doesn’t<br />
even have its catalog online other than as a PDF download.<br />
(Isn’t this the 21st Century?)<br />
I wish I could tell you how I found Duncan McRee’s Tam<br />
Valley Depot website [www.tamvalleydepot.com]. I think it<br />
was via the Fast Tracks website [www.handlaidtrack.com].<br />
Duncan is an HO <strong>Scale</strong> modeler (Espee), uses DCC and also<br />
has an interest in RC flying and battlebots! Tam Valley makes<br />
and sells a number of items, all DCC related, and one of those<br />
items is called a Singlet Servo Decoder. Basically, the singlet<br />
is a microprocessor on a circuit board that allows you to use<br />
an RC servo motor as a switch machine. The Singlet can be<br />
powered by DC or AC current and can also be programmed<br />
to accept a DCC accessory address. It operates with just two<br />
push buttons and two LEDs. The design is brilliant!<br />
I bought one to play with and you will be reading a full<br />
review in the next issue but let me say here it’s slicker than a<br />
Slip ’n Slide. Even better is the cost. I bought the Singlet kit,<br />
which requires you to do a bit of soldering, for $10.50 (if you<br />
buy 10 or more the price drops to $8.75 each). I also purchased<br />
a miniature servo from Tam Valley for $4.50. That’s a<br />
total cost (excluding shipping) of $15 and it’s tiny. You’ll have<br />
to wait for next issue to learn more but you can visit the Tam<br />
Valley website to explore Duncan’s other products.<br />
Having found a new switch motor, I was still in search of<br />
an optical sensor. With some persistance I found Tim Hatch’s<br />
TCH Technology website [www.tchtechnology.com]. Tim is an<br />
N <strong>Scale</strong> modeler who uses DCC and started building circuits<br />
in 1995 to sell to other modelers. TCH Technology makes and<br />
sells IR optical sensors, turnout controls, power conditioners,<br />
and a number of other DCC items. As it turned out TCH’s<br />
Sensa-Trak II optical detector was exactly what I needed. The<br />
best part is the sensor is $9.95. Another well-known online<br />
firm sells a comparable IR dtector for over $20 each.<br />
The final piece of my needed solution is the Atlas O Nonderail<br />
Circuit we reviewed in issue #43. If you poke around<br />
the Atlas O website you will find a link to several pages of diagrams<br />
[www.Atlas O.com/manuals.htm] using this circuit. On<br />
these pages Atlas calls the board a Universal Switch Controller<br />
and, indeed, that is its real purpose. I queried Atlas electronics<br />
guru Steve Horvath (again over the holiday break) with some<br />
technical questions and he graciously provided the answers.<br />
Both Duncan and Tim also provided some technical support.<br />
Duncan even took out time while traveling to look over<br />
the Atlas USC schematic for me and provide an opinion on<br />
how to connect the Singlet to it to do what I wanted.<br />
The final solution for my curved switch frog powering<br />
experiment involves a Tam Valley Singlet Servo Decoder, a<br />
pair of TCH Technology’s Sensa-Trak II IR sensors and an Atlas<br />
O Universal Switch Controller. I made a breadboard to test it<br />
out and it works. Now I need to get it all installed on the layout<br />
and see if it still works in real operations.<br />
The combined efforts of an O <strong>Scale</strong>r, an HO <strong>Scale</strong>r and<br />
an N <strong>Scale</strong>r produced the desired outcome. That outcome in<br />
this case will be described in an article that I will write called<br />
“Turnout Control Schemes”, likely for the July issue. In it, I will<br />
explore different ways to throw turnouts using some neat, yet<br />
relatively inexpensive, electronics that anyone can use and no<br />
EE degree required!<br />
I would like to thank Steve, Tim and Duncan for their help<br />
in figuring out the solution I needed. It’s great that we all share<br />
the love of a hobby that is so diverse.<br />
Keep Highballin’<br />
u<br />
66 • O <strong>Scale</strong> <strong>Trains</strong> - <strong>Mar</strong>/<strong>Apr</strong> ’10
O <strong>Scale</strong> <strong>Trains</strong> mth 04-<strong>2010</strong>.qxp 1/14/<strong>2010</strong> 4:33 PM Page 1<br />
The Princess Coronation<br />
British Railways<br />
Princess Coronation Duchess of Atholl Steam Engine<br />
20-3371-1 Hi-Rail Wheels $1199.95<br />
20-3371-2 <strong>Scale</strong> Wheels $1199.95<br />
Second In A Series Of European Locomotives<br />
In the years before World War II, Londoners had at<br />
least two ways to get to Scotland in style. From<br />
Kings Cross, one could speed up the East Coast<br />
main to Edinburgh on the LNER's Flying Scotsman,<br />
behind one of Nigel Gresley's handsome Pacifics -<br />
perhaps a streamlined A4 or maybe an older, applegreen<br />
A3. Or one could depart instead from Euston<br />
station on the LMS and fly northward to Glasgow on<br />
the Coronation Scot or the Royal Scot behind the<br />
most powerful steam locomotives in the land, William<br />
Stanier's Princess Coronation Class 4-6-2's.<br />
Stanier's crowning achievement was the four-cylinder<br />
Princess Coronation Duchess Class Pacifics, built<br />
from 1937-1948. In contrast with American designers,<br />
who generally shunned engines with more than<br />
two cylinders as being too hard to maintain,<br />
Europeans often used three or four cylinders to produce<br />
a more balanced engine that was easier on the<br />
track. In Stanier's design, the Walschaert's valve gear<br />
on the outside cylinders also drove the valves on the<br />
inside cylinders, located within the frame, through a<br />
set of rocker arms.<br />
Relive the glory days of LMS express passenger service<br />
with our superbly detailed Princess Coronation<br />
Class Pacific, complete with sounds recorded from the<br />
prototype Duchess of Sutherland, synchronized puffing<br />
smoke with synchronized chuffs per driver revolution,<br />
and station sounds for the Royal Scot.<br />
SEE IT IN<br />
ACTION<br />
ON THE WEB<br />
Features Include:<br />
• 1/43.5 <strong>Scale</strong> Die-Cast Steamer<br />
• Equipped With Proto-Sound 2.0 Digital Sound<br />
• Variable Intensity Synchronized<br />
Puffing Smoke<br />
• Locomotive Speed Control In <strong>Scale</strong> MPH<br />
Increments<br />
• Featuring European & U.S. Couplers<br />
• Operates On O-54 Curves<br />
• Choose From FIVE Different Versions<br />
• Available in 2 or 3-Rail Versions<br />
www.mthtrains.com/europe<br />
©<strong>2010</strong> M.T.H.Electric <strong>Trains</strong> 7020 Columbia Gateway Drive, Columbia, MD 21046
HUGE WAREHOUSE<br />
SALE - BRASS - SALE - BRASS - SALE - BRASS<br />
SP AM-2 CAB FORWARD<br />
PRE OR POST WAR<br />
UP FEF Grey #837 & #844<br />
NYC ESE SETS<br />
GTW and OC U-3b<br />
NYC J-3A SUPER HUDSON<br />
CB&Q M4A 2-10-4<br />
A4 “Sir Nigel Gresley”<br />
Dreyfuss Hudson<br />
PRR O-1a Electric (Pair)<br />
SP M6/M9 Mogul<br />
INCREDIBLE<br />
DETAIL<br />
ALL NEW 2 RAIL MODELS!<br />
SALE ENDS MARCH 31ST<br />
CALL 1-800-3RD-RAIL TODAY!<br />
B&O Q-4B 2-8-2 MIKADO<br />
THIRD RAIL DIVISION OF SUNSET MODELS INC.<br />
22 Beta Court · San Ramon, CA · 94583 · 925-820-7701 · fax 925-820-7709 · www.3rdrail.com


