Ali Abdullah is a citizen of the Kingdom - Black Heart Enterprises
Ali Abdullah is a citizen of the Kingdom - Black Heart Enterprises
Ali Abdullah is a citizen of the Kingdom - Black Heart Enterprises

Create successful ePaper yourself
Turn your PDF publications into a flip-book with our unique Google optimized e-Paper software.
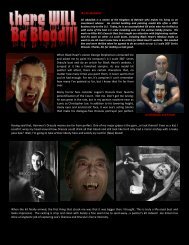
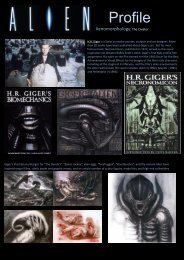
<strong>Ali</strong> <strong>Abdullah</strong> <strong>is</strong> a <strong>citizen</strong> <strong>of</strong> <strong>the</strong> <strong>Kingdom</strong> <strong>of</strong> Bahrain who makes h<strong>is</strong> living as an investment adv<strong>is</strong>or. He<br />
started building and painting model kits after a 2001 business trip to <strong>the</strong> U.S. Today, he <strong>is</strong> an<br />
accompl<strong>is</strong>hed GK art<strong>is</strong>t who has thrilled us with some <strong>of</strong> <strong>the</strong> best 1:1 scale modeling seen on <strong>the</strong> various<br />
hobby forums. H<strong>is</strong> work on Killer Kit’s Exorc<strong>is</strong>t Bust first caught our attention with frightening real<strong>is</strong>m.<br />
And h<strong>is</strong> work on o<strong>the</strong>r 1:1 scale busts, including <strong>Black</strong> <strong>Heart</strong>’s Medusa made us want to see <strong>Ali</strong> invest<br />
some time in an article for <strong>Black</strong> <strong>Heart</strong>’s website. We emailed him and were thrilled when he agreed to<br />
do an article on our 1:1 scale 360° Series Dracula. Thanks, <strong>Ali</strong>.<br />
Killer Kits’ Exorc<strong>is</strong>t <strong>Black</strong> <strong>Heart</strong> Mummy <strong>Black</strong> <strong>Heart</strong> Medusa<br />
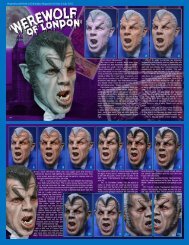
When George Stephenson asked me to paint <strong>Black</strong><br />
<strong>Heart</strong>’s 1:1 scale 360 series Dracula and do an<br />
article for <strong>Black</strong> <strong>Heart</strong>’s website, I jumped at it like a<br />
fam<strong>is</strong>hed vampire. As any model kit painter will<br />
attest, <strong>the</strong>re are certain characters that no matter<br />
how many times you paint <strong>the</strong>m it never seems that<br />
you’ve had enough. For me, it’s vampires! I can’t<br />
remember how many I’ve painted so far, but I know<br />
that I’m far from over.<br />
Many horror fans consider Lugosi’s Dracula <strong>the</strong>ir<br />
favorite personification <strong>of</strong> <strong>the</strong> Count. Not me. Don’t<br />
get me wrong; he was great in <strong>the</strong> role, but in my<br />
opinion nowhere near as iconic as Chr<strong>is</strong>topher Lee.<br />
In addition to h<strong>is</strong> towering height, steely eyes and<br />
ar<strong>is</strong>tocratic face, it was Lee’s acting talents that<br />
make h<strong>is</strong> dialogue-free Dracula portrayal just<br />
perfect.<br />
Having said that, Hammer’s Dracula movies are far<br />
from perfect. One <strong>of</strong> my major gripes <strong>is</strong> <strong>the</strong> gore…or<br />
lack <strong>the</strong>re<strong>of</strong>. Even as a kid, I couldn’t wrap my head<br />
around how Dracula could drink all that blood and<br />
still look like he’d only had a minor m<strong>is</strong>hap with a<br />
leaky juice box? Well, I’m going to take art<strong>is</strong>tic<br />
liberty here and sat<strong>is</strong>fy my lust for (fake) blood!<br />
When <strong>the</strong> kit finally arrived, <strong>the</strong> first thing that struck<br />
me was that it was bigger than I thought. Th<strong>is</strong> <strong>is</strong> truly<br />
a life-sized bust and looks impressive. The casting <strong>is</strong><br />
cr<strong>is</strong>p and clean with barely a fine seam line to sand<br />
away…a painter’s kit indeed! Joe Simon has done a<br />
fangtastic job <strong>of</strong> capturing Lee’s likeness and<br />
Dracula’s fierce intensity.
The kit comes in two parts, <strong>the</strong> main body and <strong>the</strong> upper dental palate. I start by giving <strong>the</strong> kit a<br />
good wash with liquid soap and warm water. Once dry, I spray it with a light gray sandable<br />
primer [ PIC 1]<br />
Pic 1<br />
Once thoroughly dry (I prefer to keep it for a whole day), I base coat <strong>the</strong> face with a mixture<br />
cons<strong>is</strong>ting <strong>of</strong> Liquitex White, Raw Sienna, Burnt Sienna with drops <strong>of</strong> Raw Umber and Bronze<br />
Yellow. Th<strong>is</strong> gives me a pale flesh color to work with. [PIC 2]<br />
Pic 2<br />
I seal th<strong>is</strong> layer with Dullcote <strong>the</strong>n proceed to loosely highlight <strong>the</strong> facial features using Golden’s<br />
Napthol Red mixed with small drops <strong>of</strong> Burnt Sienna and Shading Gray. I also use th<strong>is</strong> to define<br />
<strong>the</strong> creases. [PIC 3]<br />
Pic 3<br />
Now I begin to break up <strong>the</strong> skin, add capillaries and fur<strong>the</strong>r<br />
define <strong>the</strong> creases. I do th<strong>is</strong> by taking <strong>the</strong> previous batch<br />
and adding more Shading Gray and Raw Umber Hue. I lower<br />
my air pressure and brush thin, tight mottles and random<br />
squiggles all over <strong>the</strong> face. [Pic 4 and 5] As you can see he<br />
looks like Freddy Kreuger, but that’s OK as for <strong>the</strong> next step,<br />
I m<strong>is</strong>t <strong>the</strong> base flesh coat color to bring it all toge<strong>the</strong>r.<br />
Pics 4 & 5
I basically use <strong>the</strong> original batch <strong>of</strong> <strong>the</strong> base flesh color and thin it down with<br />
Windex. While keeping <strong>the</strong> airbrush a foot or two away, I spray an even m<strong>is</strong>t<br />
all over it until <strong>the</strong> colors fuse toge<strong>the</strong>r. [Pic 6]<br />
Next I add more detailing to <strong>the</strong> skin. I mix FW Ink’s Scarlet Red with a drop <strong>of</strong><br />
Purple Lake and thin it with Rubbing Alcohol until I get a transparent hue. I<br />
use th<strong>is</strong> to highlight <strong>the</strong> nose, temples, cheeks and around <strong>the</strong> eyes, etc.<br />
Looking into a mirror helps to pinpoint <strong>the</strong> areas you need to focus on.<br />
Pic 6<br />
To add <strong>the</strong> larger veins usually found around <strong>the</strong><br />
temples and neck, I mix FW Ink’s Turquo<strong>is</strong>e with<br />
Olive Green and add drops <strong>of</strong> Golden’s Dark Umber<br />
Hue and Shading Gray. I thin it with alcohol to a<br />
slightly transparent hue and carefully airbrush <strong>the</strong><br />
veins in those areas. For <strong>the</strong> 5:00 shadow, I use<br />
Golden’s Shading Gray thinned with alcohol and add<br />
a small amount <strong>of</strong> <strong>the</strong> previous vein mix to it. I m<strong>is</strong>t<br />
th<strong>is</strong> on <strong>the</strong> area where <strong>the</strong> shadow would appear.<br />
[Pic 7] Once again, I m<strong>is</strong>t <strong>the</strong> face with <strong>the</strong> base flesh<br />
coat and seal <strong>the</strong> work with Dullcote. [Pic 8]<br />
Pic 7 Pic 8
I <strong>the</strong>n proceed to block <strong>the</strong><br />
hair and eyebrows using FW<br />
Ink’s <strong>Black</strong> and also spray <strong>the</strong><br />
whites <strong>of</strong> <strong>the</strong> eyes using<br />
Liquitex Titanium White<br />
mixed with drops <strong>of</strong> Raw<br />
Sienna and Paynes Gray [Pic<br />
9]<br />
Now, using a long-br<strong>is</strong>tled<br />
30/0 brush I carefully add<br />
<strong>the</strong> hairline and detail <strong>the</strong><br />
eyebrows. I use FW Ink’s<br />
<strong>Black</strong> thinned with alcohol to<br />
a light cons<strong>is</strong>tency. I use s<strong>of</strong>t<br />
strokes in a flicking motion<br />
and follow <strong>the</strong> area’s natural<br />
path <strong>of</strong> hair growth. For <strong>the</strong><br />
eyebrows my brush strokes<br />
start at <strong>the</strong> root <strong>of</strong> <strong>the</strong> hair<br />
while for <strong>the</strong> hairline I go <strong>the</strong><br />
opposite direction.<br />
Pic 9 Pic 10<br />
I also use a s<strong>of</strong>t pencil to mark where <strong>the</strong> eyes are going to be positioned. I initially was going for a dead-on look, but<br />
later changed my mind. [Pic 10]<br />
Pic 11 Pic 12 Pic 13 Pic 14<br />
I repositioned <strong>the</strong> eyes as if Drac was hungrily looking down at a victim’s throat. I <strong>the</strong>n carefully airbrush FW Ink’s Burnt<br />
Umber mixed with White as a base coat for <strong>the</strong> ir<strong>is</strong>. [Pic 11]<br />
Then using my 30/0 brush, I detail <strong>the</strong> ir<strong>is</strong> with various shades <strong>of</strong> dark and light browns <strong>the</strong>n add <strong>the</strong> pupils [Pic 12]. I<br />
<strong>the</strong>n mix FW Ink’s Red Earth with a drop or two <strong>of</strong> Golden’s Shading Gray and spray <strong>the</strong> outer edges <strong>of</strong> <strong>the</strong> sclera. I<br />
follow th<strong>is</strong> up by mixing a slightly darker shade and brushing in <strong>the</strong> fine veins. [Pic 13]<br />
I <strong>the</strong>n airbrush <strong>the</strong> color I originally used for <strong>the</strong> sclera to smooth out <strong>the</strong> edges and blur <strong>the</strong> edges <strong>of</strong> <strong>the</strong> ir<strong>is</strong> to give<br />
<strong>the</strong>m a more natural look. I seal <strong>the</strong> work with a m<strong>is</strong>ting <strong>of</strong> Dullcote <strong>the</strong>n add a layer <strong>of</strong> high gloss [Pic 14]
Lifesize models, <strong>of</strong> course, will look very odd without eyelashes. I used to paint<br />
<strong>the</strong>se on in <strong>the</strong> past, which was “ok”, but once I tried using false eyelashes I never<br />
looked back! I got a few boxes <strong>of</strong> th<strong>is</strong> particular type from a Chinese seller on<br />
Ebay….It had <strong>the</strong> right feel compared to <strong>the</strong> numerous o<strong>the</strong>r brands I looked at<br />
[Pic 15].<br />
Pic 15<br />
Putting <strong>the</strong>m on, however, <strong>is</strong> test in patience and wit!<br />
What I do first <strong>is</strong> test-fit <strong>the</strong> lashes for <strong>the</strong>n cut <strong>the</strong>m to<br />
<strong>the</strong> appropriate length. I <strong>the</strong>n carefully add a thin layer<br />
<strong>of</strong> Super Glue to <strong>the</strong> inner part <strong>of</strong> <strong>the</strong> upper lid and let it<br />
settle a bit. Next I grab each end with hair tweezers and<br />
slowly push <strong>the</strong>m up towards <strong>the</strong> layer <strong>of</strong> glue. I <strong>the</strong>n<br />
use <strong>the</strong> end <strong>of</strong> a small brush <strong>the</strong> entire length <strong>of</strong> <strong>the</strong><br />
lashes to settles against <strong>the</strong> lid. After <strong>the</strong>y dry properly,<br />
I trim <strong>the</strong> outer edges with a small nose hair clipper. [Pic<br />
16]<br />
For <strong>the</strong> lower lashes, I use a thinned batch <strong>of</strong> Shading<br />
Gray to paint <strong>the</strong> individual lashes. Very few fines<br />
strokes will do.<br />
Pic 16<br />
I paint <strong>the</strong> teeth with an<br />
ivory mix (Liquitex White<br />
mixed with Raw Sienna and<br />
Paynes Gray) and shade<br />
<strong>the</strong>m with a transparent<br />
Raw Sienna. I paint <strong>the</strong><br />
gums with a base <strong>of</strong> Liquitex<br />
Red Oxide mixed with<br />
Titanium White, <strong>the</strong>n<br />
highlighted with a lighter<br />
version <strong>of</strong> th<strong>is</strong> mix. I also use<br />
FW Ink’s Scarlet Red mixed<br />
with Shading Gray to shade.<br />
[Pic 17]<br />
Pic 17 Pic 18 Pic 19<br />
After protecting <strong>the</strong> neck area with Silly Putty [Pic 18], I base coat <strong>the</strong> shirt collars with Titanium White and shade with<br />
light Gray and drops <strong>of</strong> blue added to <strong>the</strong> white base coat. Once sealed, I cover <strong>the</strong> collars and spray FW Ink’s <strong>Black</strong><br />
mixed with Neutral Gray over <strong>the</strong> rest <strong>of</strong> <strong>the</strong> clo<strong>the</strong>s. I highlight with a lighter shade <strong>of</strong> <strong>the</strong> same mix and shade with<br />
straight black. [Pic 19] I also add strokes <strong>of</strong> white and gray to <strong>the</strong> hair and give <strong>the</strong> entire bust a couple <strong>of</strong> layers <strong>of</strong><br />
Dullcote.<br />
Well, I’m done….Almost! Now we need BLOOD!!! I initially wanted to give Sir Lee a trademark Hammer blood, but I<br />
decided to go for a fiercer and gorier look with th<strong>is</strong>. After feeding on a carotid artery, things do get messy.
Well, I hope you had fun reading th<strong>is</strong> and picked up a thing or two. Th<strong>is</strong> was a fun kit to work on and a great likeness<br />
and tribute to Sir Chr<strong>is</strong>topher Lee. Many thanks to <strong>Black</strong> <strong>Heart</strong> for giving me <strong>the</strong> opportunity to paint th<strong>is</strong>.