- Page 1 and 2:
Developer’s Guide Enterprise Serv
- Page 3 and 4:
Contents Chapter 1 Introduction to
- Page 5 and 6:
Entity beans . . . . . . . . . . .
- Page 7 and 8:
Chapter 23 Using JMS 209 Configurin
- Page 9 and 10:
Entity Bean Properties (applicable
- Page 11 and 12:
Figures 0.1 Borland Enterprise Serv
- Page 13 and 14:
BES Products and Editions overview
- Page 15 and 16:
Documentation conventions Important
- Page 17 and 18:
Contacting Borland support World Wi
- Page 19 and 20:
BES services overview Figure 0.1 Bo
- Page 21 and 22:
The Partition and its services ■
- Page 23 and 24:
Borland Enterprise Server and J2EE
- Page 25 and 26:
14 BES Developer’s Guide
- Page 27 and 28:
Creating Partitions Creating Partit
- Page 29 and 30:
Running Partitions Table 3.1 Option
- Page 31 and 32:
Configuring Partitions You can also
- Page 33 and 34:
JMX support in Partitions ■ ■ A
- Page 35 and 36:
JMX support in Partitions Figure 3.
- Page 37 and 38:
Thread pools Partition properties r
- Page 39 and 40:
28 BES Developer’s Guide
- Page 41 and 42:
Apache web server implementation Fo
- Page 43 and 44:
Borland web container implementatio
- Page 45 and 46:
Borland web container implementatio
- Page 47 and 48:
Borland web container implementatio
- Page 49 and 50:
Smart Agent implementation Smart Ag
- Page 51 and 52:
40 BES Developer’s Guide
- Page 53 and 54:
Apache web server to Borland web co
- Page 55 and 56:
Apache web server to Borland web co
- Page 57 and 58:
Apache web server to Borland web co
- Page 59 and 60:
Large data transfer Downloading lar
- Page 61 and 62:
Large data transfer Uploading large
- Page 63 and 64:
IIS web server to Borland web conta
- Page 65 and 66:
IIS web server to Borland web conta
- Page 67 and 68:
IIS web server to Borland web conta
- Page 69 and 70:
Session management with JSS If an i
- Page 71 and 72:
Managing and configuring the JSS Co
- Page 73 and 74:
The Borland IIOP connector BES supp
- Page 75 and 76:
Setting up your web container with
- Page 77 and 78:
66 BES Developer’s Guide
- Page 79 and 80:
Web-enabling your CORBA server Impo
- Page 81 and 82:
Configuring your Apache web server
- Page 83 and 84:
Configuring your Apache web server
- Page 85 and 86:
Web Services and Partitions ■ ■
- Page 87 and 88:
Web Service providers Java:RPC prov
- Page 89 and 90:
How Borland Web Services work
- Page 91 and 92:
Packaging Web Service Application A
- Page 93 and 94:
Tools Overview Java2WSDL tool Note
- Page 95 and 96:
84 BES Developer’s Guide
- Page 97 and 98:
Client view of an enterprise bean L
- Page 99 and 100:
Client view of an enterprise bean E
- Page 101 and 102:
Managing transactions Managing tran
- Page 103 and 104:
Support for JNDI Support for JNDI T
- Page 105 and 106:
EJB to CORBA mapping A CORBA progra
- Page 107 and 108:
96 BES Developer’s Guide
- Page 109 and 110:
Application Client architecture Pac
- Page 111 and 112:
Document Type Definitions (DTDs) my
- Page 113 and 114:
Support of references and links The
- Page 115 and 116:
Use of Manifest files Use of Manife
- Page 117 and 118:
106 BES Developer’s Guide
- Page 119 and 120:
Sessions in secondary storage If yo
- Page 121 and 122:
110 BES Developer’s Guide
- Page 123 and 124:
Container-managed persistence and R
- Page 125 and 126:
Implementing an entity bean Generat
- Page 127 and 128:
Container-Managed Persistence in Bo
- Page 129 and 130:
Container-Managed Persistence in Bo
- Page 131 and 132:
Setting Properties Setting Properti
- Page 133 and 134:
Setting Properties into a BLOB. The
- Page 135 and 136:
Setting Properties Automatic table
- Page 137 and 138:
126 BES Developer’s Guide
- Page 139 and 140:
Container-managed persistence and R
- Page 141 and 142:
Container-Managed Persistence in Bo
- Page 143 and 144:
Container-Managed Persistence in Bo
- Page 145 and 146:
Container-Managed Persistence in Bo
- Page 147 and 148:
Container-Managed Persistence in Bo
- Page 149 and 150:
Container-Managed Persistence in Bo
- Page 151 and 152:
Container-Managed Persistence in Bo
- Page 153 and 154:
142 BES Developer’s Guide
- Page 155 and 156:
Setting Properties J2EE 1.3 Entity
- Page 157 and 158:
Setting Properties Figure 16.2 Edit
- Page 159 and 160:
Setting Properties Table 16.1 ejb.m
- Page 161 and 162:
Setting Properties Table 16.3 Table
- Page 163 and 164:
Setting Properties Security Propert
- Page 165 and 166:
Aggregate Functions in EJB-QL Selec
- Page 167 and 168:
Support for ORDER BY Support for OR
- Page 169 and 170:
Overriding SQL generated from EJB-Q
- Page 171 and 172:
Container-managed data access suppo
- Page 173 and 174:
162 BES Developer’s Guide
- Page 175 and 176:
Generating primary keys from a cust
- Page 177 and 178:
Implementing primary key generation
- Page 179 and 180:
Transaction manager services Consis
- Page 181 and 182: Transaction manager services When t
- Page 183 and 184: Transaction manager services Follow
- Page 185 and 186: Declarative transaction management
- Page 187 and 188: Declarative transaction management
- Page 189 and 190: JDBC API Modifications JDBC API Mod
- Page 191 and 192: Handling of EJB exceptions Applicat
- Page 193 and 194: 182 BES Developer’s Guide
- Page 195 and 196: Client View of an MDB Client View o
- Page 197 and 198: Clustering of MDBs This is yet anot
- Page 199 and 200: Error Recovery Redelivered messages
- Page 201 and 202: 190 BES Developer’s Guide
- Page 203 and 204: JNDI Definitions Module Important s
- Page 205 and 206: Disabling and Enabling a Deployed D
- Page 207 and 208: Configuring JDBC Datasources In the
- Page 209 and 210: Configuring JDBC Datasources To add
- Page 211 and 212: Defining the Connection Pool Proper
- Page 213 and 214: Defining the Connection Pool Proper
- Page 215 and 216: Descriptions of Borland Enterprise
- Page 217 and 218: Advanced Topics for Defining JDBC D
- Page 219 and 220: Connecting to JDBC Resources from J
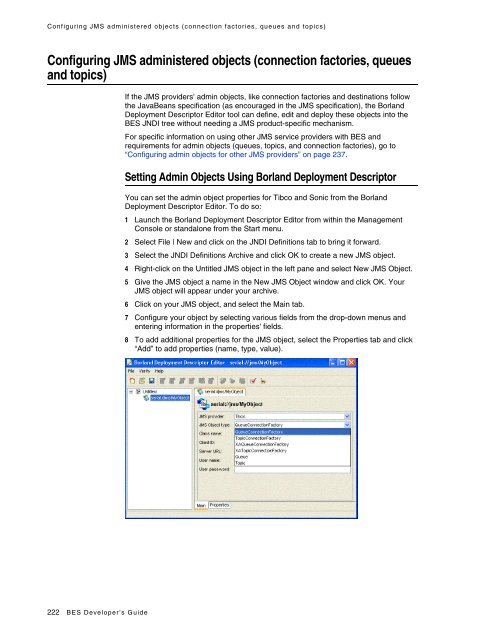
- Page 221 and 222: Configuring JMS Connection Factorie
- Page 223 and 224: Defining Connection Pool Properties
- Page 225 and 226: Obtaining JMS Connection Factories
- Page 227 and 228: JMS and Transactions and its accomp
- Page 229 and 230: JMS and Transactions For instance:
- Page 231: 220 BES Developer’s Guide
- Page 235 and 236: Tibco Creating Clustered JMS Servic
- Page 237 and 238: Sonic serverUrl String localhost:72
- Page 239 and 240: Sonic Creating Clustered JMS Servic
- Page 241 and 242: OpenJMS Even though OpenJMS can be
- Page 243 and 244: OpenJMS Important If you use OpenJM
- Page 245 and 246: OpenJMS openjms.clean_messages_on_s
- Page 247 and 248: OpenJMS Table 24.1 Property Name De
- Page 249 and 250: Other JMS providers The following a
- Page 251 and 252: 240 BES Developer’s Guide
- Page 253 and 254: Creating the Interceptor Class For
- Page 255 and 256: Creating the JAR file Creating the
- Page 257 and 258: Components Components The Connector
- Page 259 and 260: System Contracts Connection Managem
- Page 261 and 262: System Contracts Security Managemen
- Page 263 and 264: Common Client Interface (CCI) Conne
- Page 265 and 266: Packaging and Deployment Figure 26.
- Page 267 and 268: Resource Adapters Resource Adapters
- Page 269 and 270: Connection management Connection ma
- Page 271 and 272: Security management with the Securi
- Page 273 and 274: Security management with the Securi
- Page 275 and 276: Resource Adapter overview Note Reso
- Page 277 and 278: Deployment Descriptors for the Reso
- Page 279 and 280: Developing the Resource Adapter Con
- Page 281 and 282: Deploying the Resource Adapter Pack
- Page 283 and 284:
Application development overview 8
- Page 285 and 286:
Application development overview //
- Page 287 and 288:
Application development overview
- Page 289 and 290:
Other Considerations Other Consider
- Page 291 and 292:
Other Considerations To illustrate,
- Page 293 and 294:
Other Considerations } } { cf = new
- Page 295 and 296:
General syntax and usage General sy
- Page 297 and 298:
Syntax and usage for iastool Table
- Page 299 and 300:
Syntax and usage for java2iiop Exam
- Page 301 and 302:
Syntax and usage for appclient Tabl
- Page 303 and 304:
Building and running the BES exampl
- Page 305 and 306:
Using the iastool command-line tool
- Page 307 and 308:
Using the iastool command-line tool
- Page 309 and 310:
Using the iastool command-line tool
- Page 311 and 312:
Using the iastool command-line tool
- Page 313 and 314:
Using the iastool command-line tool
- Page 315 and 316:
Using the iastool command-line tool
- Page 317 and 318:
Using the iastool command-line tool
- Page 319 and 320:
Using the iastool command-line tool
- Page 321 and 322:
Using the iastool command-line tool
- Page 323 and 324:
Using the iastool command-line tool
- Page 325 and 326:
Using the iastool command-line tool
- Page 327 and 328:
Using the iastool command-line tool
- Page 329 and 330:
Using the iastool command-line tool
- Page 331 and 332:
Using the iastool command-line tool
- Page 333 and 334:
Executing iastool command-line tool
- Page 335 and 336:
324 BES Developer’s Guide
- Page 337 and 338:
element ■ ■ ■ element The
- Page 339 and 340:
element The Partition statistics ag
- Page 341 and 342:
element element The services eleme
- Page 343 and 344:
element element The archive elemen
- Page 345 and 346:
EJB Container-level Properties Tabl
- Page 347 and 348:
EJB Container-level Properties Tabl
- Page 349 and 350:
EJB Customization Properties: Deplo
- Page 351 and 352:
Complete Index of EJB Properties Co
- Page 353 and 354:
Complete Index of EJB Properties Ta
- Page 355 and 356:
Complete Index of EJB Properties Ta
- Page 357 and 358:
Complete Index of EJB Properties Ta
- Page 359 and 360:
Java Session Service (JSS) Properti
- Page 361 and 362:
Java Session Service (JSS) Properti
- Page 363 and 364:
Partition Transaction Service (Tran
- Page 365 and 366:
Borland-specific web DTD 33, 36 bra
- Page 367 and 368:
ejb.mdb.maxMessagesPerServerSession
- Page 369 and 370:
J J2EE VisiClient 97 VisiClient env
- Page 371 and 372:
optimistic concurrency 130 SelectFo
- Page 373 and 374:
Sonic clustered service 228 SonicMQ
- Page 375:
X XML DTD 99 VisiClient 98 grammar