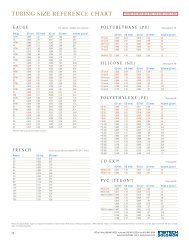
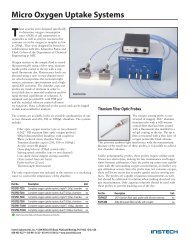
110 / 210 Fiber Optic Oxygen Monitor - Instech Laboratories, Inc.
110 / 210 Fiber Optic Oxygen Monitor - Instech Laboratories, Inc.
110 / 210 Fiber Optic Oxygen Monitor - Instech Laboratories, Inc.

You also want an ePaper? Increase the reach of your titles
YUMPU automatically turns print PDFs into web optimized ePapers that Google loves.
Timing Tab<br />
-- To synchronize data acquisition with<br />
external events, choose External<br />
Software Trigger. In this leveltriggered<br />
mode, the spectrometer is<br />
"free running," just as it is in the normal<br />
mode. With each trigger, the data<br />
collected up to the trigger event is<br />
transferred to the software. (See<br />
Appendix D for details.)<br />
♦ Once you have configured a timed data<br />
acquisition procedure, you can start and stop<br />
the acquisition by clicking on the Time<br />
Chart switch on the main display window.<br />
Display Tab<br />
To configure a timed data acquisition procedure,<br />
select Configure | Spectrometer from the menu<br />
and select the Timing tab. In this dialog box,<br />
you can set the parameters for a timed data<br />
acquisition procedure.<br />
♦ Preset Duration. Enable this box and enter<br />
values to set the length for the entire timed<br />
acquisition process. Be sure to enter hours<br />
(HH), minutes (MM) and seconds (SS).<br />
♦ Preset Sampling Interval. This is<br />
frequently used to reduce the number of data<br />
points saved to disk by inserting a delay<br />
between samples. Enable the Preset<br />
Sampling Interval box and enter a value to<br />
set the frequency of the data collected in a<br />
timed acquisition process. Be sure to select<br />
hours (HH), minutes (MM) and seconds<br />
(SS).<br />
♦ Flash Delay. (Normally not selected) Enter<br />
a value to set the delay, in milliseconds,<br />
between external strobe signals of the LS-<br />
450 Blue LED light source. You can only<br />
use this feature if you have an ADC1000<br />
A/D converter.<br />
♦ External Trigger Mode. (Not normally<br />
used).You have two methods of acquiring<br />
data. Choose a triggering mode from the pull<br />
down menu:<br />
-- In the normal mode (called No<br />
External Trigger), the spectrometer is<br />
continuously scanning, acquiring, and<br />
transferring data to your computer,<br />
according to parameters set in the<br />
software. In this mode, however, there<br />
is no way to synchronize the acquisition<br />
of data with an external event.<br />
To configure your display window, select<br />
Configure | Spectrometer from the menu and<br />
click on the Display tab. In this dialog box,<br />
select the graphs and charts to appear in the<br />
display window.<br />
♦ Graph and Chart Display Mode. Choose<br />
the information that appears in the display<br />
window. If you choose Spectral Graph<br />
Only, a spectral graph appears in the display<br />
window. If you choose Spectral Graph &<br />
Time Chart, the spectral graph appears in<br />
the top of the display window and the time<br />
chart appears in the bottom. (To view a<br />
temperature chart, select Graph&Chart |<br />
View Temperature Chart from the main<br />
menu. The temperature chart then replaces<br />
the spectral graph.)<br />
♦ Temperature Units. Select either Celsius<br />
or Fahrenheit as the temperature units. (The<br />
application works in Kelvin, and converts to<br />
Celsius or Fahrenheit.)<br />
♦ Color for overlays. Select colors for static<br />
spectra that open when selecting File | Open<br />
Spectrum from the menu. These static<br />
21