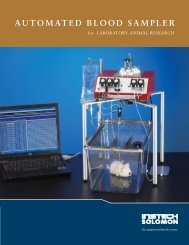
110 / 210 Fiber Optic Oxygen Monitor - Instech Laboratories, Inc.
110 / 210 Fiber Optic Oxygen Monitor - Instech Laboratories, Inc.
110 / 210 Fiber Optic Oxygen Monitor - Instech Laboratories, Inc.

You also want an ePaper? Increase the reach of your titles
YUMPU automatically turns print PDFs into web optimized ePapers that Google loves.
2. zooms in on the horizontal scale, but the<br />
vertical scale remains the same<br />
3. zooms in on the vertical scale, but the<br />
horizontal scale remains the same<br />
4. zooms in approximately one point vertical<br />
and horizontal, click once or press<br />
continuously<br />
5. zooms out approximately one point vertical<br />
and horizontal, click once or press<br />
continuously<br />
6. reverts to the last zoom function<br />
Cursor Diamonds<br />
To move the cursor left or right in small<br />
increments in the graph area, click on the left and<br />
right cursor diamonds.<br />
Cursor Label<br />
The first box in the configure cursor taskbar<br />
allows you to label the cursor.<br />
X and Y Values<br />
The cursor taskbar displays the X value and Y<br />
value of the cursor point.<br />
Cursor Properties<br />
To the right of the X and Y values of the<br />
cursor is a cursor selection button that<br />
allows you to utilize many cursor features such<br />
as choosing a cursor style, selecting a point style<br />
and finding a color for the cursor trace.<br />
Data Values<br />
Spectral Graph<br />
The data displayed to the<br />
right of the graphs and chart<br />
areas provides you with the<br />
oxygen values for each<br />
spectrometer channel and<br />
probe combination. If you<br />
are monitoring and<br />
correcting for temperature,<br />
these values appear in this<br />
area as well.<br />
The spectral graph area of the display window<br />
provides you with real-time spectral scans of your<br />
sample. You can change the vertical and/or<br />
horizontal scales of the graph by simply clicking on<br />
an X and Y endpoint and manually typing in a value.<br />
The graph will then resize itself.<br />
Temperature Chart<br />
To display the temperature chart, select<br />
Graph&Chart | View Temperature Chart from<br />
the menu. The Temperature Chart will then take the<br />
place of the Spectral Graph. To save the<br />
Temperature Chart, select File | Save Time Chart<br />
from the menu. You will receive two Save prompts,<br />
one for the Time Chart and one for the Temperature<br />
Chart. By selecting Graph&Chart | View<br />
Temperature Chart again (deselecting the<br />
function), the Spectral Graph will return.<br />
You can also save Temperature Chart data without<br />
displaying the chart. By selecting Configure |<br />
Spectrometer from the menu, clicking on the Sensors<br />
tab, and enabling the Chart function under<br />
Temperature Measurement, temperature data is<br />
collected, whether or not the Temperature Chart is<br />
displayed. Then you can use the save function.<br />
Time Chart<br />
The time chart displays the data from all active<br />
channels at a specific wavelength over time. To view<br />
the Time Chart, select Configure | Spectrometer<br />
from the menu and click on the Display tab. Make<br />
sure that Spectral Graph & Time Chart is selected<br />
next to Graph and Chart Display Mode . To<br />
configure a timed data acquisition procedure, select<br />
Configure | Spectrometer from the menu and click<br />
on the Timing tab. (For details on configuring a timed<br />
acquisition procedure, see page 53.)<br />
Time Chart and Log On/Off Switches<br />
Once you have configured a<br />
timed data acquisition<br />
procedure, you can start and<br />
stop the acquisition by clicking<br />
on the Time Chart switch.<br />
(To set the parameters for a timed data acquisition<br />
procedure, select Configure | Spectrometer from the<br />
menu, click on the Timing tab and enter your<br />
settings.) Turn on and off saving this data to a log file<br />
by clicking on the Log switch. (To set parameters for<br />
saving timed acquisition data, select Configure |<br />
Spectrometer from the menu, click on the Log tab,<br />
select how frequently you want to save data and<br />
choose the file name for the log.) Only the last<br />
10,000 scans of a timed data acquisition can be saved<br />
in the log file.<br />
17