You also want an ePaper? Increase the reach of your titles
YUMPU automatically turns print PDFs into web optimized ePapers that Google loves.
<strong>Exercises</strong> <strong>for</strong> <strong>People</strong> <strong>with</strong> <strong>Hemophilia</strong><br />
by Kathy Mulder
Published by the World Federation of <strong>Hemophilia</strong><br />
© World Federation of <strong>Hemophilia</strong>, 2006<br />
Illustrations © VHI, 1999<br />
Permission to reproduce or translate this document in whole or in part, is granted to affiliated hemophilia<br />
organizations and hemophilia treatment centres, <strong>with</strong> appropriate acknowledgement of the WFH.<br />
However, permission does not extend to the reproduction or translation of this document, in whole or in<br />
part, <strong>for</strong> sale or <strong>for</strong> use in conjunction <strong>with</strong> commercial purposes. To obtain permission to reprint, redistribute,<br />
or translate this publication, please contact the Communications Department at the address below.<br />
This guide is also available as a pdf file at www.wfh.org.<br />
World Federation of <strong>Hemophilia</strong><br />
1425 René Lévesque Boulevard West, Suite 1010<br />
Montreal, Quebec H3G 1T7<br />
Tel. (514) 875-7944<br />
Fax: (514) 875-8916<br />
E-mail: wfh@wfh.org<br />
Website: www.wfh.org<br />
Acknowledgements<br />
<strong>Exercises</strong> <strong>for</strong> <strong>People</strong> <strong>with</strong> <strong>Hemophilia</strong> by Kathy Mulder was developed in collaboration <strong>with</strong> WFH<br />
volunteers from around the world. Much appreciation goes to the guide’s reviewers: Lily Heijnen, MD,<br />
and physical therapists David Stephensen, Pamela Narayan, Karen Beeton, Nichan Zourikian, Greig<br />
Blamey, and WFH VP Communications David Page. The WFH also thanks medical illustrator Tim Fedak,<br />
whose drawings and diagrams supplement those licensed from VHI.
Table of Contents<br />
Introduction 1<br />
Section 1: How Joints and Muscles are Affected by <strong>Hemophilia</strong> 3<br />
Section 2: A Few Words About Exercise and <strong>Hemophilia</strong> 7<br />
Section 3: Suggested Joint <strong>Exercises</strong> 9<br />
<strong>Exercises</strong> <strong>for</strong> the Knee 10<br />
<strong>Exercises</strong> <strong>for</strong> the Ankle 15<br />
<strong>Exercises</strong> <strong>for</strong> the Elbow 18<br />
Section 4: Suggested Muscle <strong>Exercises</strong> 23<br />
<strong>Exercises</strong> <strong>for</strong> the Iliopsoas (Hip Flexor) 24<br />
<strong>Exercises</strong> <strong>for</strong> the Gastrocnemius (Calf Muscle) 29<br />
<strong>Exercises</strong> <strong>for</strong> the Hamstrings 31<br />
<strong>Exercises</strong> <strong>for</strong> the Forearm Flexors 34<br />
<strong>Exercises</strong> <strong>for</strong> the Quadriceps 36<br />
Conclusion 41<br />
Glossary of Terms 42<br />
Bibliography 44
Introduction<br />
The question sounds simple enough: “I have hemophilia. What kinds of exercises should I do?” Or, “What<br />
exercises should I give my patients <strong>with</strong> hemophilia?” The answer is simple too: “It depends.”<br />
There is no such thing as “exercises <strong>for</strong> hemophilia.” Different exercises serve different purposes and<br />
“each person’s situation” is unique. Exercise, like medicine, works best when there has been a complete<br />
assessment done by a trained professional, and specific exercises have been chosen that suit the<br />
“individual’s goals and ability.”<br />
This guide is intended <strong>for</strong>:<br />
• physical therapists <strong>with</strong> little experience working <strong>with</strong> people <strong>with</strong> bleeding disorders;<br />
• other healthcare workers, such as community rehabilitation workers and physical therapy<br />
assistants working in areas where a physical therapist is not always available; and<br />
• people <strong>with</strong> hemophilia and their families.<br />
Section 1 – How Joints and Muscles are Affected by <strong>Hemophilia</strong> provides a description of common muscle<br />
and joint bleeds and how particular muscles and joints react to bleeds over the long term. Physical<br />
therapists who have little experience <strong>with</strong> treating people <strong>with</strong> hemophilia should read this section first.<br />
Section 2 – A Few Words About Exercise and <strong>Hemophilia</strong> provides some important “dos and don’ts” <strong>for</strong><br />
physical therapists and people <strong>with</strong> hemophilia.<br />
The subsequent sections provide a description of exercises that aim to counteract the long-term effects<br />
of joint and muscle bleeding and the tendency to develop abnormal postures. These are by no means the<br />
only exercises that can be used, but they have been selected <strong>for</strong> specific goals and because they are<br />
relatively safe to do <strong>with</strong> minimal equipment and little supervision. The exercises can be photocopied<br />
and distributed to patients by physical therapists. At the beginning of each section is a description of the<br />
anatomy and the frequent problems related to that part of the body.<br />
Section 3 – Suggested Joint <strong>Exercises</strong> provides exercise progressions <strong>for</strong> the knee, ankle, and elbow joints,<br />
focusing on range of motion, strength, and proprioception.<br />
Section 4 – Suggested Muscles <strong>Exercises</strong> provides exercise progressions to strengthen or lengthen muscles<br />
that have become tight due to bleeding or in response to joint bleeds. <strong>Exercises</strong> <strong>for</strong> each muscle have been<br />
chosen that will restore length (flexibility) and muscle strength. The exercises focus on the following<br />
muscles: iliopsoas (hip flexor), gastrocnemius (calf), hamstrings, <strong>for</strong>earm flexors, and quadriceps.<br />
A Glossary of Terms can be found at the back, <strong>with</strong> definitions <strong>for</strong> the words that appear in bold text<br />
throughout the guide.<br />
The exercises in this guide are not the only exercises useful <strong>for</strong> people <strong>with</strong> hemophilia. They have been<br />
chosen to meet specific goals, and because they are relatively safe to do <strong>with</strong> minimal equipment and<br />
supervision. The “right” exercise <strong>for</strong> each individual depends on many things:<br />
• What is the goal of the exercise program? Different exercises are selected depending on whether<br />
there is a need to improve mobility, strength and/or coordination, cardiovascular fitness, or<br />
ability in simple activities or sports.<br />
• Has there been a recent bleed?<br />
• Is there a target joint?<br />
• Is there a de<strong>for</strong>mity or some joint damage that has been present <strong>for</strong> a long time?<br />
<strong>Exercises</strong> <strong>for</strong> <strong>People</strong> <strong>with</strong> <strong>Hemophilia</strong> Introduction 1
• Is there pain at rest?<br />
• Is there pain or crepitus <strong>with</strong> movement?<br />
• Are there particular activities that are difficult or painful, such as rising from a chair, climbing<br />
stairs, squatting, or kneeling?<br />
• Has this person done exercises be<strong>for</strong>e or is he just starting?<br />
• Does this person see the need to do the exercises, or is it someone else’s idea?<br />
• Is this person able to understand and follow detailed instructions?<br />
• Is factor available <strong>for</strong> prophylaxis or in case of an injury?<br />
There are hundreds of books, videos, and television shows that feature celebrities making all sorts of<br />
promises about their exercise programs. Some people <strong>with</strong> hemophilia may be tempted to try these<br />
programs since they are told that exercise is good <strong>for</strong> people <strong>with</strong> hemophilia. In other situations, exercises<br />
are “prescribed” by practitioners who have no training in exercise selection. Both of these approaches can<br />
be frustrating and unsuccessful at best, and in the worst-case scenarios can cause further damage.<br />
One exercise program does not meet the needs of all people <strong>with</strong> hemophilia. The wrong exercise, an<br />
exercise done incorrectly, an exercise done at the wrong time in the recovery stage, or an exercise done at<br />
the wrong frequency or intensity can cause harm.<br />
Some people <strong>with</strong> hemophilia avoid exercise because they think it may cause bleeds, but regular physical<br />
activity can actually help prevent bleeds and joint damage. Exercise is important <strong>for</strong> building healthy<br />
bones and strengthening the muscles that support joints.<br />
Ideally, exercises should be prescribed <strong>for</strong> people <strong>with</strong> hemophilia by a skilled and patient physical<br />
therapist following a detailed assessment. The exercise program should then be supervised and advanced<br />
carefully by the same physical therapist. However, this is not always possible <strong>for</strong> many reasons:<br />
• Not all physical therapists are familiar <strong>with</strong> hemophilia and its effects on joints and muscles;<br />
• Comprehensive hemophilia treatment centres (HTCs) do not exist in all countries;<br />
• Even when HTCs do exist, individuals <strong>with</strong> hemophilia may see the HTC physical therapist only<br />
infrequently (<strong>for</strong> example, at the annual assessment). Interim communication is done by phone,<br />
fax, or wireless communication devices. Assessment and the assignment of exercises are done<br />
remotely instead of face to face;<br />
• Individuals <strong>with</strong> hemophilia and/or nurses and physicians may not be aware of all that<br />
physical therapy can offer, and the physical therapist is not consulted <strong>for</strong> an opinion;<br />
• In smaller or more remote communities, there may be no physical therapist available.<br />
This guide should be used:<br />
• at annual assessment clinic visits <strong>with</strong> the HTC physical therapist (exercises should be reviewed<br />
to ensure that they are still appropriate <strong>for</strong> the individual);<br />
• <strong>for</strong> rehabilitation during recovery from bleeds, especially if the patient lives far away from the<br />
HTC (the physical therapist can prescribe exercises by phone or e-mail based on patient<br />
descriptions of their status); and<br />
• in the home, as a reference to ensure that the exercises are being done correctly.<br />
Exercise is a good thing. Too much rest is not good <strong>for</strong> anyone, and the right amount of activity, whether<br />
physical or mental, is very beneficial. Adults must “use it or lose it” and children must “learn how to use it.”<br />
2 Introduction <strong>Exercises</strong> <strong>for</strong> <strong>People</strong> <strong>with</strong> <strong>Hemophilia</strong>
Section 1: How Joints and Muscles are Affected by <strong>Hemophilia</strong><br />
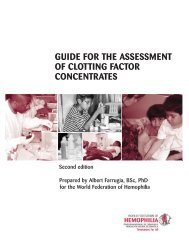
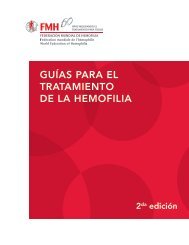
The knees, ankles, and elbows are more commonly affected by hemophilic bleeding than other joints.<br />
This is attributed to two main reasons.<br />
First, these joints have one degree of freedom of movement — as simple hinge joints, they can only flex<br />
and extend. Joints such as the hip and the shoulder, however, have multiple degrees of freedom of<br />
movement and can move around in many directions <strong>with</strong>out strain. These ball and socket joints are not<br />
affected by bleeds as often as the hinge joints.<br />
Second, the hinge joints are not surrounded by protective muscles, whereas the hip and shoulder joints<br />
are covered by many layers of strong muscles. The muscles of the knees, ankles, and elbows are situated<br />
above and below the joints and in most cases only the tendons cross over the actual joints. There<strong>for</strong>e, the<br />
joints are not as well protected on all sides.<br />
Figure 1: Joints Affected by Hemophilic Bleeding<br />
Shoulder<br />
Elbow<br />
Wrist<br />
Hip<br />
Knee<br />
Ankle<br />
<strong>Exercises</strong> <strong>for</strong> <strong>People</strong> <strong>with</strong> <strong>Hemophilia</strong> Section 1: How Joints and Muscles are Affected by <strong>Hemophilia</strong> 3
It is also understood that different muscle groups react differently to injury. Muscles function as either<br />
“stabilizers” or “mobilizers.” Stabilizer muscles provide stability to the body and limbs. They work<br />
constantly to hold the body up against gravity, or allow the body to remain still while we superimpose a<br />
movement. They are made up mainly of muscle fibre types that do not fatigue quickly. Mobilizer muscles<br />
produce movement and work only when they are needed to per<strong>for</strong>m a particular task. These muscles<br />
work in short bursts and are made up mainly of muscle fibre types that fatigue quickly.<br />
Stabilizer muscles are usually deep muscles, located near the joints. When there is an injury in the area, they<br />
react by becoming weaker. The nearby mobilizer muscles are then called on to take over the stabilizing<br />
function. Because they fatigue quickly, mobilizer muscles cannot per<strong>for</strong>m as the stabilizer muscles do. The<br />
mobilizer muscles then become tight and painful and are easily injured if they are stretched or overworked.<br />
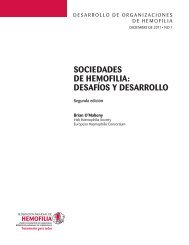
Muscles that react by tightening include the flexor muscles of the wrist and fingers, calf muscles,<br />
hamstrings, and hip flexor muscles (iliopsoas). Figure 2 shows that these are also the common sites of<br />
muscle bleeding in people <strong>with</strong> hemophilia.<br />
Muscles that react by weakening include the quadriceps, triceps, and hip extensor muscles. Over time, the<br />
weak muscles become weaker and the tight muscles become tighter.<br />
This is why a proper assessment of muscle function is so very important be<strong>for</strong>e an exercise program is<br />
selected. The right muscles must be trained in the right way or the situation can be made worse.<br />
Figure 2: Muscles Affected by Hemophilic Bleeding<br />
Forearm flexors<br />
Biceps brachii<br />
Iliopsoas (hip flexor)<br />
Hamstrings<br />
Quadriceps<br />
Calf (gastrocnemius)<br />
4 Section 1: How Joints and Muscles are Affected by <strong>Hemophilia</strong> <strong>Exercises</strong> <strong>for</strong> <strong>People</strong> <strong>with</strong> <strong>Hemophilia</strong>
<strong>People</strong> <strong>with</strong> hemophilia who have had many bleeds tend to develop a distinctive posture that may<br />
include: flexion de<strong>for</strong>mities of the elbows, knees, and hips; an exaggerated arch in the back (lumbar<br />
lordosis); plantarflexed ankles; pelvic asymmetry due to leg length differences; and varying amounts of<br />
muscle wasting (Figure 3). Flexed wrist and fingers caused by deep <strong>for</strong>earm bleeds are less common, but<br />
very dramatic.<br />
Figure 3: Possible Flexion De<strong>for</strong>mities Due to Hemophilic Bleeding<br />
A distinctive posture develops in predictable patterns according to the positions that joints and muscles<br />
prefer when there is a bleed in the area. These are summarized in Table 1 – Development of Abnormal<br />
Posture Following Bleeds.<br />
Unless there is a conscientious and sustained attempt to restore full joint motion, muscle flexibility, and<br />
muscle strength, this posture can become typical <strong>for</strong> the individual and the weak muscles continue to<br />
weaken and the tight muscles become even tighter.<br />
“My child started to do some exercises to strengthen his left ankle which was bleeding occasionally.<br />
His physiotherapy program included picking up little objects (like a pencil) <strong>with</strong> his foot (which amused him a lot),<br />
and exercises in the water. His body awareness increased <strong>with</strong> the regular exercises and he steps firmly now.”<br />
– Mother of a five-year-old child <strong>with</strong> hemophilia B, Brazil<br />
“The exercise in physical therapy is a necessity <strong>for</strong> the hemophilia patient. It strengthens the muscles and releases<br />
the joints. From my experience, I began my rehabilitation when I was wheelchair bound. With much ef<strong>for</strong>t,<br />
I slowly began to walk <strong>with</strong> the help of a walker. Hydrotherapy also helped me by leaps and bounds.”<br />
– 53-year-old <strong>with</strong> severe hemophilia A, Israel<br />
<strong>Exercises</strong> <strong>for</strong> <strong>People</strong> <strong>with</strong> <strong>Hemophilia</strong> Section 1: How Joints and Muscles are Affected by <strong>Hemophilia</strong> 5
Table 1: Development of Abnormal Posture Following Bleeds<br />
Physical therapists should use the following table to become familiar <strong>with</strong> the movement restrictions and<br />
adaptive postures that are seen frequently <strong>with</strong> hemophilia. With this knowledge, physical therapists can<br />
help patients prevent these changes from becoming permanent.<br />
Joint bleeds Position of com<strong>for</strong>t Habitual posture Potential problems<br />
Knee<br />
Flexion<br />
Walking on flexed knee,<br />
<strong>with</strong> hip flexed and/or ankle<br />
plantarflexed to compensate<br />
Pain in patellofemoral joint;<br />
stress on ankle; overuse of<br />
hamstrings; weak quadriceps<br />
Elbow<br />
Flexion<br />
Loss of elbow extension,<br />
arm may be carried <strong>with</strong><br />
shoulder extended<br />
Eventual difficulty <strong>with</strong><br />
<strong>for</strong>ward elevation of the arm<br />
Ankle<br />
Plantarflexion<br />
Walking on toes, <strong>with</strong> knee<br />
and/or hip flexed to<br />
compensate<br />
Ankle in unstable position,<br />
<strong>with</strong> small area of<br />
weight-bearing on talus and<br />
sole of foot; overuse of calf<br />
muscles; pressure on knee<br />
Hip (unusual site)<br />
Flexion, external rotation<br />
Hip flexed, increased lumbar<br />
lordosis, compensatory knee<br />
flexion<br />
Incomplete hip extension<br />
during gait; compensation<br />
<strong>with</strong> increased rotation of<br />
pelvis or spine<br />
Shoulder<br />
Adduction, internal rotation<br />
Arm held close to body<br />
Difficulty <strong>with</strong> activities related<br />
to daily living and self-care<br />
Wrist and fingers<br />
Flexion<br />
Wrist flexed, hand closed<br />
Difficulty extending wrist and<br />
fingers; inefficient grip<br />
Toes<br />
Extension (dorsiflexion)<br />
Extension (dorsiflexion)<br />
Difficulty wearing shoes<br />
Muscle bleeds Position of com<strong>for</strong>t Habitual posture Potential problems<br />
Hamstrings<br />
Knee flexion, hip extension<br />
Knee flexed<br />
Altered gait; knee flexed,<br />
walking on toes<br />
Biceps brachii<br />
Elbow flexion, shoulder<br />
internal rotation<br />
Elbow flexed<br />
Incomplete elbow extension;<br />
decreased protective balance<br />
reactions<br />
Calf (gastrocnemius)<br />
Ankle plantarflexion, knee<br />
flexion<br />
Ankle plantarflexed, knee<br />
flexed<br />
Walking on toes, knee flexed;<br />
stress on knee and ankle joints<br />
Hip flexor (iliopsoas)<br />
Hip flexion, some external<br />
rotation and increased lumbar<br />
lordosis<br />
Hip flexed, extreme lordosis,<br />
walking on toes<br />
Back pain; incomplete hip<br />
extension; stress on knee and<br />
ankle<br />
Wrist and finger flexors<br />
Wrist and finger flexion, elbow<br />
flexion<br />
Wrist and finger flexion, elbow<br />
flexion<br />
Inability to open hand; weak<br />
grip due to incomplete wrist<br />
extension<br />
Thigh (quadriceps)<br />
Knee extension<br />
Knee remains extended<br />
Incomplete knee flexion; risk<br />
of re-injury <strong>with</strong> sudden knee<br />
flexion; functional difficulties<br />
on stairs, squatting, etc.<br />
Hip extensors<br />
Hip extension<br />
Hip extension<br />
Unable to sit<br />
Wrist and finger extensors<br />
Wrist and finger extension,<br />
elbow flexion<br />
Wrist and finger extension,<br />
elbow flexion<br />
Unable to grasp<br />
6 Section 1: How Joints and Muscles are Affected by <strong>Hemophilia</strong> <strong>Exercises</strong> <strong>for</strong> <strong>People</strong> <strong>with</strong> <strong>Hemophilia</strong>
Section 2: A Few Words About Exercise and <strong>Hemophilia</strong><br />
No factor? No problem.<br />
Many people are afraid to try exercises or to prescribe all but the most basic exercises if factor (clotting<br />
factor concentrate, cryoprecipitate, plasma) is not readily available. They are concerned that exercise may<br />
cause bleeding. The exercises in this guide are arranged in levels of difficulty from least difficult to more<br />
strenous. The most strenuous exercises are identified clearly, and instructions are provided on how to work<br />
up to these more difficult levels safely. If the principles and warnings given in the guide are observed, lack<br />
of treatment products should not deter people from beginning an exercise program. By the same token,<br />
access to treatment products does not mean that people should begin at a level that is too difficult.<br />
Slow and steady.<br />
As they learn new exercises, adolescents often want to show off how much they can do and may over exert<br />
themselves <strong>with</strong>out realizing it. It is very important to begin slowly and progress gradually.<br />
Don’t underestimate isometric exercises.<br />
Isometric exercises involve contracting a muscle <strong>with</strong>out producing movement at the joint. Isometrics are<br />
an excellent way to begin exercising if muscles are very weak, or if joints are very painful <strong>with</strong> movement.<br />
No gain <strong>with</strong> pain.<br />
Pain is usually a sign that something is wrong. <strong>People</strong> <strong>with</strong> hemophilia must learn to listen to their<br />
bodies, and physical therapists must listen to what they say. If a new pain begins during exercising, it is<br />
very important that it be analysed carefully: Is this muscle fatigue, or the sign of a new bleed? Is the<br />
exercise placing too much strain on a damaged joint?<br />
It is not uncommon <strong>for</strong> physical therapists to exhort patients to do “just a few more” exercises. Many<br />
people <strong>with</strong> hemophilia tell stories of times when “the physical therapist made me have a bleed.” If the<br />
person <strong>with</strong> hemophilia says he has done enough exercises or repetitions, it is wise to believe him.<br />
Each situation is unique.<br />
The number of exercises and repetitions depends on the situation of each individual. If it is very soon<br />
after a bleed, two or three repetitions may be all that can be tolerated. If the bleed has stopped and the<br />
aim is to restore lost range of motion, more repetitions may be needed. The individual and the therapist<br />
must listen to the signals from the body — discom<strong>for</strong>t usually means enough <strong>for</strong> that session.<br />
The number of repetitions will also depend on which type of muscle is being exercised. The stabilizer<br />
muscles need to be able to work repeatedly and <strong>for</strong> long periods; they should be trained <strong>with</strong> low<br />
resistance but many repetitions.<br />
Use gravity and body weight as resistance to start.<br />
Sometimes, the simplest exercises are quite adequate. Membership at the gym or investment in exercise<br />
equipment is not necessary. In fact, using exercise apparatus may be difficult <strong>for</strong> someone <strong>with</strong> arthropathy<br />
or someone who is recovering from a bleed. Start <strong>with</strong> simple, practical, functional exercises, and allow<br />
the individual to progress.<br />
Think about the other joints.<br />
Some of the exercises designed to help one joint may place too much stress on other joints. For example,<br />
weight-bearing exercises to strengthen a knee may be difficult and ill advised if the ankle on the same leg<br />
is damaged.<br />
<strong>Exercises</strong> <strong>for</strong> <strong>People</strong> <strong>with</strong> <strong>Hemophilia</strong> Section 2: A Few Words About Exercise and <strong>Hemophilia</strong> 7
Remember functional requirements.<br />
Consider the different functions the individual needs to be able to do. The exercises <strong>for</strong> someone having<br />
trouble getting on and off a chair will be different than <strong>for</strong> someone having trouble running.<br />
Furthermore, compliance <strong>with</strong> any exercise program will be increased by choosing exercises that relate<br />
to the individual’s functional goals.<br />
Don’t <strong>for</strong>get proprioception.<br />
Proprioception is the process by which the body reacts to changes in joint position. The joint position<br />
receptors are located in the joint capsule and can be damaged when the capsule is stretched during bleeds.<br />
Failure to restore proprioception will result in the inability of the joint to respond quickly enough to new<br />
stresses, and the potential <strong>for</strong> easy re-injury.<br />
Normal range of motion and muscle length.<br />
The goal <strong>with</strong> most exercises in this guide is to “continue until range/strength is equal to the opposite<br />
side.” This only applies if the opposite side has full and “normal” range and strength, and the affected<br />
joint or muscle had full and “normal” range and/or strength to begin <strong>with</strong>.<br />
Some people have developed chronic limitation of certain movements and “normal” range of motion is no<br />
longer possible. In these cases, the objective of the exercises is to prevent additional loss of function and<br />
to return the joint or muscle back to its usual state as soon as possible after new bleeds.<br />
Everyday activities are important too.<br />
Exercise is important to counteract the long-term effects of bleeding in the key joints and muscle groups.<br />
Many people find it difficult to stick to a regimented exercise program: it is important to remember that<br />
many everyday activities, such as walking, riding a bicycle, climbing stairs, or even shoveling snow can<br />
have beneficial effects too. However, specific exercises may be needed to work on certain trouble spots.<br />
The exercises in this guide are by no means the only exercises useful <strong>for</strong> people <strong>with</strong> hemophilia, but they<br />
have been chosen to meet specific goals.<br />
“Exercise and joint rehabilitation don’t come easily to me. However, when I discipline myself to follow my physical<br />
therapy protocol, I find myself <strong>with</strong> less pain, more motion and fewer bleeds. With exercise and hemophilia,<br />
slow and steady really does win the race. Pushing oneself too hard leads to setbacks, but stretching yourself just<br />
enough builds strength <strong>with</strong>out causing bleeds.”<br />
– 26-year-old <strong>with</strong> severe hemophilia A, United States<br />
“There are excellent static exercises that don’t involve using weights. Yoga positions like the Bridge,<br />
the Plough, the Grasshopper, Heel-Toe, etc. are fantastic <strong>for</strong> stretching and toning. I do them every day<br />
and I can’t recommend them highly enough.”<br />
– 49-year-old <strong>with</strong> severe hemophilia A, South Africa<br />
“The non-compliance was sky high. Functional exercise is the best solution — even smaller children,<br />
coming in <strong>with</strong> a face like thunder and hating physiotherapy, turned out to be cooperative when normal activity<br />
was used as ‘exercise.’ ”<br />
– Physiotherapist, Netherlands<br />
8 Section 2: A Few Words About Exercise and <strong>Hemophilia</strong> <strong>Exercises</strong> <strong>for</strong> <strong>People</strong> <strong>with</strong> <strong>Hemophilia</strong>
Section 3: Suggested Joint <strong>Exercises</strong><br />
The exercises in this section focus on the knee, ankle, and elbow joints. For each joint, exercises have been<br />
chosen that will help improve or maintain range of motion, muscle strength, and proprioception.<br />
The exercises progress from simple to more difficult levels. Some are suitable to begin soon after a bleed,<br />
others are more advanced. It is not necessary to progress through all exercise levels <strong>for</strong> range of motion<br />
exercises be<strong>for</strong>e beginning the strengthening exercises. In fact, there is much overlap in these areas and<br />
range of motion, strengthening, and proprioception exercises should all be included in most programs.<br />
“Exercise can be difficult when you have hemophilia, but the key is to find a good sense of balance between what is<br />
helpful and what is hurtful. Through experimenting you will be able to find your happy medium.<br />
You should try being active at an intensity that is not harmful to your body while still maximizing your abilities.<br />
Most importantly have fun <strong>with</strong> your activities, so it doesn’t feel like a chore.”<br />
– 33-year-old <strong>with</strong> severe hemophilia, United States<br />
“I play golf in the summer to stay fit. Un<strong>for</strong>tunately, these last few years, I have had a hard time finishing my 18<br />
holes as, starting around the 13th or 14th hole, my joints became stiff and sore... and my per<strong>for</strong>mance suffered,<br />
not to mention that I had to spend the rest of the day resting. Moreover, I had to use a cart to move around.<br />
But after I followed an exercise program designed by my physiotherapist, I was able to improve my condition<br />
significantly. I can now play the 18 holes <strong>with</strong>out showing any tiredness and I can even do it walking some days.<br />
My joints are not nearly as sore, their range of motion has improved and I feel in much better shape.”<br />
40-year-old <strong>with</strong> severe hemophilia A, Canada<br />
<strong>Exercises</strong> <strong>for</strong> <strong>People</strong> <strong>with</strong> <strong>Hemophilia</strong> Section 3: Suggested Joint <strong>Exercises</strong> 9
<strong>Exercises</strong> <strong>for</strong> the Knee<br />
The knee is the joint most commonly affected by hemophilic bleeding. Being both a hinge joint and a<br />
weight-bearing joint, the patellofemoral joint is subject to many stresses during the course of a day. Knee<br />
extension is easily lost due to reflex inhibition of the quadriceps muscle and overuse or spasm of the<br />
hamstrings. Repeated bleeding causes thickening of the synovium, which can further limit knee extension.<br />
Range of Motion<br />
LEVEL 1<br />
This exercise can be started as soon as bleeding<br />
has stopped.<br />
Start: Sit <strong>with</strong> legs out straight (or lie on back).<br />
Exercise: Bend hip and knee, and slide heel<br />
towards body. Then straighten knee by sliding<br />
heel away from body. Repeat several times.<br />
Goal: Try to get the back of the knee as close to<br />
the surface as possible. Also try to bend the knee<br />
as much as the other knee can bend.<br />
LEVEL 2<br />
Start: Sit on chair. Support the weight of the<br />
affected leg <strong>with</strong> the other leg if necessary.<br />
Exercise: Allow the knee to bend as much as is<br />
com<strong>for</strong>table, then straighten the leg as far as<br />
possible.<br />
Goal: Try to bend a bit more each time.<br />
LEVEL 3<br />
Note: If the person has difficulty lying on his<br />
stomach, it may be necessary to place a pillow<br />
under the waist so that the hip is more com<strong>for</strong>table,<br />
or a pad under the thigh to take pressure<br />
off the knee cap.<br />
Start: Lie on stomach.<br />
Exercise: Bend knee and try to touch heel to<br />
buttocks. Assist <strong>with</strong> the other leg if necessary.<br />
Then straighten leg as far as possible.<br />
Goal: Bend knee as much as knee could bend<br />
be<strong>for</strong>e the bleed.<br />
10 Section 3: Suggested Joint <strong>Exercises</strong> – Knee <strong>Exercises</strong> <strong>for</strong> <strong>People</strong> <strong>with</strong> <strong>Hemophilia</strong>
Strength<br />
LEVEL 1<br />
This exercise can be started as soon as bleeding<br />
has stopped.<br />
Start: Lie on back <strong>with</strong> a roll under knee.<br />
Exercise: Tighten the muscle at front of thigh,<br />
extend knee and lift heel. Hold <strong>for</strong> several seconds,<br />
then relax. Repeat until muscle feels tired.<br />
Goal: Straighten knee completely or as straight<br />
as knee could go be<strong>for</strong>e the most recent bleed.<br />
Compare to other knee or baseline assessment.<br />
LEVEL 2<br />
Start: Sit on a chair <strong>with</strong> knee bent.<br />
Exercise: Extend knee, lifting the foot off the<br />
floor as far as possible. Hold <strong>for</strong> several seconds,<br />
then slowly return foot to floor. Repeat until<br />
muscle feels tired.<br />
Goal: As above, straighten knee completely or as<br />
straight as knee could go be<strong>for</strong>e the most recent<br />
bleed. Increase repetitions. Compare to other<br />
knee or baseline assessment.<br />
LEVEL 3<br />
Start: Sit on chair. Cross ankle of uninjured leg<br />
over the ankle of the affected leg.<br />
Exercise: Press ankles together as hard as possible.<br />
Hold <strong>for</strong> several seconds, then relax. Repeat<br />
<strong>with</strong> the knee bent at different angles. Repeat<br />
until muscle feels tired.<br />
Goal: As above, straighten knee completely or<br />
as straight as knee could go. Continue until<br />
affected leg can exert strong pressure, equal to<br />
the unaffected leg.<br />
“Not too long ago — a couple of years back now — I<br />
went to a movie at the local cineplex. After the show, it<br />
took me so long to straighten my right leg and get to my<br />
feet that the cleaning staff came in and started sweeping<br />
the place out. After that happened a couple of times,<br />
I started weight training. Today I pressed 25 kg <strong>with</strong> that<br />
same leg, nearly half my body weight.”<br />
– 49-year-old <strong>with</strong> severe hemophilia A, South Africa<br />
<strong>Exercises</strong> <strong>for</strong> <strong>People</strong> <strong>with</strong> <strong>Hemophilia</strong> Section 3: Suggested Joint <strong>Exercises</strong> – Knee 11
LEVEL 4<br />
Start: Lie on back <strong>with</strong> a roll under knee. Place<br />
weight at ankle.<br />
Exercise: Extend knee and lift heel. Hold <strong>for</strong><br />
several seconds, then slowly lower foot back to<br />
surface. Repeat until muscle feels tired.<br />
Goals: There are 3 ways to progress this exercise:<br />
• Straighten knee as far as can be done<br />
<strong>with</strong>out a weight (otherwise, the weight<br />
may be too heavy to start).<br />
• Increase the length of time holding the<br />
extended position.<br />
• Increase the number of repetitions.<br />
LEVEL 5<br />
Start: Stand <strong>with</strong> weight evenly on both feet.<br />
Exercise: Squat down partway, keeping weight<br />
distributed evenly on both legs. Do not bend<br />
knees far enough to cause pain. Hold <strong>for</strong> several<br />
seconds. Return to upright position.<br />
Goals: There are 3 ways to progress this exercise:<br />
• Increase the length of time holding the<br />
flexed position.<br />
• Increase the amount of knee bend<br />
(as long as it is not painful).<br />
• Increase the number of repetitions.<br />
LEVEL 6<br />
Start: Stand <strong>with</strong> back against wall, feet apart.<br />
Exercise: Slide down wall slowly, keeping knees<br />
pointed straight over toes. Go slowly and stop if<br />
there is any pain. Hold the position <strong>for</strong> several<br />
seconds, then return to upright position.<br />
Goals: There are 3 ways to progress this exercise:<br />
• Increase the length of time holding the<br />
flexed position.<br />
• Increase the amount of knee bend<br />
(as long as it is not painful).<br />
• Increase the number of repetitions.<br />
12 Section 3: Suggested Joint <strong>Exercises</strong> – Knee <strong>Exercises</strong> <strong>for</strong> <strong>People</strong> <strong>with</strong> <strong>Hemophilia</strong>
LEVEL 7<br />
Note: If this exercise causes pain, go back a few<br />
levels to increase strength first.<br />
Start: Stand facing a step.<br />
Exercise: Step up <strong>with</strong> affected leg. Keep knee<br />
pointed over toes and push <strong>with</strong> whole leg to<br />
raise body onto the top of the step. Repeat until<br />
leg feels tired.<br />
Goal: Unless there is pain, practice until it is<br />
easy to step up onto a low stool or go up the<br />
steps at home, school, or work.<br />
LEVEL 8<br />
Start: Stand on a step facing down.<br />
Exercise: Step off the step <strong>with</strong> strong leg first,<br />
letting affected knee bend. Gradually lower<br />
body until strong leg is just touching floor, then<br />
return to upright. Repeat until leg feels tired.<br />
Goal: Unless there is pain, practice until it<br />
is easy to go down steps smoothly (no limp) and<br />
<strong>with</strong>out using railing.<br />
Note: Levels 8 and 9 are very difficult exercises<br />
and must be approached <strong>with</strong> caution. If<br />
these exercises cause pain, practice levels 6<br />
and 7 to increase strength first. <strong>People</strong> who<br />
have experienced many bleeds into the knees<br />
may never be able to do levels 8 and 9 because<br />
of their level of difficulty. If this exercise<br />
causes pain, go back a few levels to increase<br />
strength first.<br />
LEVEL 9<br />
Note: If this exercise causes pain, go back a few<br />
levels.<br />
Start: In kneeling position, bend affected knee<br />
and place foot flat on ground.<br />
Exercise: Stand up using only the affected leg,<br />
<strong>with</strong>out using hands. Repeat a few times, stop if<br />
knee is painful.<br />
Goal: Unless there is pain, practice until this can<br />
be done easily.<br />
<strong>Exercises</strong> <strong>for</strong> <strong>People</strong> <strong>with</strong> <strong>Hemophilia</strong> Section 3: Suggested Joint <strong>Exercises</strong> – Knee 13
Proprioception<br />
Proprioception is the process by which the body reacts to position changes. Proprioception exercises are<br />
like balance exercises. Beginners should start these exercises close to a wall or piece of furniture so that<br />
they can steady themselves if necessary.<br />
LEVEL 1<br />
Start: Stand on affected leg.<br />
Exercise: Maintain balance.<br />
Goal: Practice until balance can be maintained<br />
<strong>for</strong> 30 seconds.<br />
LEVEL 2<br />
Start: Stand on affected leg <strong>with</strong> eyes closed.<br />
Exercise: Maintain balance <strong>with</strong> eyes closed as<br />
long as possible.<br />
Goal: Practice until balance can be maintained<br />
<strong>with</strong> eyes closed <strong>for</strong> 30 seconds.<br />
LEVEL 3<br />
Start: Stand on affected leg on an unstable surface<br />
(e.g., pillow, block of foam).<br />
Exercise: Maintain balance.<br />
Goal: Practice until balance can be maintained<br />
<strong>for</strong> 30 seconds.<br />
LEVEL 4<br />
Start: Stand on affected leg on an unstable surface<br />
and close eyes.<br />
Exercise: Maintain balance <strong>with</strong> eyes closed as<br />
long as possible.<br />
Goal: Practice until balance can be maintained<br />
<strong>with</strong> eyes closed <strong>for</strong> 30 seconds.<br />
LEVEL 5<br />
Note: Do not attempt this exercise if knee or<br />
ankle is swollen or painful.<br />
Start: Stand on a stable surface at a small height<br />
(e.g., bottom step or low stool – 15-20 cm).<br />
Exercise: Jump from the small height and keep<br />
balance on landing.<br />
Goal: Practice until the landing feels secure.<br />
Increase height of jump only if required <strong>for</strong><br />
function (e.g., dismounting from a bus or truck).<br />
14 Section 3: Suggested Joint <strong>Exercises</strong> – Knee <strong>Exercises</strong> <strong>for</strong> <strong>People</strong> <strong>with</strong> <strong>Hemophilia</strong>
<strong>Exercises</strong> <strong>for</strong> the Ankle<br />
The ankle joint is also commonly affected by hemophilic bleeding. The talocrural joint is the usual site<br />
of bleeding, but bleeding can also occur into the subtalar joint. Anterior swelling interferes <strong>with</strong> ankle<br />
dorsiflexion. Repeated bleeding causes thickening of the synovium, which can further limit ankle<br />
dorsiflexion. Limited dorsiflexion causes the individual to walk on a plantarflexed ankle (on the toes),<br />
which is not a stable position, or to walk <strong>with</strong> the foot turned outward.<br />
Range of Motion<br />
LEVEL 1<br />
This exercise can be started as soon as bleeding<br />
has stopped.<br />
Start: Lie in a com<strong>for</strong>table position.<br />
Exercise: Move foot up and down, in and out.<br />
Practice drawing shapes or letters of the alphabet<br />
<strong>with</strong> your foot, keeping the rest of the leg still.<br />
Goal: Full ankle motion equal to the opposite<br />
ankle or baseline.<br />
LEVEL 2<br />
Start: Sit on a chair <strong>with</strong> knee bent and foot flat<br />
on floor.<br />
Exercise: Slide heel back as far as possible,<br />
keeping heel down. It may feel as though there<br />
is pressure at the front of the ankle. Hold <strong>for</strong><br />
several seconds, then relax. Repeat.<br />
Goal: Try to slide the heel back a little bit further<br />
each time. Practice until full motion is restored.<br />
Compare to other ankle or baseline.<br />
LEVEL 3<br />
Note: Do not attempt this exercise if there is<br />
swelling or pain in the ankle.<br />
Start: Stand facing wall, <strong>with</strong> affected leg slightly<br />
ahead of the other. Place hands on wall, keeping<br />
both feet pointing toward wall.<br />
Exercise: Gently move the knee toward the wall,<br />
while keeping the heel flat on the floor. Hold <strong>for</strong><br />
a few seconds, then relax. Repeat.<br />
Goal: Try to move knee closer to wall each time.<br />
Compare to other ankle or baseline.<br />
<strong>Exercises</strong> <strong>for</strong> <strong>People</strong> <strong>with</strong> <strong>Hemophilia</strong> Section 3: Suggested Joint <strong>Exercises</strong> – Ankle 15
Strength<br />
LEVEL 1<br />
Start: Sit on a chair <strong>with</strong> knee bent and foot flat<br />
on floor.<br />
Exercise: Lift front of foot off floor and hold <strong>for</strong><br />
several seconds. Relax.<br />
Goal: Repeat until leg muscle feels tired.<br />
LEVEL 2<br />
Start: Stand <strong>with</strong> weight on both feet.<br />
Exercise: Lift both heels and stand on toes <strong>for</strong><br />
several seconds. Relax.<br />
Goal: Repeat several times, until calf muscle<br />
feels tired.<br />
LEVEL 3<br />
Start: Standing or walking.<br />
Exercise: Walk several steps on tip toes. Then<br />
walk several steps on heels.<br />
Goal: Repeat several times, until muscle feels<br />
tired. Increase by a few steps each day.<br />
LEVEL 4<br />
Start: Stand on affected leg. Hold onto something<br />
<strong>for</strong> balance.<br />
Exercise: Raise heel off floor and hold. Relax.<br />
Repeat several times.<br />
Goal: 25-30 repetitions. Do not continue if there<br />
is pain in the ankle during the exercise.<br />
“Two of my patients have bad ankles. Because they each<br />
had both knees replaced in the last three years, they want<br />
to wait a little bit be<strong>for</strong>e thinking about ankle fusion.<br />
This can also be explained by the fact that their mobility<br />
and walking capacities improved a lot after the knee<br />
surgery. Nonetheless the pain is still severe in both ankles.<br />
So one part of the treatment was to teach them some<br />
exercises to mobilize the ankle combined by mobilization<br />
physiotherapy session each week. This treatment doesn’t<br />
relieve the pain completely but the ankle surgery<br />
can be delayed.”<br />
– Physiotherapist, Belgium<br />
16 Section 3: Suggested Joint <strong>Exercises</strong> – Ankle <strong>Exercises</strong> <strong>for</strong> <strong>People</strong> <strong>with</strong> <strong>Hemophilia</strong>
Proprioception<br />
LEVEL 1<br />
Start: Stand on affected leg.<br />
Exercise: Maintain balance.<br />
Goal: Practice until balance can be maintained<br />
<strong>for</strong> 30 seconds.<br />
LEVEL 2<br />
Start: Stand on affected leg <strong>with</strong> eyes closed.<br />
Exercise: Maintain balance <strong>with</strong> eyes closed as<br />
long as possible.<br />
Goal: Practice until balance can be maintained<br />
<strong>with</strong> eyes closed <strong>for</strong> 30 seconds.<br />
LEVEL 3<br />
Start: Stand on affected leg on an unstable surface<br />
(e.g., pillow, block of foam).<br />
Exercise: Maintain balance.<br />
Goal: Practice until balance can be maintained<br />
<strong>for</strong> 30 seconds.<br />
LEVEL 4<br />
Start: Stand on affected leg on an unstable surface<br />
and close eyes.<br />
Exercise: Maintain balance <strong>with</strong> eyes closed as<br />
long as possible.<br />
Goal: Practice until balance can be maintained<br />
<strong>with</strong> eyes closed <strong>for</strong> 30 seconds.<br />
LEVEL 5<br />
Note: Do not attempt this exercise if knee or<br />
ankle is swollen or painful.<br />
Start: Stand on a stable surface at a small height<br />
(e.g., bottom step or low stool – 15-20 cm).<br />
Exercise: Jump from the small height and keep<br />
balance on landing.<br />
Goal: Practice until the landing feels secure.<br />
Increase height of jump only if required <strong>for</strong><br />
function (e.g., dismounting from a bus or truck).<br />
<strong>Exercises</strong> <strong>for</strong> <strong>People</strong> <strong>with</strong> <strong>Hemophilia</strong> Section 3: Suggested Joint <strong>Exercises</strong> – Ankle 17
<strong>Exercises</strong> <strong>for</strong> the Elbow<br />
The elbow consists of two joints: the radio-humeral joint is where flexion and extension of the arm takes<br />
place, while pronation and supination of the <strong>for</strong>earm occur at the radio-ulnar joint. Both joints are<br />
enclosed in a single synovial capsule, so either joint can be affected by bleeding in hemophilia. While a<br />
loss of elbow extension usually can be tolerated fairly well <strong>with</strong> only minimal impact on function, people<br />
are severely limited in many daily tasks when pronation and supination are affected.<br />
Range of Motion<br />
LEVEL 1<br />
This exercise can be started as soon as bleeding<br />
has stopped.<br />
Start: Sit in a com<strong>for</strong>table position.<br />
Exercise: Gently bend and straighten elbow.<br />
Goal: Try to extend a little bit more <strong>with</strong> each<br />
repetition, but do not <strong>for</strong>ce the movement.<br />
LEVEL 2<br />
Start: Sit or lie <strong>with</strong> elbow supported.<br />
Exercise: Extend elbow slowly, letting the<br />
weight of the arm assist. Repeat several times.<br />
Goal: Try to straighten a bit further <strong>with</strong> each<br />
repetition, but do not <strong>for</strong>ce the movement.<br />
LEVEL 3<br />
Note: Do not attempt this exercise if there is<br />
swelling or pain in the elbow.<br />
Start: Sit, resting elbow near edge of table.<br />
Exercise: Straighten elbow as far as possible,<br />
assisting <strong>with</strong> the other hand.<br />
Goal: Complete extension. Compare to other<br />
arm or baseline.<br />
18 Section 3: Suggested Joint <strong>Exercises</strong> – Elbow <strong>Exercises</strong> <strong>for</strong> <strong>People</strong> <strong>with</strong> <strong>Hemophilia</strong>
Forearm Rotation<br />
LEVEL 1<br />
This exercise can be started as soon as bleeding<br />
has stopped.<br />
Start: Sit in a com<strong>for</strong>table position <strong>with</strong> elbow<br />
bent and arm supported.<br />
Exercise: Turn palm of the hand up, then down.<br />
Repeat several times.<br />
Goal: Try to turn palm <strong>with</strong>out moving the rest<br />
of the arm. Try to turn palm upward a little bit<br />
more each time.<br />
LEVEL 2<br />
Start: Sit in a com<strong>for</strong>table position <strong>with</strong> elbow<br />
bent. Hold a small weight in hand.<br />
Exercise: Turn palm up and down. Let the weight<br />
help the arm turn further. Do not allow elbow to<br />
move away from body. Repeat several times.<br />
Goal: Gently try to turn a bit further each time.<br />
Compare to other arm or baseline.<br />
“I work <strong>with</strong> a man <strong>with</strong> severe bilateral elbow<br />
arthropathy. When he was 42 years old, I convinced him<br />
to start a fitness training. He is going to the gym two<br />
times a week. In two years, he lost 10 kg (which is very<br />
good <strong>for</strong> his two knee replacements) and the most<br />
important thing is that since this training, he doesn’t have<br />
any elbow hemarthrosis (he used to have hemorrhagic<br />
accidents at least five times a year in each elbow).<br />
The exercises were simply biceps and triceps exercises<br />
carefully taught by a fitness instructor who was aware<br />
of the disease.”<br />
– Physiotherapist, Belgium<br />
<strong>Exercises</strong> <strong>for</strong> <strong>People</strong> <strong>with</strong> <strong>Hemophilia</strong> Section 3: Suggested Joint <strong>Exercises</strong> – Elbow 19
Elbow extension<br />
LEVEL 1<br />
Start: Place strong hand under affected arm.<br />
Exercise: Press affected arm down into strong<br />
hand and hold <strong>for</strong> several seconds. Repeat<br />
several times, until arm feels tired.<br />
Goal: Gradually increase pressure. Practice until<br />
affected arm can exert pressure equal to other<br />
arm.<br />
LEVEL 2<br />
Start: Sit, or lie on back. Bend elbow and place<br />
hand near shoulder, <strong>with</strong> elbow pointing towards<br />
the ceiling.<br />
Exercise: Extend arm and reach hand toward the<br />
ceiling. Hold several seconds, then relax. Repeat<br />
several times, until arm feels tired.<br />
Goal: Practice until elbow can be straightened<br />
completely.<br />
LEVEL 3<br />
Start: Sit, or lie on back. Bend elbow and place<br />
hand near shoulder, <strong>with</strong> elbow pointing towards<br />
the ceiling. Hold a weight in hand.<br />
Exercise: Extend arm slowly and reach hand<br />
toward the ceiling. Then slowly lower hand back<br />
toward shoulder. Repeat until arm feels tired.<br />
Goal: Make sure elbow can extend as far as it<br />
can <strong>with</strong>out the weight — if not, the weight may<br />
be too heavy.<br />
• Gradually increase the number of<br />
repetitions.<br />
• Increase the weight.<br />
20 Section 3: Suggested Joint <strong>Exercises</strong> – Elbow <strong>Exercises</strong> <strong>for</strong> <strong>People</strong> <strong>with</strong> <strong>Hemophilia</strong>
LEVEL 4<br />
Start: Stand facing wall. Place hands flat on wall<br />
<strong>with</strong> arms straight.<br />
Exercise: Lean body towards wall, allowing<br />
elbows to bend. Return to upright position by<br />
pushing <strong>with</strong> arms and straightening elbows.<br />
Goal: Start <strong>with</strong> only small amounts of bending<br />
and progress through these levels only if the<br />
exercise remains pain free.<br />
LEVEL 5<br />
Note: The following exercises should not be<br />
attempted if there is pain or crepitus in the<br />
elbow, wrist or shoulder, or if the person is<br />
not able to support the weight of his body<br />
through the movement. Do not do this exercise if<br />
it causes pain in the elbow, wrist, or shoulder.<br />
Start: Sit on edge of chair. Place hands on seat of<br />
chair.<br />
Exercise: While holding the seat of the chair,<br />
move body <strong>for</strong>ward and off the chair. Then let<br />
elbows bend slowly, controlling the weight of<br />
the body as it sinks towards the floor. Return to<br />
starting position.<br />
Goal: This exercise can be progressed two ways:<br />
• Increase the number of repetition.<br />
• Bend the elbows further.<br />
LEVEL 6<br />
Note: Do not do this exercise if is causes pain in<br />
the elbow, wrist or shoulder.<br />
Start: Place hands flat on floor <strong>with</strong> elbows<br />
straight. If the person is strong enough, feet can<br />
be on floor as shown. Otherwise, place knees<br />
on floor.<br />
Exercise: Slowly allow elbows to bend and<br />
lower the chest towards the floor. Go slowly,<br />
controlling the weight of the body, and stop if<br />
there is pain. Straighten the arms and return to<br />
starting position.<br />
Goal: This exercise can be progressed two ways:<br />
• Increase the number of repetition.<br />
• Bend the elbows further.<br />
<strong>Exercises</strong> <strong>for</strong> <strong>People</strong> <strong>with</strong> <strong>Hemophilia</strong> Section 3: Suggested Joint <strong>Exercises</strong> – Elbow 21
Proprioception<br />
LEVEL 1<br />
Note: Do not do these exercises if there is pain or<br />
swelling in elbow, wrist, or knee.<br />
Start: On hands and knees, on floor or mat.<br />
Exercise: Raise one leg backward while maintaining<br />
balance on the both arms. Maintain<br />
balance <strong>for</strong> several seconds then lower the leg.<br />
Repeat <strong>with</strong> opposite leg. Repeat until arms feel<br />
tired.<br />
Goal: Maintain position <strong>for</strong> 30 seconds.<br />
LEVEL 2<br />
Start: On hands and knees, on floor or mat.<br />
Exercise: Raise unaffected arm and the opposite<br />
leg (keep weight on the affected arm). Maintain<br />
balance <strong>for</strong> several seconds. Return to start position.<br />
Repeat until affected arm feels tired or shaky.<br />
Goal: Maintain position <strong>for</strong> 30 seconds.<br />
LEVEL 3<br />
Start: On hands and knees <strong>with</strong> both hands on<br />
an unstable surface (e.g., a pillow).<br />
Exercise: Raise one leg backward while maintaining<br />
balance on both arms. Maintain balance<br />
<strong>for</strong> several seconds then lower the leg. Repeat<br />
<strong>with</strong> opposite leg. Repeat until arms feel tired.<br />
Goal: Maintain position <strong>for</strong> 30 seconds.<br />
LEVEL 4<br />
Start: On hands and knees <strong>with</strong> both hands on<br />
an unstable surface.<br />
Exercise: Raise unaffected arm and the opposite<br />
leg (keep weight on the affected arm). Maintain<br />
balance <strong>for</strong> several seconds. Return to start position.<br />
Repeat until affected arm feels tired or shaky.<br />
Goal: Maintain position <strong>for</strong> 30 seconds.<br />
LEVEL 5<br />
Note: Do not start until level 4 is achieved.<br />
Start: On hands and knees <strong>with</strong> both hands on<br />
an unstable surface.<br />
Exercise: Raise unaffected arm and the opposite<br />
leg. Close eyes. Maintain balance <strong>for</strong> several<br />
seconds then resume original position. Repeat.<br />
Goal: Practice this exercise until balance can be<br />
maintained <strong>with</strong> eyes closed <strong>for</strong> 20 seconds.<br />
22 Section 3: Suggested Joint <strong>Exercises</strong> – Elbow <strong>Exercises</strong> <strong>for</strong> <strong>People</strong> <strong>with</strong> <strong>Hemophilia</strong>
Section 4: Suggested Muscle <strong>Exercises</strong><br />
Muscle bleeds are a real challenge to people <strong>with</strong> hemophilia, physicians, and physical therapists. Muscle<br />
bleeds are sometimes not recognized as bleeds and can be mistaken <strong>for</strong> a strained muscle. With deep<br />
muscle bleeds, there are often no visible signs.<br />
Some muscles cross two joints; one joint may move perfectly but movement at the other joint may be<br />
affected. It is often only by testing the movements at both joints simultaneously that the problem becomes<br />
apparent. A sound knowledge of anatomy is essential to assess and rehabilitate the two-joint muscles.<br />
It is also imperative to compare the combined muscle length of the affected limb to that of the opposite<br />
limb. Rehabilitation is not complete until there is enough muscle length to allow all the segments to move<br />
fully at the same time — a common error is to restore length to only one section of the muscle. For example,<br />
after a calf bleed, it may be possible to fully dorsiflex the ankle <strong>with</strong> the knee flexed, but not <strong>with</strong> the knee<br />
extended.<br />
Muscle bleeds are also a challenge because they can create tremendous complications. Deep muscle<br />
compartment bleeds can cause temporary or permanent nerve impairment, and if the pressure is severe,<br />
arterial compression and muscle necrosis can result.<br />
Some muscles, because of their location and function, are difficult to rest adequately. Many of the muscles<br />
most commonly affected by hemophilic bleeds react to injury by weakening. Most muscles lose some<br />
flexibility as they heal. Recurrence of bleeding after a few days of improvement is not unusual.<br />
Ideally, progress and resolution of hematomas are tracked <strong>with</strong> diagnostic ultrasound. When this is not<br />
possible, careful attention to the clinical assessment is crucial. The patient can usually tell whether the<br />
muscle is feeling looser and less painful as the exercises progress or if the muscle is becoming more<br />
painful. The physical therapist must listen carefully to the patients.<br />
Supporting the limb <strong>with</strong> a splint between exercise sessions, in a position of com<strong>for</strong>t while maintaining<br />
some length, may be very helpful to regain muscle length. The splint can be adjusted as muscle length<br />
improves.<br />
Rehabilitation of muscles must also include strengthening exercises to restore power and build endurance.<br />
The following exercises will help stretch or lengthen muscles that have become tight due to bleeding or in<br />
response to joint bleeds. These stretches must be done as active, not passive, stretches, <strong>with</strong>out external<br />
assistance from therapists or caregivers. They must be done <strong>with</strong> great care in order to avoid further injury<br />
to the muscle and new bleeds.<br />
Stretches must be done slowly and gradually. The limb should be stretched only until the point where the<br />
muscle begins to feel tight, no further. The stretch should be held <strong>for</strong> several seconds, then relaxed. It may<br />
be possible to gently stretch a tiny bit further <strong>with</strong> each subsequent stretch, but the individual must be<br />
taught not to stretch too far.<br />
<strong>Exercises</strong> <strong>for</strong> each muscle have been chosen that will restore length (flexibility) and muscle strength. The<br />
exercises focus on the following muscles: iliopsoas (hip flexor), gastrocnemius (calf), hamstrings, <strong>for</strong>earm<br />
flexors, and quadriceps.<br />
<strong>Exercises</strong> <strong>for</strong> <strong>People</strong> <strong>with</strong> <strong>Hemophilia</strong> Section 4: Suggested Muscle <strong>Exercises</strong> 23
<strong>Exercises</strong> <strong>for</strong> the Iliopsoas<br />
(Hip Flexor)<br />
Located deep in the pelvis, the hip flexor is a common site of<br />
bleeding in teenagers and young adults <strong>with</strong> hemophilia. The<br />
psoas portion of the muscle attaches to the spine as well as the<br />
femur; tightness of this muscle or injury to it causes the hip to<br />
flex and the back to arch.<br />
The femoral nerve and femoral artery lie adjacent to the psoas<br />
muscle, there<strong>for</strong>e bleeding at this site can have serious consequences.<br />
Pressure on the nerve can lead first to numbness<br />
and loss of sensation along the front of the thigh. This is an<br />
important early warning sign. If pressure continues to increase<br />
on the femoral nerve, the quadriceps muscle will weaken and<br />
there will be difficulty straightening the knee. This can be a<br />
serious and permanent result of a psoas bleed.<br />
Key points about the psoas:<br />
• A psoas muscle bleed can take many weeks and even months to resolve completely. There<strong>for</strong>e,<br />
rehabilitation needs to be slow and carefully supervised.<br />
• Psoas bleeds must be rested completely until the bleeding has stopped. This means no walking<br />
is allowed at first, not even <strong>with</strong> crutches.<br />
• Numbness or tingling at the front of the thigh is an early indication of nerve damage. If this<br />
happens, consult a treatment centre or hemophilia specialist immediately <strong>for</strong> an assessment.<br />
• Rehabilitation, towards regaining full flexibility and restoring strength, must be carried out<br />
under the close supervision of a physical therapist.<br />
• The psoas muscle can re-bleed easily even after it seems to be recovering. Be patient and be<br />
prepared <strong>for</strong> the patient to resume bedrest if there are any signs of a new bleed, such as increasing<br />
pain or difficulty moving.<br />
24 Section 4: Suggested Muscle <strong>Exercises</strong> – Iliopsoas (Hip Flexor) <strong>Exercises</strong> <strong>for</strong> <strong>People</strong> <strong>with</strong> <strong>Hemophilia</strong>
Flexibility<br />
Resting in a sitting position or lying on the back<br />
<strong>with</strong> the leg supported on lots of pillows may be<br />
necessary <strong>for</strong> days, possibly even weeks. During<br />
this time, keep the hip flexed in its com<strong>for</strong>table<br />
position and do not try to walk. Once it is certain<br />
that the bleeding has stopped, the following<br />
flexibility exercises may be attempted. However,<br />
be prepared to stop the exercises and continue<br />
<strong>with</strong> rest if the bleeding starts again.<br />
LEVEL 1<br />
This exercise should be started only after the<br />
bleeding has stopped, and must be discontinued<br />
immediately if the bleeding starts again.<br />
Start: Lie on back <strong>with</strong> both hips and knees bent<br />
and feet flat. This helps keep the back flat along<br />
the surface. Keep back flat by tightening the<br />
abdominal muscles (pulling belly in).<br />
Exercise: Gently extend the affected leg until a<br />
slight pulling sensation is felt in the hip/groin<br />
region — do not extend any further. Support the<br />
movement <strong>with</strong> hands if necessary. Place a<br />
pillow or roll under the thigh and allow the leg<br />
to relax in this position. Repeat this exercise<br />
every hour.<br />
Goal: As the muscle relaxes and the leg is able to<br />
be extended more, decrease the height of the roll.<br />
• Continue this exercise <strong>for</strong> as many days<br />
as it takes to flatten the affected leg<br />
along the surface while the opposite<br />
knee is bent.<br />
• Do not attempt to walk until the leg can<br />
rest completely flat <strong>with</strong>out any strain<br />
felt in the hip/groin or lower back.<br />
• Stop the exercise immediately if there is<br />
increased discom<strong>for</strong>t in the groin, back,<br />
or thigh, and continue to rest <strong>with</strong> the<br />
leg supported in a com<strong>for</strong>table position.<br />
<strong>Exercises</strong> <strong>for</strong> <strong>People</strong> <strong>with</strong> <strong>Hemophilia</strong> Section 4: Suggested Muscle <strong>Exercises</strong> – Iliopsoas (Hip Flexor) 25
LEVEL 2<br />
This exercise should be done only after level 1 is<br />
completed successfully.<br />
Start: Lie on stomach.<br />
Exercise: Keep hips flat on surface. Rest in this<br />
position, letting the hips and back relax. Stop<br />
immediately if there is increased discom<strong>for</strong>t in<br />
the groin, back, or thigh.<br />
Goal: If this exercise is com<strong>for</strong>table, short walks<br />
<strong>with</strong> very small steps may be attempted indoors.<br />
LEVEL 3<br />
This exercise should be done only after level 2<br />
can be done <strong>with</strong>out discom<strong>for</strong>t.<br />
Start: Lie on back <strong>with</strong> both knees bent and both<br />
feet flat. Keep belly pulled in.<br />
Exercise: Push heels into the ground and lift hips<br />
until a gentle stretch is felt in the groin. Hold <strong>for</strong><br />
several seconds, then relax.<br />
Goal: Lift hips, <strong>with</strong>out causing discom<strong>for</strong>t,<br />
until hips are extended completely and back<br />
does not arch.<br />
LEVEL 4<br />
This exercise, which prepares the leg <strong>for</strong> walking,<br />
should be done only after level 2 can be done<br />
<strong>with</strong>out discom<strong>for</strong>t and level 3 has been practiced<br />
<strong>for</strong> several days.<br />
Start: Stand beside a step.<br />
Exercise: Place the affected leg sideways up on<br />
the step. Push down through affected leg and<br />
extend knee to step up onto step.<br />
Goal: Step up easily, <strong>with</strong>out using hands and<br />
keeping back straight.<br />
26 Section 4: Suggested Muscle <strong>Exercises</strong> – Iliopsoas (Hip Flexor) <strong>Exercises</strong> <strong>for</strong> <strong>People</strong> <strong>with</strong> <strong>Hemophilia</strong>
LEVEL 5<br />
This exercise should be done only after levels 3<br />
and 4 can be done com<strong>for</strong>tably.<br />
Start: Lie on back <strong>with</strong> affected leg straight and<br />
non-affected leg bent.<br />
Exercise: Slowly bend the non-affected thigh<br />
toward the chest, assisting <strong>with</strong> hands if necessary,<br />
but keep the affected leg flat on the surface.<br />
Stop and hold the position as soon as there is a<br />
stretch felt in the affected groin or back, or when<br />
the affected thigh begins to lift off the surface.<br />
Goal: Practice this exercise <strong>for</strong> as many days<br />
as it takes to be able to flex the non-affected<br />
thigh completely to the chest while keeping the<br />
affected thigh flat on the surface. When this can<br />
be done successfully, walking can be increased<br />
but running should not be attempted.<br />
LEVEL 6<br />
This level must be instructed by an experienced<br />
physical therapist (preferably an HTC physical<br />
therapist), who will assign active (not passive)<br />
exercises that stretch the hip flexor beyond<br />
neutral extension as suitable to the individual.<br />
It is important to do exercises gently and slowly,<br />
and continue until full muscle length has been<br />
restored. If there is incomplete lengthening, gait<br />
and posture will be affected and the likelihood<br />
of re-bleeding is increased.<br />
Running should not be attempted until the physical<br />
therapist has advised that it is safe to do so.<br />
<strong>Exercises</strong> <strong>for</strong> <strong>People</strong> <strong>with</strong> <strong>Hemophilia</strong> Section 4: Suggested Muscle <strong>Exercises</strong> – Iliopsoas (Hip Flexor) 27
Strength<br />
LEVEL 1<br />
Start: Lie on back <strong>with</strong> knees bent. Place hand<br />
on top of affected knee.<br />
Exercise: Bend the affected leg towards chest.<br />
Press hand and knee together, gently and gradually<br />
increasing the pressure — there should be no<br />
pain. Hold <strong>for</strong> several seconds then relax.<br />
Repeat until the affected leg begins to feel tired.<br />
Goal: Increase pressure until leg can exert<br />
pressure equal to the pressure being applied by<br />
the hand.<br />
LEVEL 2<br />
Start: Stand facing a wall. Place a pillow between<br />
affected thigh and wall.<br />
Exercise: Press thigh against the wall, gradually<br />
building up the pressure. Hold <strong>for</strong> several<br />
seconds, then relax. Discontinue this exercise if<br />
there is pain felt in the affected hip/groin or<br />
lower back.<br />
Goal: Gradually increase pressure and time<br />
that the position is held. Increase repetitions.<br />
Compare to other side.<br />
28 Section 4: Suggested Muscle <strong>Exercises</strong> – Iliopsoas (Hip Flexor) <strong>Exercises</strong> <strong>for</strong> <strong>People</strong> <strong>with</strong> <strong>Hemophilia</strong>
<strong>Exercises</strong> <strong>for</strong> the Gastrocnemius<br />
(Calf Muscle)<br />
The calf muscle consists of two major muscles, gastrocnemius and soleus.<br />
Bleeds into one or both of these muscles are quite common. The gastrocnemius<br />
crosses the knee as well as the ankle. Rehabilitation is not complete<br />
until there is enough muscle length to allow full dorsiflexion of the ankle<br />
<strong>with</strong> the knee completely extended.<br />
There is also a deep muscle compartment that contains muscles that flex<br />
the toes. Bleeds here are less common, but can be serious because there are<br />
nerves and vessels in the compartment that can be compressed. Depending<br />
on which muscle has been injured, it may be necessary to restore full<br />
flexibility of the ankle, knee, and toes.<br />
Note: These exercises should not be attempted if there is a bleed in the<br />
muscle. Begin only after bleeding has stopped.<br />
Flexibility<br />
LEVEL 1<br />
Start: Sit <strong>with</strong> feet flat on floor.<br />
Exercise: Lift front of foot and keep heels down,<br />
until a stretch is felt in the calf. Hold <strong>for</strong> several<br />
seconds, then relax.<br />
Goal: Practice until full ankle motion is possible<br />
<strong>with</strong> no stretch felt in calf.<br />
LEVEL 2<br />
Start: Sit, foot flat on floor, <strong>with</strong> knee extended<br />
as needed to allow the foot to be flat.<br />
Exercise: Keeping heel flat on floor, slowly flex<br />
the knee and slide the heel back until a stretch<br />
is felt in the calf. Hold <strong>for</strong> several seconds,<br />
then relax.<br />
Goal: Try to slide heel back a bit more <strong>with</strong> each<br />
repetition. Compare to opposite leg.<br />
<strong>Exercises</strong> <strong>for</strong> <strong>People</strong> <strong>with</strong> <strong>Hemophilia</strong> Section 4: Suggested Muscle <strong>Exercises</strong> – Gastrocnemius (Calf Muscle) 29
LEVEL 3<br />
Start: Stand facing wall <strong>with</strong> affected foot slightly<br />
ahead of the other. Place hands on wall.<br />
Exercise: Keeping heel flat on the floor, press<br />
knee of affected leg towards the wall. Stop when<br />
a stretch is felt in the calf muscle.<br />
Goal: Practice until flexibility is equal on both<br />
legs. Do not begin walking <strong>with</strong>out aids until<br />
this level is achieved.<br />
LEVEL 4<br />
This exercise can be attempted once level 3 is<br />
achieved com<strong>for</strong>tably.<br />
Start: Stand facing wall, <strong>with</strong> hands on wall at<br />
shoulder height.<br />
Exercise: Step back slightly <strong>with</strong> affected leg,<br />
and place heel flat on ground. Keeping the knee<br />
straight, lean body toward the wall. Stop when a<br />
stretch is felt in the calf.<br />
Goal: Compare flexibility <strong>with</strong> opposite leg.<br />
Practice until both are equal, or leg is comparable<br />
to baseline.<br />
Strength<br />
Once the person resumes walking, this muscle<br />
usually regains its strength <strong>with</strong>out difficulty.<br />
30 Section 4: Suggested Muscle <strong>Exercises</strong> – Gastrocnemius (Calf Muscle) <strong>Exercises</strong> <strong>for</strong> <strong>People</strong> <strong>with</strong> <strong>Hemophilia</strong>
<strong>Exercises</strong> <strong>for</strong> the Hamstrings<br />
The hamstrings consists of three muscles that cross the hip joint as<br />
well as the knee joint. Injuries to the hamstrings are quite common<br />
in sports, even in people <strong>with</strong>out hemophilia, and can be very<br />
difficult to rehabilitate fully. When injured, these muscles go into<br />
extreme spasm; they can be difficult to strengthen sufficiently<br />
<strong>with</strong>out causing new bleeds.<br />
Note: These exercises should not be attempted if there is a bleed in<br />
the muscle. Begin only after bleeding has stopped. Many adolescents<br />
have very tight hamstrings during periods of rapid growth.<br />
Flexibility<br />
<strong>Exercises</strong> to improve flexibility must be done<br />
slowly and smoothly. Bouncing or lunging to try<br />
to stretch more is not an effective way to stretch<br />
and could cause a bleed.<br />
LEVEL 1<br />
Start: Lie <strong>with</strong> thigh supported and knee bent in<br />
a com<strong>for</strong>table position.<br />
Exercise: Straighten the knee and slowly lift<br />
the heel off surface. Stop at the first sign of<br />
discom<strong>for</strong>t in the back of the thigh. Hold <strong>for</strong><br />
several seconds, then relax.<br />
Goal: With each repetition, try to straighten the<br />
knee a little bit more, until it can be extended<br />
fully <strong>with</strong> no discom<strong>for</strong>t in the muscle.<br />
LEVEL 2<br />
Note: This exercise may be difficult, especially<br />
<strong>for</strong> adolescents following a growth spurt. Check<br />
the unaffected leg first.<br />
Start: Sit on a chair, <strong>with</strong> back straight and knees<br />
bent.<br />
Exercise: Straighten affected knee until a stretch<br />
is felt at the back of the thigh. Assist <strong>with</strong> the<br />
other leg if necessary. Do not allow pelvis to<br />
rotate, or spine or back to curve.<br />
Goal: Straighten the knee fully while keeping<br />
the back straight. Compare capability to other leg.<br />
<strong>Exercises</strong> <strong>for</strong> <strong>People</strong> <strong>with</strong> <strong>Hemophilia</strong> Section 4: Suggested Muscle <strong>Exercises</strong> – Hamstrings 31
LEVEL 3<br />
Note: This is an advanced stretch.<br />
Start: Lie on back on floor <strong>with</strong> both legs straight.<br />
Exercise: Bring the affected thigh towards chest<br />
and place a strap or towel around bottom of the<br />
foot. While holding the strap <strong>with</strong> both hands,<br />
slowly straighten the affected knee, pressing the<br />
heel towards the ceiling. Press gently until a<br />
stretch is felt at the back of the thigh. Hold <strong>for</strong><br />
several seconds, then relax.<br />
Goal: Equal flexibility in both legs. Practice until<br />
flexibility is equal in both legs or comparable<br />
to baseline.<br />
LEVEL 4<br />
Note: This is a difficult stretch. Do not attempt<br />
unless level 3 has been practiced <strong>for</strong> several days.<br />
Start: Stand and place foot of affected leg on a<br />
chair or step.<br />
Exercise: Lean <strong>for</strong>ward from the waist towards<br />
the foot on the chair. Keep the back straight, and<br />
do not reach <strong>with</strong> hands.<br />
Goal: The objective is to lean the pelvis <strong>for</strong>ward<br />
over the leg, keeping knee extended. Compare<br />
capability <strong>with</strong> other leg and practice until<br />
flexibility is equal in both legs or comparable<br />
to baseline.<br />
32 Section 4: Suggested Muscle <strong>Exercises</strong> – Hamstrings <strong>Exercises</strong> <strong>for</strong> <strong>People</strong> <strong>with</strong> <strong>Hemophilia</strong>
Strength<br />
LEVEL 1<br />
Start: Lie on stomach.<br />
Exercise: Bend affected knee slowly until knee<br />
is bent to 90 degrees, then lower foot slowly.<br />
Repeat several times, until muscle feels tired.<br />
Goal: Increase the number of repetitions gradually.<br />
Work up to 30 repetitions.<br />
LEVEL 2<br />
Start: Stand and hold a wall or furniture <strong>for</strong><br />
support.<br />
Exercise: Bend the affected knee to 90 degrees,<br />
keeping both knees close together, then slowly<br />
lower foot back to ground. Repeat several times,<br />
until the muscle begins to feel tired.<br />
Goal: Increase the number of repetitions gradually.<br />
Work up to 30 repetitions.<br />
LEVEL 3<br />
Start: Stand and hold a wall or furniture <strong>for</strong><br />
support. Attach a small weight to the ankle of<br />
the affected leg.<br />
Exercise: Bend the affected knee to 90 degrees,<br />
keeping both knees close together, then lower<br />
foot slowly back to start position. Repeat several<br />
times, until the muscle begins to feel tired.<br />
Goal: Gradually increase number of repetitions.<br />
Compare to opposite leg.<br />
<strong>Exercises</strong> <strong>for</strong> <strong>People</strong> <strong>with</strong> <strong>Hemophilia</strong> Section 4: Suggested Muscle <strong>Exercises</strong> – Hamstrings 33
<strong>Exercises</strong> <strong>for</strong> the Forearm Flexors<br />
Bleeds into the superficial muscles of the <strong>for</strong>earm are relatively easy to<br />
diagnose and manage because the hematoma is usually palpable and the<br />
swelling may be visible. Bleeds into the deep flexor compartment of the<br />
<strong>for</strong>earm, however, are sometimes missed in their early stages. Pain in the<br />
arm, increased by straightening the fingers and bending the wrist back,<br />
quickly confirms the diagnosis.<br />
The deep compartment contains the flexor digitorum profundus, flexor<br />
pollicis longus, median and ulnar nerves, and radial and ulnar arteries.<br />
Bleeding into this enclosed space causes extreme discom<strong>for</strong>t, but no visible<br />
swelling. As the compartment pressure increases, there will be increasing<br />
pain, paresthesia, and in the worst cases, muscle necrosis.<br />
The flexor digitorum profundus crosses the elbow, the wrist, and all the<br />
finger joints; full length must be restored across each of these joints<br />
separately first, and then to all joints together be<strong>for</strong>e rehabilitation can be<br />
considered as completed.<br />
Note: These exercises should not be attempted if there is a bleed in the<br />
muscle. Begin only after bleeding has stopped.<br />
Flexibility<br />
LEVEL 1<br />
This level has 3 parts, to stretch each part of the<br />
muscle separately.<br />
Part 1:<br />
With the wrist and elbow in a com<strong>for</strong>table<br />
position, open fingers. Repeat several times,<br />
trying to open fingers a bit more each time.<br />
Part 2:<br />
With the fingers in a relaxed position, extend<br />
wrist. Repeat several times, trying to extend the<br />
wrist more each time. Stop if there is increased<br />
discom<strong>for</strong>t in the <strong>for</strong>earm.<br />
Part 3:<br />
With the wrist and fingers in a com<strong>for</strong>table<br />
position, extend the elbow completely. Repeat<br />
several times. Stop if there is increased discom<strong>for</strong>t<br />
in the <strong>for</strong>earm.<br />
Goal: For each part of this exercise, compare the<br />
movement to the opposite side. Motion must be<br />
full at each joint, <strong>with</strong> no discom<strong>for</strong>t.<br />
34 Section 4: Suggested Muscle <strong>Exercises</strong> – Forearm Flexors <strong>Exercises</strong> <strong>for</strong> <strong>People</strong> <strong>with</strong> <strong>Hemophilia</strong>
LEVEL 2<br />
This level combines two of the three movements.<br />
Part 1:<br />
Start: With arm resting on a table, extend fingers<br />
as far as possible.<br />
Exercise: Keeping the fingers straight, gently<br />
extend the wrist until a stretch is felt in the<br />
<strong>for</strong>earm. Hold <strong>for</strong> several seconds, then relax.<br />
Goal: Practice until the amount of stretch feels<br />
the same on both arms.<br />
Part 2:<br />
Start: Place palms of hands together <strong>with</strong> fingers<br />
straight. Rotate hands upward (into prayer or<br />
greeting position).<br />
Exercise: While keeping hands pressed flat<br />
together, lift the elbows until a stretch is felt in<br />
the <strong>for</strong>earm. Hold <strong>for</strong> several seconds, then relax.<br />
Goal: Practice until the amount of stretch feels<br />
the same on both arms.<br />
LEVEL 3<br />
This level combines all three movements, and<br />
must be done carefully.<br />
Start: Stand, placing hands flat on table, <strong>with</strong> all<br />
fingers straight and the wrists extended.<br />
Exercise: Straighten the elbows, and lean gently<br />
onto outstretched hands. Apply pressure through<br />
the affected arm only until a stretch is felt. Hold<br />
<strong>for</strong> a few seconds, then relax.<br />
Goal: Practice until the amount of stretch feels<br />
the same in both arms.<br />
<strong>Exercises</strong> <strong>for</strong> <strong>People</strong> <strong>with</strong> <strong>Hemophilia</strong> Section 4: Suggested Muscle <strong>Exercises</strong> – Forearm Flexors 35
<strong>Exercises</strong> <strong>for</strong> the Quadriceps<br />
The quadriceps are four muscles at the front of the thigh. They are most<br />
often injured by a direct blow to the front of the thigh. Swelling and tenderness<br />
are obvious. It is not uncommon <strong>for</strong> larger hematomas to calcify.<br />
Three of the four quadriceps cross only the knee; when knee flexion is full,<br />
muscle length is full. The rectus femoris muscle also crosses the front of the<br />
hip joint. Rehabilitation is not complete until the knee can be flexed fully<br />
<strong>with</strong> the hip in an extended position.<br />
Note: Do not begin walking <strong>with</strong>out an aid until the knee can bend easily<br />
to 90 degrees, or to the baseline amount of knee flexion <strong>with</strong>out discom<strong>for</strong>t<br />
felt in thigh.<br />
Flexibility<br />
LEVEL 1<br />
Start: Lie on stomach. A small pillow may be<br />
needed under the hips if the hips are very tight.<br />
Exercise: Keeping hips as flat as possible on<br />
surface, bend knee of the affected leg. Repeat<br />
several times, trying to bend the knee further<br />
each time.<br />
Goal: Compare to other leg. Practice until amount<br />
of knee bend is equal and <strong>with</strong>out discom<strong>for</strong>t.<br />
LEVEL 2<br />
Start: Lie on back <strong>with</strong> affected leg close to the<br />
edge of the bed. Let the knee bend over the edge<br />
of the bed. It is preferable to let the foot rest on<br />
the floor to start.<br />
Exercise: Flex the non-affected thigh towards the<br />
chest, assisting <strong>with</strong> hands. Stop flexing as soon<br />
as there is a stretching sensation in the affected<br />
thigh. Hold this position <strong>for</strong> several seconds,<br />
then relax. Repeat a few times, but stop if<br />
discom<strong>for</strong>t increases in affected thigh.<br />
Goal: Practice until the affected leg remains flat<br />
on the surface when the opposite thigh is flexed<br />
to the chest.<br />
36 Section 4: Suggested Muscle <strong>Exercises</strong> – Quadriceps <strong>Exercises</strong> <strong>for</strong> <strong>People</strong> <strong>with</strong> <strong>Hemophilia</strong>
LEVEL 3<br />
Note: Do not attempt this exercise until level 2<br />
can be done <strong>with</strong>out discom<strong>for</strong>t.<br />
Start: Lie on back <strong>with</strong> affected leg close to the<br />
edge of the bed. Let the knee bend over the edge<br />
of the bed. It is preferable to let the foot rest on<br />
the floor to start.<br />
Exercise: Flex the non-affected thigh towards the<br />
chest, assisting <strong>with</strong> hands. Stop flexing as soon<br />
as there is a stretching sensation in the affected<br />
thigh. Keep thigh flat on bed. Slowly bend knee<br />
until stretch is felt in thigh. Hold, then relax.<br />
Goal: Practice until flexibility is equal in both<br />
legs, or comparable to baseline.<br />
“I was scheduled <strong>for</strong> a knee replacement but careful<br />
exercise and walking helped to regain range of motion and<br />
strength, and reduce pain. Now I’m walking com<strong>for</strong>tably<br />
and the surgery was cancelled.”<br />
– 54-year-old <strong>with</strong> severe hemophilia B, Canada<br />
<strong>Exercises</strong> <strong>for</strong> <strong>People</strong> <strong>with</strong> <strong>Hemophilia</strong> Section 4: Suggested Muscle <strong>Exercises</strong> – Quadriceps 37
Strength<br />
LEVEL 1<br />
This exercise can be started as soon as bleeding<br />
has stopped.<br />
Start: Lie on back <strong>with</strong> a roll under knee.<br />
Exercise: Tighten the muscle at front of thigh,<br />
extend knee and lift heel. Hold <strong>for</strong> several seconds,<br />
then relax. Repeat until muscle feels tired.<br />
Goal: Gradually increase number of repetitions.<br />
Muscle should not feel more sore after exercises.<br />
LEVEL 2<br />
Start: Sit on a chair <strong>with</strong> knee bent.<br />
Exercise: Extend knee, lifting the foot off the<br />
floor as far as possible. Hold <strong>for</strong> several seconds,<br />
then slowly return foot to floor. Repeat until<br />
muscle feels tired.<br />
Goal: Gradually increase number of repetitions.<br />
LEVEL 3<br />
Start: Sit on chair. Cross ankle of uninjured leg<br />
over ankle of the affected leg.<br />
Exercise: Press ankles together as hard as possible.<br />
Hold <strong>for</strong> several seconds, then relax. Repeat<br />
<strong>with</strong> the knee bent at different angles. Repeat<br />
until muscle feels tired.<br />
Goal: Practice until affected leg can exert pressure<br />
equal to unaffected leg.<br />
38 Section 4: Suggested Muscle <strong>Exercises</strong> – Quadriceps <strong>Exercises</strong> <strong>for</strong> <strong>People</strong> <strong>with</strong> <strong>Hemophilia</strong>
LEVEL 4<br />
Start: Lie on back <strong>with</strong> a roll under knee. Place<br />
weight at ankle.<br />
Exercise: Extend knee and lift heel. Hold <strong>for</strong><br />
several seconds then lower foot back to surface<br />
slowly. Repeat until muscle feels tired.<br />
Goal: Increase number of repetitions. Compare<br />
to other leg.<br />
LEVEL 5<br />
Start: Stand <strong>with</strong> weight evenly on both feet.<br />
Exercise: Squat down partway, keeping weight<br />
distributed evenly on both legs. Do not bend<br />
knees far enough to cause pain. Hold <strong>for</strong> several<br />
seconds. Return to upright position.<br />
Goals: There are 3 ways to progress this exercise:<br />
• Increase the length of time holding the<br />
flexed position.<br />
• Increase the amount of knee bend<br />
(as long as it is not painful).<br />
• Increase the number of repetitions.<br />
LEVEL 6<br />
Start: Stand <strong>with</strong> back against wall, feet apart.<br />
Exercise: Slide down wall slowly, keeping knees<br />
pointed straight over toes. Go slowly and stop if<br />
there is any pain. Hold the position <strong>for</strong> several<br />
seconds, then return to upright.<br />
Goals: There are 3 ways to progress this exercise:<br />
• Increase the length of time holding the<br />
flexed position.<br />
• Increase the amount of knee bend<br />
(as long as it is not painful).<br />
• Increase the number of repetitions.<br />
<strong>Exercises</strong> <strong>for</strong> <strong>People</strong> <strong>with</strong> <strong>Hemophilia</strong> Section 4: Suggested Muscle <strong>Exercises</strong> – Quadriceps 39
LEVEL 7<br />
Note: If this exercise causes pain in the muscle,<br />
go back a few levels to increase strength first.<br />
Start: Stand facing a step.<br />
Exercise: Step up <strong>with</strong> affected leg. Keep knee<br />
pointed over toes and push <strong>with</strong> whole leg to<br />
raise body to the top of the step. Repeat until leg<br />
feels tired.<br />
Goal: Practice until you can go up a whole flight<br />
of stairs smoothly and easily.<br />
LEVEL 8<br />
Note: If this exercise causes pain in the muscle,<br />
go back several levels to increase strength first.<br />
Start: Stand on a step facing down.<br />
Exercise: Step off the step <strong>with</strong> strong leg first,<br />
letting affected knee bend. Gradually lower<br />
body until strong leg is just touching floor, then<br />
return to upright. Repeat until leg feels tired.<br />
Goal: Practice until you can go downstairs<br />
smoothly <strong>with</strong>out limping.<br />
LEVEL 9<br />
Note: If this exercise causes pain in the muscle,<br />
go back several levels.<br />
Start: In kneeling position, bend affected knee<br />
and place foot flat on ground.<br />
Exercise: Stand up using only the affected leg,<br />
<strong>with</strong>out using hands. Repeat a few times — stop<br />
if knee is painful.<br />
Goal: Practice until you can get up from the floor<br />
easily, <strong>with</strong>out using hands.<br />
40 Section 4: Suggested Muscle <strong>Exercises</strong> – Quadriceps <strong>Exercises</strong> <strong>for</strong> <strong>People</strong> <strong>with</strong> <strong>Hemophilia</strong>
Conclusion<br />
With this graduated exercise program, most of the chronic postural changes that occur in people <strong>with</strong><br />
hemophilia can be avoided. By maintaining mobile joints and strong, flexible muscles, all people <strong>with</strong><br />
hemophilia should be able to continue <strong>with</strong> their regular daily activities at home, school, and work.<br />
If you have any questions about any of these exercises, please discuss them <strong>with</strong> the physical therapist at<br />
your closest hemophilia treatment centre, or contact the WFH Musculoskeletal Committee.<br />
Musculoskeletal Committee<br />
World Federation of <strong>Hemophilia</strong><br />
1425 René Lévesque Blvd. West, Suite 1010<br />
Montreal, Quebec H3G 1T7<br />
Tel. (514) 875-7944<br />
E-mail: wfh@wfh.org<br />
“We usually give the SIAGAS speech: ‘Swimming Is As Good as Soccer’<br />
— but in our country it doesn’t work very well.”<br />
– Orthopedic surgeon, Colombia<br />
“Football (soccer) is a global religion — can you invent new rules <strong>for</strong> this beautiful game so that it is really safe<br />
<strong>for</strong> us hemophiliac kids to play? How about holding World <strong>Hemophilia</strong> Olympic Games <strong>for</strong> us?”<br />
– Teenager <strong>with</strong> hemophilia, Malaysia<br />
<strong>Exercises</strong> <strong>for</strong> <strong>People</strong> <strong>with</strong> <strong>Hemophilia</strong> Conclusion 41
Glossary of Terms<br />
Arterial compression: Pressure on an artery that impedes circulation of the blood.<br />
Arthropathy: A disease or abnormality of a joint; hemophilic arthropathy refers to joint damage caused by repeated<br />
bleeding into a joint space.<br />
Baseline: Refers to the usual state of the muscles and joints of someone who has chronic joint disease, <strong>for</strong> whom<br />
the usual range of motion may not be full or “normal,” but it is normal <strong>for</strong> him.<br />
Biceps brachii: The muscle of the upper arm that bends the elbow and turns the palm up.<br />
Calcify: Calcium deposited in a healing tissue.<br />
Crepitus: A grating sound or sensation. Articular crepitus is produced by friction between bone and cartilage.<br />
Dorsiflexion: The bending backward of the body or a body part; ankle dorsiflexion refers to the bending of the foot<br />
towards the leg <strong>with</strong> toes pointing upward.<br />
Extensor: A muscle that extends or straightens a body part (e.g., arms, legs, fingers, etc.) as opposed to the flexor.<br />
Femur: The thigh bone that extends from the hip to the knee, the largest and strongest bone of the human body.<br />
Flexion: The bending of a joint or body limb so that the angle between the bones of a limb is decreased.<br />
Flexor: A muscle that bends a limb or body part.<br />
Flexor digitorum profundus: A muscle in the <strong>for</strong>earm that flexes the fingers.<br />
Flexor pollicis longus: A muscle in the <strong>for</strong>earm that bends the thumb.<br />
Forearm: The area of the arm between the wrist and the elbow, a common area <strong>for</strong> muscle bleeds.<br />
Forearm flexors: Muscles that lie along the inner sides of the <strong>for</strong>earms.<br />
Gastrocnemius: The main muscle of the calf of the leg, which points the foot down and helps bend the knee.<br />
Hamstrings: A group of muscles at the back of the upper leg that bend the knee joint and help to extend the hip.<br />
Hematoma: A localized swelling under the skin caused by a break in a blood vessel. Swelling results from the<br />
accumulation of clotted or partly clotted blood.<br />
Iliopsoas: The large flexor muscle of the hip joint, which bends the thigh to the chest.<br />
Isometric: A system of exercises where muscles contract and generate <strong>for</strong>ce <strong>with</strong>out causing motion at the<br />
adjacent joints.<br />
Lumbar: The lower back (between the lowest ribs and the pelvis).<br />
Lordosis: Forward arch of the lower back.<br />
Muscle necrosis: Death of muscle cells, usually due to lack of oxygen or injury.<br />
42 Glossary of Terms <strong>Exercises</strong> <strong>for</strong> <strong>People</strong> <strong>with</strong> <strong>Hemophilia</strong>
Palpable: Capable of being touched or felt.<br />
Patellofemoral joint: Joint between the knee cap and the femur (thigh bone).<br />
Paresthesia: An abnormal sensation of the skin, such as numbness, tingling, pricking, burning.<br />
Physical therapy: The provision of healthcare services to people to develop, maintain, and restore maximum movement<br />
and functional ability through the lifespan, including <strong>for</strong> circumstances where movement and function are<br />
threatened by injury, disease, or the process of aging.<br />
Physical therapist (physiotherapist): A healthcare specialist who diagnoses and treats individuals who have<br />
medical problems or health-related conditions that limit their abilities to move and per<strong>for</strong>m functional activities in<br />
their daily lives. Physical therapists help condition muscles and improve levels of activity and functionality through<br />
exercise programs.<br />
Plantarflexion: Pointing the foot down at the ankle.<br />
Pronation: Pronation of the hand or <strong>for</strong>earm refers to rotation of the <strong>for</strong>earm turning the palm downward. Pronation<br />
of the foot involves turning or rotating the foot so that the inner edge of the sole bears the body’s weight.<br />
Prophylaxis: The scheduled infusion of clotting factors, usually two to three times a week, in order to prevent future<br />
bleeds. The goal is to keep factor levels in the blood high enough to prevent bleeding episodes.<br />
Proprioception: Awareness of the direction, extent, and rate of movement of the joints. This awareness depends<br />
upon in<strong>for</strong>mation sent to the brain from sensory receptors in the joints, tendons, and muscles.<br />
Quadriceps: A large group of muscles at the front of the thigh that extend the knee.<br />
Radio-humeral joint: The elbow joint where flexion and extension of the arm takes place.<br />
Radio-ulnar joint: One of three joints in the elbow, responsible <strong>for</strong> <strong>for</strong>earm rotation.<br />
Reflex inhibition: A protective mechanism where a muscle decreases its activity in response to an injury.<br />
Subtalar joint: A joint located between the heel bone and the ankle bone, responsible <strong>for</strong> the foot’s side-to-side motion.<br />
Supination: Supination of the hand refers to turning the palm upward by lateral rotation of the <strong>for</strong>earm.<br />
Synovium (synovial membrane): The lining of joints, made up of special cells that produce synovial fluid.<br />
Synovectomy: A surgical procedure involving the removal of a portion or all of the synovial membrane.<br />
Talocrural joint: The “true” ankle joint connecting the foot to the shin bone and responsible <strong>for</strong> the foot’s up-anddown<br />
motion.<br />
Talus: A bone of the foot that <strong>for</strong>ms the ankle joint.<br />
Target joint: A joint where bleeding occurs repeatedly, and the joint does not return to normal between bleeds.<br />
<strong>Exercises</strong> <strong>for</strong> <strong>People</strong> <strong>with</strong> <strong>Hemophilia</strong> Glossary of Terms 43
Bibliography<br />
Buzzard, B. and Beeton, K., “Muscle Imbalance in Haemophilia,” Physical Therapy Management of<br />
Haemophilia, Blackwell Sciences, 2000.<br />
Sahrmann, S., Diagnosis and Treatment of Movement Impairment Syndromes, Mosby, 2001.<br />
Janda, V., “Evaluation of Muscular Imbalance,” Rehabilitation of the Spine: A Practitioner’s Manual,<br />
Liebenson C (ed). Williams and Wilkins, Baltimore, 1996.<br />
Janda, V., “On the Concept of Postural Muscles and Posture in Man,” Australian Journal of Physical<br />
Therapy, 1983; 29:83-84.<br />
Janda, V., “Muscle Strength in Relation to Muscle Length, Pain and Muscle Imbalance,” Muscle<br />
Strength, Harms-Rindahl, K., ed. Churchill-Livingston, New York, NY, 1993.<br />
<strong>Exercises</strong> <strong>for</strong> <strong>People</strong> <strong>with</strong> <strong>Hemophilia</strong> Bibliography 44
World Federation of <strong>Hemophilia</strong><br />
1425 René Lévesque Boulevard West, Suite 1010<br />
Montréal, Québec H3G 1T7<br />
CANADA<br />
Tel.: (514) 875-7944<br />
Fax: (514) 875-8916<br />
E-mail: wfh@wfh.org<br />
Internet: www.wfh.org