Electric Mandoline Slicer Owner's Manual - Coopers of Stortford
Electric Mandoline Slicer Owner's Manual - Coopers of Stortford
Electric Mandoline Slicer Owner's Manual - Coopers of Stortford

You also want an ePaper? Increase the reach of your titles
YUMPU automatically turns print PDFs into web optimized ePapers that Google loves.
U.K. WIRING INSTRUCTIONS<br />
The wires in the mains lead are coloured in accordance with the following code:<br />
HIGH PERFORMANCE KITCHENWARE<br />
<strong>Electric</strong> <strong>Mandoline</strong> <strong>Slicer</strong> Owner’s <strong>Manual</strong><br />
BLUE<br />
NEUTRAL<br />
BROWN<br />
LIVE<br />
GREEN/YELLOW EARTH<br />
As the colours <strong>of</strong> the wire in the mains lead <strong>of</strong> this appliance may not correspond with the colour<br />
markings identifying the terminals on your plug, proceed as follows:<br />
• The wire which is coloured BLUE must be connected to the terminal which is<br />
marked with the letter N or coloured black.<br />
• The wire which is coloured BROWN must be connected to the terminal which is<br />
marked with the letter L or coloured red.<br />
• The wire which is coloured GREEN/YELLOW must be connected to the terminal<br />
which is marked with the letter E or (earth symbol) and is coloured GREEN or<br />
GREEN/YELLOW.<br />
WARNING: THIS APPLIANCE MUST BE EARTHED<br />
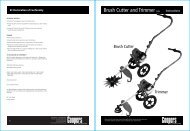
<strong>Slicer</strong> Blade & Insert<br />
(thin/thick)<br />
Thin Julienne<br />
Insert<br />
Thick Julienne<br />
Insert<br />
Grater<br />
French Fry Blade<br />
Ice Shaver<br />
Thank you for purchasing our product<br />
The Despatch Centre, Haslemere Industrial Estate, Pig Lane, Bishop’s <strong>Stortford</strong> CM23 3HG. Tel: 01279 757100.<br />
Please read this manual thoroughly for<br />
proper operation.<br />
Please keep this manual for future use.<br />
C O N T E N T S<br />
Safety Information 1-2<br />
Product Identification<br />
and Specifications 3<br />
Usage<br />
Assembly 4<br />
Operation 5-6<br />
To Use Each Blade & Insert<br />
(1) <strong>Slicer</strong> Blade & Insert 7-8<br />
(2) Julienne Inserts 9-10<br />
(3) Grater 11<br />
(4) French Fry 12<br />
(5) Ice Shaver 13<br />
Care & Storage 14<br />
Safety Rules 15<br />
Troubleshooting Guide 16
IMPORTANT SAFEGUARDS<br />
When using electric appliances, basic safety precautions<br />
should always be followed including the following:<br />
Please read all instructions carefully before using<br />
Make sure the product is "OFF"<br />
when not in use, before putting on<br />
or removing blades and inserts,<br />
and before cleaning. Hold and pull<br />
power plug when disconnecting<br />
from the power outlet.<br />
Only operate the product on a flat<br />
surface.<br />
Do not operate the product with a<br />
damaged cord or plug or after the<br />
product malfunctions, or is dropped<br />
or damaged in any manner. Return<br />
product to the nearest authorized<br />
service facility for examination,<br />
repair or adjustment <strong>of</strong> electrical or<br />
mechanical components.<br />
Close supervision is necessary when<br />
the product is used near children.<br />
Also, keep electric appliances out <strong>of</strong><br />
reach <strong>of</strong> infirm persons.<br />
Do not let them<br />
use the appliances<br />
without<br />
supervision.<br />
Do not let cord contact hot surfaces,<br />
including a stove.<br />
Do not damage, process, bend,<br />
twist, bundle or put heavy items<br />
over power cord.<br />
<strong>Electric</strong> shock or fire may occur.<br />
To prevent electrical shocks do not<br />
put unit base in water<br />
or other liquid.<br />
Blades and inserts are sharp.<br />
Handle carefully, especially<br />
when putting on<br />
or removing the<br />
blades and the<br />
inserts on the slicer<br />
and during cleaning.<br />
Do not remove food pusher during<br />
operation.<br />
Operate only with rated voltage. If<br />
wrong voltage is used, electric<br />
shock or fire may occur.<br />
Do not press the switch<br />
dent with any item. Break -<br />
down or injury may occur.<br />
When taking-out the processed<br />
vegetable, make sure unit is<br />
turned <strong>of</strong>f then hold the unit base<br />
with one hand and slowly slide the<br />
collection cup out with the other<br />
hand.<br />
Unplug from outlet when not in use,<br />
before putting on or removing parts.<br />
Do not move unit<br />
during operation.<br />
Injury may occur.<br />
Unplug from outlet<br />
before cleaning.<br />
Keep hands and utensils out <strong>of</strong><br />
container while slicing to reduce<br />
the risk <strong>of</strong> severe injury to persons<br />
or damage to the product. A<br />
scraper may be used but must only<br />
be used when the <strong>Slicer</strong> is not<br />
running.<br />
The use <strong>of</strong> attachments not recom -<br />
mended or sold by the manufac -<br />
turer may cause fire, electric<br />
shock or injury.<br />
Avoid contact with moving parts.<br />
Keep hands, hair, clothing, as well<br />
as spatulas and other utensils out<br />
<strong>of</strong> the food chute during operation<br />
to reduce the risk <strong>of</strong> injury to<br />
persons, and/or damage to the<br />
product.<br />
Do not let cord hang over edge <strong>of</strong><br />
a table or counter.<br />
Never feed food by hand.<br />
Always use food pusher.<br />
Do not use outdoors.<br />
This product is designed for<br />
indoor-use only.<br />
SAVE THESE INSTRUCTIONS<br />
1<br />
2
PRODUCT IDENTIFICATION AND SPECIFICATIONS<br />
Small<br />
Food Chute<br />
Medium<br />
Food Pusher<br />
Rib<br />
Medium<br />
Food Chute<br />
Large Food Pusher<br />
* Large and Medium Food Pushers function as Food Chutes.<br />
Switch Ring<br />
USAGE (example: when use <strong>Slicer</strong> Blade)<br />
ASSEMBLY<br />
1<br />
Slide the Collection cup into<br />
the Container.<br />
5<br />
Connect the Main Unit<br />
to the Cover.<br />
Position the dents <strong>of</strong><br />
Main Unit on the<br />
convex <strong>of</strong> the cover.<br />
Dent<br />
Convex<br />
Dent<br />
Small<br />
Food Pusher<br />
Switch Dent<br />
Pick<br />
Main<br />
Unit<br />
Power Plug<br />
Dent<br />
2 6<br />
Place the <strong>Slicer</strong> Blade<br />
on the Plate<br />
Frame.<br />
To replace.<br />
Insert the Large<br />
Food Pusher into the<br />
Large Food Chute.<br />
Make sure that the<br />
Ribs are located on<br />
the top.<br />
Large<br />
Food<br />
Pusher<br />
Rib<br />
Rib<br />
Cover<br />
Large<br />
Food Chute<br />
Power Cord<br />
Convex<br />
Groove<br />
Grater<br />
<strong>Slicer</strong> Blade<br />
Insert<br />
ATTACHMENTS<br />
Dent<br />
3 7<br />
Place the Plate Frame with<br />
the <strong>Slicer</strong> Blade onto the<br />
Step <strong>of</strong> the Container. Make<br />
sure that the Lever on the<br />
Plate Frame turns up.<br />
Insert the Medium<br />
Food Pusher into<br />
the Large Food<br />
Pusher.<br />
Large<br />
Food<br />
Pusher<br />
Medium<br />
Food<br />
Pusher<br />
<strong>Slicer</strong> Blade<br />
Saucer<br />
Plate Frame<br />
Step<br />
Container<br />
Collection<br />
Cup<br />
Rib<br />
Hook Opening<br />
Guide for rib<br />
Lever<br />
Roller<br />
Bumper<br />
SPECIFICATION<br />
AC220V-240V 50Hz<br />
Power<br />
Rated Power<br />
Consumption<br />
Max, Continuous<br />
Operating Time<br />
Reciprocating Motion<br />
<strong>of</strong> Plate (circle per time)<br />
Power Cord Length<br />
Capacity <strong>of</strong> Container<br />
Dimensions<br />
(mm)<br />
Product weight<br />
Thin Julienne<br />
Insert<br />
Thick Julienne<br />
Insert<br />
French Fry<br />
Brade<br />
25W<br />
3 min<br />
200-230 c.p.m. (without load)<br />
1.8 m<br />
1200 cubic cm<br />
Width 120<br />
Length 342<br />
Height 210<br />
Ice Shaver<br />
1.7kg (except attachments)<br />
<strong>Slicer</strong> Blade<br />
Plate Frame<br />
Container<br />
8<br />
4 9<br />
Place the Cover onto the<br />
Container. Position the<br />
Groove <strong>of</strong> Cover on the<br />
Lever on the Plate Frame.<br />
Roller<br />
Lever<br />
Groove<br />
Insert the Small<br />
Food Pusher into<br />
the Medium Food<br />
Pusher.<br />
Now, the unit is<br />
ready for operation.<br />
Large<br />
Food<br />
Pusher<br />
Small Food<br />
Pusher<br />
Medium<br />
Food<br />
Pusher<br />
3 4
USAGE<br />
TO OPERATE<br />
1<br />
2<br />
Insert vegetable into the Large Food Chute.<br />
Press the vegetable into the Food Chute with Food Pusher and press the Switch Ring onto<br />
the Switch Dent <strong>of</strong> the Main Unit.<br />
Small Food Pusher<br />
Medium Food Pusher<br />
Switch Ring<br />
Unit will be activated by pressing Switch Ring on the Switch Dent.<br />
Position the Switch Ring onto the Switch Dent correctly.<br />
Stop pressing when the vegetable height becomes 2-3 cm and<br />
vegetable can not be cut or grated further.<br />
Do not press the Food Pusher with force. In this case, vegetable<br />
may cause product failure.<br />
HOW TO INSERT / HOW TO CHOOSE THE OPENINGS<br />
You have three types <strong>of</strong> Food Chutes (Small, Medium, Large). Choose the most appropriate that<br />
fits the vegetable.<br />
For thick vegetables<br />
Insert the vegetable into the Food Chute. Press with<br />
three Food Pushers (Small, Medium, Large).<br />
Small Food Pusher<br />
Medium Food Pusher<br />
Large Food Pusher<br />
For medium vegetables<br />
Place the Large Food Pusher onto the Large Food<br />
Chute. Insert the vegetable in the Large Food Pusher<br />
and press with both Small and Medium Food Pushers.<br />
Small Food Pusher<br />
Medium Food Pusher<br />
Main Unit<br />
Switch Dent<br />
Vegetable<br />
Position the Switch Ring onto<br />
the Switch Dent on Main Unit.<br />
Position<br />
the Switch<br />
Ring on<br />
the Switch<br />
Dent<br />
Switch<br />
Dent<br />
Vegetable<br />
Large<br />
Food Chute<br />
Large<br />
Food Pusher<br />
Large<br />
Food Chute<br />
Vegetable<br />
Vegetable<br />
Cut the vegetable into a proper size to be inserted into<br />
the Large Food Chute.<br />
To slice the vegetable evenly, the vegetable bottom must<br />
be flat. Also, make the thicker side face downward.<br />
Food Pusher (Small)<br />
Do not insert prohibited vegetables. (See page 8 and 10)<br />
3<br />
4<br />
Pull out the Collection Cup and remove the sliced or grated vegetable.<br />
Make sure to remove the Switch Ring from the Switch Dent.<br />
Disconnect the plug.<br />
Do not pull the Power Cord. Instead, pull the power plug.<br />
For fine vegetables<br />
Insert the Medium Food Pusher into the Large Food<br />
Pusher. Place the Large and Medium Food Pusher<br />
onto the Large Food Chute. Insert the vegetable into<br />
Medium Food Pusher. Press with Small Food<br />
Pusher.<br />
Large<br />
Food Pusher<br />
Vegetable<br />
Medium<br />
Food Pusher<br />
Insert the Medium Food Pusher into the Large Food Pusher<br />
FOR BEST RESULTS, PLEASE SEE AND STUDY "USING<br />
EACH BLADE" IN PAGES 7-13<br />
5<br />
6
USAGE<br />
TO USE EACH BLADE & INSERT<br />
1. TO SLICE VEGETABLE<br />
1<br />
CAUTION<br />
Prepare the <strong>Slicer</strong> Blade.<br />
Switch <strong>of</strong>f the appliance and ensure all moving parts<br />
have stopped before changing accessories.<br />
Rib<br />
<strong>Slicer</strong> Blade<br />
Vegetables Preparation<br />
Before inserting, pare vegetables and cut into the<br />
size which can be inserted into the Food Chute.<br />
You have three sizes.<br />
Small Medium Large<br />
Below 40mm dia 40-60mm dia 60-80mm dia<br />
Cut Preparation<br />
Before inserting, make the following<br />
cuts so that vegetable can be cut into<br />
your favorite shape.<br />
For Round Slice<br />
<strong>Slicer</strong> Blade Insert<br />
Place the <strong>Slicer</strong> Blade on<br />
2 the Plate Frame. 3<br />
Position the<br />
Rib on the<br />
Guide for Rib.<br />
To make thick slice (5mm thickness), use<br />
the <strong>Slicer</strong> Blade only.<br />
To make thin slice (1mm thickness), insert<br />
the <strong>Slicer</strong> Blade Insert to the <strong>Slicer</strong> Blade.<br />
Place the Plate Frame on the Container.<br />
Place the Cover and the Main Unit on the<br />
Container.<br />
Below<br />
100mm<br />
Below<br />
100mm<br />
Below<br />
100mm<br />
Prohibited<br />
SLICER BLADE CAN BE USED FOR VEGETABLES ONLY.<br />
DO NOT USE FOR OTHER FOODS.<br />
PROHIBITED FOODS<br />
For Rectangular<br />
Slice<br />
CAUTION<br />
Do not stack the <strong>Slicer</strong> Blade<br />
and the Grater. This may<br />
cause product failure or injury<br />
to the user may occur.<br />
Insert the vegetables into<br />
4 5<br />
the Food Chute.<br />
Press vegetable into the Food Chute with a<br />
Food Pusher. Also, press the Switch Ring<br />
onto Switch Dent to start slicing.<br />
Meat, Fish Ham, Sausage, Cheese Hard Foods, Dry Foods, Frozen Foods<br />
PROHIBITED VEGETABLES<br />
Small onions, leeks and s<strong>of</strong>t vegetables are not recommended for this process.<br />
Scallion<br />
Hollow S<strong>of</strong>t Vegetables S<strong>of</strong>t Vegetables Others<br />
Quarter Circle<br />
For columnar vegetables<br />
(white radish or the like) cut<br />
the vegetable into the size<br />
cut into Quarter circle.<br />
H I N T<br />
For conic vegetables like carrot,<br />
make the thicker side face the<br />
bottom. For cabbage make<br />
quarter circle cuts to fit the size <strong>of</strong><br />
the Food Chute.<br />
1cm<br />
Eggplant<br />
Leek<br />
Thin Strips <strong>of</strong> Cabbage<br />
Use the <strong>Slicer</strong> Blade<br />
Insert and <strong>Slicer</strong> Blade.<br />
Cut the cabbage into<br />
the size which can fit<br />
the Large Food Chute<br />
(Approximately 1/8).<br />
*You have three types <strong>of</strong> Food<br />
Chutes, Large (80mm, dia) / Medium<br />
(60mm, dia) / Small (40mm, dia)<br />
1/8<br />
7<br />
8
USAGE<br />
TO USE EACH BLADE & INSERT<br />
2. TO MAKE JULIENNE STRIPS<br />
1<br />
Prepare the <strong>Slicer</strong> Blade<br />
Rib<br />
<strong>Slicer</strong> Blade<br />
Vegetables Preparation<br />
Before inserting, pare vegetables and cut into the<br />
size which can be inserted into the Food Chute.<br />
You have three sizes <strong>of</strong> Food Chutes<br />
Small Medium Large<br />
Direction <strong>of</strong> vegetables in the Opening<br />
Make the vegetable fiber parallel to the<br />
cutter motion direction.<br />
Below 40mm dia 40-60mm dia 60-80mm dia<br />
Radish<br />
Thin Julienne<br />
Insert<br />
Thick Julienne<br />
Insert<br />
Place the <strong>Slicer</strong> Blade on<br />
2 the Plate Frame. 3<br />
Position the<br />
Rib on the<br />
Guide for Rib.<br />
To make fine Julienne Strips<br />
Insert the Thin Julienne Blade to the <strong>Slicer</strong> Blade.<br />
To make thick Julienne Strips<br />
Insert the Thick Julienne Insert to the <strong>Slicer</strong> Blade.<br />
Place the Plate Frame on the Container.<br />
Place the Cover and the Main Unit on the<br />
Container.<br />
Below<br />
100mm<br />
Prohibited<br />
Below<br />
100mm<br />
Below<br />
100mm<br />
JULIENNE INSERTS CAN BE USED FOR VEGETABLES ONLY.<br />
DO NOT USE FOR OTHER FOODS.<br />
PROHIBITED FOODS<br />
Carrot<br />
*Use <strong>Slicer</strong> Blade and one <strong>of</strong><br />
the Julienne Insert.<br />
Do not stack the <strong>Slicer</strong> Blade<br />
and the Grater . This may<br />
CAUTION cause product failure or<br />
injury to the user may occur.<br />
Insert the vegetables into<br />
4 the Food Chute. 5<br />
*You have three types <strong>of</strong> Food<br />
Chutes, Large (80mm, dia) / Medium<br />
(60mm, dia) / Small (40mm, dia)<br />
Press vegetable into the Food Chute with a<br />
Food Pusher. Also, press the Switch Ring<br />
onto the Switch Dent to start slicing.<br />
Meat, Fish Ham, Sausage, Cheese Hard Foods, Dry Foods, Frozen Foods<br />
PROHIBITED VEGETABLES<br />
S<strong>of</strong>t and hollow vegetables such as peppers, lemon, tomato and leeks are not recommended for this process.<br />
Sweet Pepper<br />
Hollow Vegetables<br />
Eggplant<br />
Lemon<br />
S<strong>of</strong>t Vegetables<br />
H I N T<br />
For the vegetable with fine diameter<br />
Cut the vegetables into the length which fits into the Food Chute.<br />
Insert the vegetables into the Food Chute making fiber parallel<br />
to the direction <strong>of</strong> the <strong>Slicer</strong> Blade movement. In the Food<br />
Chute, place the vegetable facing away from the main unit.<br />
Direction <strong>of</strong><br />
the <strong>Slicer</strong> Blade<br />
Movement<br />
Facing away Fiber<br />
from the main unit<br />
Main<br />
Unit<br />
Tomato<br />
Leek<br />
Others<br />
Julienne Strips <strong>of</strong> Radish<br />
Use the <strong>Slicer</strong> Blade and Thin Julienne Insert. Pare<br />
the radish and cut into the length <strong>of</strong> 8cm or less. Put<br />
the radish into the Food Chute on its side making fiber<br />
parallel to the direction <strong>of</strong> the <strong>Slicer</strong> Blade movement.<br />
Julienne Strips <strong>of</strong> Carrot<br />
Use the <strong>Slicer</strong> Blade and Thick Julienne Insert. Pare<br />
the carrot and cut into the length <strong>of</strong> 8cm or less.<br />
Julienne Strips <strong>of</strong> Cucumber<br />
Use the <strong>Slicer</strong> Blade and Thick Julienne Insert. Cut <strong>of</strong>f<br />
each end and cut into the length <strong>of</strong> 8cm or less.<br />
9 10
USAGE<br />
TO USE EACH BLADE & INSERT<br />
3. TO USE GRATER<br />
1<br />
Place the Grater on the Plate<br />
Frame.<br />
2<br />
Position the Rib<br />
on the Guide for<br />
Rib.<br />
Place the Plate Frame on the Large<br />
Container. Place the Cover and the Main<br />
Unit on the Container.<br />
USAGE<br />
TO USE EACH BLADE & INSERT<br />
4. FRENCH FRY BLADE<br />
1<br />
Prepare the French Fry Blade.<br />
Rib<br />
French Fry Blade<br />
CAUTION<br />
Use French Fry Blade with<br />
potatoes. Other vegetables<br />
will not be sliced well.<br />
Do not stack the <strong>Slicer</strong> Blade<br />
and the Grater. This may cause<br />
Attention product failure or injury to the<br />
user may occur.<br />
Place the French Fry Blade<br />
2 on the Plate Frame. 3<br />
Position the<br />
Rib on the<br />
Guide for Rib.<br />
Place the Plate Frame on the Container.<br />
Place the Cover and the Main Unit on the<br />
Container.<br />
Insert the cheese into the Food Chute.<br />
3 4<br />
Cut the cheese for the size <strong>of</strong> appropriate<br />
Food Chute. Then, press the Switch Ring<br />
onto the Switch Dent to start grating.<br />
Ensure that the cheese does not exceed<br />
“Maximum Capacity for Cheese” indication.<br />
Do not stack the French Fry<br />
Blade and the Grater . This<br />
CAUTION may cause product failure or<br />
injury to the user may occur.<br />
*You have three types <strong>of</strong> Food<br />
Chutes, Large (80mm, dia) / Medium<br />
(60mm, dia) / Small (40mm, dia)<br />
*Do not press<br />
too hard<br />
Insert a potato into<br />
4 the Food Chute. 5<br />
Push the potato into the Food Chute with a<br />
Food Pusher. Also, press the Switch Ring<br />
onto the Switch Dent<br />
to start slicing.<br />
Preparation<br />
Before inserting, pare vegetables or cheese and cut<br />
into the size which can be inserted into the Food<br />
Chute.<br />
Small<br />
Below 40mm dia<br />
*For effective processing, we encourage picking<br />
hard cheese and it should be cut lengthwise and<br />
inserted in the Small Food Chute vertically.<br />
Cheese for this grater<br />
Hard cheese like Parmesan is recommended for<br />
grating.<br />
S<strong>of</strong>t cheeses will not be grated well.<br />
Below<br />
100mm<br />
*You have three types <strong>of</strong> Food<br />
Chutes, Large (80mm, dia) / Medium<br />
(60mm, dia) / Small (40mm, dia)<br />
*In the case, a potato does not slice well into pieces, we encourage<br />
cutting <strong>of</strong>f bottom <strong>of</strong> the potato a bit so that potato stays steady in the<br />
Food Chute.<br />
11<br />
12
USAGE<br />
TO USE EACH BLADE & INSERT<br />
5. TO USE ICE SHAVER<br />
1 To assemble the Ice Shaver 2<br />
This shaver is designed to shave the ice. Do<br />
not use for other foods or vegetables.<br />
Place the Ice Shaver on<br />
the Plate Frame<br />
Position the Rib on<br />
the Guide for rib.<br />
3<br />
Prepare the ice<br />
Use the ice cube made in the<br />
refrigerator in your home.<br />
*DO NOT USE LARGE ROCK ICE FROM<br />
THE RETAIL STORES<br />
To put the ice<br />
Put the ice into the<br />
Large Food Chute.<br />
CARE & STORAGE<br />
BEFORE CARING FOR THE UNIT AND PROPER MAINTENANCE,<br />
DISCONNECT THE PLUG<br />
Main Unit<br />
Use a damp cloth to clean the main unit.<br />
Do not use benzene, alcohol, polishing powder.<br />
This may scratch, discolor or crack the Product.<br />
Do not wash the Main Unit in the<br />
water.<br />
BENZINE<br />
THINNER<br />
Blades and Inserts<br />
Wash under the running water.<br />
Dry <strong>of</strong>f thoroughly and store.<br />
Prior to use, apply<br />
cooking oil such as<br />
extra virgin olive oil<br />
to prevent from<br />
staining.<br />
Handle with care<br />
When you use with carrots, you may find the plates are<br />
colored, but this does not affect the product performance.<br />
In this case, wash with detergent after use.<br />
Place the Plate Frame<br />
with the Ice Shaver onto<br />
the Step <strong>of</strong> the Container.<br />
4 To Operate<br />
5<br />
Place the Large Food Pusher on to the Large<br />
Food Chute. Press the Switch Ring onto the<br />
Switch Dent to start shaving ice.<br />
80% <strong>of</strong><br />
Capacity<br />
To use<br />
Remove the shaved ice from the Collection Cup<br />
and serve with syrup or favorite toppings.<br />
You can make ice with your favorite juice in the<br />
freezer and enjoy flavored shaved ice.<br />
Dissolve neutral<br />
detergent into<br />
lukewarm water<br />
(40 degrees C).<br />
Immerse the Food<br />
Pusher in the<br />
lukewarm water;<br />
Rinse with water,<br />
dry <strong>of</strong>f thoroughly.<br />
Food Pusher<br />
BENZINE<br />
Cover, Containers<br />
THINNER<br />
Do not use benzene,<br />
alcohol, polishing powder.<br />
This may scratch, discolor,<br />
or crack the product.<br />
Wash with lukewarm water<br />
(40 degrees C) with<br />
dissolved neutral detergent.<br />
To Store<br />
Slide the Collection Cup into the<br />
Container. Put the blades and inserts in<br />
the Collection Cup. Place the Grater on<br />
the Plate Flame and put them on the<br />
Large container. Put the cover, main unit<br />
and the Food Pushers on the Container.<br />
13<br />
14
SAFETY RULES<br />
Follow the instructions to operate the unit. Do not misuse the unit.<br />
DO NOT OPERATE WITHOUT VEGETABLE.<br />
Disconnect the Switch Ring & Switch Dent<br />
when inserting or removing the vegetable.<br />
Cause <strong>of</strong> injury<br />
Do not insert foreign substances or items.<br />
Do not process prohibited items<br />
Cause <strong>of</strong><br />
breakdown<br />
Use the Food<br />
Pusher all the time.<br />
Dangerous due to<br />
fast movement<br />
Cause <strong>of</strong><br />
injury<br />
TROUBLESHOOTING GUIDE<br />
In case <strong>of</strong> trouble<br />
WHEN CAUSE MEASUREMENT<br />
Unit does not turn on<br />
Plate does not move<br />
Switch Ring and Switch Dent is not<br />
in position.<br />
Foreign substance is stuck in the Switch.<br />
Movement stops due to excessive load.<br />
Foreign substance is stuck around<br />
step <strong>of</strong> the Container.<br />
Foreign substance is stuck in the<br />
depression <strong>of</strong> main unit.<br />
Too much processed vegetable in<br />
the Container.<br />
Place the Switch in position.<br />
Remove foreign substance.<br />
Disconnect power plug and remove<br />
the vegetable after 1 hour, no sooner.<br />
Remove foreign substance.<br />
Remove foreign substance.<br />
Remove processed vegetable.<br />
Cause <strong>of</strong> injury or<br />
break down<br />
Do not insert finger<br />
or foreign articles.<br />
Cause <strong>of</strong><br />
electric shock<br />
& breakdown<br />
Excessive vibration Operating on an uneven surface. Operating on a flat surface.<br />
If the supply cord is damaged, it must be replaced by the manufacturer or its service agent<br />
or a similarly qualified person in order to avoid a hazard. Please contact the nearest service<br />
center for replacement.<br />
When any deformation <strong>of</strong> the blade or poor cutting performance is observed, please contact<br />
the nearest service center for replacement.<br />
Never attempt to touch<br />
anything through the<br />
Large Food Chute.<br />
Keep the main unit away<br />
from water.<br />
Cause <strong>of</strong><br />
injury<br />
Cause <strong>of</strong><br />
electric shock<br />
and breakdown<br />
Handle with care when<br />
handling <strong>Slicer</strong> Blade,<br />
especially when removing<br />
the inserts and the blade<br />
from the container,<br />
emptying the container,<br />
and during cleaning.<br />
Cause <strong>of</strong><br />
injury<br />
Do not allow children to<br />
operate.<br />
15 16
NOTES<br />
Dispose the packaging at your local recycling centre.<br />
Dispose paper and carton separately from plastic bags at your local<br />
recycling centre.<br />
Dispose the appliance at the end <strong>of</strong> its lifespan at your local<br />
authorised household waste recycling centre.<br />
17<br />
18