

Rattlesnake Instr. Manual - Nature Coast Hobby Shop
Rattlesnake Instr. Manual - Nature Coast Hobby Shop
Rattlesnake Instr. Manual - Nature Coast Hobby Shop

Create successful ePaper yourself
Turn your PDF publications into a flip-book with our unique Google optimized e-Paper software.
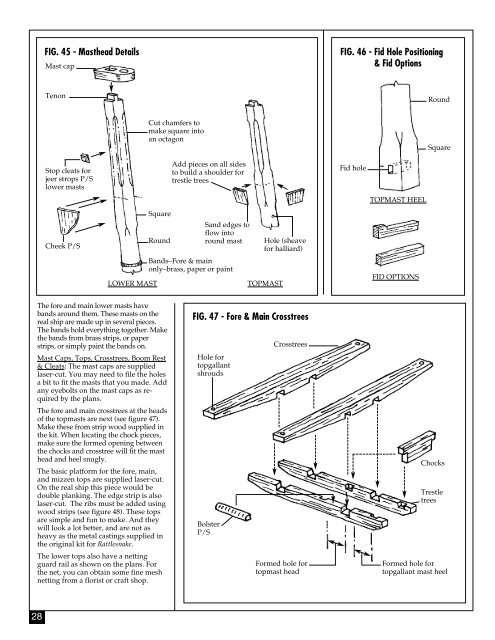
FIG. 45 - Masthead Details<br />
Mast cap<br />
FIG. 46 - Fid Hole Positioning<br />
& Fid Options<br />
Tenon<br />
Round<br />
Cut chamfers to<br />
make square into<br />
an octagon<br />
Square<br />
Stop cleats for<br />
jeer strops P/S<br />
lower masts<br />
Add pieces on all sides<br />
to build a shoulder for<br />
trestle trees<br />
Fid hole<br />
TOPMAST HEEL<br />
Square<br />
Cheek P/S<br />
Round<br />
Sand edges to<br />
flow into<br />
round mast<br />
Hole (sheave<br />
for halliard)<br />
LOWER MAST<br />
Bands–Fore & main<br />
only–brass, paper or paint<br />
TOPMAST<br />
FID OPTIONS<br />
The fore and main lower masts have<br />
bands around them. These masts on the<br />
real ship are made up in several pieces.<br />
The bands hold everything together. Make<br />
the bands from brass strips, or paper<br />
strips, or simply paint the bands on.<br />
Mast Caps, Tops, Crosstrees, Boom Rest<br />
& Cleats: The mast caps are supplied<br />
laser-cut. You may need to file the holes<br />
a bit to fit the masts that you made. Add<br />
any eyebolts on the mast caps as required<br />
by the plans.<br />
The fore and main crosstrees at the heads<br />
of the topmasts are next (see figure 47).<br />
Make these from strip wood supplied in<br />
the kit. When locating the chock pieces,<br />
make sure the formed opening between<br />
the chocks and crosstree will fit the mast<br />
head and heel snugly.<br />
The basic platform for the fore, main,<br />
and mizzen tops are supplied laser-cut.<br />
On the real ship this piece would be<br />
double planking. The edge strip is also<br />
laser-cut. The ribs must be added using<br />
wood strips (see figure 48). These tops<br />
are simple and fun to make. And they<br />
will look a lot better, and are not as<br />
heavy as the metal castings supplied in<br />
the original kit for <strong>Rattlesnake</strong>.<br />
The lower tops also have a netting<br />
guard rail as shown on the plans. For<br />
the net, you can obtain some fine mesh<br />
netting from a florist or craft shop.<br />
FIG. 47 - Fore & Main Crosstrees<br />
Hole for<br />
topgallant<br />
shrouds<br />
Bolster<br />
P/S<br />
Crosstrees<br />
Formed hole for<br />
topmast head<br />
Chocks<br />
Trestle<br />
trees<br />
Formed hole for<br />
topgallant mast heel<br />
28


