

Rattlesnake Instr. Manual - Nature Coast Hobby Shop
Rattlesnake Instr. Manual - Nature Coast Hobby Shop
Rattlesnake Instr. Manual - Nature Coast Hobby Shop

You also want an ePaper? Increase the reach of your titles
YUMPU automatically turns print PDFs into web optimized ePapers that Google loves.
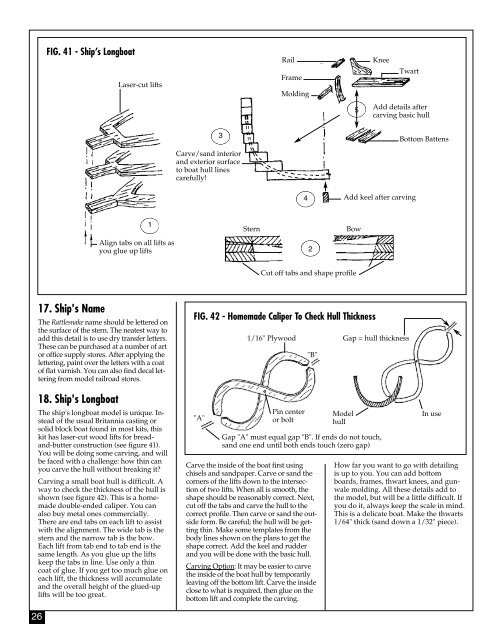
FIG. 41 - Ship’s Longboat<br />
Laser-cut lifts<br />
Rail<br />
Frame<br />
Molding<br />
Knee<br />
Twart<br />
5<br />
Add details after<br />
carving basic hull<br />
3<br />
Bottom Battens<br />
Carve/sand interior<br />
and exterior surface<br />
to boat hull lines<br />
carefully!<br />
4<br />
Add keel after carving<br />
1<br />
Stern<br />
Bow<br />
Align tabs on all lifts as<br />
you glue up lifts<br />
2<br />
Cut off tabs and shape profile<br />
17. Ship's Name<br />
The <strong>Rattlesnake</strong> name should be lettered on<br />
the surface of the stern. The neatest way to<br />
add this detail is to use dry transfer letters.<br />
These can be purchased at a number of art<br />
or office supply stores. After applying the<br />
lettering, paint over the letters with a coat<br />
of flat varnish. You can also find decal lettering<br />
from model railroad stores.<br />
18. Ship's Longboat<br />
The ship's longboat model is unique. Instead<br />
of the usual Britannia casting or<br />
solid block boat found in most kits, this<br />
kit has laser-cut wood lifts for breadand-butter<br />
construction (see figure 41).<br />
You will be doing some carving, and will<br />
be faced with a challenge: how thin can<br />
you carve the hull without breaking it?<br />
Carving a small boat hull is difficult. A<br />
way to check the thickness of the hull is<br />
shown (see figure 42). This is a homemade<br />
double-ended caliper. You can<br />
also buy metal ones commercially.<br />
There are end tabs on each lift to assist<br />
with the alignment. The wide tab is the<br />
stern and the narrow tab is the bow.<br />
Each lift from tab end to tab end is the<br />
same length. As you glue up the lifts<br />
keep the tabs in line. Use only a thin<br />
coat of glue. If you get too much glue on<br />
each lift, the thickness will accumulate<br />
and the overall height of the glued-up<br />
lifts will be too great.<br />
FIG. 42 - Homemade Caliper To Check Hull Thickness<br />
"A"<br />
1/16" Plywood Gap = hull thickness<br />
Pin center<br />
or bolt<br />
"B"<br />
Carve the inside of the boat first using<br />
chisels and sandpaper. Carve or sand the<br />
corners of the lifts down to the intersection<br />
of two lifts. When all is smooth, the<br />
shape should be reasonably correct. Next,<br />
cut off the tabs and carve the hull to the<br />
correct profile. Then carve or sand the outside<br />
form. Be careful; the hull will be getting<br />
thin. Make some templates from the<br />
body lines shown on the plans to get the<br />
shape correct. Add the keel and rudder<br />
and you will be done with the basic hull.<br />
Carving Option: It may be easier to carve<br />
the inside of the boat hull by temporarily<br />
leaving off the bottom lift. Carve the inside<br />
close to what is required, then glue on the<br />
bottom lift and complete the carving.<br />
Model<br />
hull<br />
Gap "A" must equal gap "B". If ends do not touch,<br />
sand one end until both ends touch (zero gap)<br />
In use<br />
How far you want to go with detailing<br />
is up to you. You can add bottom<br />
boards, frames, thwart knees, and gunwale<br />
molding. All these details add to<br />
the model, but will be a little difficult. If<br />
you do it, always keep the scale in mind.<br />
This is a delicate boat. Make the thwarts<br />
1/64" thick (sand down a 1/32" piece).<br />
26


