

Rattlesnake Instr. Manual - Nature Coast Hobby Shop
Rattlesnake Instr. Manual - Nature Coast Hobby Shop
Rattlesnake Instr. Manual - Nature Coast Hobby Shop

Create successful ePaper yourself
Turn your PDF publications into a flip-book with our unique Google optimized e-Paper software.
The natural wood planks will cover the<br />
existing planking, but you will still have<br />
the rails exposed. You could substitute<br />
these initially with the wood of your<br />
choice, cap them with the strips, or simply<br />
stain them to look similar.<br />
When applying the strips, proceed exactly<br />
as you did for the basswood planking<br />
process. You may want to work with<br />
longer strips since the basswood planking<br />
already defines the plank shapes.<br />
Simply lift dimensions from the hull and<br />
cut the natural wood strips. When completed,<br />
sand and finish the hull with Floquil<br />
oil, glaze, or tung oil. Finally, add a<br />
coat of wax and polish.<br />
STAGE D<br />
MOUNTING THE HULL<br />
Before proceeding with additional work<br />
it is best to mount the hull. This step will<br />
help prevent details from becoming damaged<br />
while you handle the model. It will<br />
also allow you to make any alignments<br />
that require a true waterline. So, proper<br />
mounting of the hull is very important.<br />
While any modeler can devise his own<br />
mounting, this kit contains two brass<br />
pedestals and a baseboard for mounting<br />
the model. A second option, called the<br />
launching ways, may be made by hand<br />
or purchased commercially, as well.<br />
If you intend to put the model in a glass<br />
or plastic case, you could make the bottom<br />
of the case serve as a baseboard.<br />
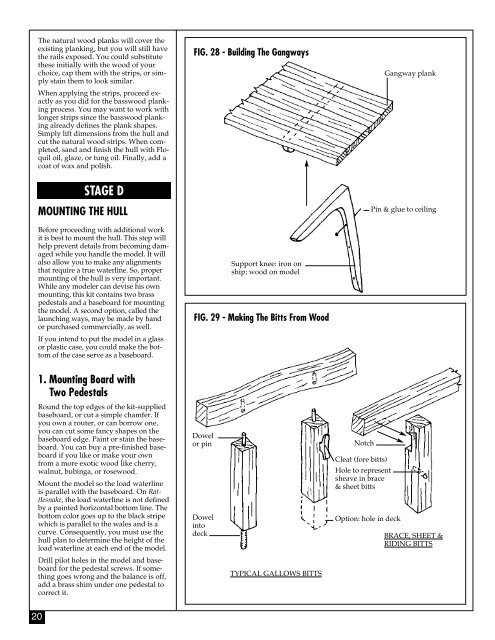
FIG. 28 - Building The Gangways<br />
Support knee: iron on<br />
ship; wood on model<br />
FIG. 29 - Making The Bitts From Wood<br />
Gangway plank<br />
Pin & glue to ceiling<br />
1. Mounting Board with<br />
Two Pedestals<br />
Round the top edges of the kit-supplied<br />
baseboard, or cut a simple chamfer. If<br />
you own a router, or can borrow one,<br />
you can cut some fancy shapes on the<br />
baseboard edge. Paint or stain the baseboard.<br />
You can buy a pre-finished baseboard<br />
if you like or make your own<br />
from a more exotic wood like cherry,<br />
walnut, bubinga, or rosewood.<br />
Mount the model so the load waterline<br />
is parallel with the baseboard. On <strong>Rattlesnake</strong>,<br />
the load waterline is not defined<br />
by a painted horizontal bottom line. The<br />
bottom color goes up to the black stripe<br />
which is parallel to the wales and is a<br />
curve. Consequently, you must use the<br />
hull plan to determine the height of the<br />
load waterline at each end of the model.<br />
Drill pilot holes in the model and baseboard<br />
for the pedestal screws. If something<br />
goes wrong and the balance is off,<br />
add a brass shim under one pedestal to<br />
correct it.<br />
Dowel<br />
or pin<br />
Dowel<br />
into<br />
deck<br />
TYPICAL GALLOWS BITTS<br />
Notch<br />
Cleat (fore bitts)<br />
Hole to represent<br />
sheave in brace<br />
& sheet bitts<br />
Option: hole in deck<br />
BRACE, SHEET &<br />
RIDING BITTS<br />
20


