

Rattlesnake Instr. Manual - Nature Coast Hobby Shop
Rattlesnake Instr. Manual - Nature Coast Hobby Shop
Rattlesnake Instr. Manual - Nature Coast Hobby Shop

You also want an ePaper? Increase the reach of your titles
YUMPU automatically turns print PDFs into web optimized ePapers that Google loves.
STAGE C<br />
COMPLETING THE BASIC<br />
HULL STRUCTURE<br />
FIG. 25 - Hatch & Grating Coamings<br />
Coaming<br />
Center Keel<br />
1. Correcting and Sanding<br />
After all the planks are installed, look<br />
over the entire hull. If you find seams<br />
with starved glue joints, rub some wood<br />
glue in the cracks and, if necessary, add<br />
some wood filler. When seams are filled,<br />
sand the entire hull and deck planks<br />
smooth.<br />
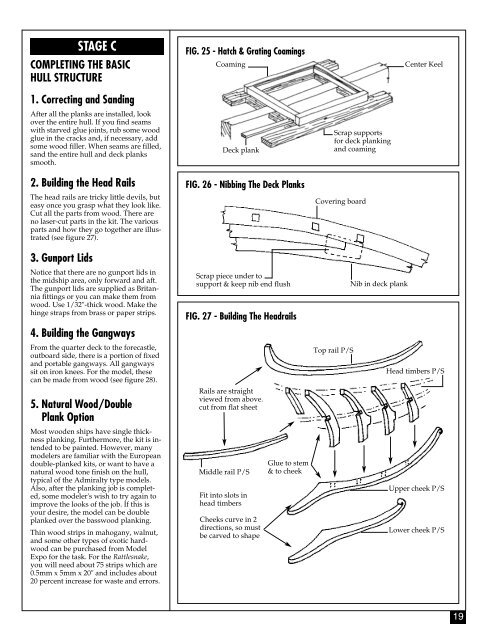
2. Building the Head Rails<br />
The head rails are tricky little devils, but<br />
easy once you grasp what they look like.<br />
Cut all the parts from wood. There are<br />
no laser-cut parts in the kit. The various<br />
parts and how they go together are illustrated<br />
(see figure 27).<br />
3. Gunport Lids<br />
Notice that there are no gunport lids in<br />
the midship area, only forward and aft.<br />
The gunport lids are supplied as Britannia<br />
fittings or you can make them from<br />
wood. Use 1/32"-thick wood. Make the<br />
hinge straps from brass or paper strips.<br />
4. Building the Gangways<br />
From the quarter deck to the forecastle,<br />
outboard side, there is a portion of fixed<br />
and portable gangways. All gangways<br />
sit on iron knees. For the model, these<br />
can be made from wood (see figure 28).<br />
5. Natural Wood/Double<br />
Plank Option<br />
Most wooden ships have single thickness<br />
planking. Furthermore, the kit is intended<br />
to be painted. However, many<br />
modelers are familiar with the European<br />
double-planked kits, or want to have a<br />
natural wood tone finish on the hull,<br />
typical of the Admiralty type models.<br />
Also, after the planking job is completed,<br />
some modeler's wish to try again to<br />
improve the looks of the job. If this is<br />
your desire, the model can be double<br />
planked over the basswood planking.<br />
Thin wood strips in mahogany, walnut,<br />
and some other types of exotic hardwood<br />
can be purchased from Model<br />
Expo for the task. For the <strong>Rattlesnake</strong>,<br />
you will need about 75 strips which are<br />
0.5mm x 5mm x 20" and includes about<br />
20 percent increase for waste and errors.<br />
Deck plank<br />
FIG. 26 - Nibbing The Deck Planks<br />
Scrap piece under to<br />
support & keep nib end flush<br />
FIG. 27 - Building The Headrails<br />
Rails are straight<br />
viewed from above.<br />
cut from flat sheet<br />
Middle rail P/S<br />
Fit into slots in<br />
head timbers<br />
Cheeks curve in 2<br />
directions, so must<br />
be carved to shape<br />
Glue to stem<br />
& to cheek<br />
Scrap supports<br />
for deck planking<br />
and coaming<br />
Covering board<br />
Top rail P/S<br />
Nib in deck plank<br />
Head timbers P/S<br />
Upper cheek P/S<br />
Lower cheek P/S<br />
19


