

Rattlesnake Instr. Manual - Nature Coast Hobby Shop
Rattlesnake Instr. Manual - Nature Coast Hobby Shop
Rattlesnake Instr. Manual - Nature Coast Hobby Shop

You also want an ePaper? Increase the reach of your titles
YUMPU automatically turns print PDFs into web optimized ePapers that Google loves.
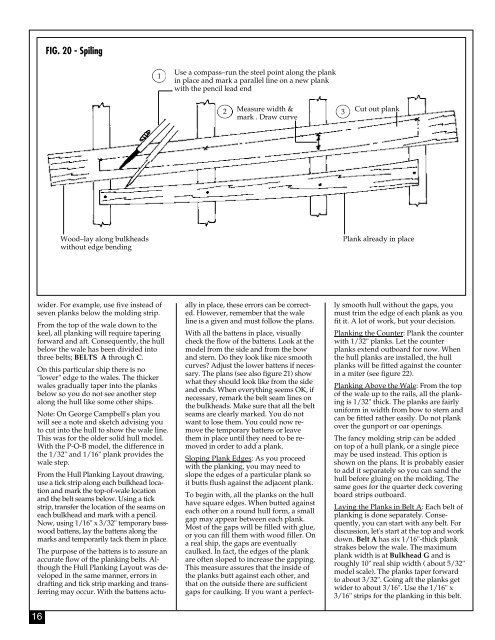
FIG. 20 - Spiling<br />
1<br />
Use a compass–run the steel point along the plank<br />
in place and mark a parallel line on a new plank<br />
with the pencil lead end<br />
2<br />
Measure width &<br />
mark . Draw curve<br />
3<br />
Cut out plank<br />
Wood–lay along bulkheads<br />
without edge bending<br />
Plank already in place<br />
16<br />
wider. For example, use five instead of<br />
seven planks below the molding strip.<br />
From the top of the wale down to the<br />
keel, all planking will require tapering<br />
forward and aft. Consequently, the hull<br />
below the wale has been divided into<br />
three belts; BELTS A through C.<br />
On this particular ship there is no<br />
"lower" edge to the wales. The thicker<br />
wales gradually taper into the planks<br />
below so you do not see another step<br />
along the hull like some other ships.<br />
Note: On George Campbell's plan you<br />
will see a note and sketch advising you<br />
to cut into the hull to show the wale line.<br />
This was for the older solid hull model.<br />
With the P-O-B model, the difference in<br />
the 1/32" and 1/16" plank provides the<br />
wale step.<br />
From the Hull Planking Layout drawing,<br />
use a tick strip along each bulkhead location<br />
and mark the top-of-wale location<br />
and the belt seams below. Using a tick<br />
strip, transfer the location of the seams on<br />
each bulkhead and mark with a pencil.<br />
Now, using 1/16" x 3/32" temporary basswood<br />
battens, lay the battens along the<br />
marks and temporarily tack them in place.<br />
The purpose of the battens is to assure an<br />
accurate flow of the planking belts. Although<br />
the Hull Planking Layout was developed<br />
in the same manner, errors in<br />
drafting and tick strip marking and transferring<br />
may occur. With the battens actually<br />
in place, these errors can be corrected.<br />
However, remember that the wale<br />
line is a given and must follow the plans.<br />
With all the battens in place, visually<br />
check the flow of the battens. Look at the<br />
model from the side and from the bow<br />
and stern. Do they look like nice smooth<br />
curves? Adjust the lower battens if necessary.<br />
The plans (see also figure 21) show<br />
what they should look like from the side<br />
and ends. When everything seems OK, if<br />
necessary, remark the belt seam lines on<br />
the bulkheads. Make sure that all the belt<br />
seams are clearly marked. You do not<br />
want to lose them. You could now remove<br />
the temporary battens or leave<br />
them in place until they need to be removed<br />
in order to add a plank.<br />
Sloping Plank Edges: As you proceed<br />
with the planking, you may need to<br />
slope the edges of a particular plank so<br />
it butts flush against the adjacent plank.<br />
To begin with, all the planks on the hull<br />
have square edges. When butted against<br />
each other on a round hull form, a small<br />
gap may appear between each plank.<br />
Most of the gaps will be filled with glue,<br />
or you can fill them with wood filler. On<br />
a real ship, the gaps are eventually<br />
caulked. In fact, the edges of the plank<br />
are often sloped to increase the gapping.<br />
This measure assures that the inside of<br />
the planks butt against each other, and<br />
that on the outside there are sufficient<br />
gaps for caulking. If you want a perfectly<br />
smooth hull without the gaps, you<br />
must trim the edge of each plank as you<br />
fit it. A lot of work, but your decision.<br />
Planking the Counter: Plank the counter<br />
with 1/32" planks. Let the counter<br />
planks extend outboard for now. When<br />
the hull planks are installed, the hull<br />
planks will be fitted against the counter<br />
in a miter (see figure 22).<br />
Planking Above the Wale: From the top<br />
of the wale up to the rails, all the planking<br />
is 1/32" thick. The planks are fairly<br />
uniform in width from bow to stern and<br />
can be fitted rather easily. Do not plank<br />
over the gunport or oar openings.<br />
The fancy molding strip can be added<br />
on top of a hull plank, or a single piece<br />
may be used instead. This option is<br />
shown on the plans. It is probably easier<br />
to add it separately so you can sand the<br />
hull before gluing on the molding. The<br />
same goes for the quarter deck covering<br />
board strips outboard.<br />
Laying the Planks in Belt A: Each belt of<br />
planking is done separately. Consequently,<br />
you can start with any belt. For<br />
discussion, let's start at the top and work<br />
down. Belt A has six 1/16"-thick plank<br />
strakes below the wale. The maximum<br />
plank width is at Bulkhead G and is<br />
roughly 10" real ship width ( about 5/32"<br />
model scale). The planks taper forward<br />
to about 3/32". Going aft the planks get<br />
wider to about 3/16". Use the 1/16" x<br />
3/16" strips for the planking in this belt.


