

Rattlesnake Instr. Manual - Nature Coast Hobby Shop
Rattlesnake Instr. Manual - Nature Coast Hobby Shop
Rattlesnake Instr. Manual - Nature Coast Hobby Shop

Create successful ePaper yourself
Turn your PDF publications into a flip-book with our unique Google optimized e-Paper software.
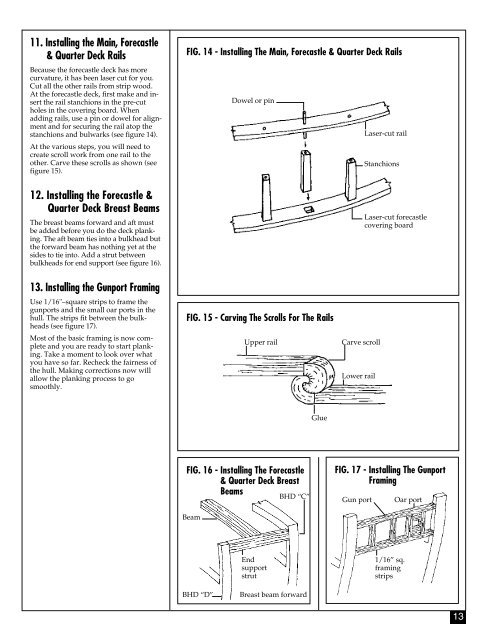
11. Installing the Main, Forecastle<br />
& Quarter Deck Rails<br />
Because the forecastle deck has more<br />
curvature, it has been laser cut for you.<br />
Cut all the other rails from strip wood.<br />
At the forecastle deck, first make and insert<br />
the rail stanchions in the pre-cut<br />
holes in the covering board. When<br />
adding rails, use a pin or dowel for alignment<br />
and for securing the rail atop the<br />
stanchions and bulwarks (see figure 14).<br />
At the various steps, you will need to<br />
create scroll work from one rail to the<br />
other. Carve these scrolls as shown (see<br />
figure 15).<br />
12. Installing the Forecastle &<br />
Quarter Deck Breast Beams<br />
The breast beams forward and aft must<br />
be added before you do the deck planking.<br />
The aft beam ties into a bulkhead but<br />
the forward beam has nothing yet at the<br />
sides to tie into. Add a strut between<br />
bulkheads for end support (see figure 16).<br />
FIG. 14 - Installing The Main, Forecastle & Quarter Deck Rails<br />
Dowel or pin<br />
Laser-cut rail<br />
Stanchions<br />
Laser-cut forecastle<br />
covering board<br />
13. Installing the Gunport Framing<br />
Use 1/16"–square strips to frame the<br />
gunports and the small oar ports in the<br />
hull. The strips fit between the bulkheads<br />
(see figure 17).<br />
Most of the basic framing is now complete<br />
and you are ready to start planking.<br />
Take a moment to look over what<br />
you have so far. Recheck the fairness of<br />
the hull. Making corrections now will<br />
allow the planking process to go<br />
smoothly.<br />
FIG. 15 - Carving The Scrolls For The Rails<br />
Upper rail<br />
Carve scroll<br />
Lower rail<br />
Glue<br />
FIG. 16 - Installing The Forecastle<br />
& Quarter Deck Breast<br />
Beams<br />
Beam<br />
BHD “C”<br />
FIG. 17 - Installing The Gunport<br />
Framing<br />
Gun port<br />
Oar port<br />
End<br />
support<br />
strut<br />
1/16” sq.<br />
framing<br />
strips<br />
BHD “D”<br />
Breast beam forward<br />
13


