Battle of Fere-Champenoise - Free NAPOLEONIC Scenarios
Battle of Fere-Champenoise - Free NAPOLEONIC Scenarios
Battle of Fere-Champenoise - Free NAPOLEONIC Scenarios

Create successful ePaper yourself
Turn your PDF publications into a flip-book with our unique Google optimized e-Paper software.
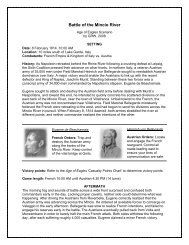
<strong>Battle</strong> <strong>of</strong> <strong>Fere</strong>-<strong>Champenoise</strong><br />
Age <strong>of</strong> Eagles Scenario<br />
by GRW, 2011<br />
SETTING<br />
Date: 25 March 1814, 12:00 PM<br />
Location: 75 miles east <strong>of</strong> Paris, France<br />
Combatants: French Empire vs. Russian Empire, Austrian Empire, & Kingdom <strong>of</strong> Württemberg<br />
History: In the chaotic final days <strong>of</strong> March 1814, elements <strong>of</strong> Schwarzenberg's Army <strong>of</strong><br />
Bohemia found a way to divide Napoleon's much smaller army. This was not by design, but<br />
rather, due to the utter confusion and swirling combat <strong>of</strong> the past two months. Hoping to<br />
somehow reunite with Napoleon, Marshals Marmont and Mortier joined their 20,000 remaining<br />
troops northeast <strong>of</strong> Sezanne. With them, they slowly dragged 84 pieces <strong>of</strong> vital artillery.<br />
On the morning <strong>of</strong> March 25, 1814, leading elements <strong>of</strong> Schwarzenberg's army made contact<br />
with the retreating French columns. The crown prince <strong>of</strong> Württemberg commanded the advance<br />
guard, and not wanting to allow the enemy to slip away, he attacked the numerically superior<br />
French without infantry support. Throughout the morning, more and more allied cavalry arrived<br />
on the field, and the prince fed them into the combat with vigor. Retreating in squares, Marmont<br />
and Mortier tried to continue their withdraw, but the allied pressure continued to mount....<br />
Auguste de Marmont<br />
French Orders:<br />
Disengage from the<br />
pursuit <strong>of</strong> the allies and<br />
withdraw with Mortier's<br />
corps.<br />
Victory points: Refer to the Age <strong>of</strong> Eagles 'Casualty Points Chart' to determine victory points.<br />
Game length: 12:00 PM until 5:30 PM (12 turns)<br />
Prince Wilhelm <strong>of</strong><br />
Württemberg<br />
Allied Orders: Infantry<br />
support is still miles<br />
behind...now is your<br />
chance to destroy the<br />
French!<br />
AFTERMATH<br />
By noon, the allied cavalry had driven <strong>of</strong> their mounted French counterparts, leaving the French<br />
infantry exposed. Mortier's Young Guard beat back three cavalry charges, but a sudden rain<br />
and hail storm around 1:00pm altered the balance <strong>of</strong> the battle. With wet powder, the French<br />
firepower slackened, and a fourth cavalry charge broke a Young Guard square. Panic struck the<br />
French, and they began to flee through the streets <strong>of</strong> <strong>Fere</strong>-<strong>Champenoise</strong> in disarray. Three<br />
miles to the north, the sounds <strong>of</strong> battle confused both sides. Who was approaching? The French<br />
troops rallied, hoping that Napoleon might be near. But the battle to the north was actually the<br />
determined retreat <strong>of</strong> Pacthod and Amey's National Guardsmen--fighting <strong>of</strong>f a horde <strong>of</strong> pursuing<br />
Russian cavalry. By 5:30pm Pacthod's men were finally overwhelmed, unable to make contact<br />
with Marmont and Mortier, who had barely escaped the field. The disastrous day cost the<br />
French nearly 10,000 men and most <strong>of</strong> their artillery. The allies lost roughly 2,000 men.
SCENARIO RULES<br />
1. PACTHOD and PRINCE WILHELM are Charismatic.<br />
2. Historically, a brief, heavy rain around 2:00pm radically impacted the battle. To simulate the<br />
possibility <strong>of</strong> rain, players should roll a D6 at the start <strong>of</strong> every turn. On a roll <strong>of</strong> "1-2," it rains<br />
during that specific turn. Rain halves any movement, removes road movement benefits for the<br />
turn, and halves fire points for shooting.<br />
3. Starting on the 2:30pm turn--and continuing at the start <strong>of</strong> each subsequent turn--the French<br />
player should roll a D6. On a roll <strong>of</strong> "6" PACTHOD and VASSILCHIKOV arrive according to the<br />
deployment rules. It is possible these forces may never arrive, implying Pacthod's destruction.<br />
4. The French deploy first.<br />
6. Lacking an overall commander, the French suffer a -2 penalty for initiative rolls. PRINCE<br />
WILHELM, considered the Allied commander, is +0. Tsar Alexander actually arrived on the field<br />
in the waning stages <strong>of</strong> the battle, around 5:00pm. By then, the French were fleeing the field.<br />
TERRAIN & WEATHER<br />
The gaming table should be six feet long by four feet wide, laid out according to the<br />
accompanying map. Urban areas <strong>of</strong>fer +1 advantages to defending units in melee and a -1<br />
benefit when under fire. Movement along roads <strong>of</strong>fers normal movement benefits, unless rain<br />
occurs (see Scenario Rule #2). The weather is cool and overcast.<br />
DEPLOYMENT<br />
Units set up according to the accompanying map, in any formation they choose. Commanders<br />
must be deployed within 12 inches <strong>of</strong> their commands.<br />
Prince WILHELM begins on the field with his advance guard, as well as PAHLEN'S Russians<br />
and NOSTITZ'S Austrians. Though not technically the overall commander, the prince did act as<br />
the de facto allied commander for the battle. GALLITZIN arrives at 2:00pm (Turn 5) from point<br />
"B".<br />
According to Scenario Rule #3, the retreating French troops north <strong>of</strong> the battle may appear from<br />
in the afternoon. If the appropriate D6 roll is made, PACTHOD appears within 6" <strong>of</strong> point "A"<br />
with infantry in square formation. Units in square may move up to 3" a turn. VASSILCHIKOV<br />
also appears the same turn in hot pursuit, but only two <strong>of</strong> his four units may enter per turn.<br />
SCALE<br />
Each infantry stand represents 360 soldiers, each cavalry stand 180 troopers, and artillery<br />
stands a battery <strong>of</strong> 8-12 guns. Ground scale is one inch to 150 yards.<br />
Notes on Sources<br />
As a small engagement in the waning weeks <strong>of</strong> the Napoleonic Wars, <strong>Fere</strong> <strong>Champenoise</strong> is<br />
difficult to research. The battle is <strong>of</strong>ten mentioned in passing, but rarely in detail. And those<br />
sources which do exist tend to disagree about some important details. Digby Smith, for<br />
instance, says that Marmont's small "corps" had 11,000 men under arms, while Houssaye puts<br />
the number closer to 6,000. This scenario averages the numbers provided by all sources.<br />
Ground scale for the map is verified by Google Maps and Alison's Atlas. For narratives, see<br />
Digby Smith, Charge! (2007), Francis L. Petre's Napoleon at Bay, 1814 (1914) and Henry<br />
Houssaye, Napoleon and the Campaign <strong>of</strong> 1814 (1914), trans. RS McClintock.
French Order <strong>of</strong> <strong>Battle</strong><br />
MARMONT & MORTIER<br />
IV Corps & Young Guard<br />
MORTIER Guard Corps ldr MARMONT IV Corps ldr<br />
Christiani E 6/-/2 Sk Middle Guard Richard R 5/4/2 line<br />
Friant E 6/5/2 Sk Young Guard Lagrange R -/5/2 line<br />
Charpentier E 6/5/2 Sk Young Guard Arrighi C -/6/3 Paris depot<br />
Light Foot Artillery #1 & 2 Light Foot Artillery #6 & 7<br />
Heavy Foot Artillery #3 & 4 Heavy Foot Artillery #8<br />
BELLIARD Cavalry Corps ldr<br />
Roussel 6th Hvy Cav. Div. ldr (POSSIBLE ARRIVAL)<br />
Sparre R 6/5/2 HC dragoons Pacthod division ldr<br />
Rigau R 6/5/2 HC dragoons Delort C -/6/3 National Guard<br />
Amey C -/6/3 National Guard<br />
Merlin R 5/4/3 LC chasseurs<br />
Bordesoulle R 5/4/2 HC cuirassiers<br />
Light Horse Artillery Reserve #5<br />
Allied Order <strong>of</strong> <strong>Battle</strong><br />
SCHWARZENBERG<br />
ARMY OF BOHEMIA, Elements<br />
WILHELM <strong>of</strong> Württemberg IV Corps ldr GALLITZIN Guard Cavalry Corps ldr<br />
Prince Adam Advance Guard Div. ldr Depreradovich 1st Cuirassier Div. ldr<br />
Walseban E 5/4/3 LC hussars Arseniev I E 4/-/2 HC chevalier guards<br />
Jett E 5/4/3 LC mounted jagers Rosen E 4/-/2 HC cuirassiers<br />
Light Horse Artillery #1<br />
Kretov 2nd Cuirassier Div. ldr<br />
Leontiev E 4/-/2 HC cuirassiers<br />
Pahlen cav. div. ldr (from VI Corps) Stahl II E 4/-/2 HC cuirassiers<br />
Rhudiger R 5/4/2 LC hussars<br />
Dechterev R 5/4/2 LC hussars Guard Light Horse Artillery Reserve #4 & 5<br />
Lissanewitz R 4/3/2 LC uhlans<br />
Vlassov C 5/4/3 LC cossacks<br />
Light Horse Artillery #2 & 3<br />
(POSSIBLE ARRIVAL)<br />
von NOSTITZ Austrian Cav. ldr Vassilchikov cavalry corps ldr<br />
Klebelsberg E 5/3/2 LC hussars Landskoi E 7/5/3 LC hussars<br />
Lederer E -/4/2 LC uhlans Pantchalidzev R 6/4/3 HC dragoons<br />
Karpov II C 6/5/4 LC cossacks<br />
Light Horse Artillery #6
MAP & DEPLOYMENT