UNIVERSAL 10 in 1 - Ruwido
UNIVERSAL 10 in 1 - Ruwido
UNIVERSAL 10 in 1 - Ruwido

You also want an ePaper? Increase the reach of your titles
YUMPU automatically turns print PDFs into web optimized ePapers that Google loves.
GB<br />
USER MANUAL<br />
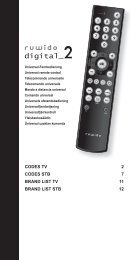
RC <strong>10</strong> - <strong>UNIVERSAL</strong> REMOTE CONTROL<br />
Thank you for hav<strong>in</strong>g purchased our new RC <strong>10</strong> remote control.Your RC <strong>10</strong> is powered by 2 type<br />
"AAA" batteries (not <strong>in</strong>cluded) and can be used for the remote control of up to <strong>10</strong> different devices,<br />
<strong>in</strong>clud<strong>in</strong>g TV, video recorder, DVD player, satellite receiver or cable box, CD player, tuner (radio), tape<br />
recorder and amplifier. By us<strong>in</strong>g the AUX option, you can also control a second TV set, video recorder,<br />
satellite receiver, cable box, CD player, tuner, tape recorder or amplifier.<br />
Easy SET-UP to operate your TELEVISION<br />
1. Insert 2 new alkal<strong>in</strong>e 1.5V batteries AAA/LR03 <strong>in</strong>to the back of your RC <strong>10</strong>; Follow the mark<strong>in</strong>gs <strong>in</strong><br />
the battery compartment.<br />
2. Switch on your TELEVISION.<br />
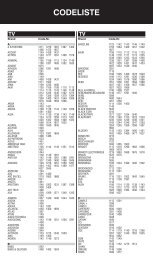
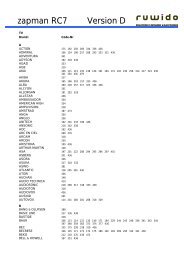
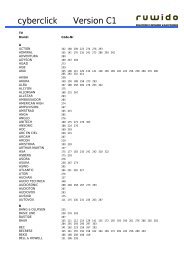
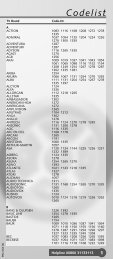
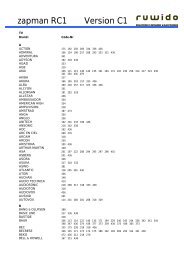
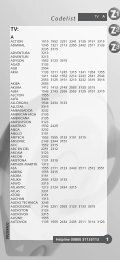
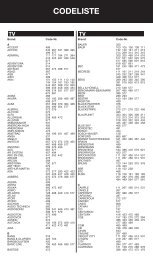
3. Look for the brand name of your TELEVISION (e.g. Sony) on the attached list with codes.<br />
4. Next to the brand name you will f<strong>in</strong>d one or more 3-digit code numbers which have to be entered<br />
<strong>in</strong>to your RC <strong>10</strong> remote control.<br />
5. Press the TV key on your RC <strong>10</strong> (for about 5 seconds) until the LED flashes twice.<br />
6. Enter the first 3-digit code from the list (e.g. 3 0 8 for Sony) with the number keys on<br />
your RC <strong>10</strong>.<br />
7. The LED will flash twice to <strong>in</strong>dicate that the code has been accepted.<br />
8. Aim your RC <strong>10</strong> at your TELEVISION and press the key.Your RC <strong>10</strong> is set up correctly if<br />
your TELEVISION switches off.<br />
9. If your TELEVISION does not react and/or it operates <strong>in</strong>correctly, repeat step 3. to step 8. by<br />
enter<strong>in</strong>g the next 3-digit code from the list.<br />
<strong>10</strong>. If none of the 3-digits codes of this form operates your TELEVISION properly, use the ”Search<br />
Method” of your RC <strong>10</strong> remote control.<br />
Easy SET-UP to operate your VIDEO RECORDER<br />
The set-up to operate your VIDEO RECORDER is similar to the set-up procedures for your television<br />
set. Follow the steps 1. until step <strong>10</strong>. by us<strong>in</strong>g the VCR key on your RC <strong>10</strong> and read<strong>in</strong>g the word VIDEO<br />
RECORDER replac<strong>in</strong>g the word TELEVISION.<br />
Easy SET-UP to operate your SATELLITE RECEIVER or CABLE BOX<br />
The set-up to operate your SATELLITE RECEIVER or CABLE BOX is similar to the set-up procedures<br />
for your television set. Follow the steps 1. until step <strong>10</strong>. by us<strong>in</strong>g the SAT key on your RC <strong>10</strong> and<br />
read<strong>in</strong>g the word SATELLITE RECEIVER / CABLE BOX replac<strong>in</strong>g the word TELEVISION.<br />
Easy SET-UP for the control of your DVD PLAYER<br />
To programme the remote control to operate your DVD PLAYER, proceed as described for the<br />
DVD<br />
television set. Complete steps 1 to <strong>10</strong> us<strong>in</strong>g the AUX key on your RC <strong>10</strong>. For TV, simply read DVD<br />
PLAYER.<br />
Easy SET-UP to operate your CD-PLAYER<br />
The set-up to operate your CD-PLAYER is almost similar to the set-up procedures for your television<br />
set:<br />
1. Insert 2 new alkal<strong>in</strong>e 1.5V batteries AAA/LR03 <strong>in</strong>to the back of your RC <strong>10</strong>; Follow the mark<strong>in</strong>gs <strong>in</strong><br />
the battery compartment.<br />
2. Switch on your CD-PLAYER.<br />
3. Look for the brand name of your CD-PLAYER (e.g. Sony) on the attached list with codes.<br />
4. Next to the brand name you will f<strong>in</strong>d one or more 3-digit code numbers which have to be entered<br />
<strong>in</strong>to your RC <strong>10</strong> remote control.<br />
5. Press the /SHIFT key on your RC <strong>10</strong>.<br />
6. Press the CD/ TV key (for about 5 seconds) until the LED flashes twice.<br />
7. Enter the first 3-digit code from the list (e.g. 8 4 2 for Sony) with the number keys on<br />
your RC <strong>10</strong>.<br />
8. The LED will flash twice to <strong>in</strong>dicate that the code has been accepted.<br />
9. Aim your RC <strong>10</strong> at your CD-PLAYER and press the key.Your RC <strong>10</strong> is set up correctly if<br />
your CD-PLAYER switches off.<br />
<strong>10</strong>. If your CD-PLAYER does not react and/or it operates <strong>in</strong>correctly, repeat step 3. to step 9. by<br />
enter<strong>in</strong>g the next 3-digit code from the list.<br />
11. If none of the 3-digits codes of this form operates your CD-PLAYER properly, use the ”Search<br />
Method” of your RC <strong>10</strong> remote control.<br />
Easy SET-UP to operate your TUNER<br />
The set-up to operate your TUNER is similar to the set-up procedures for your CD-Player. Follow the<br />
steps 1. until step <strong>10</strong>. by us<strong>in</strong>g the TUNER/ SAT<br />
key on your RC <strong>10</strong> and read<strong>in</strong>g the word TUNER<br />
replac<strong>in</strong>g the word CD-PLAYER.<br />
Easy SET-UP to operate your TAPE RECORDER<br />
The set-up to operate your TAPE RECORDER is similar to the set-up procedures for your CD-Player.<br />
Follow the steps 1. until step <strong>10</strong>. by us<strong>in</strong>g the TAPE/ VCR key on your RC <strong>10</strong> and read<strong>in</strong>g the word<br />
TAPE RECORDER replac<strong>in</strong>g the word CD-PLAYER.