You also want an ePaper? Increase the reach of your titles
YUMPU automatically turns print PDFs into web optimized ePapers that Google loves.
IMPORTER<br />
Comercializadora Thomson de México, S.A. de C.V.<br />
Miguel de Cervantes Saavedra 57<br />
Col. Ampliación Granada<br />
C.P. 11529 Mexico D.F.<br />
Telefono: (55)25 81 53 20<br />
RFC: CTM-980723-KS5<br />
0151<br />
EXPORTER<br />
Thomson multimedia Inc.<br />
P.O. Box 1976<br />
Indianapolis, IN 46206-1976<br />
© 2002 Thomson multimedia Inc.<br />
Trademark(s) ® Registered<br />
Marca(s) ® Registrada(s)<br />
Marque(s) ® Deposée(s)<br />
55570940 (EN/F/E)<br />
www.rca.com<br />
www.rca.com/LatinAmerica<br />
Printed In China / Impreso en China<br />
POWERED<br />
SOUND SYSTEM<br />
ON<br />
STANDBY<br />
L<br />
GAME<br />
•MP3•<br />
R<br />
IR SENSOR<br />
STANDBY<br />
SOURCE TIMER<br />
DIMMER•DEMO CLOCK<br />
CD DISPLAY<br />
DECK<br />
SIMU L TAN E O U S PLAY AN D LOA D S Y STEM<br />
1<br />
PRESET EQ<br />
DIGITAL TUNING<br />
PLAYBACK/ RECORD PLAYBACK<br />
AUTOMATIC RECORD LEVEL • AUTO STOP MECHANISM<br />
ONE TOUCH RECORDING<br />
5 DISC CHANGER<br />
PROG•SET BAND<br />
AUTO PROG<br />
CD-R / RW COMPATIBLE<br />
BASS BOOST<br />
DECK<br />
TUNE•PRESET<br />
REPEAT<br />
2<br />
CONTINUOUS PLAY 2 > 1<br />
TAPE DUBBING 2 > 1<br />
OPEN • CLOSE<br />
VOLUME CONTROL<br />
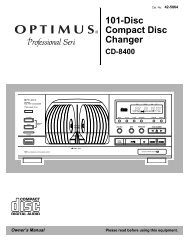
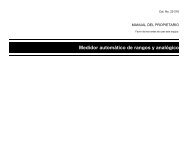
<strong>RS2620</strong><br />
It is important to read this instruction book prior to using your new product for the first time.<br />
Es importante leer este manual antes de usar por vez primera su euipo.<br />
DISC<br />
SKIP<br />
POWERED<br />
SOUND SYSTEM<br />
u s e r m a n u a l
EN<br />
FCC Information<br />
FCC Information<br />
This device complies with Part 15 of the FCC Rules.<br />
Operation is subject to the following two conditions: (1)<br />
This device may not cause harmful interference, and (2)<br />
this device must accept any interference received,<br />
including interference that may cause undesired operation.<br />
In accordance with FCC requirements, changes or modifications<br />
not expressly approved by Thomson multimedia<br />
Inc. could void the user’s authority to operate this<br />
product.<br />
This device generates and uses radio frequency (RF)<br />
energy, and if not installed and used properly, this<br />
equipment may cause interference to radio and television<br />
reception.<br />
If this equipment does cause interference to radio or<br />
television reception (which you can determine by<br />
unplugging the unit), try to correct the interference by<br />
one or more of the following measures:<br />
• Re-orient the receiving antenna (that is, the antenna<br />
for the radio or television that is "receiving" the interference).<br />
• Move the unit away from the equipment that is<br />
receiving interference.<br />
• Plug the unit into a different wall outlet so that the<br />
unit and the equipment receiving interference are on<br />
different branch circuits.<br />
If these measures do not eliminate the interference,<br />
please consult your dealer or an experienced radio/television<br />
technician for additional suggestions. Also, the<br />
Federal Communications Commission has prepared a<br />
helpful booklet, "How To Identify and Resolve <strong>Radio</strong> TV<br />
Interference Problems." This booklet is available from<br />
the U.S. Government Printing Office, Washington, DC<br />
20402. Please specify stock number 004-000-00345-4<br />
when ordering copies.<br />
This product complies with DHHS Rules 21 CFR<br />
Subchapter J. Applicable at the date of manufacture.<br />
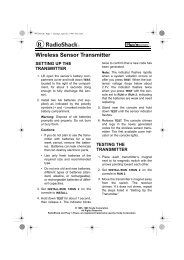
Have a Blast- Just Not in Your<br />
Eardrums<br />
Make sure you turn down the volume<br />
on the unit before you put on headphones.<br />
Increase the volume to the<br />
desired level only after headphones<br />
are in place.<br />
Technical specification<br />
Product: 5CD Audio System<br />
Brand: RCA<br />
Model: <strong>RS2620</strong><br />
Electrical Consumption:<br />
Power Supply: 120V~60Hz<br />
Power consumption: 80 Watts<br />
IMPORTER<br />
Comercializadora Thomson de México, S.A. de C.V.<br />
Miguel de Cervantes Saavedra 57<br />
Col. Ampliación Granada<br />
C.P. 11529 Mexico D.F.<br />
Telefono: (55)25 81 53 20<br />
RFC: CTM-980723-KS5<br />
For Your Safety<br />
The AC power plug is polarized<br />
(one blade is wider than the<br />
other) and only fits into AC power<br />
outlets one way. If the plug won’t<br />
go into the outlet completely, turn<br />
the plug over and try to insert it<br />
the other way. If it still won’t fit, contact a qualified<br />
electrician to change the outlet, or use a different one.<br />
Do not attempt to bypass this safety feature.<br />
CAUTION: TO PREVENT ELECTRIC SHOCK, MATCH<br />
WIDE BLADE OF PLUG TO WIDE SLOT, FULLY<br />
INSERT.<br />
For Your Records<br />
In the event that service should be required, you may<br />
need both the model number and the serial number. In<br />
the space below, record the date and place of purchase,<br />
and the serial number:<br />
Model No.<br />
Remote Control No.<br />
Date of Purchase<br />
Place of Purchase<br />
Serial No.<br />
Service Information<br />
This product should be serviced only by those specially<br />
trained in appropriate servicing techniques. For instructions<br />
on how to obtain service, refer to the warranty<br />
included in this Guide.<br />
Safety Information<br />
THE LIGHTNING<br />
FLASH AND ARROW-<br />
HEAD WITHIN THE<br />
TRIANGLE IS A<br />
W ARNING SIGN<br />
ALERTING YOU OF<br />
"DANGEROUS<br />
VOLTAGE" INSIDE<br />
THE PRODUCT.<br />
FCC Information<br />
Safety Information<br />
CAUTION<br />
RISK OF ELECTRIC SHOCK<br />
DO NOT OPEN<br />
CAUTION: TO REDUCE THE<br />
RISK OF ELECTRIC SHOCK,<br />
DO NOT REMOVE COVER<br />
(OR BACK). NO USER-<br />
SERVICEABLE PARTS IN-<br />
SIDE. REFER SERVICING<br />
TO QUALIFIED SERVICE<br />
PERSONNEL.<br />
SEE MARKING ON BOTTOM / BACK OF PRODUCT<br />
WARNING: TO PREVENT FIRE OR ELECTRICAL<br />
SHOCK HAZARD, DO NOT EXPOSE THIS PRODUCT<br />
TO RAIN OR MOISTURE.<br />
Table of Contents<br />
Getting Started . . . . . . .2<br />
Unpacking the system . . . . . . . .2<br />
Back View . . . . . . . . . . . . . . . . . .2<br />
Installation . . . . . . . . . . . . . . . . .2<br />
General Controls . . . . . .3<br />
Main Unit . . . . . . . . . . . . . . . . . .3<br />
Remote Control . . . . . . . . . . . .4<br />
Display Settings<br />
Display . . . . . . . . . . . . . . . . . . . .5<br />
Showing Demonstration . . . . .5<br />
Display Clock / Timer . . . . . . . . .5<br />
Setting the Clock . . . . . . . . . .5<br />
Setting the Timer . . . . . . . . .5<br />
Activating the Timer . . . . . . .5<br />
Adjusting the Display Brightness<br />
. . . . . . . . . . . . . . . . . . . . . . . . . . .5<br />
Sleep Mode . . . . . . . . . . . . . . . .5<br />
Sound Features . . . . . . .6<br />
Preset Equalizer Curves . . . . . .6<br />
Creating Custom curves . . . . . .6<br />
Bass Boost . . . . . . . . . . . . . . . . . .6<br />
Muting Audio . . . . . . . . . . . . . .6<br />
CD Player<br />
Notes on CD-R/RW Disc . . . . . . .6<br />
THE EXCLAMATION<br />
POINT WITHIN THE<br />
TRIANGLE IS A<br />
WARNING SIGN<br />
ALERTING YOU OF<br />
I M P O R T A N T<br />
INSTRUCTIONS<br />
ACCOMPANYING<br />
THE PRODUCT.<br />
Loading Discs . . . . . . . . . . . . . . .6<br />
Playing Discs . . . . . . . . . . . . . . . .6<br />
Play and Load<br />
Simultaneously . . . . . . . . . . .7<br />
Skipping a Disc . . . . . . . . . . .7<br />
Searching Through a CD . . .7<br />
Shuffling the Play Order . . .7<br />
Sampling Tracks . . . . . . . . . . .7<br />
Repeat . . . . . . . . . . . . . . . . . .7<br />
Setting Up a CD Program . . .7<br />
Playing a Program List . . . . .7<br />
Displaying the Program List .7<br />
Deleting Program List . . . . . .7<br />
<strong>Radio</strong> . . . . . . . . . . . . . . .8<br />
Selecting Tuner Band . . . . . . . .8<br />
Tuning to a Station . . . . . . . . . .8<br />
Using Presets . . . . . . . . . . . . . . .8<br />
Auto Preset Programming<br />
(FM only) . . . . . . . . . . . . . . . . . . .8<br />
Manually Setting Presets . . . . .8<br />
Suppressing Stereo Signal . . . .8<br />
Tape Player<br />
Playing a Tape . . . . . . . . . . . . . .9<br />
Continuous Play . . . . . . . . . . . . .9<br />
Recording . . . . . . . . . . . . . . . . . .9<br />
From Tuner . . . . . . . . . . . . . . .9<br />
From CD . . . . . . . . . . . . . . . . .9<br />
Tape to Tape . . . . . . . . . . . . .9<br />
Troubleshooting Tips . .10<br />
Maintenance . . . . . . . .11<br />
Cleaning . . . . . . . . . . . . . . . . .11<br />
CD Player . . . . . . . . . . . . . . . . .11<br />
Tape Player . . . . . . . . . . . . . . . .11<br />
Handling CDs . . . . . . . . . . . . . .11<br />
Cleaning CDs . . . . . . . . . . . . . .11<br />
CD Lens Care . . . . . . . . . . . . . .11<br />
Important Information 12<br />
Safety Precautions . . . . . . . . .12<br />
Important Battery<br />
Information . . . . . . . . . . . . . . .12<br />
Headset Safety . . . . . . . . . . . . .12<br />
Don’t Infringe . . . . . . . . . . . . .12<br />
Technical Specification . . . . . .12<br />
Limited Warranty<br />
(U.S.) . . . . . . . . . . . . . .13<br />
Limited Warranty<br />
(Canada) . . . . . . . . . . .15<br />
1<br />
EN
EN<br />
Getting Started<br />
2<br />
Unpacking the system:<br />
You should have the following:<br />
• one main unit (with 2 main speakers);<br />
• one remote control;<br />
• one AM loop antenna;<br />
• one user’s guide;<br />
• one safety leaflet.<br />
• Owner and registration Card<br />
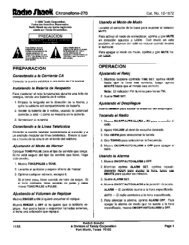
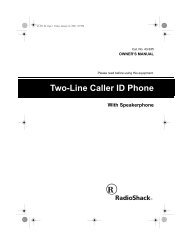
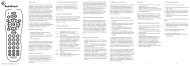
Back View<br />
~<br />
1. FM Pigtail Antenna<br />
2. AM Loop Antenna Connector<br />
3. Main Speaker Jacks<br />
Using the FM and AM Antennas<br />
Before you use your audio system, you’ll want to make<br />
sure both the FM and AM antennas are positioned properly.<br />
Uncoil the FM antenna at the back of the unit, making<br />
sure it is fully extended (you may even want to tape it<br />
to the wall behind the unit if possible. The higher the<br />
better.) You’ll also need to connect the AM antenna loop<br />
to the back of the unit if you listen to AM stations.<br />
Rotate the AM loop antenna for better reception.<br />
1<br />
3<br />
FM ANTENNA<br />
_ _<br />
R L<br />
+<br />
+<br />
MAIN SPEAKERS 6Ω<br />
AM LOOP<br />
2<br />
Connecting the Speakers<br />
Match the red wire (on the left speaker) to red terminal<br />
for the left speaker (L) on the back of the unit and the<br />
black wire (on the left speaker ) to the black terminal for<br />
left speaker (L). Follow the same procedure to connect<br />
the right (R) speaker.<br />
Speaker Wire Connection<br />
Push Speaker terminal tab<br />
down to insert wire.<br />
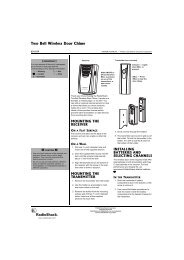
Installation<br />
To ensure sufficient ventilation, keep the spacings<br />
shown below free from other surfaces:<br />
Front View<br />
4 inches<br />
ON<br />
STANDBY<br />
Side View<br />
2<br />
inches<br />
L<br />
GAME<br />
•MP3•<br />
R<br />
IR SENSOR<br />
STANDBY<br />
SOURCE TIMER<br />
DIMMER•DEMO CLOCK<br />
CD DISPLAY<br />
5 DISC CHANGER<br />
SIMULTANEOUS PLAY AND LOAD SYSTEM<br />
PRESET EQ<br />
DIGITAL TUNING<br />
DECK 1<br />
DECK 2<br />
PLAYBACK/ RECORD PLAYBACK<br />
AUTOMATIC RECORD LEVEL • AUTO STOP MECHANISM<br />
ONE TOUCH RECORDING<br />
Release tab to lock wire in<br />
the terminal.<br />
NOTE: Make sure the insulation is completely removed from the<br />
ends of the speaker wires at all connection points.<br />
PROG•SET BAND<br />
CD-R / RW COMPATIBLE<br />
TUNE•PRESET<br />
REPEAT<br />
AUTO PROG BASS BOOST<br />
4 inches<br />
CONTINUOUS PLAY 2 > 1<br />
TAPE DUBBING 2 > 1<br />
4 inches<br />
OPEN • CLOSE<br />
DISC<br />
SKIP<br />
VOLUME CONTROL<br />
4 inches<br />
General Controls<br />
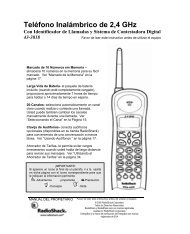
Main Unit<br />
ON<br />
STANDBY<br />
L<br />
GAME<br />
•MP3•<br />
R<br />
IR SENSOR<br />
STANDBY<br />
SOURCE<br />
DIMMER•DEMO CLOCK<br />
CD DISPLAY<br />
TIMER<br />
5 DISC CHANGER<br />
SIMULTANEOUS PLAY AND LOAD SYSTEM<br />
PRESET EQ<br />
DIGITAL TUNING<br />
DECK 1<br />
DECK 2<br />
PLAYBACK/ RECORD PLAYBACK<br />
AUTOMATIC RECORD LEVEL • AUTO STOP MECHANISM<br />
ONE TOUCH RECORDING<br />
PROG•SET BAND<br />
AUTO PROG<br />
BASS BOOST<br />
CD-R / RW COMPATIBLE<br />
TUNE•PRESET<br />
CONTINUOUS PLAY 2 > 1<br />
TAPE DUBBING 2 > 1<br />
ON/STANDBY —Turns power on or off (STANDBY<br />
mode).<br />
Tip: In STANDBY mode (press ON/STANDBY<br />
off), the system displays the time. Press<br />
ON/STANDBY to turn the system on in the<br />
previously used mode. Press CD, TAPE, TUNER<br />
or AUX (Remote Only) to select the corresponding<br />
mode. Look at the display icons to identify the<br />
current mode.<br />
GAME •MP3• L / R - Jack for auxiliary connection.<br />
PHONES — Jack for connecting headphones<br />
OPEN/CLOSE — Opens or closes the disc tray.<br />
SOURCE— Selects the CD player/ tuner/ tape player.<br />
DIMMER•DEMO/CD DISPLAY —Turns the feature<br />
demonstration on or off, adjusts display brightness,<br />
selects among displaying disc details.<br />
TIMER — Enters timer setting mode and turns the<br />
timer on/off.<br />
CLOCK —Shows clock time and enters clock setting<br />
mode.<br />
PRESET EQ —selects among the different EQ<br />
modes.<br />
REPEAT<br />
OPEN • CLOSE<br />
DISC<br />
SKIP<br />
VOLUME CONTROL<br />
DIGITAL TUNING (SKIP BACK-<br />
WARD) — Decrements radio frequency,<br />
preset down, goes to the previous CD<br />
track or setting option.<br />
DIGITAL TUNING (SKIP FOR-<br />
WARD) — Increments radio frequency,<br />
preset up, goes to the next CD track or<br />
setting option.<br />
PLAY / PAUSE — Plays or pauses<br />
CD.<br />
TUNE•PRESET — Stops CD track,<br />
Sets tune or preset mode.<br />
PROG•SET - Enters program mode<br />
for CD and Tuner; Applies new settings<br />
for Clock and Timer modes.<br />
BAND/AUTO PROG. — Changes<br />
between FM and AM tuner bands.<br />
Enters auto preset program in FM<br />
mode.<br />
BASS BOOST —Turns BASS BOOST on<br />
or off.<br />
REPEAT - Selects among repeat<br />
modes.<br />
DISC SKIP — Skips to the next CD in the tray<br />
VOLUME UP/DOWN —Increases/ decreases volume.<br />
Tape Player<br />
RECORD<br />
PLAY<br />
REWIND<br />
FAST-FORWARD<br />
STOP/EJECT<br />
PAUSE<br />
3<br />
EN
General Controls Display Settings<br />
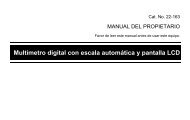
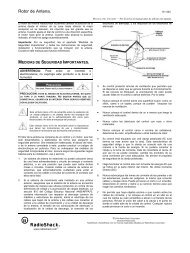
EN Remote Control<br />
Display<br />
EN<br />
CD<br />
PREV<br />
REV<br />
ON<br />
TUNER<br />
SOURCE<br />
TAPE<br />
REPEAT<br />
E Q B.BOOST<br />
VOL<br />
VOL<br />
DN•PRESET•UP<br />
AUX<br />
DEMO/<br />
DIMMER<br />
OPEN/CLOSE STOP<br />
FM ST.<br />
DISC SKIP<br />
INTRO<br />
SLEEP<br />
NEXT<br />
FWD<br />
Battery Size:<br />
“AAA” or “UM-4” or “R03”<br />
ON —Turns power on or off from STANDBY mode.<br />
CD — Selects CD player and change CD display information in CD<br />
playing mode.<br />
TUNER —Selects radio tuner and change radio band in Tuner mode.<br />
TAPE — Selects tape player.<br />
AUX — Selects Aux; turns the system on.<br />
EQ — Selects equalizer presets.<br />
B BOOST—Turns Bass Boost on or off.<br />
DEMO/DIMMER —Turns the feature demonstration on or off; adjusts<br />
display brightness.<br />
VOL+ or VOL- — Increases/ decreases volume.<br />
PLAY/PAUSE — Plays and pauses current CD.<br />
NEXT /FWD — In CD mode - Skips forward to the next CD<br />
track;<br />
In Tuner mode - Tunes up radio frequency.<br />
PREV /REV — In CD mode - Skips backwards to the previous<br />
CD track;<br />
In Tuner mode - Tunes down radio frequency.<br />
OPEN/CLOSE — Opens and closes CD disc tray.<br />
STOP —Stops playing CD.<br />
REPEAT — Repeats a track, CD, or all CDs.<br />
MUTE - mutes sound.<br />
SHUFFLE — Turns on/off random playback.<br />
FM ST. - Toggles between FM stereo and mono.<br />
DISC SKIP — Skips to next CD.<br />
INTRO - Turns INTRO mode on or off to play the first 10 seconds of<br />
each track.<br />
PRESET UP/DN — Selects next/ previous preset station.<br />
SLEEP - selects the time interval in minutes before the unit turns off.<br />
NOTE: Cassette functions can not be operated from the remote<br />
control.<br />
Installing Batteries<br />
The remote control must be inserted with 2 “AAA” or “R3” or “UM 4”<br />
batteries prior to use. Follow the steps below to ensure correct installation.<br />
1. Open the battery compartment door (located at the back of the<br />
remote control) by sliding the cover out.<br />
2. Before inserting the batteries, observe the polarities (that is, + and -)<br />
of the battery then relate the polarities to the engraved diagram inside<br />
the battery compartment. Now insert the batteries.<br />
3. After installation of the batteries, place the lit to cover the batteries.<br />
Lightly push it closed with a snap.<br />
Showing Demonstration<br />
Not operational in CD mode. Press<br />
DIMMER•DEMO/CD DISPLAY to turn on/off<br />
demonstration mode. The demonstration scrolls<br />
through all display operations.<br />
Display Clock / Timer<br />
Setting the Clock<br />
1. Press and hold CLOCK until the hour flashes on<br />
the display.<br />
2. Press DIGITAL TUNING or to set the<br />
hour and then press CLOCK to shift to minute<br />
digits.<br />
3. Press DIGITAL TUNING or to set the<br />
minute.<br />
4. Press PROG•SET to save settings and STOP to<br />
quit setting.<br />
Note: When system is ON, you can press CLOCK to<br />
display the current time for about 2 seconds.<br />
Setting the Timer<br />
1. Press and hold TIMER until the ON appear with<br />
the hour flashing ( ON - timer on time )<br />
2. For setting time, press DIGITAL TUNING or<br />
to set the hour and then press TIMER to shift<br />
to minute digits.<br />
3. Press DIGITAL TUNING or to set the<br />
minute.<br />
4. Press TIMER to change to OF (timer off time) with<br />
hour flashing. Repeat steps 2 & 3 for timer off<br />
time setting.<br />
5. Press TIMER to select source. Press DIGITAL<br />
TUNING or to select TUNER, TAPE or CD.<br />
6. Press TIMER to set volume. Press VOLUME<br />
CONTROL up or down to set desired volume level.<br />
7. Press PROG•SET to save settings or STOP to quit<br />
setting.<br />
Activating the Timer<br />
Press and release TIMER to turn on/off the timer. The<br />
timer is active when the clock icon is lit.<br />
Adjusting the Display Brightness<br />
1. Press and hold DIMMER•DEMO/CD DISPLAY for<br />
more than 2 seconds.<br />
2. While the dimmer is<br />
displayed, press and DIMM 2<br />
release<br />
DIMMER•DEMO/CD DISPLAY<br />
repeatedly to select the desired level (DIMM 1 - 3).<br />
Sleep Mode<br />
You can select the time interval in minutes before the<br />
unit turns off automatically. Press SLEEP on the<br />
remote to select among OFF, 90, 60, 45, 30, 15 and 5<br />
minutes. (Remote Only)<br />
4 5<br />
BASS<br />
SURROUND
Sound Features CD Player<br />
EN Preset Equalizer Curves<br />
BASS BOOST<br />
Play and Load Simultaneously Setting Up a CD Program<br />
EN<br />
Press PRESET EQ on the main unit or EQ on the<br />
remote to toggle among FLAT, ROCK, POP, JAZZ,<br />
CLASS and CUSTOM. The display shows the selection<br />
briefly.<br />
Creating Custom Curve<br />
1. Press PRESET EQ to select CUSTOM mode.<br />
2. While "CUSTOM" is displayed, press DIGITAL<br />
TUNING / to cycle among displayed<br />
bass- and treble - range levels.<br />
3. While BAS or TRE is<br />
displayed, adjust<br />
VOLUME CONTROL to BAS+08<br />
set the associated gain<br />
between -10 - +10.<br />
CD Player<br />
CD-R / RW This unit is compatible with<br />
CD-RW/ CD-R discs for playback.<br />
Notes on CD-R/RW Disc:<br />
• Do not affix any type of labels to either side<br />
(recordable or labeled side) of a CD-R/RW disc<br />
as this may result in the unit malfunctioning.<br />
• To avoid damages to the CD-R/RW disc, do not<br />
open the disc compartment door while the<br />
disc is being read.<br />
• Do not load an unrecorded CD-R/RW disc into<br />
the unit. This may take a longer time to read<br />
the disc.<br />
• Playback capability for CD-RW discs may<br />
vary due to variations in the quality of<br />
the CD-RW disc and the recorder used to<br />
create the disc.<br />
Press BASS BOOST to turn on/off boosting the bass<br />
frequency.<br />
Muting Audio<br />
Press MUTE on the remote to cut the sound.<br />
(Remote Only)<br />
Loading Discs<br />
1. Press SOURCE repeatedly to select CD mode.<br />
2. Press OPEN/CLOSE to open the drawer.<br />
3. Insert up to five discs with label face up. (Press<br />
DISC SKIP to rotate the disc carrier.)<br />
4. Press OPEN/CLOSE to close the drawer.<br />
Loaded disc position icon lights.<br />
Playing Discs<br />
MUTE<br />
• Press PLAY/PAUSE to begin or pause play,<br />
and STOP to stop play.<br />
• Press SKIP BACKWARD / SKIP FORWARD<br />
to select a specific track.<br />
Tip: While playing a CD, press and hold SKIP-<br />
FORWARD or BACKWARD for more than 2 seconds<br />
to search through the CD.<br />
1. Press OPEN/CLOSE to open the tray while a<br />
CD is playing<br />
2. Load/change discs for available trays by pressing<br />
DISC SKIP.<br />
3. Press OPEN/CLOSE to close the tray.<br />
Skipping a Disc<br />
Press DISC SKIP.<br />
Searching Through a CD<br />
Press and hold SKIP BACKWARD / SKIP<br />
FORWARD to search through a CD while it is<br />
playing.<br />
Shuffling the Play Order<br />
Press SHUFFLE to turn on/off the playing of<br />
tracks in random order. (Remote Only)<br />
Sampling Tracks<br />
Press INTRO to play the first 10 seconds of each track<br />
on the current disc, all discs in the tray, or turn INTRO<br />
mode off. (Remote Only)<br />
Note: You may also press REPEAT to select 1 disc<br />
or all discs before activating INTRO & SHUFFLE<br />
functions<br />
6 7<br />
Repeat<br />
Press REPEAT to repeat the current track, current<br />
disc, all discs, or turn REPEAT mode off.<br />
You can program the CD player to play up to any 32<br />
tracks on the CDs in the tray.<br />
1. While the CD player is stopped, press PROG•SET<br />
to enter program mode. The system displays the<br />
next available program number: “- - P:01,” with<br />
“- -” flashing, prompts you for the first track in<br />
the program list.<br />
5 P:01<br />
2. Press SKIP BACKWARD / SKIP FORWARD<br />
to select a track (press DISC SKIP to select a track<br />
from a different disc).<br />
3. Immediately press PROG•SET to assign the<br />
selected track to the program number. After 3<br />
seconds, you are prompted for the next track in<br />
the program list.<br />
(In CD program mode, PROG icon will be lit.)<br />
Playing a Program List<br />
While in PROGRAM mode, press PLAY/PAUSE .<br />
Displaying the Program List<br />
1. While the CD player is stopped, press PROG•SET<br />
to enter PROGRAM mode.<br />
2. Press PROG•SET repeatedly to list each track<br />
assignment in the program list.<br />
Deleting Program List<br />
While in PROGRAM mode, press and hold STOP for 3<br />
seconds. They system displays the message CLEAR.<br />
Tips:<br />
• You can create a program of up to 32 tracks.<br />
• Press CD DISPLAY repeatedly to view elapsed<br />
track time, track number, track remain time and<br />
disc remain time.<br />
Caution: Do not push to force closing of the tray<br />
during CD playback or tray opening.
EN<br />
<strong>Radio</strong><br />
8<br />
Selecting Tuner Band<br />
1. Press SOURCE to select TUNER.<br />
2. Press BAND to select between AM or FM radio<br />
band.<br />
Tip: Your audio system has 32 preset stations.<br />
Tuning to a Station<br />
Press SKIP BACKWARD / SKIP FORWARD to<br />
select frequencies.<br />
Using Presets<br />
87.50 MHz<br />
The tuner can be in either TUNE or PRESET mode.<br />
When in PRESET mode, the PROG light is on.<br />
• Press TUNE•PRESET to toggle TUNE and PRESET<br />
mode.<br />
• Press SKIP BACKWARD or SKIP FORWARD<br />
on the main system or PRESET UP or DOWN on<br />
the remote control to access the previous or next<br />
preset station. The display first shows the preset<br />
program number and after a few seconds, the<br />
frequency will be displayed. (FMPR:01 is FM<br />
preset 1)<br />
PR:01<br />
Auto Preset Programming<br />
(FM only)<br />
Press and hold BAND button for 2 seconds to scan<br />
stations in FM band. The stations will then be stored<br />
as preset channels. A maximum of 32 stations can be<br />
stored. Beware of your preset channels being erased<br />
accidentally because the scanning and storing process<br />
is automatic upon pressing the button. You can stop<br />
the automatic scan by pressing any button, but the<br />
erased stations cannot be recovered.<br />
AUTO<br />
Manually Setting Presets<br />
1. Press TUNE•PRESET button to enter TUNE mode.<br />
2. Press SKIP BACKWARD / SKIP FORWARD<br />
to access the desired frequency.<br />
3. Press the PROG•SET button once.<br />
4. The most recently accessed program location will<br />
be displayed.<br />
5. If a different program location is preferred, press<br />
SKIP BACKWARD / SKIP FORWARD<br />
to move to the desired preset number (1-32).<br />
6. Press PROG•SET to store the selected frequency<br />
at that preset.<br />
Suppressing Stereo Signal<br />
Press FM ST. to toggle between FM mono and stereo<br />
for stereo FM stations. (Remote Only)<br />
Tape Player<br />
CD DISPLAY<br />
Tape Player<br />
RECORD<br />
PLAY<br />
REWIND<br />
FAST FORWARD<br />
STOP/EJECT<br />
PAUSE<br />
Playing a Tape<br />
DECK 1 DECK 2<br />
PLAYBACK/ RECORD PLAYBACK<br />
AUTOMATIC RECORD LEVEL • AUTO STOP MECHANISM<br />
ONE TOUCH RECORDING<br />
CONTINUOUS PLAY 2 > 1<br />
TAPE DUBBING 2 > 1<br />
Tip: You can play a tape from either deck.<br />
VOLUME CONTROL<br />
1. Press SOURCE repeatedly to select TAPE.<br />
2. Press STOP/EJECT to open the cassette door.<br />
3. Insert a tape into the door and push the door<br />
closed.<br />
4. Press REWIND/FAST FORWARD to position the<br />
tape to the desired starting position. (Deck 1<br />
Only)<br />
5. Press PLAY to begin playback.<br />
AUTO PROG<br />
BASS BOOST<br />
Continuous Play<br />
1. Insert a tape into deck 2 and start playback.<br />
2. Insert a tape into deck 1 and press PLAY and<br />
PAUSE together.<br />
3. When the tape in deck 2 finishes playback, PAUSE<br />
at deck 1 will be released automatically and start<br />
playback.<br />
Recording<br />
From Tuner<br />
1. Insert a tape into deck 1.<br />
2. Press SOURCE repeatedly to select TUNER and<br />
press BAND to access the desired radio band.<br />
3. Tune to the station to be recorded.<br />
4. Press RECORD to begin recording.<br />
5. Press STOP to end recording.<br />
From CD<br />
1. Insert a tape into deck 1.<br />
2. Press SOURCE repeatedly to select CD.<br />
3. Insert the disc(s) to be recorded.<br />
4. Select the track, CD, or program to be recorded.<br />
5. Press RECORD to begin recording when CD<br />
begins to play.<br />
6. Press STOP to end recording.<br />
Tape to Tape<br />
1. Insert the destination tape in deck 1.<br />
2. Insert the source tape into deck 2.<br />
3. Press PAUSE and then RECORD on deck 1.<br />
4. Press PLAY on deck 2. The playback and<br />
recording start simultaneously.<br />
9<br />
EN
Troubleshooting Tips<br />
EN Problem Solution<br />
Problem Solution<br />
Handling CDs<br />
before performing any maintenance.<br />
EN<br />
System will<br />
not turn on<br />
No sound<br />
Poor radio<br />
reception<br />
CD does not<br />
play<br />
CD sound<br />
skips<br />
• Check power cord for a secure<br />
connection.<br />
• Unplug the unit for a moment, and<br />
then plug into power source again.<br />
• Check the outlet by plugging in<br />
another device.<br />
• Increase the volume setting.<br />
• Check connection to speakers.<br />
• Check that you have selected the<br />
appropriate function: CD, TAPE, Tuner.<br />
• Make sure mute is off.<br />
• Make sure headphones are not<br />
plugged in.<br />
• Check antenna connection.<br />
• Move antenna.<br />
• Turn off nearby electrical appliances,<br />
such as hair dryer, vacuum cleaner,<br />
microwave, fluorescent lights.<br />
• Check that CD is in the tray.<br />
• Check that CD label is facing up.<br />
• Check that PAUSE mode is not on.<br />
• Check that CD function is selected.<br />
• Use CD lens cleaner.<br />
• Clean the disc.<br />
• Try another CD.<br />
• Clean the disc.<br />
• Check disc for warping, scratches, or<br />
other damage.<br />
• Check if something is causing the<br />
system to vibrate. If so, move the<br />
system.<br />
• Make sure the speakers are at least 3<br />
feet away or on a different surface<br />
from the main unit.<br />
CD button<br />
will not<br />
respond, or<br />
does not<br />
change<br />
discs when<br />
you press<br />
DISC SKIP<br />
Distorted or<br />
noisy tape<br />
recordings<br />
Remote<br />
control<br />
does not<br />
work<br />
• Switch to another function (TAPE,<br />
Tuner) and then back to CD.<br />
• Inspect the tape head, clean it if<br />
necessary.<br />
• Check that the batteries are properly<br />
installed.<br />
• Replace weak batteries.<br />
• Check the system is plugged into<br />
power source.<br />
• Point the remote directly at the<br />
system’s front panel.<br />
• Move closer to the system.<br />
• Remove any obstacles between the<br />
remote and the system.<br />
Maintenance<br />
Disconnect the audio system from the power source<br />
Cleaning<br />
Clean the exterior of the system using a soft dust<br />
cloth.<br />
CD Player<br />
CAUTION! This system operates with a laser. It must<br />
be opened by only a qualified technician.<br />
Tape Player<br />
To prevent deterioration of sound quality, periodically<br />
open the door of each deck and clean the magnetic<br />
heads, pinch roller, and capstan with a cotton bud<br />
dipped in alcohol. Also, demagnetize the head by<br />
playing a demagnetizing cassette (available through<br />
an audio equipment store).<br />
To protect recordings on<br />
one or both sides of a tape,<br />
Side A Protection<br />
remove the corresponding<br />
tab. If you later want to<br />
record on the tape, affix a<br />
piece of adhesive tape over the hole.<br />
Quit Slacking - A little bit of slack<br />
in your tapes can cause scratches<br />
on the tape, or worse yet, the<br />
tape could break. If you notice<br />
some slack in the tape, use a<br />
pencil to tighten it up before<br />
you insert it.<br />
• Do not touch the signal surfaces. Hold CDs by the<br />
edges, or by one edge and the hole. Do not affix<br />
labels or adhesive tapes to the label surfaces. Do not<br />
scratch or damage the label. CDs rotate at high<br />
speeds inside the player. Do not use damaged<br />
(cracked or warped) CDs<br />
Cleaning CDs<br />
• Dirty CDs can cause poor sound quality. Always<br />
keep CDs clean by wiping them gently with a soft<br />
cloth from the inner edge toward the outer perimeter.<br />
• If a CD becomes dirty, wet a soft cloth in water,<br />
wring it out well, wipe the dirt away gently, and<br />
then remove any water drops with a dry cloth.<br />
• Do not use record cleaning sprays or antistatic<br />
agents on CDs. Also, never clean CDs with benzene,<br />
thinner, or other volatile solvents which may cause<br />
damage to disc surface<br />
CD Lens Care<br />
When your CD lens gets dirty it can also cause the<br />
system to output poor sound quality. To clean the<br />
lens you will need to purchase a CD lens cleaner<br />
which can maintain the output sound quality of<br />
your system. For instructions on cleaning the CD<br />
lens, refer to the ones accompanying the lens<br />
cleaner.<br />
10 11<br />
A<br />
A<br />
Side B Protection<br />
B
EN<br />
Important Information Limited Warranty (U.S.)<br />
12<br />
Safety Precautions<br />
• Never open the cabinet under any circumstances.<br />
Any repairs or internal adjustments should be made<br />
only by a trained technician.<br />
• Never operate this product with the cabinet<br />
removed.<br />
•Do not use your System immediately after transporting<br />
it from a cold place to a warm place, as condensation<br />
may cause the system to malfunction.<br />
• Keep your unit away from humid areas and abnormally<br />
hot places.<br />
• Do not touch the player with wet hands. If any liquid<br />
enters the player cabinet, take the player to a<br />
trained technician for inspection.<br />
• This compact disc player uses a laser to read the<br />
music on the disc. The laser mechanism corresponds<br />
to the cartridge and stylus of a record player.<br />
Although this product incorporates a laser pick-up<br />
lens, it is completely safe when operated according to<br />
directions.<br />
• Discs rotate at high speed inside the player. Do not<br />
use damaged, warped, or cracked discs.<br />
• Do not touch the pick-up lens which is located<br />
inside the disc compartment. To keep dust from collecting<br />
on the pick-up lens, do not leave the compartment<br />
door open for an extended period of time. If<br />
the lens becomes dirty, clean it with a soft brush, or<br />
use an air blower brush designed for camera lenses.<br />
• The apparatus shall not be exposed to dripping and<br />
splashing.<br />
Important Battery Information<br />
• Remove the batteries to avoid leakage if you do not<br />
use your remote control for more than one month.<br />
• Discard leaky batteries immediately as leaking batteries<br />
may cause skin burns or other personal injuries.<br />
Dispose of batteries in the proper manner, according<br />
to provincial and local regulations.<br />
• Any battery may leak electrolyte under the following<br />
circumstances:<br />
- if mixed with a different battery type,<br />
- if inserted incorrectly,<br />
- if all batteries are not replaced at the same time,<br />
- if disposed of in fire, or<br />
- if an attempt is made to charge a battery not<br />
intended to be recharged.<br />
Headset Safety<br />
• Do not play your headset at high volume.<br />
Hearing experts warn against extended high-volume<br />
play.<br />
• If you experience ringing in your ears, reduce volume<br />
or discontinue use.<br />
• You should use with extreme caution or temporarily<br />
discontinue use in potentially hazardous situations.<br />
Even if your headset is an open-air designed to let<br />
you to hear outside sounds, do not turn up the volume<br />
so high that you are unable to hear what is<br />
around you.<br />
Don’t Infringe<br />
This product should only be used for the purposes<br />
for which it is sold, that is, entertainment, violating<br />
no copyright law. Any attempts to use this product<br />
for which it is not intended is unlawful and therefore<br />
not condoned by Thomson multimedia.<br />
Technical Specification<br />
Power supply: 120V~60Hz<br />
Dimensions ( H x W x D inches):<br />
Unit size - 12.2 x 12 x 15.4<br />
Main Speaker - 12.2 x 8.5 x 7<br />
Tape deck: Response curve: 125Hz-8kHz (-5dB)<br />
CD player: Response curve (+/- 2dB): 60Hz to 15 kHz<br />
Rating Plate: Look for it at the back of the set.<br />
The descriptions and characteristics given in this document are given<br />
as a general indication and not as a guarantee. In order to provide<br />
the highest quality product possible, we reserve the right to make any<br />
improvement or modification without prior notice. The English version<br />
serves as the final reference on all products and operational<br />
details should any discrepancies arise in other languages.<br />
What your warranty covers:<br />
• Defects in materials or workmanship.<br />
For how long after your purchase:<br />
• One year from date of purchase for labor and parts<br />
• Warranty period for rental units begins with the first rental or 45 days from date of shipment to the rental<br />
firm, whichever comes first.<br />
What we will do:<br />
• Pay any Authorized RCA Audio Service Center the labor charges to repair your unit.<br />
• Pay any Authorized RCA Audio Service Center for the new or, at our option, refurbished replacement parts<br />
required to repair your unit.<br />
How you get service:<br />
• Take your unit to any Authorized RCA Audio Service Center. To identify your nearest Authorized RCA Audio<br />
Service Center, ask your dealer, look in the Yellow Pages, or call 1-800-336-1900.<br />
• Show the Authorized Service Center Representative your evidence of purchase date or first rental.<br />
• Pick up your unit when repairs are completed.<br />
• Proof of purchase in the form of a bill of sale or receipted invoice which is evidence that the product is within<br />
the warranty period must be presented to obtain warranty service. For rental firms, proof of first rental is also<br />
required.<br />
What your warranty does not cover:<br />
• Customer instruction. (Your Owner’s Manual describes how to install, adjust, and operate your unit. Any<br />
additional information should be obtained from your dealer.)<br />
• Installation and related adjustments.<br />
• Signal reception problems not caused by your unit.<br />
• Damage from misuse or neglect.<br />
• Cleaning of audio heads.<br />
• Batteries.<br />
• A unit that has been modified or incorporated into other products or is used for institutional or other commercial<br />
purposes.<br />
• A unit purchased or serviced outside the U.S.A.<br />
• Acts of nature, such as but not limited to lightning damage.<br />
Product Registration:<br />
• Please complete and mail the Product Registration Card packed with your product. It will make it easier to<br />
contact you should it ever be necessary. The return of the card is not required for warranty coverage.<br />
13<br />
EN
Limited Warranty (U.S.) Limited Warranty (Canada)<br />
EN Limitation of Warranty:<br />
What your warranty covers:<br />
EN<br />
• THE WARRANTY STATED ABOVE IS THE ONLY WARRANTY APPLICABLE TO THIS PRODUCT. ALL OTHER<br />
WARRANTIES, EXPRESS OR IMPLIED (INCLUDING ALL IMPLIED WARRANTIES OF MERCHANTABILITY OR<br />
FITNESS FOR A PARTICULAR PURPOSE) ARE HEREBY DISCLAIMED. NO VERBAL OR WRITTEN INFORMA-<br />
TION GIVEN BY THOMSON MULTIMEDIA INC., ITS AGENTS OR EMPLOYEES SHALL CREATE A GUARANTY<br />
OR IN ANY WAY INCREASE THE SCOPE OF THIS WARRANTY.<br />
• REPAIR OR REPLACEMENT AS PROVIDED UNDER THIS WARRANTY IS THE EXCLUSIVE REMEDY OF THE<br />
CONSUMER. THOMSON MULTIMEDIA INC. SHALL NOT BE LIABLE FOR INCIDENTAL OR CONSEQUENTIAL<br />
DAMAGES RESULTING FROM THE USE OF THIS PRODUCT OR ARISING OUT OF ANY BREACH OF ANY<br />
EXPRESS OR IMPLIED WARRANTY ON THIS PRODUCT. THIS DISCLAIMER OF WARRANTIES AND LIMITED<br />
WARRANTY ARE GOVERNED BY THE LAWS OF THE STATE OF INDIANA. EXCEPT TO THE EXTENT PROHIB-<br />
ITED BY APPLICABLE LAW, ANY IMPLIED WARRANTY OF MERCHANTABILITY OR FITNESS FOR A PARTIC-<br />
ULAR PURPOSE ON THIS PRODUCT IS LIMITED TO THE APPLICABLE WARRANTY PERIOD SET FORTH<br />
ABOVE.<br />
14<br />
How State Law relates to warranty:<br />
• Some states do not allow the exclusion nor limitation of incidental or consequential damages, or limitations<br />
on how long an implied warranty lasts, so the above limitations or exclusions may not apply to you.<br />
• This warranty gives you specific legal rights, and you also may have other rights that vary from state to state.<br />
If you purchased your unit outside the United States:<br />
• This warranty does not apply. Contact your dealer for warranty information.<br />
Service calls which do not involve defective materials or workmanship are not covered by this warranty.<br />
Costs of such service calls are the sole responsibility of the purchaser.<br />
• Defects in materials or workmanship.<br />
For how long after your purchase:<br />
• One year from date of purchase for labor and parts<br />
• The warranty period for rental units begins with the first rental or 45 days from date of shipment to the rental<br />
firm, whichever comes first.<br />
What we will do:<br />
• Pay any Authorized RCA Audio Service Center the labor charges to repair your unit.<br />
• Pay any Authorized RCA Audio Service Center for the new or, at our option, refurbished replacement parts<br />
required to repair your unit.<br />
How you get service:<br />
• Take your unit to any Authorized RCA Audio Service Center. To identify your nearest Authorized RCA Audio<br />
Service Center, ask your dealer, look in the Yellow Pages, or call 1-800-336-1900.<br />
• Show the Authorized Service Center Representative your evidence of purchase date or first rental.<br />
• Pick up your unit when repairs are completed.<br />
• Proof of purchase in the form of a bill of sale or receipted invoice which is evidence that the product is within<br />
the warranty period must be presented to obtain warranty service. For rental firms, proof of first rental is also<br />
required.<br />
What your warranty does not cover:<br />
• Customer instruction. (Your Owner’s Manual describes how to install, adjust, and operate your unit. Any<br />
additional information should be obtained from your dealer.)<br />
• Installation and related adjustments.<br />
• Signal reception problems not caused by your unit.<br />
• Damage from misuse or neglect.<br />
• Cleaning of audio heads.<br />
• Batteries.<br />
• A unit that has been modified or incorporated into other products or is used for institutional or other commercial<br />
purposes.<br />
• A unit purchased or serviced outside Canada.<br />
• Acts of nature, such as but not limited to lightning damage.<br />
Product Registration:<br />
• Please complete and mail the Product Registration Card packed with your product. It will make it easier to<br />
contact you should it ever be necessary. The return of the card is not required for warranty coverage.<br />
15
EN<br />
Limited Warranty (Canada)<br />
16<br />
Limitation of Warranty:<br />
• THE WARRANTY STATED ABOVE IS THE ONLY WARRANTY APPLICABLE TO THIS PRODUCT. NO VERBAL<br />
OR WRITTEN INFORMATION GIVEN BY THOMSON MULTIMEDIA LTD., ITS AGENTS OR EMPLOYEES SHALL<br />
CREATE A GUARANTY OR IN ANY WAY INCREASE THE SCOPE OF THIS WARRANTY.<br />
• REPAIR OR REPLACEMENT AS PROVIDED UNDER THIS WARRANTY IS THE EXCLUSIVE REMEDY OF THE<br />
CONSUMER. THOMSON MULTIMEDIA LTD. SHALL NOT BE LIABLE FOR INCIDENTAL OR CONSEQUENTIAL<br />
DAMAGES RESULTING FROM THE USE OF THIS PRODUCT. EXCEPT TO THE EXTENT PROHIBITED BY<br />
APPLICABLE PROVINCIAL LAW, ANY IMPLIED WARRANTY OF MERCHANTABILITY OR FITNESS FOR A<br />
PARTICULAR PURPOSE ON THIS PRODUCT IS LIMITED TO THE APPLICABLE WARRANTY PERIOD SET<br />
FORTH ABOVE.<br />
How Provincial Laws relates to warranty:<br />
• This warranty gives you specific legal rights which are in addition to statutory warranties that may vary from<br />
Province to Province.<br />
If you purchased your unit outside Canada:<br />
• This warranty does not apply. Contact your dealer for warranty information.<br />
Service calls which do not involve defective materials or workmanship are not covered by this warranty.<br />
Costs of such service calls are the sole responsibility of the purchaser.