Instrukcja obsÅugi - Lark
Instrukcja obsÅugi - Lark Instrukcja obsÅugi - Lark
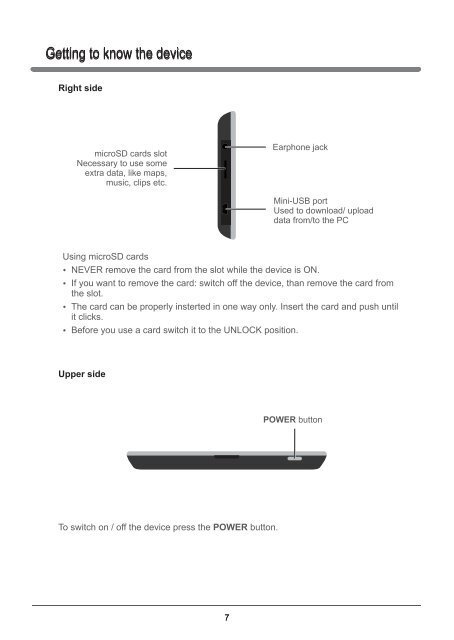
Getting to know the device Right side microSD cards slot Necessary to use some extra data, like maps, music, clips etc. Earphone jack Mini-USB port Used to download/ upload data from/to the PC Using microSD cards NEVER remove the card from the slot while the device is ON. If you want to remove the card: switch off the device, than remove the card from the slot. The card can be properly insterted in one way only. Insert the card and push until it clicks. Before you use a card switch it to the UNLOCK position. Upper side POWER button To switch on / off the device press the POWER button. 7
Getting to know the device Charging the device To charge the battery of the device please place the USB jack of the car charger in the USB slot of the device. The other end of the charger place in the car lighter jack (make sure the car electricity is on). The battery will be charging regardless of the fact if the device is on or off. Red LED on means charging is in progress. When the battery is fully charged, the LED will turn green. 1. If you are using the device during the charging process, the charging will take longer. 2. After charging is complete or when you want to stop charging the device, simple detach the charger’s cable from the device. 3. Never crush the battery or throw it to fire! Fire or electric shock hazard! 4. While travelling it is recommended to have the car charger attached to the device all the time. 5. Please, make sure that the device and the cable do not obstruct the driver’s view of the road and do not interfere with the vehicle operating controls. Mounting the car holder (vehicle suction mount) Step 1 Press the rubber part of the mount to the windscreen and move the latch to fasten the mount. Step 2 Using the knobs adjust the position of the mount to your needs. When installing the device in your vehicle please make sure it does not obstruct the driver’s view of the road or interfere with vehicle operating controls. Do not place the device unsecured on the vehicle dashboard. Do not place the device on or above any airbag. Getting started – acquiring satellites’ signal When you switch ON the device for the first time, please make sure you are in an open space, with no large objects near (like tall buildings and trees). Hold the device steadily until the acquisition of satellites’ signal. Pls note that acquiring the satellites can take a few minutes. Than you can set your route. It is always recommended to acquire the GPS signal before placing the device in the car. Connecting the GPS device to PC After installing the ActiveSyc software (see page 19) connect the GPS device to your PC using the USB cabel (mini-A USB type). The cable must be obtained separately, it is not included in the set. 8
- Page 1 and 2: 50.4HD -BT User manual / Instrukcja
- Page 3 and 4: Contents Precautions and safety tip
- Page 5 and 6: Precautions and safety tips Safety
- Page 7: Getting to know the device Parts an
- Page 11 and 12: Using the device Navigation mode To
- Page 13 and 14: Using the device Click Click Click
- Page 15 and 16: Using the device Language settings
- Page 17 and 18: Using the device Power Touch to ent
- Page 19 and 20: Using the device Bluetooth Touch to
- Page 21 and 22: Connecting the GPS device to PC Aft
- Page 23 and 24: Troubleshooting After connecting th
- Page 25 and 26: Dziękujemy za wybór nawigacji Lar
- Page 27 and 28: Wskazówki dotyczące bezpieczeńst
- Page 29 and 30: Wprowadzenie do obsługi urządzeni
- Page 31 and 32: Wprowadzenie do obsługi urządzeni
- Page 33 and 34: Obsługa urządzenia Włączanie i
- Page 35 and 36: Obsługa urządzenia Odtwarzanie pl
- Page 37 and 38: Obsługa urządzenia Ustawienia Dot
- Page 39 and 40: Obsługa urządzenia Kalibracja ekr
- Page 41 and 42: Obsługa urządzenia Transmiter FM
- Page 43 and 44: Podłączenie urządzenia GPS do ko
- Page 45 and 46: Rozwiązywanie problemów Urządzen
- Page 47 and 48: Parametry techniczne Wbudowany wy
Getting to know the device<br />
Right side<br />
microSD cards slot<br />
Necessary to use some<br />
extra data, like maps,<br />
music, clips etc.<br />
Earphone jack<br />
Mini-USB port<br />
Used to download/ upload<br />
data from/to the PC<br />
Using microSD cards<br />
NEVER remove the card from the slot while the device is ON.<br />
If you want to remove the card: switch off the device, than remove the card from<br />
the slot.<br />
The card can be properly insterted in one way only. Insert the card and push until<br />
it clicks.<br />
Before you use a card switch it to the UNLOCK position.<br />
Upper side<br />
POWER button<br />
To switch on / off the device press the POWER button.<br />
7


