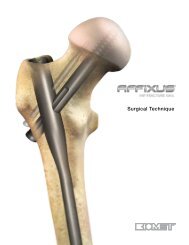
S3™ Proximal Humerus Plating System Surgical Technique - Biomet
S3™ Proximal Humerus Plating System Surgical Technique - Biomet
S3™ Proximal Humerus Plating System Surgical Technique - Biomet

Create successful ePaper yourself
Turn your PDF publications into a flip-book with our unique Google optimized e-Paper software.
<strong>Surgical</strong> <strong>Technique</strong><br />
<strong>Surgical</strong> <strong>Technique</strong><br />
Step 17: Attach Tuberosities to Plate<br />
• Using 20 gauge, monofilament stainless wire,<br />
secure the tuberosities to the plate by passing<br />
the needles close to the insertion of the tendon<br />
and then through to side, front or top loading<br />
wire attachment points (see insert)<br />
Step 19: Final Verification<br />
• Evaluate the humerus under fluoroscopy to<br />
assess the reduction and to confirm<br />
proper positioning<br />
• Twist the wire until appropriate tension<br />
is reached<br />
Step 18: Fix Remaining Screws in Plate<br />
• The shaft of the plate can be fixed with either<br />
90˚ locking screws or multidirectional<br />
cortical screws<br />
Step 20: Function<br />
• The S 3 <strong>Proximal</strong> <strong>Humerus</strong> Plate is designed<br />
to provide the greatest patient function and the<br />
lowest risk of subacromial impingement<br />
• Using the appropriate end of the tissue<br />
protector, drill to the correct depth (far cortex)<br />
and measure with the barrel depth gauge<br />
• Multiple divergent blunt pegs provide optimum<br />
subchondral support<br />
• Use a set screw for each 90˚ screw to lock it<br />
into place<br />
• Do not use a set screw when using<br />
multidirectional screws<br />
Tips: an alternate approach is to apply the wire<br />
tension bands to the plate prior to placing the<br />
subchondral support pegs. This may aid in the<br />
reduction.<br />
10 11