2 - Kühler Rath KG
2 - Kühler Rath KG
2 - Kühler Rath KG

Create successful ePaper yourself
Turn your PDF publications into a flip-book with our unique Google optimized e-Paper software.
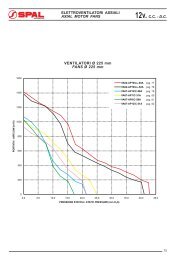
12<br />
Fittings<br />
Raccords<br />
> Lokring Tooling<br />
> Outillage Lokring<br />
Principle of Use<br />
Principe d’utilisation<br />
Benutzungsgrundsatz<br />
Principio di utilizzo<br />
Principio de utilización<br />
No welding, brazing or epoxy to join tubing. Lokrings join aluminum, copper, and steel tubing of equal or dissimilar diameters<br />
Sans soudure, Brasage ou epoxy pour raccorder. Lokring vous permet de joindre les raccords en alu, cuivre ou acier de diamètre identique ou différent<br />
Für Rohrinstandsetzung. Werkzeugssatz Handmontage für einseitige bzw. doppelseitige Lokring Verbindungen<br />
Senza saldatura, Brasage o epossidico per collegare. Lokring vi permette di unire i collegamenti in alu, rame o acciaio di diametro identico o diverso<br />
Sin soldadura, cobre-soldadura o epoxi para unir tubos. Lokrings une tubos de aluminio, cobre y acero de diámetro igual o diferente.<br />
70<br />
1<br />
2<br />
3<br />
4<br />
Fittinge<br />
Raccordi<br />
> Lokring Werkzeug<br />
> Attrezzatura Lokring<br />
Before the assembly of the LOKRING tube connection clean the tube ends with abrasive paper or abrasive mat. To avoid longitudinal grooves clean the tube ends in a<br />
rotational motion (not in longitudinal direction of the tube).<br />
Réparer l’outillage et nettoyer les tubes à l’aide d’une toile abrasive par mouvements rotatifs, jusqu’àce que le tube soit brillant et sans trace d’oxydation, d’huile ou de<br />
graisse. Ebavurer le tube et le placer dans sa position définitive. Sélectionner le raccord LOKRING et les mâchoires selon le diamètre des tubes.<br />
Um sicherzustellen, dass die spätere Verbindung hermetisch dicht ist, müssen die Rohrenden metallisch blank sein. Entfernen Sie also zunächst alle Verunreinigungen mit<br />
unserem Schleifvlies. Zur Vermeidung von Riefen sind die Rohrenden mit einer Drehbewegung zu reinigen. Vermeiden Sie Schleifbewegungen in Längsrichtung des Rohres<br />
.Prima di collegare il tubo LOKRING pulire le estremità del tubo con carta abrasiva. Per evitare le scanalature longitudinali sul tubo pulire con un moto di rotazione (non nella<br />
direzione longitudinale del tubo).<br />
Antes de la conexión del tubo LOKRING limpiar los extremos de tubo con papel abrasivo. Para evitar ranuras longitudinales limpiar el tubo con un movimiento de rotación<br />
(no en le dirección longitudinal del tubo).<br />
The tube ends have to be inserted into the LOKRING connection until the stop.For a better distribution of<br />
the LOKPREP the LOKRING con-nection has to be rotated at 360°.<br />
Déposer du joint LOKPREP sur toute la périphérie du tube en contact avec le raccord.<br />
Nun benetzen Sie den gesamten Rohrumfang mit LOKPREP, indem Sie die Flasche einmal von außen<br />
360° um das Rohr führen.<br />
Distribuire la giunzione LOKPREP su tutta la circonferenza periferica del tubo a contatto con il raccordo.<br />
Distribuir el producto LOKPREP sobre toda la circunferencia periferica del tubo en contacto de la conexión.<br />
The tubes have to be inserted into the LOKRING union joint up to the limit.<br />
Maintenir le tube en buté dans le raccord et si possible effectuer une rotation complète du raccord pour<br />
bien répartir le LOKPREP.<br />
Als Nächstes schieben Sie die mit LOKPREP benetzten Rohre in den Stutzen.<br />
Mantenere il tubo inserito nel raccordo e se possibile effettuare una rotazione completa del raccordo per<br />
meglio distribuire il LOKPREP.<br />
Mantener el tubo insertado en la conexión y si puede hacer una rotación completa para mejor distribuir le<br />
LOKPREP.<br />
The manual assembly tool has to be applied to the union joint, so that the LOKRING are seated squarely in<br />
the assembly jaws. By operating the ratchet handle the LOKRING are pressed onto the connexion untill<br />
they meet at the center top.<br />
Engager les 2 mâchoires. Actionner la pince LOKRING jusqu’en butée. Assemblage du 1er tube terminé,<br />
retirer la pince et assembler le 2ème tube en procédant de la même manière. Respecter le temps de<br />
polymérisation avant toute manipulation.<br />
Fijaciones de tuberīas<br />
> Herramientas Lokring<br />
SEASON S<br />
Zuletzt setzen Sie die Handzange mit den eingesetzten Montagebacken flächen bündig an und verpressen<br />
die LOKRING axial auf den Stutzen, bis diese bündig am inneren Anschlag anliegen. – Fertig.<br />
Impegnare le 2 ganasce. Chiudere con forza la pinza il LOKRING. L'assemblaggio del primo tub è<br />
completato, togliere la pinza e assemblare il secondo tubo nello stesso modo. Aspettare il tempo di<br />
polimerizzazione del prodotto prima di qualsiasi manipolazione.<br />
Insertar las 2 fauces. Sujetar con abrazaderas el LOKRING con fuerza. El montaje del primer tubo es<br />
completo, quitar la garra y montar el segundo tubo en la misma forma. Espere el tiempo de polimerización<br />
del producto antes de cualquier manipulación.<br />
®