Very High Speed Counter Module - Esco Drives & Automation
Very High Speed Counter Module - Esco Drives & Automation
Very High Speed Counter Module - Esco Drives & Automation

You also want an ePaper? Increase the reach of your titles
YUMPU automatically turns print PDFs into web optimized ePapers that Google loves.
2<br />
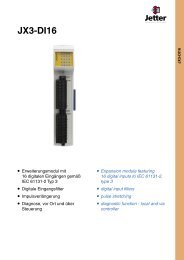
2-2 Installing the <strong>Very</strong> <strong>High</strong> <strong>Speed</strong> <strong>Counter</strong> <strong>Module</strong><br />
<strong>Module</strong> Locking Mechanism<br />
1<br />
<strong>Module</strong><br />
Status<br />
Network<br />
Status<br />
NODE:<br />
24VDC<br />
Source<br />
Output<br />
0<br />
1<br />
Slide-in Writable Label<br />
3<br />
1734<br />
OB4E<br />
Insertable I/O <strong>Module</strong><br />
<strong>Module</strong> Wiring Diagram<br />
Mechanical Keying<br />
(orange)<br />
DIN Rail Locking Screw<br />
(orange)<br />
RTB Removing Handle<br />
Removable Terminal Block (RTB)<br />
Interlocking Side Pieces<br />
Mounting Base<br />
3. Press firmly to seat the mounting base on the DIN rail. The<br />
mounting base will snap into place.<br />
4. To remove the mounting base from the DIN rail, remove any<br />
installed module (and any module immediately to the right), and<br />
use a small bladed screwdriver to rotate the DIN rail locking<br />
screw to a vertical position. This releases the locking<br />
mechanism. Then lift straight up to remove the mounting base.<br />
5. Repeat this procedure for the next mounting base assembly.<br />
Installing an I/O <strong>Module</strong><br />
The module can be installed before, or after base installation. Make<br />
sure that the mounting base is correctly keyed before installing the<br />
module into the mounting base. In addition, make sure the mounting<br />
base locking screw is positioned horizontal referenced to the base.<br />
Publication 1734-UM003A-EN-P - August 2000