INSTALLATION INSTRUCTIONS - American Standard
INSTALLATION INSTRUCTIONS - American Standard
INSTALLATION INSTRUCTIONS - American Standard

You also want an ePaper? Increase the reach of your titles
YUMPU automatically turns print PDFs into web optimized ePapers that Google loves.
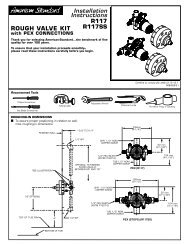
<strong>INSTALLATION</strong> <strong>INSTRUCTIONS</strong><br />
COMPACT CADET® 3 - 1.6 GPF ONE-PIECE TOILET<br />
COMPACT CADET® 3 FloWise - 1.28 GPF ONE-PIECE TOILET<br />
Model 2403 – Compact Elongated Right Height with Seat<br />
Thank you for selecting <strong>American</strong> <strong>Standard</strong> – the benchmark of fine quality for over 100 years. To ensure this product is installed<br />
properly, please read these instructions carefully before you begin. (Certain installations may require professional help.) Also be sure<br />
your installation conforms to local codes.<br />
!<br />
RECOMMENDED TOOLS AND MATERIALS<br />
Putty Knife Regular Screwdriver Adjustable Wrench Sealant Tape Measure<br />
Hacksaw Wax Ring/Gasket Flexible Supply Tube Closet Bolts Carpenters Level<br />
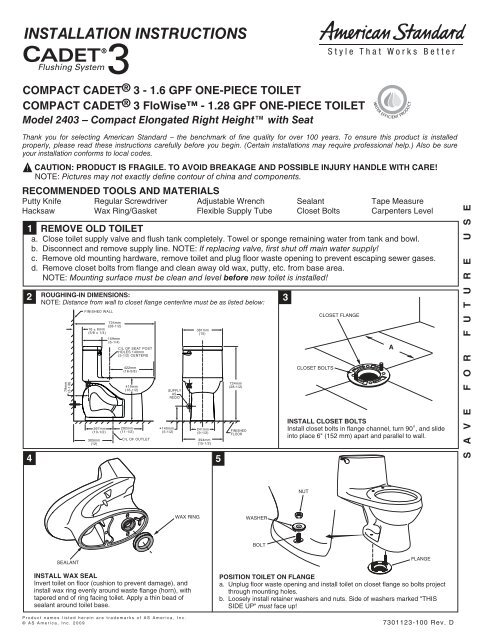
1 REMOVE OLD TOILET<br />
a. Close toilet supply valve and flush tank completely. Towel or sponge remaining water from tank and bowl.<br />
b. Disconnect and remove supply line. NOTE: If replacing valve, first shut off main water supply!<br />
c. Remove old mounting hardware, remove toilet and plug floor waste opening to prevent escaping sewer gases.<br />
d. Remove closet bolts from flange and clean away old wax, putty, etc. from base area.<br />
NOTE: Mounting surface must be clean and level before new toilet is installed!<br />
2<br />
4<br />
CAUTION: PRODUCT IS FRAGILE. TO AVOID BREAKAGE AND POSSIBLE INJURY HANDLE WITH CARE!<br />
NOTE: Pictures may not exactly define contour of china and components.<br />
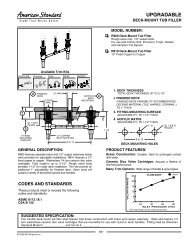
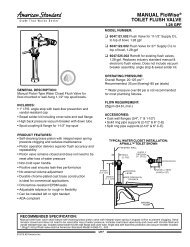
ROUGHING-IN DIMENSIONS:<br />
NOTE: Distance from wall to closet flange centerline must be as listed below:<br />
79mm<br />
(3-1/8)<br />
FINISHED WALL<br />
724mm<br />
(28-1/2)<br />
16 ± 6mm<br />
(5/8 ± 1/4)<br />
267mm<br />
(10-1/2)<br />
305mm<br />
(12)<br />
159mm<br />
(6-1/4)<br />
C/L OF SEAT POST<br />
HOLES 140mm<br />
(5-1/2) CENTERS<br />
422mm<br />
(16-5/8)<br />
419mm<br />
(16-1/2)<br />
292mm<br />
(11-1/2)<br />
C/L OF OUTLET<br />
SUPPLY<br />
AS<br />
REQ'D<br />
381mm<br />
(15)<br />
5<br />
724mm<br />
(28-1/2)<br />
140mm<br />
* 241mm<br />
(5-1/2)<br />
FINISHED<br />
(9-1/2)<br />
FLOOR<br />
394mm<br />
(15-1/2)<br />
3<br />
CLOSET BOLTS<br />
CLOSET FLANGE<br />
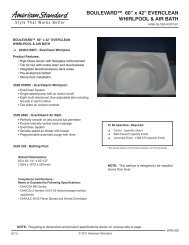
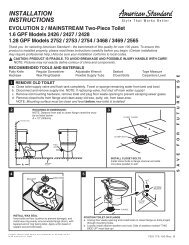
INSTALL CLOSET BOLTS<br />
Install closet bolts in flange channel, turn 90°, and slide<br />
into place 6" (152 mm) apart and parallel to wall.<br />
A<br />
S A V E F O R F U T U R E U S E<br />
NUT<br />
WAX RING<br />
WASHER<br />
THIS SIDE UP<br />
BOLT<br />
SEALANT<br />
INSTALL WAX SEAL<br />
Invert toilet on floor (cushion to prevent damage), and<br />
install wax ring evenly around waste flange (horn), with<br />
tapered end of ring facing toilet. Apply a thin bead of<br />
sealant around toilet base.<br />
Product names listed herein are trademarks of AS America, Inc.<br />
© AS America, Inc. 2009<br />
FLANGE<br />
POSITION TOILET ON FLANGE<br />
a. Unplug floor waste opening and install toilet on closet flange so bolts project<br />
through mounting holes.<br />
b. Loosely install retainer washers and nuts. Side of washers marked "THIS<br />
SIDE UP" must face up!<br />
7301123-100 Rev. D
6<br />
INSTALL TOILET<br />
a. Position toilet squarely to wall and, with a rocking<br />
motion, press bowl down fully on wax ring and flange.<br />
Alternately tighten nuts until toilet is firmly seated on floor.<br />
!<br />
CAUTION: DO NOT OVERTIGHTEN NUTS<br />
OR BASE MAY BE DAMAGED!<br />
BOLT CAP<br />
b. Install caps on washers. (If necessary, cut bolt height<br />
to size before installing caps.)<br />
c. Smooth off the bead of sealant around base. Remove<br />
excess sealant.<br />
BOLTS<br />
CLOSET FLANGE<br />
7<br />
INSTALL TOILET SEAT Install toilet seat in accordance with manufacturer's directions.<br />
8a<br />
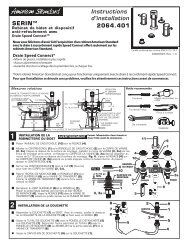
Before continuing, determine the type of water supply connecation you have from<br />
the chart below and use the appropriate assembly parts required to properly<br />
reconnect the water supply. DO NOT use plumber's putty to seal these fittings.<br />
8b<br />
METAL/COPPER<br />
FLARED TUBING<br />
METAL FLANGED<br />
TUBING<br />
METAL SPIRAL<br />
TUBING<br />
VINYL/BRAIDED<br />
CONNECTOR<br />
LOCK NUT LOCK NUT LOCK NUT<br />
CONE<br />
WASHER<br />
COUPLING<br />
NUT<br />
EXISTING<br />
WASHER<br />
EXISTING<br />
COUPLING<br />
NUT<br />
EXISTING<br />
CONE<br />
WASHER<br />
COUPLING<br />
NUT<br />
LOCK NUT<br />
COUPLING<br />
NUT<br />
WATER<br />
SHUT-OFF<br />
WATER<br />
SHUT-OFF<br />
WATER<br />
SHUT-OFF<br />
WATER<br />
SHUT-OFF<br />
These parts must be used as<br />
illustrated to insure water-tight<br />
connection. Use of existing<br />
coupling nut may result in<br />
water leakage. Water supply<br />
tube or pipe must extend at<br />
least 1/2" inside threaded<br />
shank of valve (does not apply<br />
to flanged tubing).<br />
Use existing<br />
coupling nut<br />
and washer.<br />
Use existing spiral<br />
cone washer.<br />
Fluidmaster cone<br />
washer may not<br />
seal completely on<br />
spiral type supply<br />
line.<br />
Captive cone<br />
washers already<br />
included. No<br />
additional washers<br />
needed.<br />
With correct washers in place<br />
(see Step 8a), tighten<br />
COUPLING NUT 1/4 turn beyond<br />
hand tight. DO NOT<br />
OVERTIGHTEN.<br />
CAUTION: DO NOT USE<br />
CONE WASHER WITH<br />
PLASTIC SUPPLY LINE.<br />
CAUTION: Overtightening of<br />
LOCK NUT or COUPLING NUT<br />
could result in breakage and<br />
potential flooding.<br />
!<br />
WARNING: Do not use plumber’s putty, pipe dope, or any other sealant on the water supply connection<br />
to this tank. If the connection leaks after hand tightening, replace the supply line. If the connection<br />
continues to leak with the new supply line, replace the fill valve.<br />
Warranty is void if any type of sealant is used on the water supply connection.<br />
- 2 -<br />
7301123-100 Rev. D
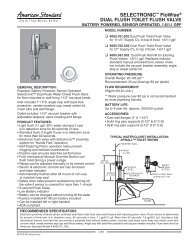
9 10<br />
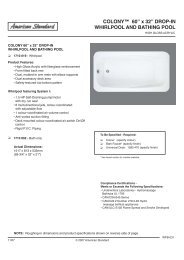
TOP<br />
CRITICAL LEVEL<br />
MARK ("C.L.")<br />
MUST BE<br />
1" ABOVE<br />
OVERFLOW PIPE<br />
FILL<br />
VALVE<br />
VALVE<br />
BODY<br />
ADJUSTABLE<br />
HEIGHT<br />
LOCK NUT<br />
CONE WASHER<br />
COUPLING NUT<br />
(HAND TIGHT ONLY)<br />
FLOAT<br />
CUP<br />
ARM<br />
NIPPLE<br />
WATER LEVEL<br />
ADJUSTMENT<br />
ROD<br />
FLAPPER<br />
SHANK<br />
WASHER<br />
THREADED<br />
SHANK<br />
REFILL<br />
TUBE<br />
TANK<br />
LEVER<br />
PARTS FOR WATER<br />
CONNECTION<br />
(SEE STEP 9)<br />
FLUSH<br />
VALVE<br />
"S"<br />
CLIP<br />
Fig. 9A<br />
Diagram 1<br />
ADJUSTMENTS<br />
a. Adjust water level. Water level<br />
should be adjusted to level indicated<br />
on tank by adjusting float cup.<br />
See Step 10 for water level adjustment<br />
method.<br />
b. If bowl fails to siphon, an adjustment<br />
may be required with the lift chain.<br />
Simply remove the bead chain from<br />
the retainment clip (see Fig. 9A) and<br />
take up slack on the chain, and<br />
reinsert on lift rod. Make sure the chain<br />
is not too taught.<br />
Turn on water supply.<br />
Submerge the FLOAT CUP<br />
under the water for 30<br />
seconds. Adjust the water to<br />
desired level by turning<br />
WATER LEVEL ADJUSTMENT<br />
ROD and moving FLOAT CUP<br />
up or down.<br />
11<br />
CARE AND CLEANING<br />
When cleaning your toilet, wash it with mild, soapy water, rinse thoroughly with clear water and dry with a soft cloth. Avoid detergents,<br />
disinfectants, or cleaning products in aerosol cans. NEVER use abrasive scouring powders or abrasive pads on your toilet seat. Some<br />
bathroom chemicals and cosmetics may damage the seat's finish.<br />
!<br />
WARNING: Do not use in-tank cleaners. Products containing chlorine (calcium hypochlorite) can seriously damage fittings in the<br />
tank. This damage can cause leakage and property damage.<br />
<strong>American</strong> <strong>Standard</strong> shall not be responsible or liable for any tank fitting damage caused by the use of cleaners containing<br />
chlorine (calcium hypochlorite).<br />
12<br />
TROUBLESHOOTING<br />
IF FILL VALVE SHUTS OFF BUT CONTINUES TO LEAK<br />
SLOWLY, repeat Step 12.<br />
IF FILL VALVE TURNS OFF AND ON DURING PERIODS OF<br />
NON-USE, it is a signal you are wasting water because:<br />
LEVER LE<br />
BRAS EN<br />
PREMIER<br />
• The end of the refill tube is inserted into overflow pipe, below<br />
water level in tank. Attach refill tube to overflow pipe using "S"<br />
clip provided.<br />
IMPORTANT: Always<br />
clear sand and rust from<br />
system.<br />
• Make sure water supply is<br />
off. Remove valve TOP by<br />
lifting arm and rotating top<br />
and arm 1/8 turn<br />
counterclockwise, pressing<br />
down slightly on cap.<br />
• While holding a<br />
container over the<br />
uncapped VALVE to<br />
prevent splashing, turn<br />
water supply on and off<br />
a few times. Leave<br />
water supply off.<br />
• Replace TOP by engaging<br />
lugs and rotating 1/8 turn<br />
clockwise. MAKE<br />
CERTAIN TIP IS TURNED<br />
TO THE LOCKED<br />
POSITION. VALVE MAY<br />
NOT TURN ON IF TOP IS<br />
NOT FULLY TURNED TO<br />
THE LOCKED POSITION.<br />
Always use quality Fluidmaster repair parts when maintaining your Fluidmaster products. Fluidmaster<br />
shall not be responsible or liable for any damages caused by products used with Fluidmaster valves<br />
that were not manufactured by Fluidmaster, Inc.<br />
• The flush valve is leaking because it's worn, dirty or misaligned<br />
with tank ball or flapper (replace with a new flapper).<br />
IF FILL VALVE WON'T TURN ON OR SHUT OFF or REFILL<br />
OF TANK WATER IS SLOW after valve has been in use for<br />
some time, Fluidmaster Model 242 Replacement Seal may be<br />
needed.<br />
Go to our website at www.fluidmaster.com for more<br />
solutions to toilet problems.<br />
For troubleshooting information please contact:<br />
30800 Rancho Viejo Road<br />
San Juan Capistrano, CA 92675<br />
(949) 728-2000 (800) 631-2011<br />
www.fluidmaster.com<br />
© 2001 Fluidmaster, Inc.<br />
® Registered trademark of Fluidmaster, Inc.<br />
- 3 -<br />
7301123-100 Rev. D
FLUIDMASTER<br />
WATER CONTROL<br />
FLUSH VALVE<br />
SEAT AND COVER<br />
(INCLUDES MTG. KIT)<br />
TANK COVER<br />
FLAPPER<br />
ASSEMBLY<br />
SEAT POST<br />
MTG. KIT<br />
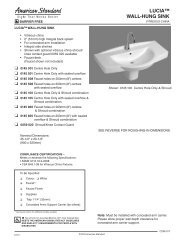
COMPACT CADET ® 3 ONE PIECE<br />
REPAIR PARTS LIST<br />
NOTE: "XXX" represents color options. Specify when ordering.<br />
TRIP<br />
LEVER<br />
BOLT<br />
CAPS<br />
COMPONENT<br />
735125.XXX0A<br />
5350.110.XXX<br />
034783-XXX0A<br />
738903-XXX0A<br />
738919.XXX0A<br />
738565-409.0070A<br />
738942-1000A<br />
738920-0070A<br />
738942-1010A<br />
7381043-400.0070A<br />
DESCRIPTION<br />
Tank Cover<br />
Seat - Elongated<br />
Bolt Cap Kit<br />
Trip Lever - Left Hand<br />
Trip Lever - Right Hand<br />
Inlet Valve<br />
Flush Valve - 1.6 GPF<br />
Flapper Assembly - 1.6 GPF<br />
Flush Valve - 1.28 GPF<br />
Flapper Assembly - 1.28 GPF w/Float<br />
1.6<br />
GPF<br />
√<br />
√<br />
√<br />
-<br />
-<br />
√<br />
√<br />
√<br />
1.28<br />
GPF<br />
√<br />
√<br />
√<br />
-<br />
-<br />
√<br />
√<br />
√<br />
TROUBLESHOOTING GUIDE<br />
PROBLEM POSSIBLE CAUSE CORRECTIVE ACTION<br />
Does not flush a. Water supply valve closed. a. Open valve and allow water to fill tank.<br />
b. Supply line blocked. b. Shut off water supply, disconnect supply line, and inspect<br />
all gaskets and washers. Reassemble. Also, see Fluidmaster<br />
maintenance (see step 12).<br />
c. Flush valve chain too loose or disconnected. c. Readjust chain length as required.<br />
d. Sand or debris lodged in water control. d. Shut off water supply. Remove cap and clean per Step 12.<br />
Poor or sluggish flush a. Bowl water level too low. a. Check that refill tube is connected to water control and<br />
inserted into tank overflow without being kinked or damaged.<br />
b. Supply valve partly closed. b. Open supply valve fully. Be sure that proper supply tube size is used.<br />
c. Partially clogged trapway and/or drain pipe and/or vent. c. Remove obstruction. Consult a plumber if necessary.<br />
d. Supply pressure too low. d. Normal supply pressure must be at least 20 psi.<br />
Toilet leaks a. Poor supply line connection. a. Review Step 8 of installation procedure.<br />
b. Poor bowl to tank/floor connection. b. Review Step 4 through 6 of installation procedure.<br />
Toilet does not shut off a. Flush valve chain too tight, holding flush valve open. a. Readjust chain length as needed. Review step 9.<br />
b. Flush valve seat and/or flapper worn or deformed. b. Replace flapper/flush valve assembly, as needed.<br />
c. Sand or debris lodged in water control. c. Shut off water supply. Remove cap and clean per Step 12.<br />
In the United States:<br />
<strong>American</strong> <strong>Standard</strong> Brands<br />
P.O. Box 6820<br />
Piscataway, New Jersey 08855<br />
Attention: Director of Consumer Affairs<br />
For residents of the United States, warranty information may also be<br />
obtained by calling the following toll free number: (800) 442-1902<br />
www.americanstandard-us.com<br />
In Canada:<br />
AS Canada ULC<br />
2480 Stanfield Rd.<br />
Mississauga, Ontario<br />
Canada L4Y 1S2<br />
Toll Free: (800) 387-0369<br />
www.americanstandard.ca<br />
In Mexico:<br />
Customer Service Manager<br />
AS Maquila, S.A. de C.V.<br />
Via Morelos #330<br />
Col. Santa Clara<br />
Ecatepec 55540 Edo. Mexico<br />
www.americanstandard.com.mx<br />
- 4 -<br />
7301123-100 Rev. D