BoonDocker Nitrous Manifold Installation Instructions
BoonDocker Nitrous Manifold Installation Instructions
BoonDocker Nitrous Manifold Installation Instructions

Create successful ePaper yourself
Turn your PDF publications into a flip-book with our unique Google optimized e-Paper software.
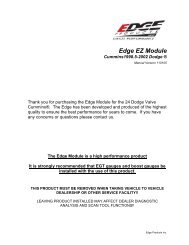
<strong>BoonDocker</strong> <strong>Nitrous</strong> <strong>Manifold</strong> <strong>Installation</strong> <strong>Instructions</strong><br />
Before you begin, please read all the instructions below and check kit contents.<br />
I. Kit Contents:<br />
1 – <strong>Nitrous</strong> <strong>Manifold</strong> with fittings installed<br />
1 – 5-hole nozzle<br />
2 – 3/16” plastic Tees<br />
1 – 12” black 1/8” poly line<br />
II. Tools Required:<br />
Drill + bits (¾”, ¼”)<br />
5/32”and 7/32” allen wrenches<br />
III. Theory of Operation:<br />
A common misconception about nitrous oxide is that it is explosive or flammable. <strong>Nitrous</strong> by itself does not burn, nor is it<br />
explosive. At 565 deg. F, nitrous oxide (N 2 0) breaks apart and forms two parts nitrogen and one part oxygen. Inside an<br />
engine, this added oxygen speeds up the combustion process (the nitrogen plays an important part in buffering the<br />
reaction). Whenever nitrous is used, additional fuel is necessary, otherwise the added oxygen will act as a blow-torch<br />
inside your engine. When used properly, nitrous oxide provides the same benefits as turbocharging or supercharging your<br />
engine (extra power is made by burning more fuel and oxygen), but without the added cost or complexities.<br />
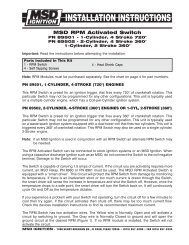
Below is a diagram of the major components of the Boondocker Liquid <strong>Nitrous</strong> System. The simplicity of this system<br />
makes it the most reliable, easy to tune, and easy to install nitrous system available. By using the existing fuel system<br />
(carburetor) to add the required extra fuel for nitrous, the complexity and unreliability of extra components is eliminated.<br />
<br />
<br />
+12 V<br />
(sled voltage)<br />
<br />
<br />
push-button switch<br />
(mounts on handlebar)<br />
<br />
<br />
<br />
<br />
The part that makes the Boondocker nitrous system so unique is our patent pending <strong>Nitrous</strong> <strong>Manifold</strong>. This manifold<br />
simply mounts on the airbox or airfilter where it sprays a fine mist of nitrous that is then drawn into the engine through the<br />
carburetor(s). This allows the nitrous to be naturally aspirated into the cylinder instead of being forced, which is much<br />
friendlier to the motor and allows the nitrous to be used in a much wider range of throttle and rpm settings.<br />
(continued on next page)<br />
<strong>BoonDocker</strong> Liquid <strong>Nitrous</strong> – 1589 Hollipark Dr. Idaho Falls, ID 83401 – (208) 542-4411<br />
website: www.boondockers.com - email: info@boondockers.com<br />
Revised 10-27-03 Page 1 of 6
This nitrous manifold greatly simplifies the way extra fuel is delivered that is needed for nitrous use. The carburetor vents<br />
are connected to this manifold, allowing the carburetor(s) to breathe normally through the airbox when nitrous is not used.<br />
When nitrous is sprayed, the manifold produces a positive pressure that goes to the carburetor float bowl, which “pushes”<br />
more fuel through the main jet of the carburetor(s). This eliminates the need for an extra fuel pump, fuel solenoid, extra<br />
plumbing, and nozzle(s) that are necessary to inject the extra fuel in other systems.<br />
This manifold is also designed to vary the float bowl pressure in relation to nitrous pressure, thus keeping the nitrous and<br />
fuel delivery in sync. Fluctuations in bottle temperature greatly affect nitrous pressure, which affects nitrous delivery. By<br />
automatically adjusting the fuel delivery as nitrous pressure varies, this manifold makes nitrous safe, reliable, and easy to<br />
use.<br />
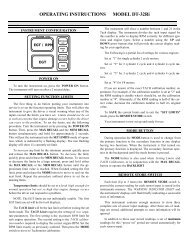
IV. Bottle Mounting Position<br />
With nitrous in the bottle, both nitrous liquid and nitrous gas are<br />
present under high pressure (760psi at 70 deg F). Due to gravity<br />
and acceleration forces, the liquid portion of the nitrous will be at<br />
the bottom and rearward parts of the bottle. For this nitrous system<br />
to work properly, it is important that nitrous liquid be drawn from<br />
the bottle. <strong>Nitrous</strong> vapor will cause a significant decrease in<br />
performance.<br />
We prefer not to use a siphon tube inside the bottle since the tube<br />
can sometimes come loose and move around inside the bottle.<br />
Without a siphon tube, the bottle must be mounted so the valve is<br />
pointed down and towards the back of the sled as shown.<br />
Rear of<br />
snowmobile<br />
20 deg to 90 deg<br />
Front of<br />
snowmobile<br />
<strong>BoonDocker</strong> Liquid <strong>Nitrous</strong> – 1589 Hollipark Dr. Idaho Falls, ID 83401 – (208) 542-4411<br />
website: www.boondockers.com - email: info@boondockers.com<br />
Revised 10-27-03 Page 2 of 6
V. <strong>Nitrous</strong> <strong>Manifold</strong> <strong>Installation</strong><br />
1. Locate a suitable place on the airbox for the<br />
nitrous manifold. Ideally this will be halfway<br />
between the two carburetors and pointed<br />
towards the incoming airflow so nitrous will<br />
be evenly mixed with the incoming air before<br />
entering the carburetors. If the shelf is left in<br />
the airbox, the manifold should be located<br />
above the shelf.<br />
Note: The manifold should be mounted<br />
sideways so the two ¾” barrels are positioned<br />
vertically (one above the other). This will<br />
allow a more even distribution if one barrel<br />
sprays more holes than the other.<br />
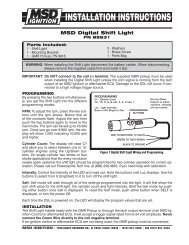
2. Using the template below as a guide, drill the<br />
three holes shown using 3/4” and 1/4” drill<br />
bits.<br />
Note: The dotted lines may be cut so the<br />
manifold can be installed with the stem still attached. This may<br />
be useful for locations where it is difficult to access the inside of<br />
the airbox. The manifold can be installed as one piece as follows:<br />
a. Loosen the bolt until the stem extends past the aluminum body<br />
by ¼”.<br />
b. Rotate the stem 90deg. in relation to the body.<br />
c. Fit the stem through the oval-shaped hole in the airbox (the<br />
stem may need to be rotated as it goes through the hole),<br />
d. Realign the stem to the body and tighten the bolt. Be sure the<br />
two ¾” holes on the stem are properly aligned to the body of<br />
the manifold before tightening the bolt.<br />
3. Install the manifold with the stem half inside the airbox and the<br />
aluminum half on the outside. Align the two halves together then<br />
thread the bolt in so the two halves are tight against the airbox.<br />
0.57” 0.57”<br />
3/4” 1/4”<br />
<strong>Manifold</strong> Cutout Template<br />
<strong>BoonDocker</strong> Liquid <strong>Nitrous</strong> – 1589 Hollipark Dr. Idaho Falls, ID 83401 – (208) 542-4411<br />
website: www.boondockers.com - email: info@boondockers.com<br />
Revised 10-27-03 Page 3 of 6
VI. Hose <strong>Installation</strong><br />
Connect the 1/8” black nylon line from the solenoid brass fitting (side marked “OUT”) to the nitrous manifold brass<br />
compression fitting. Keep this away from hot items. Note – do not overtighten these fittings! (if overtightened, the<br />
compression fitting may constrict the inside of the hose and limit nitrous flow).<br />
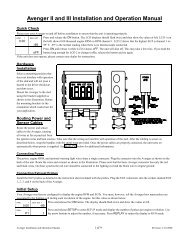
VII. Carb Vent to <strong>Nitrous</strong> <strong>Manifold</strong> <strong>Installation</strong><br />
The nitrous manifold must be able to pressurize the carb float bowl. Connect the carb vent lines to the nitrous manifold as<br />
shown below. Insert a plastic Tee in each line and connect the two vent lines together as shown.<br />
Insert Tees and connect<br />
vent lines together<br />
Connect Carb vents to<br />
<strong>Nitrous</strong> <strong>Manifold</strong><br />
carb<br />
carb<br />
VIII. Startup and Tuning Procedures<br />
A. Important Notes before using <strong>Nitrous</strong>:<br />
1. We strongly recommend using high octane fuel (at least 94 for most stock motors, more for modified motors). We<br />
have found that race fuel or Boondocker race fuel concentrate mixed with premium gas can provide the necessary<br />
octane.<br />
2. Be sure to use filtered nitrous – always use a filter when filling your bottle!<br />
3. When tuning the system, do not use nitrous for more than 2 seconds at a time. Once the system is properly tuned<br />
(see steps below), we recommend not using nitrous for more than 8 seconds at a time. If nitrous is used for longer<br />
durations, it is critical that the system be carefully tuned and that no detonation problems are occurring.<br />
B. Startup & Leak Test Procedure<br />
The rider must do the following steps every time the bottle is turned on and before doing the fuel adjustment procedure.<br />
1. With the engine off, open the bottle valve and check for leaks. Shut the bottle valve off. With the valve shut, the<br />
hose will still have pressure in it.<br />
2. With pressure in the hose and the bottle valve closed, start the engine. Check to make sure the solenoid does not<br />
discharge hose pressure.<br />
3. With the engine running (be ready to shut down engine if necessary), open the bottle valve. Push the nitrous button<br />
for about one second or less. Engine rpm should increase if the nitrous system is functioning properly.<br />
<strong>BoonDocker</strong> Liquid <strong>Nitrous</strong> – 1589 Hollipark Dr. Idaho Falls, ID 83401 – (208) 542-4411<br />
website: www.boondockers.com - email: info@boondockers.com<br />
Revised 10-27-03 Page 4 of 6
C. <strong>Nitrous</strong> <strong>Manifold</strong> Fuel Adjustment Procedure<br />
The steps below should be done with a full nitrous bottle that is at the proper operating temperature (70-90deg F). Make<br />
sure the engine is at normal operating temperature. Do not exceed 2 seconds of nitrous use until the fuel adjustment is<br />
complete and correct.<br />
This adjustment process should only be performed by an experienced tuner. If you are not an experienced tuner, find<br />
someone who is. Remember, safety first!<br />
Warning: Only adjust the fuel mixture screws according to the steps below. The factory setting should provide a<br />
good starting baseline. If this setting accidentally gets changed, turn the screws in (clockwise) all the way and then<br />
back out 2.5 turns each, then proceed with the steps below.<br />
There are two fuel adjustment screws on the nitrous manifold. These screws adjust the amount of fuel when nitrous is<br />
being used - they will not affect carburetor jetting off nitrous. All adjustments below should be done using the fine<br />
adjustment screw (small arrow, small “R”) first. The coarse adjustment screw (large arrow, large “R”) should only be<br />
used if correct results cannot be obtained using the fine adjustment screw (if fine screw is turned in all the way or turned<br />
out more than 6-8 turns). Two turns on the fine adjustment screw equal one turn on the coarse adjustment screw. “R”<br />
stands for “Rich” – turning the adjustment screws in will add more fuel when using nitrous.<br />
1. Run the sled in an open area at full throttle and apply nitrous for 1 or 2 seconds. Note engine power and rpms when the<br />
button is pushed.<br />
2. Enrichen the mixture by turning the nitrous manifold adjustment screw in (clockwise) 1/2 turn. Run nitrous for 1 or 2<br />
seconds again and note power and rpm difference. If no power loss is noted, repeat step 2 until a loss is noted. A<br />
power loss indicates you are rich enough (be sure!) - go to step 3.<br />
3. To find where the mixture starts to become too lean, turn the nitrous manifold adjustment screw out (counterclockwise)<br />
1/2 turn and note power. A power increase should be noted. Turn nitrous manifold adjustment out 1/2 turn and<br />
compare to previous run. If no power increase is noted, go to step 4. If power increase is noted, repeat step 3 until no<br />
power increase is noted. Use extreme caution - you can go too lean!<br />
4. For the final setting, turn the nitrous manifold adjustment screw back in (clockwise) 1/2 turn.<br />
5. After this adjustment is made, if the engine does not run perfectly smooth when using nitrous, do not use it! If the<br />
exhaust note does not sound clean, the cause is likely detonation which can quickly destroy the engine. Either use<br />
higher octane fuel or reduce the engine’s compression before using nitrous again.<br />
<strong>BoonDocker</strong> Liquid <strong>Nitrous</strong> – 1589 Hollipark Dr. Idaho Falls, ID 83401 – (208) 542-4411<br />
website: www.boondockers.com - email: info@boondockers.com<br />
Revised 10-27-03 Page 5 of 6
IX. Changing <strong>Nitrous</strong> <strong>Manifold</strong> Nozzles<br />
It is possible to increase/decrease the amount of nitrous the nitrous<br />
manifold sprays by replacing the white ¾” nozzles with nozzles with<br />
more/less orifice holes. In general, each orifice hole that is sprayed is<br />
equivalent to a 5hp increase.<br />
<br />
<br />
Read this before you increase nitrous!<br />
Be sure your engine is working good before you decide to increase the<br />
amount of nitrous. If you are not getting the power increase you are<br />
expecting with the original setup, something is likely wrong. Review the<br />
manifold tuning procedure and verify that you can tune the manifold so<br />
you know there is too much fuel. From there, if leaning the manifold<br />
mixture screw does not produce an increase in power, one of the following<br />
problems may exist:<br />
1. Be sure your bottle is full, at the correct temperature (70-90 deg), and positioned correctly so the valve picks up liquid<br />
nitrous. The system will not work properly if nitrous vapor is being picked up or if the bottle is too cold.<br />
2. Your engine could be detonating. Detonation can occur if your compression ratio is high, your timing has been<br />
advanced, or you are not using good octane fuel. Listen carefully to the motor - if it does not sound clean and you are<br />
not too rich, you are likely detonating.<br />
3. A bad power source or faulty electrical connection may cause the nitrous system to malfunction intermittently.<br />
Carefully check all connections. If necessary, solder all connections.<br />
Important Note: A known problem exists on Polaris snowmobiles when the lighting system has been disconnected<br />
(often when the hood has been removed). The voltage will be fine at an idle, but when revved up, the voltage regulator<br />
will become overloaded and the voltage will drop to a very low voltage, causing the nitrous solenoid to no longer work.<br />
Either reconnect the headlight so there is enough load on it, or remove the old voltage regulator an replace it with two<br />
new regulators wired in parallel (connect both yellow wires together). Both regulators must in good working order and<br />
be the exact same type so they both regulate to the same voltage.<br />
4. Dirty nitrous can quickly plug the nitrous filter and obstruct the nitrous delivery. Remove and clean the sintered bronze<br />
filter element by blowing compressed air through it backwards. Always fill your bottle from a filtered source.<br />
Installing / Removing Nozzles<br />
1. Remove the nitrous manifold from the airbox.<br />
2. Use a 7/32” hex wrench to carefully remove/install a nozzle. Be sure the o-ring is still in place before threading in a<br />
new nozzle. Be very careful not to overtighten the plastic nozzle – it needs to be just snug.<br />
3. If you want to increase nitrous delivery, increase the total number of nozzle holes by one! (ie. go from 7 holes to 8<br />
holes)<br />
4. Retune the nitrous manifold according to the instructions above. Anytime the orifices are changed, the nitrous manifold<br />
pressure will change so retuning is necessary.<br />
X. Warranty, Terms & Conditions<br />
Returned Goods – No merchandise will be accepted without prior approval. A RMA number (Return Merchandise<br />
Authorization) provided by Boondocker is required before a return will be accepted. A 20% handling and restocking<br />
charge will be applied to returned merchandise. No unauthorized returns will be accepted.<br />
Limited Warranty – Boondocker warrants its product to the original purchaser against workmanship defects for a period<br />
of 90 days, commencing from the date of product delivery to the Consumer.<br />
Maximum Liability – The maximum liability of Boondocker in connection with this warranty shall not under any<br />
circumstances exceed the price of the product claimed to be defective.<br />
<strong>BoonDocker</strong> Liquid <strong>Nitrous</strong> – 1589 Hollipark Dr. Idaho Falls, ID 83401 – (208) 542-4411<br />
website: www.boondockers.com - email: info@boondockers.com<br />
Revised 10-27-03 Page 6 of 6