Trail Cam 119256CW - Tasco
Trail Cam 119256CW - Tasco
Trail Cam 119256CW - Tasco

Create successful ePaper yourself
Turn your PDF publications into a flip-book with our unique Google optimized e-Paper software.
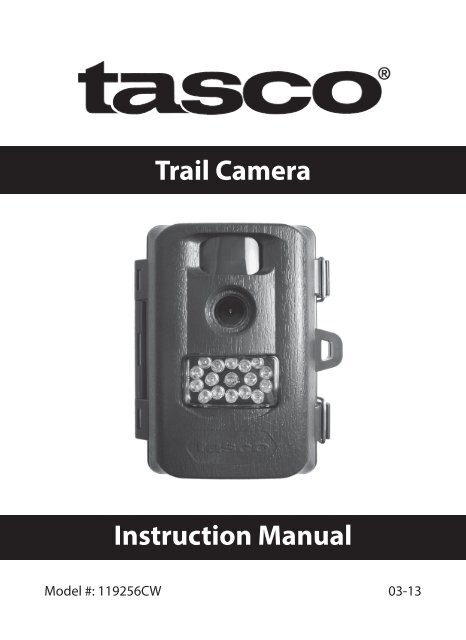
<strong>Trail</strong> <strong>Cam</strong>era<br />
Instruction Manual<br />
Model #: <strong>119256CW</strong><br />
03-13
Page Index<br />
Introduction 5<br />
Parts & Controls Guide 6-7<br />
Battery and SD Card Installation 8<br />
About the Setup Menu 9<br />
Using the Setup Menu 9<br />
SETUP MENU REFERENCE TABLE 10-11<br />
<strong>Cam</strong>era Operation 12<br />
Mount the <strong>Cam</strong>era 12<br />
Power on the <strong>Cam</strong>era 12<br />
Test the Coverage Area 13<br />
Secure the <strong>Cam</strong>era 13<br />
Viewing the Photos and Videos 14<br />
Glossary 15<br />
Technical Specifications 16<br />
Troubleshooting/FAQ 17-20<br />
3
IMPORTANT NOTE<br />
Congratulations on your purchase of one of the best trail cameras on the<br />
market! <strong>Tasco</strong> is very proud of these cameras and we are sure you will<br />
be pleased with yours as well. We appreciate your business and want to<br />
earn your trust. Please refer to the notes below and the instructions in<br />
this manual to ensure that you are completely satisfied with this product.<br />
If your <strong>Tasco</strong> <strong>Trail</strong> <strong>Cam</strong> does not seem to be functioning properly<br />
or if you are having photo/video quality issues, please check the<br />
Troubleshooting/FAQ section on pages 17-20.<br />
Problems are often due to something simple that was overlooked, or<br />
require only changing one setting to solve.<br />
If your problem continues after trying the solutions in the<br />
Troubleshooting/FAQ section, please call <strong>Tasco</strong> Customer Service at<br />
(800) 423-3537. In Canada, call (800) 361-5702.<br />
<strong>Tasco</strong> recommends using 4 Energizer® Lithium AA batteries in this <strong>Trail</strong><br />
<strong>Cam</strong> to obtain maximum battery life.<br />
Do Not Mix Old and New Batteries<br />
Do not mix battery types-use ALL lithium or ALL alkaline.<br />
Rechargeable batteries are not recommended.<br />
<strong>Tasco</strong> recommends using SanDisk® SD and SDHC Cards<br />
(up to 32GB capacity) in this <strong>Trail</strong> <strong>Cam</strong>.<br />
4
INTRODUCTION<br />
Congratulations on your purchase of a <strong>Tasco</strong> Digital <strong>Trail</strong> <strong>Cam</strong>era. This<br />
camera is designed to record animal activity in the outdoors with its still<br />
image and movie modes and weatherproof, rugged construction. Your<br />
trail cam features a compact, portable size and an extra long battery life.<br />
Main Features:<br />
• 1.3 MP digital sensor<br />
• Compact Size (120mm*94mm*46mm)<br />
• Long Battery Life (Up to 6 months)<br />
• Trigger Time=1.3 seconds or less<br />
• Automatic IR Filter<br />
• LCD Display<br />
• 15 Night Vision LEDs<br />
• Adjustable Photo Delay: 5~ 59 second ,1~ 10mins (default 10S)<br />
• Multiple Shot Mode (3 images per trigger)<br />
• 640*480 at 30 FPS Videos<br />
• Supports up to 32 GB SD Card<br />
• Date, Time & Moon Phase Imprint<br />
• Auto Exposure<br />
• Auto White Balance<br />
• Power Supply: 4 AA batteries (lithium or alkaline)<br />
• Mounting Socket for Standard Tripods<br />
• Weatherproof<br />
5
Parts and Controls Guide<br />
PIR Motion<br />
Sensor<br />
<strong>Cam</strong>era<br />
Lens<br />
Padlock<br />
Hole<br />
Infrared<br />
LED Array<br />
Front of <strong>Cam</strong>era<br />
Tripod<br />
Socket<br />
Light<br />
Sensor<br />
PIR<br />
Indicator<br />
(Setup<br />
Mode<br />
Only<br />
6<br />
IR LED Array Detail
Parts and Controls Guide<br />
USB Port<br />
LCD<br />
Display<br />
Power<br />
Switch<br />
SD Card<br />
Slot<br />
Battery<br />
Compartment<br />
Control Panel<br />
(Front Unlatched & Opened)<br />
Control Panel Detail<br />
7
BATTERY and SD CARD INSTALLATION<br />
Your <strong>Tasco</strong> Digital <strong>Trail</strong> <strong>Cam</strong>era is designed to operate using 4 AA batteries.<br />
We recommend using Lithium (for longest life) or Alkaline batteries.<br />
NOTE: Always set the power switch to the OFF position when installing or<br />
removing batteries.<br />
Please make sure the batteries are inserted correctly, as indicated inside<br />
the battery compartment. Incorrect voltage or polarity (+/-) will damage<br />
the camera.<br />
Do not mix old and new batteries.<br />
Do not mix battery types-use ALL lithium or ALL alkaline.<br />
Rechargeable batteries are not recommended.<br />
Memory<br />
Your Digital <strong>Trail</strong> <strong>Cam</strong>era has a memory card slot, to accept SD cards up to<br />
32GB max. capacity (sold separately).<br />
Inserting an SD card<br />
• Make sure the power switch is in the OFF position whenever adding<br />
or removing memory.<br />
• Insert an SD card into the card slot completely and oriented correctly<br />
as shown by the icon above the slot (label up, contacts facing down<br />
and notched corner on the right).<br />
• To remove the SD memory card, depress the SD card and pull out<br />
the card gently.<br />
Using a new, blank SD card is recommended. If the SD card has been used<br />
in another device, please make sure to format using the Format option in<br />
the <strong>Trail</strong> <strong>Cam</strong>’s Setup menu before you set the camera to capture photos/<br />
videos. New cards are ready to use straight from the package.<br />
8
ABOUT THE SETUP MENU<br />
Slide the power switch to the On position. You’ll see “WAIT” on the display,<br />
then the setup menu screen. Before you start using the camera, you’ll no<br />
doubt want to set the date/time so they are imprinted correctly on your<br />
photos, and maybe change the trigger delay time and image resolution<br />
to your preferences. This is done by editing the settings of an item listed<br />
in the Setup Menu.<br />
To enter the Setup Menu at any time, press the SETUP button (to left of<br />
the power switch).<br />
USING THE SETUP MENU<br />
The Setup Menu has 5 different items, which appear on a list in the left<br />
frame of the display. Here’s how to edit (change) the setting of a menu<br />
item:<br />
1. Select the menu item you want to edit by pressing the UP or DOWN<br />
button until the item is blinking. Note: you can see the current/<br />
default setting for each item (without changing it) in the main center<br />
frame as you move up and down the list of items.<br />
2. Press the OK button.<br />
3. You can now select the setting you prefer for the selected item by<br />
pressing the UP or DOWN button (do not hold the button down). The<br />
setting displayed in the center frame will blink until you press OK to<br />
confirm it is the setting you want to save.<br />
4. To exit the Setup menu at any time, simply press the Setup button.<br />
SETUP MENU DISPLAY<br />
Battery Level<br />
SELECTED<br />
MENU<br />
ITEM<br />
CURRENT<br />
SETTING OF<br />
SELECTED ITEM<br />
Indicates Photo (1P or 3P) or Movie Mode<br />
9
The following table lists all of the menu items, their available settings,<br />
and a description of their functions:<br />
Menu Item<br />
Settings<br />
(Bold=default)<br />
Description/Operation<br />
10<br />
Date<br />
Time<br />
set year, month,<br />
and day<br />
set hour and<br />
minute<br />
Delay set minutes (0-<br />
10) or seconds<br />
(5-59)<br />
Default delay<br />
time= 10 sec.<br />
Press OK and use the UP/DOWN<br />
keys (to change the setting), then<br />
press OK again to go to the next<br />
date parameter and repeat, to<br />
set the current year, month, and<br />
day. Press OK after setting the<br />
day to move on and set the Time<br />
(next item)<br />
Press OK and use the UP/DOWN<br />
keys (to change the setting) then<br />
OK again ( to move to the next<br />
field) to set the current hour (24-<br />
hr format only, “00”=midnight,<br />
“12”=noon) and minute.<br />
Selects the length of time that<br />
the camera will “wait” until it<br />
responds to any additional<br />
triggers from the PIR after an<br />
animal is first detected and<br />
remains within the sensor’s<br />
range. During this user set<br />
“ignore triggers” interval, the<br />
camera will not capture photos/<br />
videos. This prevents the card<br />
from filling up with too many<br />
redundant images. Settings<br />
begin with 10 second default<br />
time. Press OK, set the delay time<br />
in minutes (if desired), press OK<br />
and set the delay in seconds.
Menu Item<br />
Mode<br />
Format<br />
Settings<br />
(Bold=default)<br />
1.3M/3M (with<br />
Mode set to<br />
1P or 3P for<br />
photos),<br />
5-60 Sec (in<br />
Movie (video)<br />
mode<br />
FO/NO,<br />
Y/N<br />
Description/Operation<br />
Select “Mode” and press OK. Use<br />
UP/DOWN to select 1P (single<br />
photo), 3P (burst of 3 photos), or<br />
Movie (video mode). Press OK.<br />
Use UP/DOWN to set LO (1.3 MP)<br />
or HI (3 MP) still photo resolution<br />
(High resolution provides better<br />
quality photos, low resolution<br />
allows you to store more photos<br />
on the SD card), or video length<br />
from 5-60 sec. (if video mode was<br />
selected).<br />
Deletes (erases) all files stored<br />
on a card to prepare it for reuse.<br />
Always format a card that has<br />
been previously used in other<br />
devices. Caution! Make sure you<br />
have downloaded and backed<br />
up any files on the card that you<br />
want to preserve first! Press UP to<br />
select “FO”, press OK, then select<br />
“Y” (Yes) and press OK again to<br />
confirm you want to format the<br />
card. The extra step and “No”<br />
defaults help prevent accidental<br />
erasure of all your photos/videos.<br />
11
When you’ve finished using the Setup Menu, and are ready to return the<br />
camera to normal operating mode, so it will begin to capture photos or<br />
videos for you, simply press the Setup button. After you exit the Setup<br />
Menu, the display will go blank and the camera is in “sleep” mode. About<br />
30 seconds later, the camera will begin taking photos or videos when<br />
triggered, at intervals determined by the trigger delay time setting.<br />
Once your camera has been setup, you are ready to begin using it to<br />
capture photos of activity in the area you choose to locate it. Just follow<br />
these steps:<br />
1. Mount the <strong>Cam</strong>era<br />
CAMERA OPERATION<br />
It is recommended that you mount the camera about 4 or 5 feet (1.2~1.5<br />
meters) off the ground, with the camera pointed at a slight downward<br />
angle. It’s best to avoid mounting the camera facing east or west as the<br />
rising and setting of the sun could produce false triggers and overexposed<br />
images. Clear branches and other debris away from the front of the<br />
camera so as not to block the camera lens or PIR sensor.<br />
To mount the camera in place, insert the strap through the strap slots on<br />
the rear housing. Wrap the strap around the mounting surface. Secure<br />
the strap and tighten the buckle in order to secure the camera.<br />
Make sure that both door latches are securely locked in place, to ensure<br />
proper weather resistance.<br />
2. Power On the <strong>Cam</strong>era<br />
The camera will be in “sleep” status after it has been powered on. When<br />
the PIR sensor is triggered, it will start to take photos immediately after<br />
the delay time (as set) has passed.<br />
12
<strong>Cam</strong>era OPERATION (continued)<br />
3. Test the Coverage Area<br />
One of the <strong>Trail</strong> <strong>Cam</strong>era’s most useful features is the ability to test the<br />
coverage area.<br />
• After mounting the camera, open the front housing and slide<br />
the Power switch to the “ON” position. Press the SETUP button if<br />
necessary to enter the Setup Menu.<br />
• The PIR indicator light below the lens will blink when you have<br />
entered the coverage area.<br />
• Adjust the camera position as needed and repeat the test until the<br />
desired coverage area is achieved.<br />
• Press the SETUP button again when you are finished using the test<br />
mode-the camera will be “sleeping” and waiting for the PIR sensor<br />
to trigger the first photo or video capture.<br />
• Maximum PIR sensor range is approx. 30 ft.<br />
4. Secure the <strong>Cam</strong>era<br />
A standard padlock may be used in the camera’s lock hole to secure it<br />
and prevent theft.<br />
13
VIEWING THE PHOTOS and VIDEOS<br />
After your camera has been operating for awhile, you will of course want<br />
to review the photos and/or videos it has been capturing. This can be<br />
done by either of two methods, according to your preference or the<br />
availability of accessory equipment:<br />
Using an SD Card Reader<br />
1. Push the SD card in slightly to release it then pull it out gently.<br />
2. Put the SD card into any of the widely available SD card readers<br />
(either a dedicated SD card reader or “multi-card reader” that<br />
features slots for several different memory cards, including SD cards.<br />
3. Follow the card reader supplier’s directions to view or download the<br />
photo and/or video files on the SD card.<br />
Connecting the <strong>Cam</strong>era to Your Computer via USB<br />
1. Slide the Power switch to the “ON” position, then press the SETUP<br />
button.<br />
2. Connect your camera’s USB port (left side near the display with<br />
camera unlatched and open) to a PC or Mac computer with a USB<br />
cable (not included, available at most electronics/computer retailers)<br />
that has a “Mini-B” USB plug on one end (camera) and a “Standard-A”<br />
USB plug at the other end (computer).<br />
3. The PC will recognize the camera as an external storage device,<br />
using the “USB Mass Storage” standard (no driver installation<br />
necessary-not compatible with Windows 98 or earlier). The PC will<br />
display a new disk symbol under “My Computer” or in Windows<br />
Explorer (Macs-new disk appears on the desktop), and you will see a<br />
dialog window on your desktop with several options to view, move,<br />
or copy the photo and video files that are stored on the SD card.<br />
The camera’s LCD will display “STO”, meaning the camera is in mass<br />
storage mode.<br />
14
GLOSSARY<br />
PIR (Passive Infrared Sensor): Senses motion like a typical security motion<br />
detector. Requires infrared energy (heat) in addition to motion to trigger<br />
the sensor to help limit detection to live subjects (rather than leaves, etc).<br />
<strong>Cam</strong>era Delay: Time elapsed between photos while events are sensed<br />
and recorded. You should set this based on wildlife activity in the area.<br />
Moon Phase: The trail cams have a feature which imprints a moon phase<br />
stamp on each photo for reference.<br />
IR Flash: Also called IR LED Array. This is a “night vision” feature, which<br />
emits a burst of infrared light, invisible to the human eye. Especially<br />
useful for night photos when a visible flash may be undesirable.<br />
Battery Life: Time that camera will function in the field. Dependent on<br />
ambient temperature, number of images taken and number of times the<br />
IR flash fires. When the battery voltage drops below 4.5v, the IR flash stops<br />
firing. When battery voltage is below 3.5v, the camera stops working.<br />
Single/Multi-Image Modes: The number of pictures the camera takes<br />
per PIR trigger (still photo capture mode only).<br />
1P: A single image is captured for each PIR trigger<br />
3P: A three image sequence captured for each PIR trigger<br />
FULL: When the SD card’s memory capacity is full, the LCD display<br />
indicates “FULL”<br />
Mass Storage: Connect the camera with a USB cable to a computer,<br />
press the “SETUP” button, and the computer can access the contents of<br />
the SD card. The camera is automatically recognized as an “external drive”,<br />
without the need to install special drivers. (Win 98 and older operating<br />
systems are not supported. Mac OSX is also compatible-the camera will<br />
appear on your desktop as an external storage device or “disk”).<br />
15
Technical Specifications<br />
Model Number<br />
Image Sensor Type<br />
Sensor Resolution<br />
<strong>119256CW</strong><br />
1/4 Inch CMOS<br />
1.3 Megapixels<br />
Effective Focal Length<br />
7.6 mm<br />
Lens Aperture<br />
f/2.0<br />
IR Filter<br />
Automatic IR Filter<br />
Display<br />
LCD (menu screen)<br />
PIR Sensor<br />
Yes<br />
Trigger Speed<br />
1.3 seconds or less<br />
Number of IR LED<br />
15 LEDs<br />
Max Night Vision Lighting Distance 30 feet<br />
Storage<br />
SD Card, up to 32 GB Capacity<br />
PIR Indicator<br />
Yes (Setup mode only)<br />
Adjustable Delay Time Range 5~ 59 second, 1~ 10mins (default 10S)<br />
Selectable Image Resolution LO (1.3 MP) or HI (3 MP*)<br />
Multiple Image Mode<br />
Video Resolution<br />
File Format (Image/Video)<br />
Date/Time Imprint<br />
Moon Phase Imprint<br />
Exposure<br />
White Balance Mode<br />
Power Supply<br />
Water Resistant<br />
Yes-3 photos<br />
Movie: AVI 640 x 480 pixels @ 30 fps (5-60<br />
seconds).<br />
JPEG/AVI<br />
Yes<br />
Yes<br />
Auto<br />
Auto<br />
4 AA Cell batteries (alkaline or lithium)<br />
Yes<br />
*3MP resolution via software interpolation<br />
16
Troubleshooting / FAQ<br />
Battery life is shorter than expected<br />
1. Battery life will vary with operating temperature and the number<br />
of images taken over time. Typically, the trail cam will be able to<br />
capture several thousand images before the batteries die.<br />
2. Check to make sure you have used new alkaline or lithium<br />
batteries. <strong>Tasco</strong> recommends using 4 Energizer® Lithium AA<br />
batteries in this <strong>Trail</strong> <strong>Cam</strong> to obtain maximum battery life.<br />
3. Make sure that the power switch was turned to the “ON” position<br />
and that the camera was not left in Setup mode while in the field.<br />
4. Make sure that you are using a good quality name brand SD card<br />
in your camera. <strong>Tasco</strong> recommends SanDisk® brand SD Cards<br />
up to 32GB. Our experience indicates that poor quality SD cards<br />
can sometimes reduce your trail cam battery life.<br />
<strong>Cam</strong>era stops taking images or won’t take images<br />
1. Please make sure that the SD card is not full. If the card is full, the<br />
camera will stop taking images.<br />
2. Check the batteries to make sure that they are new alkaline or<br />
lithium AA batteries. See note above about short battery life.<br />
3. Make sure that the camera power switch is in the “ON” position<br />
and not in the “OFF” position or in Setup mode.<br />
4. Make sure that you are using a good quality SD card in your<br />
camera. <strong>Tasco</strong> recommends SanDisk® SD Cards up to 32GB.<br />
5. If the SD card has its write protect switch in the lock position, the<br />
camera will not take images.<br />
6. If you have used an SD card in another device before inserting<br />
it in your trail cam , you might want to try formatting the card<br />
using the “Format” parameter in Setup mode (make sure you<br />
have backed up any important files first, as formatting will erase<br />
all previous files). In some cases, other devices may change the<br />
formatting of the SD card so that it will not work properly with<br />
the trail cam .<br />
17
18<br />
Troubleshooting / FAQ<br />
<strong>Cam</strong>era won’t power up<br />
1. Make sure that you have installed all 4 batteries in the battery<br />
compartment. <strong>Tasco</strong> recommends using 4 Energizer® Lithium<br />
AA batteries in this trail cam .<br />
2. Make sure that the batteries are installed correctly, observing<br />
proper polarity. Always place the negative (flat) end of each<br />
battery in contact with the spring tab side of its slot inside the<br />
camera.<br />
Do not mix old and new batteries.<br />
Do not mix battery types-use ALL lithium or ALL alkaline.<br />
Rechargeable batteries are not recommended.<br />
Still Photo and/or Video Quality Problems<br />
1. Night photos or videos appear too dark<br />
a. Try using a set of new batteries. The flash will stop operating<br />
near the end of the battery life.<br />
b. You will get the best results when the subject is within the<br />
ideal flash range, no farther than 30’ from the camera. Subjects<br />
may appear too dark at greater distances.<br />
c. Please note that when the still photo mode is set to “3P”, or with<br />
very short Delay time settings, some images may appear darker<br />
than others due to the quick response and rapid retriggering<br />
of the camera, allowing less time for the flash to fully recharge<br />
before firing again.<br />
2. Daytime photos or videos appear too dark<br />
a. Make sure that the camera is not aimed at the sun or other<br />
light sources during the day, as this may cause the auto exposure<br />
to produce darker results.<br />
3. Night photos or videos appear too bright<br />
a. You will get the best results when the subject is within the<br />
ideal flash range, no closer than 10’ (3m) from the camera.<br />
Subjects may appear too light at closer distances.<br />
4. Daytime photos or videos appear too bright<br />
a. Make sure that the camera is not aimed at the sun or other<br />
light sources during the day.
Troubleshooting / FAQ<br />
5. Photos with streaked subject<br />
a. In some cases with low lighting conditions and fast moving<br />
subjects, the 3 MP resolution setting (“HI”) may not perform as<br />
well as the 1.3 MP setting (“LO”).<br />
b. If you have multiple images where fast moving subjects<br />
produce streaks on the photo, try the “LO” resolution setting<br />
instead.<br />
6. Red , green or blue color cast<br />
a. Under certain lighting conditions, the sensor can become<br />
confused resulting in poor color images.<br />
b. If this is seen on a consistent basis, then the sensor may need<br />
servicing. Please contact <strong>Tasco</strong> customer service.<br />
7. Short video clips—not recording to the length set<br />
a. Check to make sure that the SD card is not full.<br />
b. Make sure that the camera has good batteries in it. Near the<br />
end of the battery life, the camera may choose to record shorter<br />
video clips to conserve power.<br />
Photos Do Not Capture Subject of Interest<br />
1. Try to set your camera up in an area where there is not a heat<br />
source in the camera’s line of sight.<br />
2. In some cases, setting the camera near water will make the<br />
camera take images with no subject in them. Try aiming the<br />
camera over ground.<br />
3. Try to avoid setting the camera up on small trees that are prone<br />
to being moved by strong winds.<br />
4. Remove any limbs which are right in front of the camera lens.<br />
PIR Sensor LED Flashes/Doesn’t Flash<br />
1. When the camera is in the “Setup” mode, the PIR Indicator LED<br />
on the front of the camera will flash when it senses motion. This<br />
is for setup purposes only and will help the user aim the camera.<br />
2. During use, the LED will not flash when the camera takes an<br />
image. This is to help keep the camera hidden from game.<br />
19
Troubleshooting / FAQ<br />
<strong>Cam</strong>era won’t retain settings<br />
1. Make sure that you have been saving the changes to any parameter<br />
settings that you made while in Setup mode, by pressing “OK”<br />
after changing the setting. If you don’t save your new setting after<br />
changing it, the camera will continue to use the original default<br />
setting for that parameter.<br />
Do not mix old and new batteries.<br />
Do not mix battery types-use ALL lithium or ALL alkaline.<br />
Rechargeable batteries are not recommended.<br />
20
TWO-YEAR LIMITED WARRANTY<br />
Your <strong>Tasco</strong> ® product is warranted to be free of defects in materials and workmanship for two years after<br />
the date of purchase. In the event of a defect under this warranty, we will, at our option, repair or replace<br />
the product, provided that you return the product postage prepaid. This warranty does not cover damages<br />
caused by misuse, improper handling, installation, or maintenance provided by someone other than a<br />
<strong>Tasco</strong> Authorized Service Department.<br />
Any return made under this warranty must be accompanied by the items listed below:<br />
1. A check/money order in the amount of $10.00 to cover the cost of postage and handling<br />
2. Name and address for product return<br />
3. An explanation of the defect<br />
4. Proof of Date Purchased<br />
5. Product should be well packed in a sturdy outside shipping carton, to prevent damage in transit,<br />
with return postage prepaid to the address listed below:<br />
IN U.S.A. Send To:<br />
IN CANADA Send To:<br />
<strong>Tasco</strong><br />
<strong>Tasco</strong><br />
Attn.: Repairs<br />
Attn.: Repairs<br />
9200 Cody 25A East Pearce Street, Unit 1<br />
Overland Park, Kansas 66214<br />
Richmond Hill, Ontario L4B 2M9<br />
For products purchased outside the United States or Canada please contact your local dealer for applicable<br />
warranty information. In Europe you may also contact <strong>Tasco</strong> at:<br />
<strong>Tasco</strong> Germany GmbH<br />
European Service Centre<br />
Mathias-Brüggen-Str. 80<br />
D-50827 Köln<br />
GERMANY<br />
Tel: +49 221 995568-0<br />
Fax: +49 221 995568-20<br />
This warranty gives you specific legal rights.<br />
You may have other rights which vary from country to country.<br />
©2013 B.O.P.<br />
Specifications and designs are subject to change without<br />
any notice or obligation on the part of the manufacturer.<br />
21
FCC Compliance Statement:<br />
This equipment has been tested and found to comply with the limits for a Class<br />
B digital device, pursuant to part 15 of the FCC Rules. These limits are designed<br />
to provide reasonable protection against harmful interference in a residential<br />
installation.<br />
Operation is subject to the following two conditions: (1) This device may not<br />
cause harmful interference, and (2) this device must accept any interference<br />
received, including interference that may cause undesired operation.<br />
This equipment generates, uses and can radiate radio frequency energy and, if<br />
not installed and used in accordance with the instructions, may cause harmful<br />
interference to radio communications. However, there is no guarantee that<br />
interference will not occur in a particular installation. If this equipment does<br />
cause harmful interference to radio or television reception, which can be<br />
determined by turning the equipment off and on, the user is encouraged to<br />
try to correct the interference by one or more of the following measures:<br />
· Reorient or relocate the receiving antenna.<br />
· Increase the separation between the equipment and receiver.<br />
· Connect the equipment into an outlet on a circuit different from that to<br />
which the receiver is connected.<br />
· Consult the dealer or an experienced radio/TV technician for help.<br />
The device does not contain any user-serviceable parts. Repairs should<br />
only be made by an Authorized <strong>Tasco</strong> repair center. Unauthorized repairs or<br />
modifications could result in permanent damage to the equipment, and will<br />
void your warranty and your authority to operate this device under Part 15<br />
regulations.<br />
The shielded interface cable which is provided must be used with the<br />
equipment in order to comply with the limits for a digital device pursuant to<br />
Subpart B of Part 15 of FCC Rules.<br />
22
For further questions or additional information please contact:<br />
<strong>Tasco</strong><br />
9200 Cody, Overland Park, Kansas 66214<br />
(800) 423-3537 • www.tasco.com<br />
©2013 B.O.P.