Speedy 2 Speedy 2 Shocker/Nerve Board User's Manual
Speedy 2 Speedy 2 Shocker/Nerve Board User's Manual
Speedy 2 Speedy 2 Shocker/Nerve Board User's Manual

Create successful ePaper yourself
Turn your PDF publications into a flip-book with our unique Google optimized e-Paper software.
Features:<br />
Unique Activation Codes<br />
--Varying in 3-6 digits, there are over 100 unique<br />
codes in existence.<br />
Parabolic Ramping<br />
---Undeniably the most advanced ramping logic ever<br />
created. Unlike percentage ramping, parabolic is<br />
dynamic; always changing. The faster you shoot, the<br />
faster it ramps. The result is super smooth ramping<br />
you have to feel to believe.<br />
2 Ways to Disable Ramping<br />
--Ramping can be disabled simply by taping the<br />
power button or by holding the trigger down for 2<br />
seconds.<br />
<strong>Speedy</strong> 2<br />
<strong>Shocker</strong>/<strong>Nerve</strong><br />
<strong>Board</strong><br />
User’s <strong>Manual</strong><br />
TM<br />
AMB Software<br />
---Anti Mechanical Bounce Software combined with a<br />
safe debounce setting will help your gun to NEVER<br />
bounce. Not even on slow pull tests.<br />
ABS Software<br />
---Anti-Bolt Stick programming helps to eliminate First<br />
Shot Drop Off. . Dipswitch 1 On = ABS on;<br />
Dipswitch 1 off = ABS off<br />
Adjustable Debounce, Dwell, and MROF with<br />
Eyes off.<br />
---Adjustable through programming menu.<br />
For More Information Please See:<br />
www.AdvantagePB.com<br />
AdvantagePB LLC<br />
103 Fulton Blvd.<br />
Commack, NY 11725
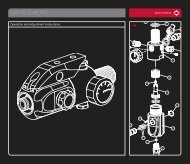
Installing Your AdvantagePB <strong>Shocker</strong>/<strong>Nerve</strong><br />
<strong>Board</strong>:<br />
1. With the grip frame open, push out the two pins<br />
that are holding in your existing board.<br />
2. Remove the battery from the wiring harness<br />
being careful not to damage the wires.<br />
3. Carefully remove your existing board from the<br />
marker and disconnect the wire harness from<br />
your existing board.<br />
4. Connect that same wire harness to the<br />
AdvantagePB Virtue <strong>Shocker</strong>/<strong>Nerve</strong> <strong>Board</strong>.<br />
5. Place the Virtue <strong>Shocker</strong>/<strong>Nerve</strong> board back into<br />
the grip frame making sure the bottom of the<br />
board is in the slot of the grip frame.<br />
6. Line up the two pins you removed in step 1, and<br />
push them back into place.<br />
7. Last, reconnect the battery and close the grips.<br />
LED Indicator:<br />
The power button on the back of the marker also<br />
functions as a small blue LED, telling you the status<br />
of your marker:<br />
Solid Blue Eye Enabled / Ball in Breech<br />
Flickering Blue Eye Enabled / No Ball in Breech<br />
Fast Flashing Blue Eye Disabled<br />
Flashing Blue Eye Malfunction<br />
Eye Operation:<br />
When the marker is turned on the eye system is<br />
automatically enabled. The eyes can then be turned<br />
off by pressing the power button for 1 second. When<br />
the eyes are disabled the max rate of fire will not go<br />
over 20bps.<br />
The eye logic differentiates between a ball being<br />
fired, and something continually blocking the eye (like<br />
your finger). If the eye becomes blocked, the LED<br />
will flash blue, indicating an eye malfunction. When<br />
the object blocking the eyes is removed the eye will<br />
automatically return to working mode.<br />
Ramp Activation Operating Instructions:<br />
The activation codes for the <strong>Speedy</strong> 2 <strong>Shocker</strong>/<strong>Nerve</strong><br />
<strong>Board</strong> have been done in a "Morse code" system.<br />
The activation codes vary in length from three to six<br />
digits and use "Taps" and "Presses." Taps are<br />
holding the power button for less then a ¼ of a<br />
second, and Presses are holding the power button for<br />
¼ of a second or more.<br />
To turn ramping on, the gun and eye must be on.<br />
Then tap in your activation code. The led will go out<br />
for ¼ of a second to indicate the code has been<br />
entered correctly, and Parabolic Ramping is now<br />
enabled. To turn ramping off at anytime, simply tap<br />
the power button, or hold the trigger for 2 seconds.<br />
There is no indicator to show when ramping is shut<br />
off.<br />
Also, if the marker is not fired for 90 seconds,<br />
ramping is turned off.<br />
Please note <strong>Speedy</strong> <strong>Board</strong>s will only ramp when the<br />
eye is on, and paint is being fired.<br />
Programming Mode:<br />
Your Activation Code:<br />
To access the programming mode of the <strong>Speedy</strong> 2<br />
<strong>Shocker</strong>/<strong>Nerve</strong> <strong>Board</strong> Dipswitch 2 must be in the on<br />
position. When Dipswitch 2 is in the off position, the<br />
gun is in “Tournament Lock”, and program settings<br />
cannot be changed.<br />
With Dipswitch 2 in the on position, turn the marker<br />
on. The multi color LED on the board will then cycle<br />
through a rainbow of colors and stop on green,<br />
indicating that you are now in programming mode.<br />
Tapping the trigger will then toggle through the<br />
different programming modes:<br />
Green - Debounce Values 1 - 20 (stock setting is 5)<br />
Debounce is the amount of time that the trigger has<br />
to be released before next trigger pull is allowed.<br />
Red - Dwell Values 5 - 30 (stock setting is 12)<br />
Dwell is the amount of time that the solenoid will be<br />
activated.<br />
Blue – MROF with eyes off Values 5 - 20 (stock<br />
setting is 20bps)<br />
When the Anti Chop Eye (ACE) is deactivated, this is<br />
your Max Rate of Fire. The MROF is unlimited when<br />
the eye is on.<br />
To Change the Value of a Setting:<br />
When the LED is lit for the desired setting, pull and<br />
hold the trigger until the LED Begins to flash. The<br />
LED will flash the number of times the current value<br />
is set to. When the LED stops flashing you then have<br />
2 seconds to enter in the new value by tapping the<br />
trigger the amount of times you want the new value to<br />
be. After you have set the new value, the LED will<br />
flash through the rainbow of colors and stop on green<br />
indicating the new value has been set. To exit<br />
programming mode, set Dipswitch 4 to the down or<br />
off position.<br />
Programming Example:<br />
If you want to change the debounce to 2 you would:<br />
1. With Dipswitch 2 in the on position, turn<br />
the marker on.<br />
2. The multi-color LED will now cycle through<br />
a rainbow of colors and stop on Green.<br />
3. Pull and hold the trigger until the LED<br />
starts to flash (factory default for debounce<br />
is 5, so the LED will flash 5 times).<br />
4. When the LED stops flashing, quickly tap<br />
the trigger 2 times.<br />
5. The LED will now flash 2 times, and then<br />
flash through the rainbow of colors, and<br />
stop on green, indicating the new value has<br />
been set.<br />
6. To exit program mode, put dipswitch 2<br />
back to the OFF position.<br />
Please note the marker cannot be turned off while in<br />
programming mode.<br />
For More Information Please See:<br />
www.AdvantagePB.com