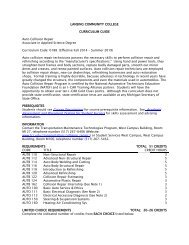
Course Index - Lansing Community College
Course Index - Lansing Community College
Course Index - Lansing Community College

You also want an ePaper? Increase the reach of your titles
YUMPU automatically turns print PDFs into web optimized ePapers that Google loves.
SPRING SEMESTER 2009<br />
General Information<br />
Web Registration Instructions Spring 2009<br />
Banner Student System<br />
1. Begin at www.lcc.edu and click on starport<br />
“login”<br />
2. Click the “Spring 2009 registration” tab and<br />
then click “Register Here!”<br />
3. Enter your TUID (all uppercase) and your<br />
banner pin. The first time logging in, your<br />
banner pin will be your date of birth in<br />
MMDDYY format. You will then set a<br />
permanent 6 digit pin and create a security<br />
question and corresponding answer.<br />
A note on navigation: do not use your browser’s<br />
“back” button from this point forward; instead use<br />
links on the page such as “Return to previous<br />
menu” or others to navigate through the system.<br />
4. Click “student”<br />
5. Click “registration”<br />
a. Click “1) verify address” and either<br />
“update” your address or, if your<br />
address is correct, return “Return to<br />
Registration Steps” to continue.<br />
b. Click “2) select term” and submit Spring<br />
2009<br />
c. Click “3) add or drop classes”; then<br />
i. either enter the CRN number<br />
for the section you wish to<br />
register for and click “submit<br />
changes” to register for that<br />
class.<br />
ii. or click the “class search”<br />
button to look for the CRN.<br />
Register for the desired CRN<br />
by checking the select box on<br />
the left, then scroll down and<br />
click “register” button.<br />
6. Repeat step 5 c until satisfied with your<br />
schedule.<br />
7. To view or print your class schedule from here<br />
a. click the “student” tab at the top<br />
b. click “registration”<br />
c. click “4) student detail schedule”<br />
d. view or print, as desired and click<br />
“Return to Registration Steps”<br />
8. Click “5) registration fee assessment” to view<br />
your fees<br />
9. Click “exit” to end your session and secure your<br />
account; do not use the x button on your<br />
browser’s window.<br />
Note: If you wish to audit a course (e.g. not get a<br />
grade or credit for the course), complete the<br />
following steps after you are registered:<br />
• Repeat step 7 a, b, and c above to view<br />
your schedule. Under “Grade Mode” click<br />
the blue text “numeric standard”. For the<br />
desired course(s), change grade mode to<br />
“audit” and click “submit changes”. Your<br />
new schedule will be displayed with the<br />
grade mode changes.<br />
Register early! For the most current online information about class offerings go to: www.lcc.edu/schedule/<br />
182