


You also want an ePaper? Increase the reach of your titles
YUMPU automatically turns print PDFs into web optimized ePapers that Google loves.
Ocs <strong>Inventory</strong> <strong>NG</strong> on MacOSX<br />
What is this ?<br />
I work as sysadmin and network engineer, fortunately networks where I work are not mine.<br />
Often, in big companies, there is the necessity to inventory what is really attached to the network.<br />
So, when I'm out for business I keep in my car just a couple of trashware computers, I install linux on-the-fly and I do the dirty work. In<br />
the past I worked also in a graphic lab where there were only macs, so I guess to install ocsinventory directly on a mac, without<br />
pcs."ok" I said, then I pointed to www.ocsintory-ng.org and "ARGH, no Mac OSX support".<br />
The challenge has started.<br />
Ocs<strong>Inventory</strong> <strong>NG</strong> ( http://www.ocsinventory-ng.org) is a software, developed by a french team that allows to inventory all the things that<br />
are attached to your network, PCs, Routers, Switches, Network Printers and everything that has a mac-address.<br />
Ocs<strong>Inventory</strong> <strong>NG</strong> allows you to deeply analyze all the software installed on your clients, also in different networks.<br />
And least but not last ocsinventory-ng is also capable to deploy other software, with a procedure of remote installation (not discussed<br />
here.<br />
Obviously is possible to analyze machines not only with MacOsx installed, but also with different flavours of unix, and microsoft<br />
windows.<br />
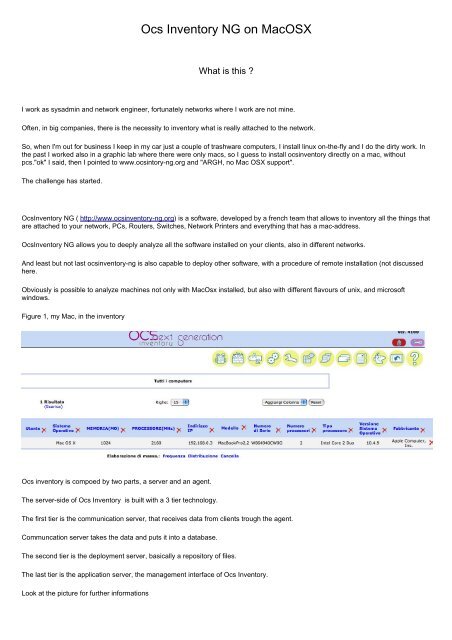
Figure 1, my Mac, in the inventory<br />
Ocs inventory is compoed by two parts, a server and an agent.<br />
The server-side of Ocs <strong>Inventory</strong> is built with a 3 tier technology.<br />
The first tier is the communication server, that receives data from clients trough the agent.<br />
Communcation server takes the data and puts it into a database.<br />
The second tier is the deployment server, basically a repository of files.<br />
The last tier is the application server, the management interface of Ocs <strong>Inventory</strong>.<br />
Look at the picture for further informations
The product is a mix of apache, perl, php e mysql.<br />
The agent, also for Macosx, is a little pice of software that analyzes the machine and then sends data to the server<br />
On windows machines this agent is available as a stand-alone agent or as a windows service. ( Here we will not speak about windows<br />
but is important to notice that ocsinventory perfectly fits into your domain, with active directory and Gpos and so on.<br />
Officialy, as I wrote previuosly, the Ocs <strong>Inventory</strong> Ng server does not work with MacOsx.<br />
Often I live and I work in a world where interoperability is a dream, I sit down on my chiar and today I tell you all I've done to get<br />
Ocsinvenory work on my mac.<br />
So let's get it started.<br />
**** Mind that this tutorial is written and tested on an Intel Mac, but probably there are no problems to do the same thing on a powerpc<br />
platform.****<br />
Mental requirements:<br />
Terminal<br />
Network basis<br />
Basic Knowledge of *nix<br />
Basic Knowledge of installation of perl modules (via cpan or darwinports)<br />
Developer Tools (make, perl)
Software requirements:<br />
Ocs <strong>Inventory</strong> requires:<br />
- MySQL version 4.1 or +<br />
- PERL 5.6 or +<br />
- Apache version 1.3.33 or +<br />
- PHP 4.3.2 +<br />
- A lot of perl modules.<br />
Analyzing the problem:<br />
At a glance, we can say the <strong>OCS</strong> <strong>Inventory</strong> ng is a software based on a AMP architecture (Apache, Mysql,Php) so, with a clean<br />
installations of MAMP, all the stuff should be work. Is not so.<br />
MAMP has many problems with perl, because is redistributed with a versione of apache that does not have mod_perl<br />
So we have to follow the Tafazzi way. (look at the picture, if you don't know who is Tafazzi, please document yourself on wikipedia)<br />
Briefly,<br />
- Use macosx built-in apache<br />
- Manual installation of Php<br />
- Manual installation of Mysql<br />
- Mysql and PHP tricks<br />
- Compilations of perl modules.
Project realization<br />
Phase 1: Creation of an appropriate environment<br />
some technical notes,when the font has the "terminal" style means that you have to digit lines into the Terminal.<br />
At the end of each line there is "Return".<br />
So just open Terminal,or a console and then let's start:<br />
cd /etc/httpd/<br />
then<br />
sudo mkdir conf.d<br />
if the system wants your password, please digit it, then<br />
sudo chmod 755 conf.d<br />
What we have done ?<br />
We have created a new folder that our web server will read to load other configuration files, that I want to keep separated from<br />
httpd.conf, which is the main configuration file.<br />
Phase 2: Modify httpd.conf<br />
Now we have to open with write privileges the httpd.conf file, ( I use vi) so from the Terminal<br />
sudo vi httpd.conf<br />
Let's comment the built-in php (if is already enables) so<br />
we have to comment lines 240 and 284.<br />
If you're using vi, it will be sufficient press the I key, insert the modifies and then press "ESC"
#LoadModule phnormale_module<br />
libexec/httpd/libphnormale.so<br />
#AddModule mod_phnormale.c<br />
now we have to uncomment lines 239 and 283<br />
If you're using vi, it will be sufficient press the "x" key<br />
LoadModule perl_module<br />
libexec/httpd/libperl.so<br />
AddModule mod_perl.c
then, scroll down<br />
and we have to add to the bottom of the file the following line<br />
If you're using vi, it will be sufficient press the "i" key (insert), adding the line, and then press "esc"<br />
Include /etc/httpd/conf.d/<br />
save and exit.<br />
With vi<br />
:wq!<br />
very good.<br />
What we have done ?<br />
We have disabled the buil-in php, because this version of php has some problems, then we have specified that we want mod_perl<br />
enabled. Mod_perl is a piece of software that allow to interface directly perl scripts with the webserver.<br />
Then we have added a line with and Include, to specifies where there are other configuration files.<br />
Phase 3: Mysql download, installations and tricks<br />
Let's download from Mysql site, the last version of Mysql for MacOsx version in pkg format.<br />
http://dev.mysql.com/downloads/mysql/5.0.html#macosx
let's install Mysql, via pkg.<br />
At this point I often use MysqlAdministrator.<br />
http://dev.mysql.com/downloads/gui-tools/5.0.html<br />
Editing Mysql:<br />
Open Terminal<br />
cd /usr/local/mysql/lib<br />
sudo mkdir mysql<br />
Insert your password<br />
sudo cp ../* .<br />
We have to do this due to a bug with paths, it's not elegant, but it works.<br />
What we have done ?<br />
Abbiamo installato una versione aggiornata di Mysql, e abbiamo copiato le librerie di mysql, in un'altra directory perchè un modulo di<br />
perl ha un bug nella gestione dei percorsi.
Phase 4: <strong>Download</strong> Ocsinventory-ng<br />
Aye Aye, now you can go dinner. Or continue.<br />
Now, we have to download <strong>OCS</strong><strong>Inventory</strong>-ng, linux version, of course.<br />
http://prdownloads.sourceforge.net/ocsinventory/<strong>OCS</strong><strong>NG</strong>_LINUX_SERVER_1.01.tar.gz?download<br />
The packet is in tar.gz format<br />
Let's decompress the packet, even on Desktop, and now we must modify the setup.sh script.<br />
The script is quite simple, let's see.<br />
Phase 5: Editing setup.sh<br />
setup.sh verifies if the system is able to support OCsinventory-ng, then edits apache's files. The script also install administration<br />
console and communication server.<br />
Let's open setup.sh with a text editor, possibly with coloured syntax; I use smultron, that is free, or if you prefere you can use<br />
textwrangler,textmate, pico and so on.<br />
Let's change lines 91 and 92 where is specified mysql.<br />
Mysql does not exist in the system path, because its binary is in another folder (/usr/local/mysql), so we have to specify this linke in this<br />
figure.<br />
At this point , we have to comment some lines, that modifies logrotate, this is not used by OsX.<br />
So, in bash style, we have to comment lines from 795 to 818 as shown.
save and exit setup.sh<br />
Phase 6: Perl modules compilation<br />
Now we can compile some perl modules:<br />
There are 2 ways to do this:<br />
- The first one is using cpan<br />
- The second is using darwinports,macports,fink etc.<br />
I choose to first<br />
Let's explain a bit:<br />
cpan (the command) is a command line utility that allow to download and install perl modules, directly from cpan repository. So the<br />
command cpan takes the latest version,downloads it,decompress it,configures it and then compiles and installs it.<br />
We have to install some modules.<br />
if the system ask for dependencies we must answer yes.<br />
Little note on darwinports,fink etc:<br />
I didn't choose this way because I'm not sure how those packet integrates with the system. Often those packet works in /opt/local/ and<br />
anyway at least one module is to be recompiled.<br />
So let's get it started:<br />
-Open Terminal<br />
If you have already used cpan, there will be no problems, otherwise you may have to answer to a couple of questions, for the first<br />
startup.
sudo cpan -i Compress::Zlib<br />
if the packet gives no errors, we can continue with<br />
sudo cpan -i DBI<br />
if the packet gives no errors, we can continue with<br />
sudo cpan -i Net::IP<br />
if the packet gives no errors, we can continue with<br />
sudo cpan -i Apache::DBI<br />
if the packet gives no errors, we can continue with<br />
sudo cpan -i XML::Simple<br />
XML probabyly ask for installation of XML::Namespaces, XML::Sax, XML::Sax-Expat, XML::Parser<br />
Very well.<br />
Now the harder part. Two modules a little bit more complicated: SOAP::Lite, and DBD::Mysql<br />
first SOAP::Lite<br />
sudo cpan -i SOAP::Lite<br />
The system will work for a bit, if the system stops on make-test is because of some problems.<br />
To resolve the problem, we have to force a bit the system.<br />
sudo su
insert your password<br />
**** You're working as a root be careful ! ***<br />
Let's move in the folder /var/root/.cpan/build/<br />
cd /var/root/.cpan/build/<br />
searching for a folder named SOAP-Lite-x.xx<br />
cd SOAP-Lite*<br />
at this point digit "make"<br />
make<br />
followed by<br />
make install<br />
exit<br />
At this point, I'll go to sleep<br />
Phase 7: Installation of DBD::mysql<br />
Let's manually download the module form here<br />
http://search.cpan.org/CPAN/authors/id/C/CA/CAPTTOFU/DBD-mysql-4.004.tar.gz<br />
in Terminal windows let's digit
sudo su<br />
insert your password<br />
**** **** You're working as a root be careful ! *** ***<br />
Let's move in the folder /var/root/.cpan/build/<br />
cd /var/root/.cpan/build/<br />
then we have to copy from desktop the file downloaded<br />
cp /Users//Desktop/DBD-mysql-4.004.tar.gz .<br />
decompress<br />
tar fxvz DBD-mysql-4.004.tar.gz<br />
moving to the folder named DBD-mysql-x.xx<br />
cd DBD-mysql*<br />
what we are doing:<br />
we're going to configure manually the packet, specifing where mysql libraries are.<br />
perl MakeFile.PL --mysql_config=/usr/local/mysql/bin/mysql_config<br />
followed by<br />
make
now<br />
make test<br />
giving make test, there are two common errors:<br />
Phase 8 : Errors in the compilation phase<br />
- make test does not found mysql socket<br />
- make test has socket problems,because of a pre-existent mysql installation with root password not-empty<br />
* Resolution to Can't connect to local MySQL server through socket '/tmp/mysql.sock'<br />
How to resolve this.<br />
First of all, the sock file, is a file that is used by php,perl and other programs to connect at a database istance. the sock file is a sort of<br />
"database device" and indicates that the service is working, is active and we can connect to a service trhought this file.<br />
from osx 10.4 there is a bit of confusion regarding where this file must be.<br />
Some people have seen it in /var/mysql/mysql.sock , other say that must be in /tmp/mysql.sock<br />
I added a soft-link between /var/mysql/mysql.sock and /tmp/mysql.sock so there are no problems. Is not so elegant but it works.<br />
There is an intresting article on tevac about this.<br />
http://www.tevac.com/article.php/2006012513085364<br />
cd /etc/<br />
sudo vi my.cnf<br />
and then I insert in my.cnf<br />
[mysqld]<br />
socket=/var/mysql/mysql.sock<br />
save and exit
at this point<br />
sudo mkdir /var/mysql/<br />
chmod 755 /var/mysql/<br />
restart mysql, I use MySQL Administrator<br />
cd /tmp<br />
sudo ln -s /var/mysql/mysql.sock mysql.sock<br />
* Resolution at a connection problem<br />
make test want a mysql root user without password.<br />
So temporary substitute the mysql root password, I use MySQL Administrator<br />
If the make testgives no errors you can give<br />
make install<br />
very very well.<br />
exit<br />
Phase 9 : Packet Installation:<br />
Form terminal<br />
cd ~/Desktop/<strong>OCS</strong>*<br />
and now we have to start setup.sh<br />
the script could ask for apache's binary
usr/sbin/httpd<br />
the script could ask for apache's binary where is the apache's configuration file<br />
/etc/httpd/httpd.conf<br />
the script could ask for user, let's digit "www", and group "www"<br />
the script could ask for apache's include directory<br />
/etc/httpd/conf.d/<br />
If the script stops for some missing perl modules, write down the name, then using cpan install it.<br />
sudo cpan -i <br />
Answer yes to the other questions,when the script ask for DocumentRoot, digit<br />
/Library/WebServer/Documents<br />
the script ask for an apache restart.<br />
At this point, let's install the php packet provided by Marc<br />
http://www2.entropy.ch/download/entropy-php-5.2.2-1.tar.gz<br />
stop Apache, stop mysql, restart all<br />
Open Safari and digit<br />
Phase 10: First step with administration console<br />
http://localhost/ocsreports/<br />
Let's start configuration.<br />
***Remember to set mysql root password now***<br />
Insert username and password
The system generates table, press enter.<br />
** Errors<br />
/var/mysql/mysql.sock not found<br />
verify if the socket exist, and look for socket not found in this document.<br />
the system has no permission to use the socket<br />
check /var/mysql/mysql.sock permission<br />
And here is the Administration Console ( user: admin pass: admin )<br />
Phase 11 : First <strong>Inventory</strong><br />
Let's install the Macosx agent<br />
thanks to codejanitor, we can use an agent for macosx<br />
http://codejanitor.com/wp/apps/ocs-mac-agent/<br />
Install the pkg, then with terminal we have to move into the folder /etc/ocsinventory-client/<br />
cd /etc/ocsinventory-client/<br />
let's digit<br />
sudo vi ocsinv.conf<br />
and we have to change the file in the line <strong>OCS</strong>FSERVER, substituting ocsinventory-ng with the ip-address or the dns name of the<br />
machine that has the server installed, in our case, we can write in this way.<br />
localhost<br />
or
192.168.0.1<br />
or the ip-address correct.<br />
let's force the packet to do an inventory, let's digit<br />
sudo php /usr/local/sbin/ocs_mac_agent.php<br />
The agent must respond with a 200 message.<br />
***<br />
Errors<br />
server gives 500<br />
verify /var/log/httpd/error.log<br />
Probably is a problem of DBI , or DBD<br />
GIYF<br />
Phase 12: Results<br />
If all things goes well<br />
1) handshake yourself<br />
2) digit http://localhost/ocsreports and you'll see your Mac<br />
Ahr.
Other things:<br />
Other ways:<br />
There are many way to do what we have done.<br />
This is essential:<br />
* Apache with mod_perl.<br />
* Mysql with include directory for correct compilation of DBD:mysql<br />
* Php, possibily the Entropy's one.<br />
Debug:<br />
files to check:<br />
/var/log/httpd/error.log<br />
/var/log/ocsinventory-ng/ocsinventory-ng.log<br />
Thanks to:<br />
If anything gives problem feel free to contact me.<br />
I also want to thank my wife and myself.<br />
And thanks to Tevac.<br />
07/2007


