
You also want an ePaper? Increase the reach of your titles
YUMPU automatically turns print PDFs into web optimized ePapers that Google loves.
<strong>Windows</strong> <strong>XP</strong> <strong>Outline</strong><br />
The Desktop<br />
You can put an icon on the desktop for My Computer (or any other program such<br />
as MS Office programs)<br />
Open the Start menu.<br />
Right click on My Computer (or another program) and drag it to the desktop.<br />
Click on Create Shortcuts Here<br />
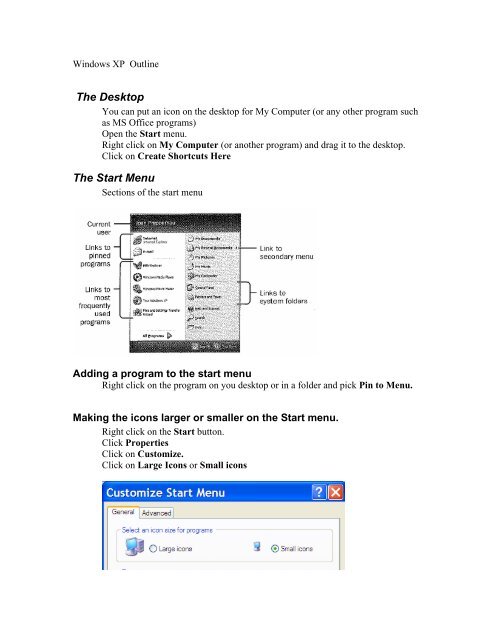
The Start Menu<br />
Sections of the start menu<br />
Adding a program to the start menu<br />
Right click on the program on you desktop or in a folder and pick Pin to Menu.<br />
Making the icons larger or smaller on the Start menu.<br />
Right click on the Start button.<br />
Click Properties<br />
Click on Customize.<br />
Click on Large Icons or Small icons
Moving an items up or down in the Start menu<br />
Open the Start menu.<br />
Click on a program and drag it to another location by holding the mouse button<br />
down.<br />
Sorting the items in the Programs list.<br />
Right click in a blank area of the list of programs and select Sort by name.<br />
A user might want to move Accessories beside All Programs in the list so it is<br />
easier to select.<br />
The Task Bar<br />
Moving the Taskbar<br />
You can drag the taskbar to the top or either side of the screen. Click on the taskbar and<br />
hold down the left mouse button. Drag the task bar to the top or sides of the screen.<br />
Start Quick Launch Icons for open programs System Tray<br />
Button Toolbar<br />
For each program that you open, an icon is placed on the Task bar. To quickly<br />
switch between programs, click on the program’s icon on the task bar. If you<br />
open several instances of the same program, similar windows are grouped onto<br />
one button. A number indicates how many instances of the program are open.
Click on that button on the Task bar and move the cursor up the list to the<br />
instance of the program you want to activate and click on it.<br />
Example – 2 instances of Word are open. Click on either one to open one of the files.<br />
Right click on the Word icon on the Task bar and select Close Group to close all<br />
instances of the Word program in one click.<br />
Opening and Minimizing Programs from the Task Bar<br />
To switch between minimized and open view, click an icon on taskbar. If multiple<br />
instances of a program are open, click on the program icon on the task bar and when a<br />
pop up list with the different instances appears, slide the cursor up to the instance you<br />
want to use.<br />
The Quick Launch Tool Bar<br />
Programs with an icon on the Quick Launch Tool Bar can be opened with a single<br />
click. Drag a program icon to the Quick Launch Tool Bar to add it there.<br />
Unlock the taskbar it if you can’t add icons to the tool bar.<br />
To unlock the Task Bar, right click in a blank area of the task bar (where there are<br />
no icons) and click on Lock the Taskbar to remove the checkmark.<br />
To add the Quick Launch toolbar to the task bar once it is unlocked, right click in<br />
a blank area of the task bar. Select Toolbars; Select Quick Launch<br />
Click on the Show Desktop<br />
desktop.<br />
icon on the Quick Launch toolbar to get to your
Working with <strong>Windows</strong><br />
Maximizing a window or Reducing its Size.<br />
To switch between a maximized window and one that is not full screen, you can<br />
double-Click anywhere in the top blue bar. You are not limited to clicking on the<br />
Maximize icon or the Restore Down icon.<br />
Easy Access to Frequently used Files and Folders<br />
Create a folder with shortcuts to frequently used documents<br />
The System Tray<br />
Click on the icon in system tray to see all the icons in the tray. You may need<br />
to do this to get to the volume control. As long as you hold the cursor over the<br />
system tray, it will remain open. Move the cursor off the system tray and it will<br />
automatically retract.<br />
You can make the volume control always available.<br />
Right click on blank area of task bar and select properties.
Click on Customize.<br />
Highlight Volume<br />
Select Always show from the drop down list.<br />
You can make the taskbar wider (to show 2 rows of icons) To do this, hold the cursor<br />
over the top edge of the task bar. When the cursor turns into a 2-headed arrow, drag<br />
upward till the Taskbar becomes 2 rows wide.
To change the amount of space allowed for the Quick Launch toolbar, click on the dotted<br />
line, hold down the mouse button, and drag left or right.<br />
Search<br />
Start the Search Program Shortcut: <strong>Windows</strong> + f Wait about 2 seconds and type the<br />
letter l. This brings up the search for files and folders dialog box. The <strong>Windows</strong> key<br />
looks like a 4-colored flag. It’s on the task bar.<br />
Switch between open programs<br />
Use icons on the taskbar or<br />
Use Alt tab to cycle through open programs<br />
The display<br />
You can change the display settings to change the size of your icons.<br />
Right click on an open area of the desktop.<br />
Select Properties<br />
Settings
In the Screen resolution area of the window, drag the slider to the right or left to increase<br />
or decrease the resolution. Click OK. The higher the resolution, the smaller your icons<br />
will be.<br />
The Desktop<br />
You can create an icon on the desktop for My Computer or any other program<br />
such as the MS Office products.<br />
To do this, click on Start; scroll till your mouse is over the program you want to<br />
place on the desktop; hold down the right mouse button and drag the program to<br />
the desktop. Select Copy Here to create a copy of the shortcut on the desktop.<br />
Viewing the desktop when you have several applications open<br />
When you have one or more programs open and want to see the desktop, click on<br />
the Show Desktop icon on the Quick Launch toolbar or press <strong>Windows</strong>+d<br />
Changing the icon for a shortcut.<br />
Right click the current icon.<br />
Select Properties; Change icon
Press Browse. Browse to<br />
c:\windows\system32\shell32.dll.<br />
Select one of the icons and click<br />
OK. If you have other icon files<br />
on your computer, you may also<br />
browse and find them.<br />
Deleting Files<br />
The Recycle Bin is actually a storage folder. Files that are in the Recycle bin<br />
(like paper you put into your wastebasket) can be retrieved and restored to your<br />
computer.<br />
When you Empty your Recycle Bin, then files can no longer be retrieved.<br />
Delete files by dragging them to the Recycle Bin.<br />
To permanently delete a file from you computer, hold down the Shift key as you<br />
drag the file to the Recycle bin. The file will be completely removed from your<br />
computer and you will not be able to restore it. If you hold down the shift key<br />
when dragging a file to the Recycle Bin, the file doesn’t ever get put in the<br />
Recycle bin folder.<br />
TIP! When you drag a file to the Recycle Bin from a network drive (whether<br />
or not you hold down the shift key), the file is permanently deleted<br />
immediately. Be careful when deleting from network drives!<br />
To restore a file to your computer from the Recycle Bin, double click on the<br />
Recycle Bin to open it.
Highlight one or more items that you want to restore in the list of files on the<br />
right. Click Restore the selected items from the tasks on the left.<br />
Cleaning Up Your Desktop<br />
To rearrange icons on the desktop, right click on an open area of your desktop.<br />
Point to Arrange Icons By
Select from several options including Name, Type and Auto Arrange.<br />
There is an Unused Desktop Icons Folder on your desktop. <strong>Windows</strong> periodically moves<br />
icons that you haven’t used for 60 days into that folder. You can request that <strong>Windows</strong><br />
do this at any time.<br />
Right click on an open area of your desktop.<br />
Point to Arrange Icons By<br />
Click Run Desktop Cleanup Wizard<br />
The wizard will guide you through selecting icons to be moved from the desktop<br />
into the Unused Desktop Icons folder.<br />
Protecting your Computer<br />
Running System Updates<br />
To run system updates, select the Control Panel from the Start menu.<br />
Select <strong>Windows</strong> Update.<br />
Click on Pick Updates to Install
Click on Critical Updates and Service Packs<br />
Click on Review and Install Updates.<br />
Other Ways to Protect Your Computer<br />
It is recommended that you download and run weekly:<br />
Spybot<br />
Stinger<br />
Ad-Aware.<br />
The link to get to these programs is:<br />
http://shares:10081/compserv/admin/Learning%20Tree.htm<br />
Your Computer Name and other System Properties<br />
To see system properties, click on <strong>Windows</strong>+Pause key<br />
Click on various tabs to get information about your hardware or computer name.
Adding A Printer to Your Printers Folder<br />
From the Start Menu select Printers and Faxes<br />
Select Add a Printer<br />
Select Next. Select A network printer or a printer attached to another computer.<br />
Click Next. Click Next again.
Click Find Now. Select a printer from the list at the bottom of the screen and click OK.
Decide whether you want this new printer to be your default printer and make the<br />
appropriate choice.<br />
Working with Files and Folders<br />
Backing Up Your Files<br />
You can use the Explorer window to backup your files.<br />
Open Explorer<br />
Double click on folders on the left till you see the folders you want to back up in<br />
the right panel.<br />
Use the scroll bar in the left pane to scroll down to the point where you can see<br />
your H: drive.<br />
Highlight the folders you want to back up in the right pane. To do this, click on<br />
the first one, hold down the Ctrl key and click on all other folders you want to<br />
back up.<br />
Highlight<br />
folders here.
Drag the items to your H: drive (in the left pane) and release the mouse button.<br />
All files in the folders will be copied from your C: drive to your H: drive into<br />
folders of the same name. If you already have folders with these names on the H:<br />
drive, you will be asked if you want to overwrite folders. Usually you will want<br />
to overwrite older files on the H: drive with more recent versions from your C:<br />
drive.<br />
Synchronizing files<br />
You can set up your computer to access your network files when you are offline. This is<br />
especially if you take your laptop computer away from the office or if the network is<br />
down.<br />
To do this:<br />
Open My Computer<br />
From the Tools menu, select Folder Options<br />
Select the Offline files tab<br />
Select Enable Offline Files if it isn’t already checked<br />
Select Synchronize all offline files before logging off to get a full<br />
synchronization.<br />
Once you have enabled synchronization, you must select the files that you want to<br />
make available offline. To do this:<br />
Open My Computer<br />
Double click on the network drive with your files to view its contents.<br />
Click on the file or folder you want to make available offline.<br />
On the File menu, select Make Available Offline.<br />
Folder Options<br />
In the control panel, select Tools; Folder Options<br />
Select the View tab.<br />
Here you can choose to :<br />
Clear the check box on Hide extensions for known file types. This will<br />
allow you to see file extensions such as .doc on Word files and .xls on<br />
Excel files.<br />
Show hidden folders and files<br />
Sometimes files (such as templates) are stored in folders that are hidden by<br />
default. This can make it hard to find these files. By showing hidden<br />
folders, this problem is eliminated.
Make all folder open with the same settings<br />
When you look at a folder several views are available from the View menu. You<br />
can set the view to Details, List, Tiles, Icons, or Thumbnails (for graphics).<br />
Details View<br />
In this view you can click on the Headings (Name, Size, Type, or Data Modified)<br />
to sort on that field.
List View<br />
Icons View<br />
Tiles View<br />
Thumbnails View<br />
If you want to have all folders open up the same way by default, set a folder (any<br />
folder) to the view you prefer. Then from the window shown above, click on the<br />
Apply to All Folders button.
Zipped Folders<br />
<strong>Windows</strong> <strong>XP</strong> offers an easy way to compress (zip) files so that storage space<br />
required for the files is reduced. It may also be necessary to zip files to make<br />
them small enough to send as email attachments.<br />
To create a zipped folder:<br />
Create a folder to store the files you want to zip. (You can right click on your<br />
desktop; select New; select Folder).<br />
Drag the files you want to compress into this folder. Close the folder.<br />
Right click on the folder and select Send To; Then select Compressed (zipped)<br />
Folder.<br />
The new folder will have the same<br />
name as the original folder with the<br />
extension of .zip added to it. You can<br />
now delete the original folder and the<br />
files in it.<br />
To unzip the files and restore them to their original state, double click on the .zip folder.<br />
Click on Extract all files under Folder Tasks.
Follow the steps in the Extraction wizard. You will need to supply a location for the<br />
expanded files. Click the Browse button to find a location for the unzipped files. Click<br />
Next.<br />
Click Finish.<br />
Using a CD to Store Files<br />
Start by inserting a blank CD into the CD drive. The following window opens up. Select<br />
the option Open writable CD folder using <strong>Windows</strong> Explorer and click OK<br />
A window will open showing the contents of the CD in the drive. (There are no folders<br />
or files listed yet since we started with a blank CD). Browse to find the files and folders
that you want to copy to the CD. To browse and see your drives and folders, click on the<br />
Folders icon .<br />
With the Folders showing on the left, you can browse to find the files to copy. Click on<br />
the + signs in the directory tree to expand folders and double click on folders to open<br />
them. Files and subfolders in the location selected on the left will appear in the right<br />
hand pane.
When you see the files and folders you want to copy in the right pane, select them. To<br />
select multiple files that are contiguous (adjacent in the list), click on the first item you<br />
want to copy, hold down the Shift key, and click on the last item. All items in between<br />
will be highlighted to show they are selected. To select multiple files that are not<br />
contiguous , click on the first item you want to copy, hold down the Ctrl key and click on<br />
each other file or folder you want to select.<br />
Click on the<br />
icon again to see the list of File and Folder Tasks.<br />
Click on Copy the selected items in the left pane.<br />
Select the destination. In this case the CD is in drive D: so I clicked on that. Click on<br />
Copy.
The copying window will indicate approximately how long the process will take.<br />
At this point the files have been copied to a temporary storage location. They have not<br />
yet been copied to the CD. You can still choose to add other files to the list to be copied<br />
or remove items from the list. The following message pops up at the bottom of the<br />
window.<br />
To see what is waiting to be copied, click on the balloon icon. The files and folders that<br />
are ready to be copied are displayed. The note in the Location column, indicates that the<br />
files are still waiting to be written.
At this point you have several choices. You may add more files to the list, remove some<br />
of the files now on the list, remove all of the files on this list to start over, or write the<br />
files on the CD.<br />
To remove all these files from this list (this does not remove them from their original<br />
location), click on Delete temporary files in the CD Writing Tasks pane on the left.<br />
To remove one file from the list, right click on its name and select Delete from the drop<br />
down list that appears.<br />
To select more files to record, browse to find them by repeating the steps provided above.<br />
To write the files on the CD, click on Write these files to CD in the left pane.<br />
The CD Writing Wizard starts and prompts you for a name to label the CD. Select one<br />
and click Next.
The writing process will begin. An indicator will let you know approximately how long<br />
the process will take. When it is complete, the CD will eject from the drive.<br />
If you put the CD (with files recorded on it) into the drive again, a window will open<br />
showing the contents of the CD. The note in the Location columns now says Files<br />
Currently on the CD.<br />
You can again browse and select files to be copied to the CD. You may continue to add<br />
files to the CD as long as it has free remaining disk space. Look in the Details area of the<br />
left pane to see the Free Space that remains on the CD. Repeat the steps at the beginning<br />
of this section to add more files to the CD.
Control Panel<br />
Internet Options
Setting your homepage<br />
Deleting temporary internet files and cookies
Show all buttons or commands in Menus<br />
Depending on your settings, you may see all or a subset of menu options when you open<br />
a menu. To always see all options (which many people prefer), you must turn off a<br />
feature called personalized menus.<br />
Personalized menus simplifies the Programs menu by hiding items you haven't used<br />
recently, while keeping all of your programs easily accessible.<br />
You can still gain access to hidden programs by clicking Start, pointing to Programs,<br />
and then clicking the down arrow at the bottom of the menu.<br />
To turn off Personalized Menus so you see all menu options each time you click on a<br />
menu:<br />
1. Right-click the Start button, and then click Properties.<br />
2. On the Start Menu tab, click Classic Start menu, and then click Customize.<br />
(see the graphic below)<br />
3. Under Advanced Start menu options, clear the Use Personalized Menus check<br />
box.<br />
4. Click OK. You can now switch back to the regular <strong>Windows</strong> <strong>XP</strong> menu by<br />
clicking on Start Menu (rather than Classic Start menu)<br />
Note that you have easy access to My Computer, the Control panel, and a number of<br />
other programs from the new <strong>XP</strong> menu.
Older Classic Menu<br />
New <strong>Windows</strong> <strong>XP</strong> Menu<br />
Using Task Manager to Stop a Crashed Program<br />
When a program hangs or stops responding, there are several things you can try.<br />
• Press the Esc key<br />
• Cycle through all the active programs by pressing Alt Tab multiple times.<br />
When you get back to the hung program, see if it responds.<br />
• Right click the program’s icon on the task bar and select Close.<br />
• Use the Task manager to stop the program.<br />
o Right click on a blank area in the task bar and select Task Manager<br />
or press the Ctrl, Alt, and Delete keys and click on Task Manager.<br />
Click on the Applications tab. Highlight the hung application.<br />
Press End Task<br />
These steps may allow you to close the hung program without disturbing other<br />
open programs. You may then restart the problem program.<br />
If all else fails, you may need to reboot your computer.
Using <strong>Windows</strong> Explorer<br />
Backing up your files to another directory<br />
Open <strong>Windows</strong> Explorer by right clicking on the Start button and<br />
selecting Explore. In order to copy files (for backup or any other reason), you<br />
must double click folders in the left pane until you see the folders/files to be<br />
copied in the right pane. In the figure below, I double clicked on the My<br />
Documents folder so that its contents appear in the right window pane.<br />
Once you see the folders/files to be copied in the right pane, scroll in the left pane<br />
using the scroll bar until you can see the folder where you want to copy items.<br />
Select the items in the right pane that you want to copy***. Right click and drag<br />
the items to the destination folder on the left. When the destination folder is<br />
highlighted, let go of the mouse button. From the menu, select Copy here.<br />
***Selecting items in Explorer<br />
To select all items in a window, press Ctrl + A.<br />
To select several non-adjacent items, click on one of the items. Press the Ctrl key<br />
and hold it down. Click on each other item.<br />
To select several adjacent items, click on the first item. Press the Shift key and<br />
hold it down. Click on the last item in the list.
Notes on Copying and Moving Files/Folders<br />
By default, if you select files and drag them to another folder on the same drive,<br />
the files will be moved. If you select files and drag them to another folder on a<br />
different drive, the files will be copied.<br />
If you select files, right click and drag them to another folder (on the same or a<br />
different drive) you will be asked whether you want to copy or move the files.<br />
Explorer Tips<br />
To expand all folders under the selected folder, press NumLock + *<br />
In a very long list of file/folder names, you can quickly move to a file name that<br />
starts with a selected letter by clicking any file in the list and pressing the first<br />
letter of the file/folder you are trying to locate. The selection will move to the<br />
first file with the letter you typed.<br />
Moving up a level in the directory structure<br />
This step can be used in any open dialog box. If you are clicking down several<br />
layers in the directory structure and want to move back up to a higher level, click<br />
on the Up One Level icon<br />
level higher. In the figure below, click on the<br />
folder C:\.<br />
. The default folder will become the folder one<br />
icon would make the default<br />
Capturing Graphic Information from the Screen<br />
Periodically it is useful to be able to capture the information on a screen. This can<br />
be done by pressing the Print Scrn key (to capture the entire screen) or Alt + the<br />
Print Scrn key to capture the active window. Images captured in this way are
stored on the Clipboard. From there they can be pasted onto a web page, into a<br />
Word document, into a Paint document, or into other programs.<br />
If you open the Microsoft Paint program and paste the picture into it, you can use<br />
Paint tools to edit it. To paste an image from the Clipboard into a document<br />
created in another application, click in a document to make it active. From the<br />
Edit menu select Paste.<br />
Locking the PC when you will be away from Your Desk<br />
Because your mail and files are available to anyone who walks up to your PC<br />
once you have logged in, it is important to lock your computer when you will be<br />
away from your desk. Locking and unlocking is much faster that logging off.<br />
All documents and applications remain in the state they were in when you locked<br />
the computer. They do not have to be restarted. To lock your PC,<br />
simultaneously press the Ctrl, Alt, and Delete keys. Press Enter.<br />
When you return, unlock your PC by pressing the Ctrl, Alt, and Delete keys again<br />
and entering your password.