MicroCab Plus - Danville Materials
MicroCab Plus - Danville Materials
MicroCab Plus - Danville Materials

Create successful ePaper yourself
Turn your PDF publications into a flip-book with our unique Google optimized e-Paper software.
D A N V I L L E<br />
DUST CONFINEMENT CABINET<br />
<strong>MicroCab</strong>+<br />
TM<br />
INSTRUCTIONS<br />
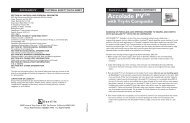
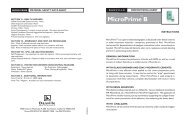
The <strong>MicroCab</strong>+ Dust Cabinet, is ideal for sandblast dust and<br />
handpiece grinding containment. It features a built in suction/filter<br />
system, as well as a bright, fluorescent light for even illumination.<br />
The <strong>MicroCab</strong>+ is compact and portable, making it perfect for any<br />
lab or operatory.
USE<br />
The <strong>MicroCab</strong>+ is shipped with the fluorescent light and power cord inside<br />
the unit. Prior to use, plug the fluorescent light into the socket located on the<br />
inside lid of the unit. Then connect the power cord to the inlet on the back<br />
(see figure 3) and into an electrical receptacle. The on/off switch under the<br />
integrated handle will operate the fluorescent light and suction/filter system.<br />
When using the <strong>MicroCab</strong>+, only the fingertips with the MicroEtcher (or handpiece)<br />
and the work need to be placed in the cabinet. Directing the abrasive<br />
spray towards the back of the cabinet will help contain the abrasive. It may<br />
tend to escape if the spray is directed towards a hand hole.<br />
WINDOW INSTALLATION<br />
Four disposable windows are supplied with the original kit. Each window has<br />
a blue protective film covering it, which must be removed prior to use. The<br />
windows are installed by sliding the wide section up under the metal frame top<br />
(see figure 1). By slightly bowing the window, the bottom corners are inserted<br />
into the tabs on the bottom of the window opening. Windows only need to<br />
be removed for replacement.<br />
Figure 1<br />
FRAME TOP<br />
DISPOSABLE<br />
WINDOW<br />
TABS
CLEANING<br />
The <strong>MicroCab</strong>+ is easily opened for cleaning. (See figures 2 & 3)<br />
1. Unplug the power cord from the inlet on the back of the cabinet.<br />
2. Open the two latches on the back of the cabinet.<br />
3. Remove the window.<br />
4. Grasping the top handle, pull the filter and cabinet top straight up and out<br />
of the cabinet body.<br />
5. Dump all debris out of the cabinet. The filter can be tapped against the<br />
sides of a trash pail. This allows powder trapped in the filter fins to fall. If the<br />
filter is removed from the filter assembly, reinstall it with the fins vertical.<br />
6. Reinstall the filter assembly by sliding it down into the cabinet. Use care<br />
that the orange rubber of the filter slides behind the sealing fins that project<br />
into the cabinet. There is also a channel under the front of the cabinet<br />
lid that captures the small rod running across the cabinet frame. This assures<br />
proper alignment.<br />
7. Reconnect the back cabinet latches and replace the window and power cord.<br />
DISINFECTING<br />
Once the filter assembly is removed the interior of the cabinet can be sprayed<br />
with disinfectant and wiped down.<br />
Figure 2<br />
HANDLE<br />
ON/OFF SWITCH<br />
BRIGHT,<br />
FLUORESCENT LIGHT<br />
EASY TO CLEAN<br />
FILTER<br />
RUBBER<br />
FILTER SIDES<br />
DISPOSABLE<br />
WINDOW<br />
SEALING FIN<br />
ROD CHANNEL<br />
ROD<br />
LATCHES<br />
Figure 3<br />
RUBBER<br />
HAND GUARDS<br />
91346 REV A<br />
POWER CORD INLET
D A N V I L L E<br />
M A T E R I A L S<br />
3420 FOSTORIA WAY STE. A-200 SAN RAMON, CALIFORNIA 94583 USA<br />
PHONE 800/827-7940 FAX 925/973-0764<br />
91346 REV A