
Create successful ePaper yourself
Turn your PDF publications into a flip-book with our unique Google optimized e-Paper software.
Explorer Education Programme<br />
Lesson Plan: How does a Submarine see above the Water?<br />
Make a Periscope<br />
HOW DOES A SUBMARINE SEE ABOVE THE WATER?<br />
MAKE A PERISCOPE<br />
Aim / Description:<br />
In design and making students can learn about the reflection of light by making a<br />
<strong>periscope</strong>.<br />
Background:<br />
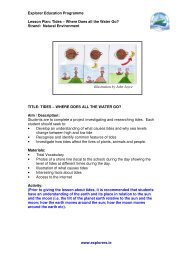
A submarine under the water uses a <strong>periscope</strong> to see above the water. The word<br />
“Periscope” comes from the Greek words, “peri” which means "around," and<br />
“scopus” which means, “look."<br />
A <strong>periscope</strong> can be used to see over high objects and around corners. A <strong>periscope</strong><br />
uses two mirrors facing each other to bounce reflections between them. Light<br />
reflects away from a mirror at the same angle that it hits the mirror. In a <strong>periscope</strong>,<br />
light hits the top mirror at a 45-degree angle and reflects away at the same angle,<br />
which bounces it down to the bottom mirror. That reflected light hits the second<br />
mirror at a 45-degree angle and reflects away at the same angle, right into your eye.<br />
The longer the tube of a <strong>periscope</strong>, the smaller the image will be. Periscopes in<br />
submarines have magnifying lenses between the mirrors to <strong>make</strong> the reflected<br />
image bigger.<br />
For marine related lesson plans, worksheets and activities see<br />
www.marine.ie
Explorer Education Programme<br />
Lesson Plan: How does a Submarine see above the Water?<br />
Make a Periscope<br />
Materials:<br />
• Two small pocket sized (flat square mirrors are best)<br />
• A piece of strong cardboard 1 foot x 1 foot (30cm x 30cm)<br />
• Strong tape<br />
• Pencil / Pen<br />
• Ruler<br />
• Scissors<br />
• Items to decorate the <strong>periscope</strong><br />
Activity: Make a Periscope<br />
Step 1. Discuss with students how submarines use a <strong>periscope</strong> to see outside.<br />
Step 2. Give step-by-step instructions and the diagram showing how to <strong>make</strong> a<br />
<strong>periscope</strong>:<br />
o Form a circular tube using cardboard and tape it together.<br />
o The tube needs to be cut to fit the mirrors into the tube and viewing holes are<br />
required. Therefore, lightly flatten the tube so you can draw an outline of<br />
where the tubing needs to be cut (see illustration below).<br />
o Draw a circle at the top of the tube smaller than the mirrors.<br />
o Draw a circle at the bottom of the tube on the opposite side of the tube i.e. big<br />
enough for an eye to see through.<br />
o Draw a slit above the circle at the top of the <strong>periscope</strong> (approximately a 45-<br />
degree angle from the top). The opening of the slit is to be above the circle<br />
and should be big enough to put a mirror in facing towards the bottom of the<br />
<strong>periscope</strong> – do not cut right across the tube.<br />
o Draw a slit at the bottom of the <strong>periscope</strong> at the same 45-degree angle as the<br />
slit at the top. The slit should be below the circle at the bottom. The opening<br />
of the slits should be on the same side of the tube.<br />
o When the correct markings are made - cut them out.<br />
o Fit one mirror into the bottom of the tube facing upwards. Holding up the<br />
tube, view through the hole at the bottom. You should see the ceiling. (If you<br />
cannot see the ceiling - readjust the angle of the mirror.)<br />
o Fit the second mirror into the top slit of the tube facing downwards. The<br />
mirrors should be at 45-degree angles facing each other. Tape them into the<br />
slits so they do not fall out.<br />
Step 3. Encourage the students to test their <strong>periscope</strong>s by looking through the<br />
viewing hole. Get the students to sit under their desks and observe what can be<br />
seen.<br />
Step 4. Get the students to paint and decorate their <strong>periscope</strong>.<br />
Outcome:<br />
Students will have developed skills:<br />
• understanding how <strong>periscope</strong>s work using the science of reflection<br />
• understanding angles and calculations.<br />
• using their imagination and creative skills making and decorating their own<br />
<strong>periscope</strong>.<br />
For marine related lesson plans, worksheets and activities see<br />
www.marine.ie
Explorer Education Programme<br />
Lesson Plan: How does a Submarine see above the Water?<br />
Make a Periscope<br />
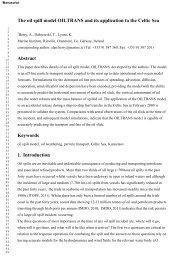
Illustration showing the holes and slits needed to <strong>make</strong> a Periscope.<br />
Cut slits in the tube at<br />
right angles large<br />
enough to fit the<br />
mirrors.<br />
Cut the hole at the<br />
top of the <strong>periscope</strong><br />
under the slit.<br />
Place mirrors into the<br />
slits facing each other.<br />
Cut the hole at the<br />
bottom of the<br />
<strong>periscope</strong> above the<br />
slit.<br />
For marine related lesson plans, worksheets and activities see<br />
www.marine.ie