Table of Contents - netgear
Table of Contents - netgear
Table of Contents - netgear

Create successful ePaper yourself
Turn your PDF publications into a flip-book with our unique Google optimized e-Paper software.
<strong>Table</strong> <strong>of</strong> <strong>Contents</strong><br />
1: Preparing to Install the WGE101 Bridge . . . . . . . . . . . . . . . . . . . . . . . . . .1<br />
Introduction . . . . . . . . . . . . . . . . . . . . . . . . . . . . . . . . . . . . . . . . . . . . .1<br />
Package <strong>Contents</strong> . . . . . . . . . . . . . . . . . . . . . . . . . . . . . . . . . . . . . . . . .1<br />
System Requirements . . . . . . . . . . . . . . . . . . . . . . . . . . . . . . . . . . . . . .2<br />
Placement and Range Guidelines . . . . . . . . . . . . . . . . . . . . . . . . . . . . . .2<br />
Operating Modes . . . . . . . . . . . . . . . . . . . . . . . . . . . . . . . . . . . . . . . . .2<br />
WGE101 Default Wireless Configuration Settings . . . . . . . . . . . . . . . . .3<br />
2: Installing the WGE101 Bridge . . . . . . . . . . . . . . . . . . . . . . . . . . . . . . . . . .4<br />
Connecting the Bridge to a Single Device . . . . . . . . . . . . . . . . . . . . . . . .4<br />
Connecting the Bridge to Multiple Devices . . . . . . . . . . . . . . . . . . . . . .5<br />
3: Preparing to Configure the WGE101 Bridge . . . . . . . . . . . . . . . . . . . . . . . .7<br />
Identifying Your Wireless Network Settings . . . . . . . . . . . . . . . . . . . . . .7<br />
Connecting the Bridge to a Computer . . . . . . . . . . . . . . . . . . . . . . . . . .8<br />
Checking and Changing the Computer’s IP Address . . . . . . . . . . . . . . . .8<br />
Changing the Bridge’s IP Address . . . . . . . . . . . . . . . . . . . . . . . . . . . . . .10<br />
Using the NetBIOS Name . . . . . . . . . . . . . . . . . . . . . . . . . . . . . . . . . . .11<br />
4: Configuring the WGE101 Bridge for Your Wireless Network . . . . . . . . . . .12<br />
Changing the Country/Region Setting . . . . . . . . . . . . . . . . . . . . . . . . . .12<br />
Selecting a Specific Wireless Network . . . . . . . . . . . . . . . . . . . . . . . . . . .13<br />
Changing the Bridge’s Password . . . . . . . . . . . . . . . . . . . . . . . . . . . . . . .13<br />
Enabling WEP Security . . . . . . . . . . . . . . . . . . . . . . . . . . . . . . . . . . . . .14<br />
Upgrading the Bridge . . . . . . . . . . . . . . . . . . . . . . . . . . . . . . . . . . . . . .15<br />
Configuring the Bridge for Ad Hoc Mode . . . . . . . . . . . . . . . . . . . . . . .16<br />
Setting the Bridge’s Data Rate . . . . . . . . . . . . . . . . . . . . . . . . . . . . . . . .17<br />
WGE101 Bridge Status Lights and Settings . . . . . . . . . . . . . . . . . . . . . . . . . .18<br />
WGE101 Bridge Status Lights . . . . . . . . . . . . . . . . . . . . . . . . . . . . . . . .18<br />
Restoring the Bridge to the Default Settings . . . . . . . . . . . . . . . . . . . . . .18<br />
WGE101 Bridge Status Information . . . . . . . . . . . . . . . . . . . . . . . . . . .19<br />
Troubleshooting Tips . . . . . . . . . . . . . . . . . . . . . . . . . . . . . . . . . . . . . . . . . . .20<br />
WGE101 Bridge System Requirements and Specifications . . . . . . . . . . . . . . . .22
1<br />
Preparing to Install the WGE101 Bridge<br />
Introduction<br />
Thank you for purchasing a NETGEAR WGE101 54 Mbps Wireless Ethernet Bridge. With<br />
this bridge you can connect one or more gaming consoles, personal computers, printers, or<br />
other Ethernet-enabled devices to communicate with your network.<br />
Note: If you have a wired network, you must have a wireless router or access point set up in the<br />
network. To connect more than one device to the bridge you must use switch or a hub.<br />
This guide shows you how to connect the bridge and configure it for your network — whether<br />
to work with a wireless router or access point, or to work with other wireless devices. Setup is<br />
easy – follow the instructions in this guide and your network will be up and running quickly.<br />
Package <strong>Contents</strong><br />
Resource CD for 54 Mbps<br />
Wireless Ethernet Bridge,<br />
Installation guide,<br />
Support information card,<br />
Warranty card<br />
Power adapter<br />
100 Mbps<br />
Ethernet cable<br />
WGE101 54 Mbps<br />
Wireless Ethernet Bridge<br />
The product package should contain the following items:<br />
• WGE101 54 Mbps Wireless Ethernet Bridge<br />
• Power adapter<br />
• Ethernet cable<br />
• WGE101 54 Mbps Wireless Ethernet Bridge Resource CD, that includes this Reference<br />
Manual for the Model WGE101 54 Mbps Wireless Ethernet Bridge in Adobe ® Acrobat ®<br />
PDF file format<br />
• Installation guide<br />
• Warranty card<br />
• Support information card<br />
1
System Requirements<br />
Before installing the WGE101 54 Mbps Wireless Ethernet Bridge, please make sure that these<br />
minimum requirements have been met:<br />
• For connecting into a wired network, you must have the network set up and working with<br />
an access point or wireless router.<br />
• For creating an Ad-Hoc network without an access point, all devices must have a<br />
receiver/transmitter. (The receiver/transmitter may be another WGE101 bridge.)<br />
If the default settings on the bridge do not work, you will need to configure the bridge. Also, if<br />
you have more than one WGE101 in the network, only one can use the default IP address.<br />
You’ll have to configure the others with unique IP addresses. To configure the bridge with the<br />
configuration s<strong>of</strong>tware, you must have a personal computer with Internet browser s<strong>of</strong>tware<br />
installed, such as Micros<strong>of</strong>t ® Internet Explorer 5.0 (or later) or Netscape ® 6.0 (or later).<br />
Placement and Range Guidelines<br />
Computers and other Ethernet-enabled devices can connect over wireless networks indoors at<br />
more than 500 feet. However, the operating distance or range <strong>of</strong> your wireless connection can<br />
vary significantly based on the physical location <strong>of</strong> the WGE101 54 Mbps Wireless Ethernet<br />
Bridge. For best results, avoid potential sources <strong>of</strong> interference, such as:<br />
• Large metal surfaces<br />
• Microwaves<br />
• 2.4 GHz cordless phones<br />
In general, wireless devices can communicate through walls. However, if the walls are<br />
constructed with concrete or have metal (or metal mesh), the effective range will decrease if<br />
such materials are between the wireless devices.<br />
Operating Modes<br />
The WGE101 Wireless Ethernet Bridge operates in either Infrastructure or Ad-Hoc mode.<br />
• Infrastructure mode is used when you have an access point or wireless router connected to<br />
a wired network. The wireless devices and computers communicate with the wired<br />
network (and other wireless devices) through the wireless router or access point. For<br />
example, with a wireless router multiple computers (both wired and wireless) can share a<br />
single cable or DSL broadband Internet connection.<br />
• You use the bridge in Ad-Hoc mode if you have a small, wireless-only network and all the<br />
devices have wireless transmitters/receivers. In this case, there’s no need for an access point<br />
or a wireless router for the wireless devices communicate directly to one another.<br />
2
WGE101 Default Wireless Configuration Settings<br />
Note: If you are setting up a new wireless network, please set up the network and make sure it<br />
works before adding the WGE101 Wireless Ethernet Bridge into the network.<br />
You will need to identify the wireless configuration and security parameters already defined in<br />
your wireless network.<br />
Note: All NETGEAR, Inc. 802.11g and 802.11b wireless access products use similar factory<br />
settings as the WGE101 and will work without any configuration changes.<br />
The factory default settings for your WGE101 54 Mbps Wireless Ethernet Bridge are:<br />
• Mode (Infrastructure or Ad-Hoc): Infrastructure<br />
• Wireless network name Service Set Identification (SSID): Any<br />
Note: Any means the bridge will connect to the access point or wireless router that has the<br />
strongest signal. This may not be the closest access point or wireless router. For the WGE101<br />
Wireless Ethernet Bridge to communicate with a specific wireless router or access point, both<br />
devices must be configured with the same SSID.<br />
• User ID: admin<br />
• Password: password<br />
• Authentication type: Auto<br />
• WEP security: Disabled<br />
• Country/Region: United States<br />
Warning: Having the bridge set to the wrong country or region may result in the violation <strong>of</strong><br />
local laws.<br />
WGE101-specific default settings:<br />
• IP address: 192.168.0.201<br />
• Protocol: Static<br />
• Device name: <strong>netgear</strong>xxxx (where xxxx is the last 4 digits <strong>of</strong> the MAC address)<br />
• Data rate: b/g combo<br />
3
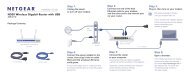
2<br />
Internet<br />
Installing the WGE101 Bridge<br />
Cable/DSL<br />
modem<br />
N E T G E A R<br />
WGR814 54 Mbps<br />
Cable/DSL<br />
Wireless Router<br />
3<br />
Desktop PC with<br />
Ethernet connection<br />
Macintosh computer with<br />
WGE101 54 Mbps Wireless<br />
Ethernet Bridge<br />
family family<br />
room room<br />
Gaming console with<br />
WGE101 54 Mbps Wireless<br />
Ethernet Bridge<br />
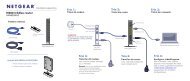
This section provides instructions for connecting the WGE101 54 Mbps Wireless Ethernet<br />
Bridge, using the default settings, to either a single Ethernet-enabled device or to multiple<br />
devices through a switch or hub.<br />
Note: If you find that the default settings don’t work, if you know that you’ve configured your<br />
wireless network with WEP security, if you’re placing more than one WGE101 bridge on the<br />
network, or if you are not in the United States, you’ll have to configure the bridge before<br />
connecting it to the Ethernet-enabled device(s). To configure the bridge, see Configuring the<br />
WGE101 Bridge for Your Wireless Network on page 12.<br />
Connecting the Bridge to a Single Device<br />
1. Unpack the box and verify the contents.<br />
2. Identify a flat surface where you will put the wireless bridge. For best results, follow<br />
these guidelines:<br />
• Place it away from potential sources <strong>of</strong> interference, such as computers, monitors,<br />
TVs, microwaves, cordless phones, or large metal surfaces.<br />
Warning: Failure to follow these guidelines can cause intermittent or complete failure<br />
<strong>of</strong> wireless connectivity.<br />
• Place it in an elevated location such as a high shelf or on a wall in the center <strong>of</strong><br />
your wireless access area. If you mount the bridge on a wall, do not place the bridge<br />
in such a way that it is vertical with the NETGEAR name upside-down and the power<br />
adapter plug hanging from the bottom <strong>of</strong> the unit. Having the unit in this position<br />
violates power adapter regulations.<br />
3. Lift the bridge’s antenna so it is vertical.<br />
4
WGE101 54 Mbps<br />
Wireless Ethernet Bridge<br />
Gaming console or other<br />
Ethernet-enabled device<br />
4. Turn <strong>of</strong>f the gaming console or other Ethernet-enabled device.<br />
5. Connect the provided Ethernet cable between the WGE101 Wireless Bridge and the<br />
gaming console or other Ethernet-enabled device.<br />
6. Connect the power adapter to the bridge and plug the power adapter in to a power outlet.<br />
The Power and Wireless LAN lights should light up.<br />
7. After you see the Wireless LAN light light up, turn on the gaming console or other<br />
Ethernet-enabled device.<br />
If the bridge and the Ethernet-enabled device are successfully connected, the Network<br />
light will light up. This light flashes when there is network activity.<br />
Note: If your setup works with the default settings, you don’t need to configure the bridge<br />
unless you need to change the Country/Region setting from the default setting (United States)<br />
or you need to assign a unique IP address to subsequent WGE101 bridges. See page 12 for<br />
information on configuring the bridge.<br />
Connecting the Bridge to Multiple Devices<br />
1. Unpack the box and verify the contents.<br />
2. Identify a flat surface where you will put the wireless bridge. For best results, follow<br />
these guidelines:<br />
• Place it away from potential sources <strong>of</strong> interference, such as computers, monitors,<br />
TVs, microwaves, cordless phones, or large metal surfaces.<br />
Warning: Failure to follow these guidelines can cause intermittent or complete failure<br />
<strong>of</strong> wireless connectivity.<br />
• Place it in an elevated location such as a high shelf or on a wall in the center <strong>of</strong><br />
your wireless access area. If you mount the bridge on a wall, do not place the bridge<br />
in such a way that it is vertical with the NETGEAR name upside-down and the power<br />
adapter plug hanging from the bottom <strong>of</strong> the unit. Having the unit in this position<br />
violates power adapter regulations.<br />
3. Lift the bridge’s antenna so it is vertical.<br />
4. Turn <strong>of</strong>f the gaming consoles or other Ethernet-enabled devices.<br />
5
WGR614 54 Mpbs<br />
Wireless Router<br />
WGE101 54 Mbps<br />
Wireless Ethernet Bridge<br />
Cable<br />
or DSL<br />
modem<br />
Fast Ethernet<br />
Switch FS605<br />
Ethernet-enabled<br />
computer<br />
Gaming console or other<br />
Ethernet-enabled device<br />
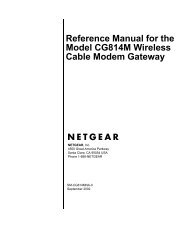
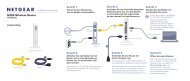
5. Connect the provided Ethernet cable between the WGE101 Wireless Bridge and the<br />
switch (or hub).<br />
6. Connect each gaming console or other Ethernet-enabled device to the switch (or hub)<br />
using an Ethernet cable.<br />
7. Connect the switch’s (or hub’s) power adapter and plug that power adapter in to a power<br />
outlet.<br />
8. Connect the bridge’s power adapter and plug the power adapter in to a power outlet.<br />
The Power and Wireless LAN lights should light up.<br />
9. After the Wireless LAN light lights up, turn on any gaming console(s).<br />
10. After turning on any gaming consoles, turn on any other Ethernet-enabled device(s).<br />
If the bridge, switch, and the Ethernet-enabled devices are successfully connected, the<br />
Network light will light up. This light flashes when there is network activity.<br />
Note: If your setup works with the default settings, you don’t need to configure the bridge<br />
unless you need to change the Country/Region setting from the default setting (United States)<br />
or you need to assign a unique IP address to subsequent WGE101 bridges. See page 12 for<br />
information on configuring the bridge.<br />
6
3<br />
Preparing To Configure the WGE101<br />
Bridge<br />
If the default settings don’t work in your wireless network, if you are in a country or region<br />
other than the United States, or if you have multiple WGE101 bridges on the network, you<br />
need to configure the bridge.<br />
Identifying Your Wireless Network Settings<br />
You may want to print this page separately, fill in the configuration parameters, and put it in a<br />
safe place for possible future reference. For an existing wireless network, the person who set up<br />
the network will be able to provide this information.<br />
Note: For wireless devices and the bridge to communicate with each other, each must be<br />
configured with the same SSID, WEP security settings, and the same IP subset address.<br />
• Wireless Network Name (SSID): The Service Set Identification (SSID) identifies the<br />
wireless local area network. Any is the default WGE101 SSID. If you have named your<br />
wireless network with a different SSID, write your network’s SSID on the line below.<br />
Wireless network name (SSID): ______________________________<br />
• Bridge IP Address: Your Ethernet network has an IP subset address given as a set <strong>of</strong> three<br />
numbers plus a last set <strong>of</strong> unique numbers (xxx.xxx.xxx.yyy) to identify each device on the<br />
network. The default IP address for the bridge is 192.168.0.201. To communicate to your<br />
Ethernet network, each bridge must have a unique address consistent with your network’s IP<br />
subset address. If you need to change the bridge’s IP address, write down the new address.<br />
Bridge’s IP address: ______________________________<br />
• WEP Security Encryption key: The default WEP encryption mode <strong>of</strong> the bridge is<br />
disabled. If you have set up WEP security on your wireless network (through the router or<br />
access point), you’ll need to configure the bridge using the same WEP security parameters.<br />
WEP Encryption Key Length, circle one: 40/64 or 128 bits<br />
WEP Encryption Passphrase, if used: ___________________<br />
A passphrase is used to automatically generate the WEP hexadecimal numbers for the key.<br />
Otherwise, you will have to manually enter up to four hexadecimal numbers.<br />
WEP Hexadecimal Numbers: ______________________________<br />
______________________________<br />
______________________________<br />
______________________________<br />
7
Connecting the Bridge to a Computer<br />
You use browser-based configuration s<strong>of</strong>tware to configure the bridge. To access the s<strong>of</strong>tware, the<br />
bridge must be directly connected or connected through a switch (or hub) to a computer. The<br />
computer must have an Internet browser installed. For example, if the bridge is connected to a<br />
game box, you’ll have to connect the bridge to a computer to be able to configure the bridge.<br />
To connect the bridge to a computer:<br />
1. If your network has a wireless router or access point,<br />
make sure it is powered up.<br />
2. Power down the Ethernet-enabled computer.<br />
3. Connect the provided Ethernet cable between the<br />
computer and the bridge.<br />
4. Power up the bridge.<br />
5. Power on the computer.<br />
Checking and Changing the Computer’s IP Address<br />
If your wireless network has an IP address other than 192.168.0.yyy, you need to change the IP<br />
address on the computer before you can access the browser-based configuration s<strong>of</strong>tware.<br />
Note: All NETGEAR products use 192.168.0.yyy. If you have NETGEAR wireless products<br />
working in your wireless network without configuration changes, you won’t need to check or<br />
change IP addresses.<br />
Windows 98/Me<br />
1. Choose Settings>Control Panel from the Start menu.<br />
2. Double-click the Network icon.<br />
3. Click the Configuration tab.<br />
4. In the list <strong>of</strong> installed network<br />
components, select the TCP/IP entry for<br />
the computer’s Ethernet adapter or NIC.<br />
5. Click Properties.<br />
6. Click the IP Address tab.<br />
7. If Obtain an IP address automatically is<br />
selected, select Specify an IP Address.<br />
OR<br />
If Specify an IP Address is already<br />
selected, note the current IP address.<br />
8. Change the IP address to 192.168.0.230.<br />
WGE101 54 Mpbs<br />
Wireless Ethernet Bridge<br />
8
9. Click OK twice to close the Network control panel and save any changes.<br />
10. If you made a change, restart the computer.<br />
Note: After you’ve changed the settings on the bridge, you’ll have to reset the TCP/IP<br />
Properties: IP Address tab values back to their original state.<br />
Windows 2000/XP<br />
1. Right-click My Network Place and choose<br />
Properties.<br />
2. Double-click Local Area Network Connection and<br />
click Properties.<br />
3. Select Internet Protocol (TCP/IP) and click<br />
Properties.<br />
4. If Obtain an IP address automatically is selected,<br />
select Use the following IP Address.<br />
OR<br />
If Use the following IP Address is selected, note<br />
the current IP address.<br />
5. Change the IP address to 192.168.0.230.<br />
6. Click OK twice and click Close to save any<br />
changes.<br />
7. If you made a change, restart the computer.<br />
Note: After you’ve changed the settings on the bridge, you’ll have to reset the Internet Protocol<br />
(TCP/IP) Properties dialog box back to its original state.<br />
Mac OS ® 8.6 or 9.x<br />
1. Choose Control Panels >TCP/IP from the<br />
Apple (apple) menu.<br />
2. If not already selected, select Ethernet in the<br />
Connect via list.<br />
3. If Manually isn’t selected in the Configure list,<br />
note the current selection and select Manually.<br />
OR<br />
If Manually is selected, note the current IP<br />
address.<br />
4. Change the IP address to 192.168.0.230 and<br />
click the close box.<br />
5. If asked, click Save. 9
Note: After you’ve changed the settings on the bridge, you’ll have to reset the TCP/IP dialog<br />
box back to its original state.<br />
Mac OS X<br />
1. Choose System Preferences from the Apple<br />
(apple) menu.<br />
2. Double-click Network.<br />
3. If not already selected, select Built-in<br />
Ethernet in the Configure list.<br />
4. If Manually isn’t selected in the Configure list,<br />
note the current selection and select Manually.<br />
OR<br />
If Manually is selected, note the current IP<br />
address.<br />
5. Change the IP address to 192.168.0.230 and<br />
click Apply Now.<br />
Note: After you’ve changed the settings on the bridge, you’ll have to reset the Network: TCP/IP<br />
dialog box back to its original state.<br />
Linux ® and UNIX ®<br />
If you’re configuring the bridge with a Linux-based or UNIX-based computer see your system<br />
documentation for TCP/IP and networking setup information.<br />
Changing the Bridge’s IP Address<br />
1. Start your browser s<strong>of</strong>tware.<br />
2. Type http://192.168.0.201 as the web address and press Enter (or Return).<br />
3. Type admin as the User ID and type password as the Password.<br />
4. Click OK.<br />
You’ll see the Status page.<br />
5. To change the IP address for the bridge to match your wireless network, click IP Settings.<br />
6. Select Use this IP address and type a unique IP address for the bridge. The first three sets<br />
<strong>of</strong> numbers (xxx.xxx.xxx.yyy) should be the same as your access point or router. The last<br />
set <strong>of</strong> numbers (.yyy) should be a set <strong>of</strong> unique numbers on your network.<br />
OR<br />
If your network has a router with a router table, change the Protocol to DHCP.<br />
(By doing this, the bridge’s IP address is assigned dynamically by the router and you’ll use<br />
the router table to find out what the bridge’s current IP address is.) 10
8. Click Apply.<br />
9. Click Logout.<br />
10. Restore the computer to its previous<br />
network settings. See Checking and<br />
Changing the Computer’s IP Address<br />
on page 8 for details.<br />
11. Make any other configuration<br />
changes.<br />
12. If you want this bridge used<br />
elsewhere on your network, install<br />
it now.<br />
Note: If you have multiple WGE101 bridges in your network and want to use the default IP<br />
address <strong>of</strong> 192.168.0.201, only one bridge can use this default IP address. You’ll have to create<br />
IP addresses for each bridge using 192.168.0.yyy, where yyy is a unique number for each<br />
device.<br />
Using the NetBIOS Name<br />
If you’re familiar with using a device’s NetBIOS name, you may use it in the Internet browser<br />
instead <strong>of</strong> the IP address to access the configuration s<strong>of</strong>tware. The WGE101 NetBIOS name is<br />
<strong>netgear</strong>xxxx, where xxxx stands for the last four digits <strong>of</strong> the WGE101 MAC address, which is<br />
found on the bridge’s label.<br />
11
4<br />
Configuring the WGE101 Bridge for Your<br />
Wireless Network<br />
You use browser-based configuration s<strong>of</strong>tware to configure the bridge. To do so, you must have<br />
the bridge connected to a computer (either directly or through a switch or hub) that has an<br />
Internet browser installed. See Installing the WGE101 Bridge on page 4 or Connecting the Bridge<br />
to a Computer on page 8.<br />
Once you are logged into the configuration s<strong>of</strong>tware, you can view the status <strong>of</strong> your wireless<br />
network and the bridge’s current configuration, change the password, enable WEP security (if<br />
you have it set up on your wireless network), select a specific network for the wireless<br />
connection, or make other configuration changes.<br />
Changing the Country/Region Setting<br />
If you are not in the United States, you must first change the Country/Region selection.<br />
1. Start your browser s<strong>of</strong>tware.<br />
2. Type http:// followed by the bridge’s IP address as the web address and press Enter (or<br />
Return).<br />
Note: The default value is 192.168.0.201. If you’ve set the bridge to use DHCP, check the<br />
router table to find out what the current address is for the bridge.<br />
3. Type admin as the User ID and type<br />
password as the Password.<br />
4. Click OK.<br />
You’ll see the Status page.<br />
5. Click Wireless Settings.<br />
6. Select the correct country or region<br />
from the Country/Region list. Click<br />
Yes to accept the new country or<br />
region.<br />
Warning: Having the bridge set to the<br />
wrong country or region may result in<br />
the violation <strong>of</strong> local laws.<br />
7. Click Apply.<br />
8. Click OK.<br />
9. If you are through making changes, click Logout.<br />
12
10. To use the bridge with a different computer or other Ethernet-enabled device, return to<br />
Installing the WGE101 Bridge on page 4 to connect the bridge.<br />
Selecting a Specific Wireless Network<br />
On the Wireless Settings page, you can select a specific wireless network (SSID) and make<br />
other configuration changes.<br />
1. Start your browser s<strong>of</strong>tware.<br />
2. Type http:// followed by the bridge’s IP address as the web address and press Enter (or<br />
Return).<br />
Note: The default value is 192.168.0.201. If you’ve set the bridge to use DHCP, check the<br />
router table to find out what the current address is for the bridge.<br />
3. Type admin as the User ID and<br />
type the current password.<br />
(password is the default password.)<br />
4. Click OK.<br />
You’ll see the Status page.<br />
5. Click Wireless Settings.<br />
6. To connect to a specific wireless<br />
router or access point, select the<br />
correct one from the SSID (Existing<br />
networks) list.<br />
7. Click Apply.<br />
8. Click OK.<br />
9. Click Logout.<br />
Note: You may also select the SSID on the Wireless Network Available page instead <strong>of</strong> the<br />
Wireless Settings page.<br />
Changing the Bridge’s Password<br />
1. Start your browser s<strong>of</strong>tware.<br />
2. Type http:// followed by the bridge’s IP address as the web address and press Enter (or<br />
Return).<br />
Note: The default value is 192.168.0.201. If you’ve set the bridge to use DHCP, check the<br />
router table to find out what the current address is for the bridge.<br />
3. Type admin as the User ID and type the current password. (password is the default<br />
password.) 13
4. Click OK.<br />
You’ll see the Status page.<br />
5. Click Change Password.<br />
6. Type the old password in the Old<br />
Password box.<br />
7. Type a new password in the New<br />
Password box.<br />
8. Re-type the new password in the<br />
Confirm Password box.<br />
9. Click Apply.<br />
10. If you are through making changes,<br />
click Logout.<br />
Enabling WEP Security<br />
To prevent others from accessing your wireless network, you may enable WEP (Wired<br />
Equivalent Privacy) security on your wireless network. If you do so, you’ll need to enable WEP<br />
security in all the devices. If you filled in the parameters on page 7, you may want to refer to<br />
that page before making any configuration change.<br />
Note: By default, WEP security is disabled.<br />
1. Start your browser s<strong>of</strong>tware.<br />
2. Type http:// followed by the IP address for the bridge as the web address and press Enter<br />
(or Return).<br />
Note: The default value is<br />
192.168.0.201. If you’ve set the bridge<br />
to use DHCP, check the router table to<br />
find out what the current address is for<br />
the bridge.<br />
3. Type admin as the User ID and<br />
type the current password.<br />
(password is the default.)<br />
4. Click OK.<br />
You’ll see the Status page.<br />
5. To change the WEP settings, click<br />
Wireless Settings.<br />
6. Select Web Data Encryption to enable WEP security.<br />
14
7. Select Open System or Shared as the Authentication Type.<br />
8. Select 64 bits or 128 bits as the Key Length.<br />
9. If the key is determined through s<strong>of</strong>tware, type the phrase in the Passphrase box and click<br />
Generate.<br />
OR<br />
If you entered a key manually for your wireless router or access point, select a Key and<br />
type the hexadecimal values that are used with the wireless router or access point.<br />
10. Click Apply.<br />
11. If you are through making changes, click Logout.<br />
Upgrading the Bridge<br />
If there’s a firmware upgrade, download the s<strong>of</strong>tware from www.NETGEAR.com to your<br />
computer and then use the browser-based configuration s<strong>of</strong>tware to upgrade the bridge.<br />
1. Start your browser s<strong>of</strong>tware.<br />
2. Type http:// followed by the IP address for the bridge as the web address and press Enter<br />
(or Return).<br />
Note: The default value is 192.168.0.201. If you’ve set the bridge to use DHCP, check the<br />
router table to find out what the current address is for the bridge.<br />
3. Type admin as the User ID and<br />
type the current password.<br />
(password is the default.)<br />
4. Click OK.<br />
You’ll see the Status page.<br />
5. To upgrade the bridge, click<br />
Upgrade Firmware.<br />
6. Click Browse and locate the<br />
downloaded s<strong>of</strong>tware.<br />
7. Click Upload.<br />
8. If you are through making changes,<br />
click Logout.<br />
15
Configuring the Bridge for Ad-Hoc Mode<br />
You may use this bridge in a wireless-only network where the wireless devices are all set to Ad-<br />
Hoc mode. By default, the bridge is set to Infrastructure mode; therefore, you’ll need to change<br />
the Network Type on the Wireless Settings page.<br />
Note: In an Ad-Hoc network, all devices must have the same SSID, WEP settings, and IP<br />
network subset address with a unique identifying number (xxx.xxx.xxx.yyy).<br />
1. Start your browser s<strong>of</strong>tware.<br />
2. Type http:// followed by the IP<br />
address for the bridge as the web<br />
address and press Enter (or Return).<br />
Note: The default value is<br />
192.168.0.201. If you’ve set the bridge<br />
to use DHCP, check the router table to<br />
find out what the current address is for<br />
the bridge.<br />
3. Type admin as the User ID and<br />
type the current password.<br />
(password is the default.)<br />
4. Click OK.<br />
You’ll see the Status page.<br />
5. Click Wireless Settings.<br />
6. If you are setting up the Ad-Hoc network, type a SSID for the network in the SSID<br />
(Service Set Identifier) box.<br />
OR<br />
If the Ad-Hoc network already exists, select the correct SSID in the SSID (Existing<br />
network) list.<br />
Note: You may also select the SSID on the Wireless Network Available page.<br />
7. Select Ad-Hoc as the Network Type.<br />
8. Select the correct channel/frequency for the Ad-Hoc network.<br />
9. Click Apply.<br />
10. If you are through making changes, click Logout.<br />
16
Setting the Bridge’s Data Rate<br />
The wireless Ethernet standard, 802.11, supports several data rates — the most common are<br />
the 802.11b and the 802.11g standards. The 802.11b standard is slower with a maximum data<br />
rate <strong>of</strong> 11 Mbps. The 802.11g standard supports data rates up to 54 Mbps. By default the<br />
WGE101 bridge is set to connect at either standard, but it tries first using the 802.11g<br />
standard. If you want to force the bridge to connect using a specific standard, you can set the<br />
Data Rate on the Wireless Settings page.<br />
Note: The actual data rates achieved can be much lower than the maximum depending on the<br />
devices, distances, and any interference.<br />
1. Start your browser s<strong>of</strong>tware.<br />
2. Type http:// followed by the IP address for the bridge as the web address and press Enter<br />
(or Return).<br />
Note: The default value is 192.168.0.201. If you’ve set the bridge to use DHCP, check the<br />
router table to find out what the current address is for the bridge.<br />
3. Type admin as the User ID and<br />
type the current password.<br />
(password is the default.)<br />
4. Click OK.<br />
You’ll see the Status page.<br />
5. Click Wireless Settings.<br />
6. Select either B only (802.11b) or<br />
G only (802.11g) as the Data Rate.<br />
7. Click Apply.<br />
8. If you are through making changes,<br />
click Logout.<br />
17
WGE101 Bridge Status Lights and Settings<br />
Status Lights<br />
The WGE101 54 Mbps Wireless Ethernet Bridge has the following three lights, which give you<br />
information about the status <strong>of</strong> your wireless connection:<br />
PWR Green OFF: No power to the unit.<br />
ON: Power applied to the unit.<br />
WLAN Green OFF: No wireless LAN activity.<br />
Flashing: Searching for an access point or wireless router.<br />
ON: Connected to a wireless LAN.<br />
LAN Green OFF: No Ethernet traffic.<br />
Flashing: Wired Ethernet traffic.<br />
ON: Connected to the Ethernet.<br />
Restoring the Bridge to the Default Settings<br />
There are two ways to return the bridge to its default factory settings.<br />
Using the Default button:<br />
1. Press the Default button with the point <strong>of</strong> a pen or pencil for at least 6 seconds until the<br />
WLAN light flashes.<br />
2. Then release the button.<br />
The LAN light and then the WLAN light should each flash and then come on<br />
steadily.<br />
Using the browser-based s<strong>of</strong>tware:<br />
To use this procedure the bridge must<br />
be connected to a computer — either<br />
directly or through a switch or hub —<br />
that has an Internet browser installed.<br />
1. Open and log into the browser-based<br />
configuration s<strong>of</strong>tware.<br />
2. Click Restore Factory Default in the<br />
navigation bar on the left.<br />
3. Click Restore.<br />
4. When the warning appears, click OK.<br />
5. When the Status page appears, click<br />
Logout. 18
Status Information<br />
In the browser-based configuration s<strong>of</strong>tware, you can get certain status information about the<br />
bridge and your wireless network.<br />
The Status page <strong>of</strong> the configuration s<strong>of</strong>tware shows:<br />
• Connection status<br />
• A signal strength indicator<br />
• Network name SSID<br />
• Current country or region setting<br />
• Channel and frequency <strong>of</strong> the bridge<br />
• Type <strong>of</strong> encryption currently active<br />
• Transmitted and received data amounts<br />
• The bridge’s IP address, subnet mask, default gateway, and the source <strong>of</strong> the IP address<br />
• NETBIOS name<br />
• Media access control (MAC) address<br />
• Firmware version<br />
19
Troubleshooting Tips<br />
If you have problems connecting to your wireless network, check these tips.<br />
Symptom<br />
The WLAN light is<br />
flashing and I can’t<br />
connect to the<br />
router or access<br />
point.<br />
My gaming console<br />
or remote<br />
computer could not<br />
connect to the<br />
Internet.<br />
Cause Solution<br />
The bridge is too far away<br />
from the wireless router or<br />
access point.<br />
OR<br />
The bridge is not<br />
configured correctly for<br />
the network<br />
There is a problem<br />
connecting to the wireless<br />
router.<br />
• Move the bridge and the wireless<br />
router or access point closer<br />
together.<br />
OR<br />
• Check the configuration utility for<br />
the router or access point, to see if<br />
it lists the WGE101 bridge.<br />
• Use the configuration s<strong>of</strong>tware for<br />
the bridge to verify that the WEP<br />
settings, Network Name (SSID),<br />
and country/region settings match<br />
those <strong>of</strong> the router or access point.<br />
• Make sure WLAN light is on<br />
solidly. If not, see the previous<br />
symptom/solution.<br />
• Make sure the gaming console or<br />
remote computer has a correct IP<br />
address with the same IP subset<br />
address as the wireless router or<br />
access point.<br />
• Turn the bridge <strong>of</strong>f and then back<br />
on. Recheck the IP address for the<br />
gaming console or remote<br />
computer.<br />
• Turn <strong>of</strong>f all devices. Then, power<br />
on the wireless router (or access<br />
point), wait, and then power on<br />
the bridge. Check that the bridge<br />
connects to the wireless router or<br />
access point. If it connects, power<br />
on the gaming console or remote<br />
computer.<br />
20
Symptom Cause Solution<br />
My bridge-enabled<br />
computer could not<br />
communicate with<br />
my wireless-enabled<br />
computer or printer.<br />
I can’t get the<br />
configuration utility<br />
to show the bridge.<br />
or<br />
I can’t open the<br />
configuration<br />
s<strong>of</strong>tware with my<br />
browser.<br />
I have a gaming<br />
console, computer,<br />
and the bridge<br />
connected through a<br />
switch. The<br />
computer connects<br />
to the Internet but<br />
the gaming console<br />
can’t.<br />
This most likely is a<br />
network configuration<br />
problem.<br />
This could be a network<br />
configuration problem or<br />
a hardware connection<br />
problem.<br />
If using a switch or hub<br />
with an Ethernet-enabled<br />
gaming console, the<br />
gaming console must be<br />
powered on before the<br />
other Ethernet-enabled<br />
devices.<br />
• Check that the wireless-enabled<br />
computer or printer is on the same<br />
wireless network as the computer<br />
using the bridge.<br />
• Make sure the Network Name<br />
(SSID), WEP key (if WEP is<br />
enabled), and country/region<br />
selection are the same for all devices<br />
connected to the same wireless<br />
network.<br />
• If the computer is connected to the<br />
bridge through a switch or hub, try<br />
connecting it directly to the bridge.<br />
• If the wireless LAN setting are<br />
correct, make sure all the devices<br />
are on the same IP network.<br />
• Make sure the Ethernet cable<br />
connectors are plugged into the<br />
computer and bridge securely.<br />
• You may need to change the IP<br />
address <strong>of</strong> your computer<br />
temporarily to change the bridge’s<br />
IP address. See page 8.<br />
• Reset to factory defaults. See pg.18.<br />
• With power on, disconnect<br />
everything from the switch or hub.<br />
Re-connect the WGE101, then<br />
connect the game console(s).<br />
Finally, connect the other<br />
device(s).<br />
Note: For more troubleshooting information, go to the NETGEAR, Inc. web site.<br />
21
WGE101 System Requirements and<br />
Specifications<br />
System Requirements for the Bridge<br />
To use the bridge in your network you must have:<br />
• Wireless router or access point (Infrastructure mode) or a network <strong>of</strong> wireless<br />
devices (Ad-Hoc mode)<br />
• Network s<strong>of</strong>tware (Windows, Mac OS, Linux, or UNIX)<br />
• Internet Explorer 5.0 or later; Netscape 6.0 or later<br />
Bridge Specifications<br />
Dimensions: W: 175 mm (6.9") D: 118 mm (4.7") H: 28 mm (1.1")<br />
Weight: 0.3 kg (0.7 lbs.)<br />
LAN: 10BASE-T and 100BASE-T<br />
WLAN: 802.11g or 802.11b<br />
Power Adapter: 12V AC, 1.2A with localized plug for North America, UK, Europe<br />
or Australia<br />
Environmental Specifications<br />
Operating temperature: –10° to 55° C (14° to 131° F)<br />
Operating humidity: 85% maximum relative humidity, noncondensing<br />
Electromagnetic<br />
Emissions: CE/LVD: EN 60950:1992+A1+A2+A3+A4+A11<br />
CE/EMC: EN301489-17 (2002-08)<br />
EN301489-1 (2002-08)<br />
CE/Radio: EN 300328-1 V1.3.1: 12-2001<br />
EN 300328-2 V1.2.1: 12-2001<br />
FCC Part 15 Subpart C<br />
FCC Part 15 Subpart B<br />
Safety Certifications: UL 1950, CUL, TUV licensed (EN 60950)<br />
22
Statement <strong>of</strong> Conditions<br />
In the interest <strong>of</strong> improving internal design, operational function, and/or reliability, NETGEAR reserves the right to<br />
make changes to the products described in this document without notice.<br />
NETGEAR does not assume any liability that may occur due to the use or application <strong>of</strong> the product(s) or circuit<br />
layout(s) described herein.<br />
Certificate <strong>of</strong> the Manufacturer/Importer<br />
It is hereby certified that the Model WGE101 54 Mbps Wireless Ethernet Bridge has been suppressed in accordance<br />
with the conditions set out in the BMPT- AmtsblVfg 243/1991 and Vfg 46/1992. The operation <strong>of</strong> some equipment<br />
(for example, test transmitters) in accordance with the regulations may, however, be subject to certain restrictions.<br />
Please refer to the notes in the operating instructions.<br />
Federal Office for Telecommunications Approvals has been notified <strong>of</strong> the placing <strong>of</strong> this equipment on the market and<br />
has been granted the right to test the series for compliance with the regulations.<br />
VCCI Statement<br />
This equipment is in the Class B category (information equipment to be used in a residential area or an adjacent area<br />
thereto) and conforms to the standards set by the Voluntary Control Council for Interference by Data Processing<br />
Equipment and Electronic Office Machines aimed at preventing radio interference in such residential areas. When used<br />
near a radio or TV receiver, it may become the cause <strong>of</strong> radio interference. Read instructions for correct handling.<br />
Federal Communications Commission (FCC) Compliance Notice: Radio Frequency Notice<br />
This device complies with part 15 <strong>of</strong> the FCC Rules. Operation is subject to the following two conditions:<br />
1. This device may not cause harmful interference.<br />
2. This device must accept any interference received, including interference that<br />
may cause undesired operation.<br />
NETGEAR WGE101 Wireless Ethernet Bridge<br />
Tested to Comply<br />
with FCC Standards<br />
Note: This equipment has been tested and found to comply with the limits for FOR HOME OR OFFICE USE<br />
a Class B digital device, pursuant to part 15 <strong>of</strong> the FCC Rules. These limits are<br />
designed to provide reasonable protection against harmful interference in a residential installation. This equipment<br />
generates, uses, and can radiate radio frequency energy and, if not installed and used in accordance with the<br />
instructions, may cause harmful interference to radio communications. However, there is no guarantee that interference<br />
will not occur in a particular installation. If this equipment does cause harmful interference to radio or television<br />
reception, which can be determined by turning the equipment <strong>of</strong>f and on, the user is encouraged to try to correct the<br />
interference by one or more <strong>of</strong> the following measures: (1) Reorient or relocate the receiving antenna, (2) Increase the<br />
separation between the equipment and receiver, (3) Connect the equipment into an outlet on a circuit different from<br />
that to which the receiver is connected, (4) Consult the dealer or an experienced radio/TV technician for help.<br />
Federal Communications Commission (FCC) Radiation Exposure Statement<br />
This equipment complies with FCC radiation exposure limits set forth for an uncontrolled environment. In order to<br />
avoid the possibility <strong>of</strong> exceeding the FCC radio frequency exposure limits, human proximity to the antenna shall not<br />
be less than 20 cm (8 inches) during normal operation.<br />
Canadian Department <strong>of</strong> Communications Radio Interference Regulations<br />
This digital apparatus (Model WGE101 54 Mbps Wireless Ethernet Bridge) does not exceed the Class B limits for<br />
radio-noise emissions from digital apparatus as set out in the Radio Interference Regulations <strong>of</strong> the Canadian<br />
Department <strong>of</strong> Communications.
Technical Support<br />
PLEASE REFER TO THE SUPPORT INFORMATION CARD THAT SHIPPED WITH<br />
YOUR PRODUCT.<br />
By registering your product at www.NETGEAR.com/register, we can provide you with faster<br />
expert technical support and timely notices <strong>of</strong> product and s<strong>of</strong>tware upgrades.<br />
NETGEAR, INC.<br />
Support Information<br />
Phone: 1-888-NETGEAR (for US & Canada only), available 24x7.<br />
For other countries see your Support Information card.<br />
E-mail: support@NETGEAR.com (24x7 online support)<br />
www.NETGEAR.com<br />
0560 !<br />
Attention: When you configure the wireless settings <strong>of</strong> this device<br />
please make sure to select the correct country settings. Due to EU-law,<br />
the country settings must be identical to the country where the device<br />
is operating (important due to non-harmonized frequencies in the EU).<br />
©2003 by NETGEAR, Inc. NETGEAR, the Netgear logo, Everybody’s Connecting, Auto Uplink and The Gear Guy<br />
are trademarks or registered trademarks <strong>of</strong> Netgear, Inc. in the United States and/or other countries. Micros<strong>of</strong>t and<br />
Windows are trademarks or registered trademarks <strong>of</strong> Micros<strong>of</strong>t Corporation in the United States and/or other<br />
countries. Other brand or product names are trademarks or registered trademarks <strong>of</strong> their respective owners.<br />
Information is subject to change without notice. All rights reserved.<br />
July 2003