Exercises for LaTeX introduction course spring 2008
Exercises for LaTeX introduction course spring 2008
Exercises for LaTeX introduction course spring 2008
Create successful ePaper yourself
Turn your PDF publications into a flip-book with our unique Google optimized e-Paper software.
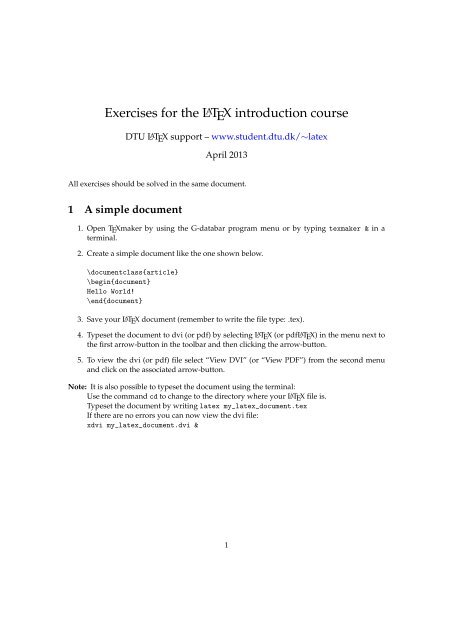
<strong>Exercises</strong> <strong>for</strong> the L A TEX <strong>introduction</strong> <strong>course</strong><br />
DTU LATEX support – www.student.dtu.dk/∼latex<br />
April 2013<br />
All exercises should be solved in the same document.<br />
1 A simple document<br />
1. Open TEXmaker by using the G-databar program menu or by typing texmaker & in a<br />
terminal.<br />
2. Create a simple document like the one shown below.<br />
\documentclass{article}<br />
\begin{document}<br />
Hello World!<br />
\end{document}<br />
3. Save your LATEX document (remember to write the file type: .tex).<br />
4. Typeset the document to dvi (or pdf) by selecting LATEX (or pdfLATEX) in the menu next to<br />
the first arrow-button in the toolbar and then clicking the arrow-button.<br />
5. To view the dvi (or pdf) file select “View DVI” (or “View PDF”) from the second menu<br />
and click on the associated arrow-button.<br />
Note: It is also possible to typeset the document using the terminal:<br />
Use the command cd to change to the directory where your LATEX file is.<br />
Typeset the document by writing latex my_latex_document.tex<br />
If there are no errors you can now view the dvi file:<br />
xdvi my_latex_document.dvi &<br />
1
2 L A TEX in other languages<br />
If you want to write in other languages than English you need to tell LATEX to use the correct<br />
hyphenation patterns and to accept non-English characters. E.g. if you want to write Danish<br />
text you need to use the following packages and settings:<br />
\usepackage[T1]{fontenc} % Better support <strong>for</strong> characters with accents<br />
% and non-English characters<br />
\usepackage[utf8]{inputenc} % Define the input encoding of your document.<br />
% In this case ’utf8’<br />
\usepackage{lmodern} % Vector version of the standard font Computer Modern<br />
% <strong>for</strong> better onscreen viewing.<br />
It is of great importance that the option <strong>for</strong> the inputenc package is the same as the encoding<br />
that your editor is configured to use.<br />
To check which encoding TEXmaker is configured to use select “Editor” in TEXmaker’s preferences<br />
and look <strong>for</strong> the option “Editor Font Encoding”.<br />
To get the correct hyphenation patterns add package babel in the preamble:<br />
\usepackage[danish]{babel} % Danish hyphenation<br />
All four packages must be included in the preamble (after the \documentclass command and<br />
be<strong>for</strong>e the \begin{document} command).<br />
1. Insert the four packages in your preamble and write some Danish characters in your document.<br />
Note: When you write English texts it is still a good idea to use the fontenc, the inputenc and the<br />
lmodern packages.<br />
Note: In this exercise we have also shown how to write comments in LATEX. Commented text<br />
will be skipped when you typeset the document, thus it will not appear in the output file<br />
(dvi, ps, or pdf).<br />
2
3 Sections<br />
1. Create a section structure like shown below.<br />
1 Theory<br />
1.1 Newtons laws<br />
1.1.1 Newtons 1st Law<br />
2. What happens if you use the *-version (e.g. \section*{})?<br />
3. Why is it not possible to use \chapter{} in this document?<br />
4 Math<br />
When you write math in your document it is a good idea to include the mathtools and the bm<br />
(<strong>for</strong> making bold text in math \bm{}) packages in your preamble.<br />
1. Create a new section called “Math”<br />
2. Include the mathtools and the bm package in your preamble.<br />
3. Create the following inline math:<br />
Einstein once wrote E = mc 2 , which turned out to be true.<br />
4. Create the following emphasised math:<br />
Einstein once wrote<br />
which turned out to be true.<br />
E = mc 2<br />
5. Now create an equation with a number:<br />
Einstein once wrote<br />
which turned out to be true.<br />
E = mc 2 (1)<br />
3
5 Text <strong>for</strong>matting and layout<br />
LATEX handles white space in a different way than e.g. MS Word. More than one space character<br />
between words are ignored. In math white space is completely ignored. If you <strong>for</strong> some reason<br />
want extra space you can use the commands \quad or \qquad.<br />
A single line break in the LATEX file does not result in a line break in the output file, instead<br />
it will produce a normal inter word space. Two or more line breaks in the LATEX file results in a<br />
line break and an indent in the output file. This is the way you should produce line breaks in your<br />
document.<br />
If you <strong>for</strong> some reason want to <strong>for</strong>ce LATEX to break a line you can use the command \newline,<br />
but try not to use it. If you do not like the indent style (every paragraph is indented) include<br />
the package parskip in the preamble (\usepackage{parskip}).<br />
LATEX was created in the USA and there<strong>for</strong>e the default paper size is letter, there<strong>for</strong>e you must<br />
tell LATEX to use A4 paper if this is the paper you want: \documentclass[a4paper]{article}.<br />
Formatting and layout commands:<br />
Command<br />
\textbf{}<br />
\textit{}<br />
\texttt{}<br />
\emph{}<br />
\newline<br />
\quad and \qquad<br />
Function<br />
Bold text<br />
Italic text<br />
Typewriter text<br />
Emphasised text<br />
Force LATEX to break the line<br />
Extra space in text and math<br />
Exercise:<br />
1. Create a new section called Formatting and layout.<br />
2. Experiment with the different commands.<br />
Example:<br />
This is some <strong>for</strong>matted text.<br />
Double line break results in a new line and an indent. With \qquad it is possible to<br />
create horizontal space.<br />
Maybe you have noticed that some characters, e.g. $, & or %, have special meanings in LATEX.<br />
If you want to write these characters in you document and make them appear in the output, you<br />
have to use commands. Here are some examples:<br />
Command<br />
\$ $<br />
\&<br />
&<br />
\% %<br />
\{ {<br />
$\backslash$ \<br />
Result<br />
4
6 Lists<br />
1. Create a new section called “Lists” and a subsection called “Bullet list”.<br />
2. Create the following list.<br />
• The first item.<br />
• The second item.<br />
3. Create the following list.<br />
* An item with a star.<br />
- An item with a dash.<br />
Hint: in the itemize environment you can specify what character to use as bullet:<br />
\item[]<br />
4. Now create a new subsection called “numbered list” and create the following list.<br />
1. The first item.<br />
2. The second item.<br />
7 References<br />
One of the things that make LATEX really great is the fact that cross-referring is really easy.<br />
1. Start by going back in your document and place a label at the “Newton’s laws” section.<br />
Also place a label at one of the numbered equations. The syntax is:<br />
\subsection{}\label{}<br />
\begin{equation}<br />
\label{}<br />
\end{equation}<br />
A label name must be unique and can consist of any sequence of letters (do not use Danish<br />
letters), digits, or punctuation characters. Upper and lowercase letters are different.<br />
2. Create a new section called References.<br />
3. Now refer to the two labels. E.g. create the code <strong>for</strong> this:<br />
In section 1.1 on page 3...<br />
Equation (1) can be rearranged so m = E/c 2 .<br />
Hint: use \ref{}, \pageref{} and \eqref{}<br />
4. Typeset one time. Does it look correct? – no<br />
5. Typeset one more time. It should now look right.<br />
When working with labels and references you have to typeset twice when a new label has<br />
been added or a label has been moved.<br />
6. Try writing \tableofcontents in the top of your document (just after \begin{document}).<br />
What happens when you typeset?<br />
5
7.1 varioref<br />
The package varioref makes it even easier to do cross-referring. The package provides the<br />
command \vref which will automatically insert text like “on the next page”, “on previous<br />
page” etc.<br />
Example: LATEX code: section \vref{sec:sections}<br />
Output: section 3 on page 3<br />
8 Two ways to typeset<br />
You can typeset your document in two ways:<br />
1. Using the latex typesetter resulting in a dvi file<br />
2. Using the pdflatex typesetter which will create a pdf file<br />
But does it matter which typesetter you use? – Yes! Some packages only work with one of<br />
them and when you work with images it matters which typesetter you use (see slides).<br />
1. Typeset your document using the “PDF<strong>LaTeX</strong>” button and show the result by clicking the<br />
“View PDF” button.<br />
Note: You do not need to close Acrobat Reader every time you have made a change just<br />
reload the file by clicking Ctrl-R (File -> Reload) after pdfLATEX is done (this requires Adobe<br />
Acrobat 9 or newer).<br />
Note: TEXmaker has a “Quick Build” button which can be used to typeset and view in<br />
one click. You can configure which typesetter to use in TEXmakers preferences section “Quick<br />
Build”.<br />
9 Images and figures<br />
When you want to insert images you must load the graphicx package.<br />
1. Insert the graphicx package in your preamble.<br />
2. Download figure.png or figure.eps from www.student.dtu.dk/~latex → download →<br />
<strong>course</strong>.<br />
3. Make sure that the figure is in the same directory as your LATEX document.<br />
4. Create a new section called ”Images and figures”.<br />
5. Now insert the image in your document. Typeset your document using "PDF<strong>LaTeX</strong>" (png,<br />
jpg figures) or "<strong>LaTeX</strong>" (eps figures). The result should be something like in Figure 1.<br />
6
A simple figure created with Xfig<br />
Figure 1: Here is a simple figure.<br />
left center right<br />
1 2 3<br />
Table 1: A table<br />
10 Tables<br />
1. Create a new section called “Tables”.<br />
2. Create a table that looks as Table 1.<br />
It is possible to create more stylish tables by using the booktabs package. This package<br />
gives you the following commands \toprule, \midrule and \bottomrule which can be<br />
used instead of \hline.<br />
3. Add the booktabs package to your preamble.<br />
4. Create a table that looks as Table 2.<br />
left center right<br />
1 2 3<br />
4 5 6<br />
Table 2: A table<br />
7
11 BibTEX<br />
BibTEX is used to make the bibliography. BibTEX uses a special .bib file which contains all your<br />
sources (books, articles etc.). When your sources have been added to the BibTEX file and you<br />
have referred to these, you must run the BibTEX compiler on your .aux file.<br />
A source (in this case a book) is written like this:<br />
@book{companion,<br />
author = {Michel Goossens and Frank Mittelbach},<br />
title = {The \<strong>LaTeX</strong>\ Companion},<br />
publisher = {Addison-Wesley Publishing Company},<br />
year = {2004},<br />
edition = {2}<br />
}<br />
The first word after “@book{” (in this case “companion”) is the label <strong>for</strong> this book. This label is<br />
used when you refer to the book, and must be unique.<br />
In the LATEX document you must write the following three lines where you want your bibliography<br />
to appear.<br />
\bibliographystyle{unsrt} % The layout of the bibliography<br />
\bibliography{mybibfile} % the path to your BibTeX file<br />
\addcontentsline{toc}{section}{Bibliography} % For the table of contents<br />
Now you can refer to you sources using the command \cite[]{}.<br />
Example: the table is done as shown in \cite[p. 132]{companion}.<br />
1. Create a BibTEX file containing the above mentioned book.<br />
2. Add the three “bibliography” commands at the end of your document.<br />
3. Add a \cite[]{} command some place in your document.<br />
4. Typeset in this particular order<br />
1. latex<br />
2. bibtex<br />
3. latex<br />
4. latex<br />
Note: The BibTEX compiler can be started from TEXmakers “Tools” menu or by pushing F11.<br />
Note: It is only necessary to rerun the BibTEX compiler if you add a new source to the .bib<br />
file or refer to at source that has not been referred to be<strong>for</strong>e.<br />
8


