Motorola RAZR V3 Manual - Cell Phones Etc.
Motorola RAZR V3 Manual - Cell Phones Etc.
Motorola RAZR V3 Manual - Cell Phones Etc.

Create successful ePaper yourself
Turn your PDF publications into a flip-book with our unique Google optimized e-Paper software.
<strong>V3</strong><br />
GSM
Welcome<br />
Welcome to the world of <strong>Motorola</strong> digital wireless<br />
communications! We are pleased that you have chosen the<br />
<strong>Motorola</strong> <strong>V3</strong> GSM wireless phone.<br />
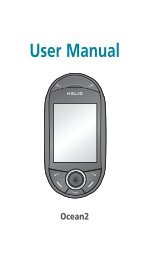
Smart Key<br />
Volume Keys<br />
Left Soft Key<br />
Perform function<br />
in lower left<br />
display.<br />
Operator Key<br />
Send Key<br />
Make & answer<br />
calls.<br />
Accessory<br />
Connector Port<br />
Insert charger &<br />
phone<br />
accessories.<br />
040128o<br />
4-Way<br />
Navigation Key<br />
with Center<br />
Select<br />
Voice Key<br />
Create voice<br />
records & voice<br />
dial names.<br />
Menu Key<br />
Right Soft Key<br />
Perform function<br />
in lower right<br />
display.<br />
Message Key<br />
Power & End Key<br />
Turn phone<br />
on/off, end calls,<br />
exit menu<br />
system.<br />
1
2<br />
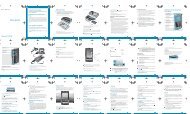
Check It Out!<br />
Feature Description<br />
Take Photo Press CAMERA (-) to activate the<br />
camera, point lens at subject, press<br />
CAPTURE (+) to take a photo.<br />
Take<br />
Self-Portrait<br />
(flip closed)<br />
Camera Lens Bluetooth®<br />
LED Indicator<br />
Smart Key<br />
Take self-portrait<br />
photo with<br />
camera when flip<br />
is closed.<br />
External Display<br />
View incoming<br />
call information,<br />
use as camera<br />
viewfinder when<br />
flip is closed.<br />
Activate the camera, close the flip, use<br />
viewfinder to aim lens, press smart key to<br />
take a photo.<br />
Send Photo Send a photo to a phone number or<br />
email address:<br />
Take photo, then press STORE (+)<br />
> Send.
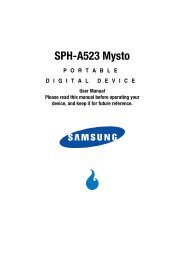
Feature Description<br />
Set Photo as<br />
Picture ID<br />
Send<br />
Multimedia<br />
Message<br />
Wireless<br />
Connection<br />
Assign a photo to a phonebook entry to<br />
allow picture caller ID:<br />
Take photo, then press STORE (+)<br />
> Apply as Phonebook Entry.<br />
Send a multimedia message<br />
with pictures, animations,<br />
sounds, and videos:<br />
E > Create Message<br />
> New Multimedia Msg<br />
032380o<br />
Set up a Bluetooth® wireless connection<br />
to a headset accessory, car kit, or<br />
external device:<br />
M > Settings > Connection > Bluetooth Link<br />
> Setup > Power > On, press BACK (-),<br />
press > Handsfree > [Look For Devices]<br />
3
4<br />
<strong>Motorola</strong>, Inc.<br />
Consumer Advocacy Office<br />
1307 East Algonquin Road<br />
Schaumburg, IL 60196<br />
www.motorola.com<br />
1-800-331-6456 (United States)<br />
1-888-390-6456 (TTY/TDD United States for hearing impaired)<br />
1-800-461-4575 (Canada)<br />
MOTOROLA and the Stylized M Logo are registered in the US Patent &<br />
Trademark Office. America Online, AOL, the America Online & Design<br />
logo, the AOL & Design logo, AIM, and the Triangle Logo, are registered<br />
trademarks of America Online, Inc. in the United States and/or other<br />
countries. Instant Messenger is a trademark of America Online, Inc. The<br />
Bluetooth trademarks are owned by their proprietor and used by <strong>Motorola</strong>,<br />
Inc. under license. Java and all other Java-based marks are trademarks<br />
or registered trademarks of Sun Microsystems, Inc. in the U.S. and other<br />
countries. All other product or service names are the property of their<br />
respective owners.<br />
© <strong>Motorola</strong>, Inc. 2004.<br />
The information contained in <strong>Motorola</strong>’s user’s guides is believed to be<br />
correct at the time of printing. <strong>Motorola</strong> reserves the right to change or<br />
modify any information or specifications without notice. The contents of<br />
<strong>Motorola</strong>’s user’s guides are provided “as is.” Except as required by<br />
applicable law, no warranties of any kind, either express or implied,<br />
including, but not limited to, the implied warranties of merchantability and<br />
fitness for a particular purpose, are made in relation to the accuracy,<br />
reliability, or contents of this guide.<br />
Caution: Changes or modifications made in the radio phone, not<br />
expressly approved by <strong>Motorola</strong>, will void the user’s authority to operate<br />
the equipment.<br />
<strong>Manual</strong> number: 6809491A59-O
Contents<br />
Getting Started . . . . . . . . . . . . . . . . . . . . . . . . . . . . . . . . . . 8<br />
About This Guide . . . . . . . . . . . . . . . . . . . . . . . . . . . . . . . 8<br />
Installing the SIM Card . . . . . . . . . . . . . . . . . . . . . . . . . . . 9<br />
Battery Tips . . . . . . . . . . . . . . . . . . . . . . . . . . . . . . . . . . 10<br />
Installing the Battery . . . . . . . . . . . . . . . . . . . . . . . . . . . . 11<br />
Charging the Battery. . . . . . . . . . . . . . . . . . . . . . . . . . . . 11<br />
Turning Your Phone On. . . . . . . . . . . . . . . . . . . . . . . . . . 13<br />
Turning Your Phone Off. . . . . . . . . . . . . . . . . . . . . . . . . . 13<br />
Adjusting Volume . . . . . . . . . . . . . . . . . . . . . . . . . . . . . . 14<br />
Making a Call . . . . . . . . . . . . . . . . . . . . . . . . . . . . . . . . . 14<br />
Answering a Call. . . . . . . . . . . . . . . . . . . . . . . . . . . . . . . 15<br />
Viewing Your Phone Number . . . . . . . . . . . . . . . . . . . . . 15<br />
Highlight Features . . . . . . . . . . . . . . . . . . . . . . . . . . . . . . 16<br />
Taking and Sending a Photo. . . . . . . . . . . . . . . . . . . . . . 16<br />
Sending a Multimedia Message . . . . . . . . . . . . . . . . . . . 19<br />
Using a Bluetooth® Wireless Connection. . . . . . . . . . . . 23<br />
Learning to Use Your Phone . . . . . . . . . . . . . . . . . . . . . . 26<br />
Using the Display . . . . . . . . . . . . . . . . . . . . . . . . . . . . . . 26<br />
Using the 4-Way Navigation Key. . . . . . . . . . . . . . . . . . . 30<br />
Using the Operator Key . . . . . . . . . . . . . . . . . . . . . . . . . 31<br />
Using the Message Key . . . . . . . . . . . . . . . . . . . . . . . . . 31<br />
Using Menus. . . . . . . . . . . . . . . . . . . . . . . . . . . . . . . . . . 32<br />
Entering Text. . . . . . . . . . . . . . . . . . . . . . . . . . . . . . . . . . 34<br />
Using the Smart Key. . . . . . . . . . . . . . . . . . . . . . . . . . . . 46<br />
Using the External Display . . . . . . . . . . . . . . . . . . . . . . . 46<br />
Using the Handsfree Speaker. . . . . . . . . . . . . . . . . . . . . 48<br />
Changing a Code, PIN, or Password . . . . . . . . . . . . . . . 48<br />
Locking and Unlocking Your Phone . . . . . . . . . . . . . . . . 49<br />
5
6<br />
If You Forget a Code, PIN, or Password . . . . . . . . . . . . 50<br />
Using the Phonebook . . . . . . . . . . . . . . . . . . . . . . . . . . 51<br />
Setting Up Your Phone. . . . . . . . . . . . . . . . . . . . . . . . . . 54<br />
Setting a Ring Style. . . . . . . . . . . . . . . . . . . . . . . . . . . . 54<br />
Changing the Call Alert . . . . . . . . . . . . . . . . . . . . . . . . . 55<br />
Setting the Time and Date . . . . . . . . . . . . . . . . . . . . . . 55<br />
Setting a Wallpaper Image . . . . . . . . . . . . . . . . . . . . . . 56<br />
Setting a Screen Saver Image . . . . . . . . . . . . . . . . . . . 57<br />
Changing Phone Skin . . . . . . . . . . . . . . . . . . . . . . . . . . 58<br />
Setting a Phone Theme . . . . . . . . . . . . . . . . . . . . . . . . 58<br />
Setting Answer Options. . . . . . . . . . . . . . . . . . . . . . . . . 59<br />
Setting Display Brightness . . . . . . . . . . . . . . . . . . . . . . 60<br />
Adjusting the Backlight . . . . . . . . . . . . . . . . . . . . . . . . . 60<br />
Setting Display Timeout . . . . . . . . . . . . . . . . . . . . . . . . 61<br />
Storing Your Name and Phone Number . . . . . . . . . . . . 61<br />
Calling Features . . . . . . . . . . . . . . . . . . . . . . . . . . . . . . . 62<br />
Turning Off a Call Alert . . . . . . . . . . . . . . . . . . . . . . . . . 62<br />
Viewing Recent Calls . . . . . . . . . . . . . . . . . . . . . . . . . . 62<br />
Redialing a Number . . . . . . . . . . . . . . . . . . . . . . . . . . . 64<br />
Using Automatic Redial. . . . . . . . . . . . . . . . . . . . . . . . . 64<br />
Returning an Unanswered Call . . . . . . . . . . . . . . . . . . . 65<br />
Using the Notepad . . . . . . . . . . . . . . . . . . . . . . . . . . . . 65<br />
Putting a Call On Hold or Mute . . . . . . . . . . . . . . . . . . . 66<br />
Using Call Waiting. . . . . . . . . . . . . . . . . . . . . . . . . . . . . 66<br />
Using Caller ID (Incoming Calls) . . . . . . . . . . . . . . . . . . 67<br />
Calling an Emergency Number . . . . . . . . . . . . . . . . . . . 68<br />
Dialing International Numbers. . . . . . . . . . . . . . . . . . . . 68<br />
Calling With 1-Touch Dial . . . . . . . . . . . . . . . . . . . . . . . 68<br />
Using Voicemail. . . . . . . . . . . . . . . . . . . . . . . . . . . . . . . 69
Phone Features . . . . . . . . . . . . . . . . . . . . . . . . . . . . . . . . 71<br />
Main Menu . . . . . . . . . . . . . . . . . . . . . . . . . . . . . . . . . . . 71<br />
Settings Menu. . . . . . . . . . . . . . . . . . . . . . . . . . . . . . . . . 72<br />
Feature Quick Reference . . . . . . . . . . . . . . . . . . . . . . . . 73<br />
Calling Features . . . . . . . . . . . . . . . . . . . . . . . . . . . . . . . 73<br />
Messages . . . . . . . . . . . . . . . . . . . . . . . . . . . . . . . . . . . . 74<br />
Phonebook . . . . . . . . . . . . . . . . . . . . . . . . . . . . . . . . . . . 75<br />
Personalizing Features . . . . . . . . . . . . . . . . . . . . . . . . . . 79<br />
AOL® Instant Messenger . . . . . . . . . . . . . . . . . . . . . . 80<br />
Email. . . . . . . . . . . . . . . . . . . . . . . . . . . . . . . . . . . . . . . . 81<br />
Menu Features . . . . . . . . . . . . . . . . . . . . . . . . . . . . . . . . 82<br />
Special Dialing Features. . . . . . . . . . . . . . . . . . . . . . . . . 83<br />
Call Monitoring . . . . . . . . . . . . . . . . . . . . . . . . . . . . . . . . 84<br />
Handsfree Features . . . . . . . . . . . . . . . . . . . . . . . . . . . . 84<br />
Data and Fax Calls . . . . . . . . . . . . . . . . . . . . . . . . . . . . . 85<br />
Bluetooth® Wireless Connections . . . . . . . . . . . . . . . . . 86<br />
Network Features . . . . . . . . . . . . . . . . . . . . . . . . . . . . . . 88<br />
Personal Organizer Features . . . . . . . . . . . . . . . . . . . . . 88<br />
Security. . . . . . . . . . . . . . . . . . . . . . . . . . . . . . . . . . . . . . 90<br />
News and Entertainment . . . . . . . . . . . . . . . . . . . . . . . . 90<br />
Troubleshooting . . . . . . . . . . . . . . . . . . . . . . . . . . . . . . . . 93<br />
Specific Absorption Rate Data . . . . . . . . . . . . . . . . . . . . 94<br />
AOL® Instant Messenger License. . . . . . . . . . . . . . . . 96<br />
European Union Directives Conformance Statement. 100<br />
Index . . . . . . . . . . . . . . . . . . . . . . . . . . . . . . . . . . . . . . . . 101<br />
7
Getting Started<br />
8<br />
Getting Started<br />
CAUTION: Before using the phone for the<br />
first time, read the Important Safety and<br />
Legal Information included in the<br />
gray-edged pages at the back of this guide.<br />
032259o<br />
About This Guide<br />
This guide describes the basic features of your phone.<br />
Selecting a Menu Feature<br />
Use the menu system to access your phone’s features.<br />
This guide shows you how to select a menu feature from<br />
the home screen as follows:<br />
Find the Feature M > Recent Calls > Dialed Calls<br />
This example shows that, from the home screen, you must<br />
press the menu key M to open the menu, scroll to and<br />
select s Recent Calls, then scroll to and select Dialed Calls.<br />
Press the 4-way navigation key S to scroll and highlight a<br />
menu feature. Press SELECT (+) to select the highlighted<br />
menu feature.
Optional Features<br />
This label identifies an optional network, SIM<br />
032380o card, or subscription-dependent feature that<br />
may not be offered by all service providers in<br />
all geographical areas. Contact your service<br />
provider for more information.<br />
Optional Accessories<br />
This label identifies a feature that requires an<br />
optional <strong>Motorola</strong> Original accessory.<br />
Installing the SIM Card<br />
Your Subscriber Identity Module (SIM) card contains your<br />
phone number, service details, and phonebook/message<br />
memory.<br />
Caution: Do not bend or scratch your SIM card. Avoid<br />
exposing your SIM card to static electricity, water, or dirt.<br />
Slide the SIM card under the retention strap to insert it into<br />
the card slot as shown below:<br />
1. 2.<br />
Getting Started<br />
9
Getting Started<br />
10<br />
Battery Tips<br />
Battery life depends on the network, signal strength,<br />
temperature, features, and accessories you use.<br />
Always use <strong>Motorola</strong> Original batteries<br />
and chargers. The warranty does not<br />
cover damage caused by using<br />
non-<strong>Motorola</strong> batteries and/or chargers.<br />
New batteries or batteries stored for a long time may<br />
take more time to charge.<br />
When charging your battery, keep it near room<br />
temperature.<br />
When storing your battery, keep it uncharged in a<br />
cool, dark, dry place, such as a refrigerator.<br />
Never expose batteries to temperatures below -10°C<br />
(14°F) or above 45°C (113°F). Always take your<br />
phone with you when you leave your vehicle.<br />
It is normal for batteries to gradually wear down and<br />
require longer charging times. If you notice a change<br />
in your battery life, it is probably time to purchase a<br />
new battery.<br />
Contact your local recycling center for proper<br />
battery disposal.<br />
Warning: Never dispose of batteries in a fire because they<br />
may explode.<br />
Before using your phone, read the battery safety<br />
information in the “Safety and General Information” section<br />
included in the gray-edged pages at the back of this guide.
Installing the Battery<br />
1. 2.<br />
3. 4.<br />
Charging the Battery<br />
New batteries are shipped partially charged. Before you<br />
can use your phone, you need to install and charge the<br />
battery as described below. Some batteries perform best<br />
after several full charge/discharge cycles.<br />
Getting Started<br />
11
Getting Started<br />
12<br />
Tip: The angle connector provided with your phone makes<br />
it easier for you to use the phone with an attached battery<br />
charger or phone accessory.<br />
Action<br />
1 Insert the travel<br />
charger plug into<br />
the detachable<br />
angle connector as<br />
shown.<br />
2 Insert the angle<br />
connector plug into<br />
the USB connector<br />
port on your<br />
phone.<br />
3 Plug the other end of the travel charger into the<br />
appropriate electrical outlet.<br />
Note: It may take up to 10 seconds for your<br />
phone to provide a visible or audible indication<br />
that the battery is charging.<br />
4 When your phone indicates Charge Complete,<br />
remove the travel charger and angle connector.<br />
Note: You can safely leave the travel charger connected to<br />
the phone after charging is complete. This will not damage<br />
the battery.
Turning Your Phone On<br />
Action<br />
1 Press and hold the<br />
power key P for<br />
2 seconds to turn the<br />
phone on.<br />
Note: It may take up to<br />
4 seconds for the<br />
display to illuminate after you turn the phone on.<br />
2 If necessary, enter your SIM card PIN code and<br />
press OK (+) to unlock the SIM card.<br />
Caution: If you enter an incorrect PIN code<br />
3 times in a row, your SIM card is disabled and<br />
your phone displays SIM Blocked.<br />
3 If necessary, enter your 4-digit unlock code and<br />
press OK (+) to unlock the phone.<br />
At startup, you may be prompted to personalize your<br />
phone. Select YES (-) to set personal phone options, or<br />
NO (+) to go to the home screen. For more information<br />
about personalizing your phone, see page 79.<br />
Turning Your Phone Off<br />
Action<br />
Press and hold the power key P for 2 seconds to<br />
turn the phone off.<br />
Getting Started<br />
13
Getting Started<br />
14<br />
Adjusting Volume<br />
Press the up or down volume<br />
keys to:<br />
silence an incoming call<br />
alert<br />
increase or decrease<br />
earpiece volume during a<br />
call<br />
increase or decrease ringer volume when the home<br />
screen is visible (flip must be open)<br />
Tip: At the lowest volume setting, press the down<br />
volume key once to switch to vibrate alert. Press it<br />
again to switch to silent alert. Press the up volume key<br />
to switch back to vibrate alert, then ring alert.<br />
Making a Call<br />
040135o<br />
You must be in the home screen to dial a phone number<br />
(see page 26).<br />
Press To<br />
1 keypad keys dial the phone number<br />
2 N make the call<br />
3 O end the call and “hang up” the<br />
phone when you are finished<br />
Tip: You can also close the phone flip to end the call.
Answering a Call<br />
When you receive a call, your phone rings and/or<br />
vibrates and displays an incoming call message.<br />
When the phone flip is active, open the phone to<br />
answer the call. (To activate, press M > Settings<br />
> In Call Setup > Answer Options > Open To Answer.)<br />
If the phone flip is not active:<br />
Press To<br />
1 N or<br />
ANSWER (-)<br />
answer the call<br />
2 O end the call and “hang up” the<br />
phone when you are finished<br />
Viewing Your Phone Number<br />
To view your phone number from the home screen, press<br />
M#.<br />
While you are on a call, press M > My Tel. Numbers.<br />
Note: Your phone number must be stored on your SIM<br />
card to use this feature. To store your phone number on<br />
the SIM card, see page 61. If you do not know your phone<br />
number, contact your service provider.<br />
Getting Started<br />
15
Highlight Features<br />
16<br />
Highlight Features<br />
You can do much more with your phone than make and<br />
receive calls!<br />
Taking and Sending a Photo<br />
Shortcut: From the home screen, press CAMERA (-) to<br />
activate the camera.<br />
To activate your phone’s camera from the menu system:<br />
Find the Feature M > Multimedia > Camera<br />
The active viewfinder image appears on your display.<br />
Press S up or<br />
down to zoom<br />
in or out.<br />
Press S left<br />
or right to<br />
decrease or<br />
increase image<br />
brightness.<br />
Press BACK (-) to exit<br />
the camera application.<br />
IMAGE<br />
AREA<br />
Photo Viewfinder<br />
Memory Used:72%<br />
BACK CAPTURE<br />
Photo Storage<br />
Space Used<br />
Press<br />
CAPTURE (+)<br />
to take a photo.<br />
Press M to open<br />
My Pictures Menu.
Point the camera lens at the photo subject, then:<br />
Press To<br />
1 CAPTURE (+) take a photo<br />
2 STORE (+)<br />
or<br />
view storage options<br />
If you choose to store the<br />
photo, continue to step 3.<br />
DISCARD (-) delete the photo and return to<br />
active viewfinder<br />
3 S scroll to Send, StoreinOnlineAlb,<br />
Store in Phone, Apply as Wallpaper,<br />
Apply as Screen Saver, or<br />
Apply as Phonebook Entry<br />
4 SELECT (+) perform the storage option<br />
Taking a Self-Portrait<br />
Action<br />
1 From the home screen, press CAMERA (-) to<br />
activate the camera, then close the flip.<br />
or<br />
Close the flip, then press and hold the smart key<br />
to activate the camera and external display<br />
viewfinder.<br />
2 Use the external viewfinder to aim the camera<br />
lens.<br />
Highlight Features<br />
17
Highlight Features<br />
18<br />
Action<br />
3 Press the smart key to take a photo.<br />
4 Wait 5 seconds for your phone to save the photo<br />
and reset the external viewfinder.<br />
or<br />
Open the flip to store or discard the photo.<br />
Adjusting Camera Settings<br />
Press M to open the My Pictures Menu when the camera<br />
is active. The My Pictures Menu can include the following<br />
options:<br />
Option Description<br />
View Phone Album View pictures and photos<br />
stored on your phone.<br />
Auto-Timed Capture Set a timer for the camera to<br />
take a photo.<br />
Pictures Setup Open the setup menu to<br />
adjust the following settings:<br />
Lighting Conditions: Set to Automatic, Sunny, Cloudy,<br />
Indoor (Home), Indoor (Office), or Night.<br />
Exposure: Set to +2, +1, 0, -1, or -2.<br />
Resolution: Set the camera to capture photos at the<br />
following resolutions: MMS (160x120 pixels), Medium<br />
(320x240 pixels, or High (640x480 pixels)
Option Description<br />
Shutter Tone: Activate a tone that sounds when you<br />
take a photo. Can be set to None, Chimp, Quack, Flix,<br />
Boing, or Click.<br />
View Free Space See how much memory<br />
remains for storing pictures.<br />
Sending a Multimedia Message<br />
A Multimedia Messaging Service (MMS)<br />
032380o<br />
multimedia message contains one or more pages<br />
with text and embedded media objects (including<br />
photos, pictures, animations, sounds, voice<br />
records, and video clips). You can send a multimedia<br />
message to other MMS-capable phones, and to email<br />
addresses.<br />
Tip: The layout of all pages in a multimedia message is<br />
defined by the layout of the first page. To display a media<br />
object at the top of the page, insert it in the first half of the<br />
message text. To display a media object at the bottom of<br />
the page, insert it in the second half of the message text.<br />
Find the Feature E > Create Message<br />
> New Multimedia Msg<br />
Press To<br />
1 keypad keys enter text on the page<br />
2 M open the MMS Menu<br />
3 S scroll to Add Media<br />
4 SELECT (+) display a list of items you can<br />
insert<br />
Highlight Features<br />
19
Highlight Features<br />
20<br />
Press To<br />
5 S scroll to My Pictures,<br />
Record Voice, Sound, Video,<br />
New Page, Quick Note, or<br />
Contact Info<br />
6 SELECT (+) select the file type<br />
7 S highlight the file you want<br />
8 SELECT (+) insert the file<br />
To add another page to the<br />
message, continue to step 9.<br />
9 M open the MMS Menu to insert a<br />
new page<br />
10 S scroll to Add Media<br />
11 SELECT (+) display a list of items you can<br />
insert<br />
12 S scroll to New Page<br />
13 SELECT (+) insert a new page after the<br />
current page<br />
Repeat steps 1 to 8 to enter<br />
contents for the new page.
When you finish composing the multimedia message:<br />
Press To<br />
1 OK (+) store the message<br />
2 S scroll to a Mobile Number/Email<br />
option:<br />
Highlight an existing<br />
phonebook entry.<br />
Or highlight [One Time Entry] to<br />
enter one or more phone<br />
numbers or email addresses.<br />
Or highlight<br />
[New Phonebook Entry] to enter a<br />
number/address and add it to<br />
the phonebook.<br />
3 ADD (+)<br />
or<br />
SELECT (+)<br />
add the phonebook entry to<br />
the list of recipients<br />
Repeat steps 2 and 3 to add<br />
additional phonebook entries<br />
to the list.<br />
select [One Time Entry] or<br />
[New Phonebook Entry]<br />
4 DONE (+) store the numbers/addresses<br />
5 S scroll to Subject<br />
6 EDIT/ADD (-) select Subject<br />
032380o<br />
Highlight Features<br />
21
Highlight Features<br />
22<br />
Press To<br />
7 keypad keys enter the subject<br />
8 OK (+) store the subject<br />
9 EDIT/ADD (-) select Attachments to attach a<br />
file to the message, if desired<br />
10 S scroll to Picture, Sounds, or Video<br />
11 SELECT (+) select the file type<br />
12 S highlight the file you want<br />
13 SELECT (+) attach the file<br />
14 BACK (-) return to the message editor<br />
15 S scroll to Receipt to request a<br />
receipt, if desired<br />
16 EDIT/ADD (-) select Receipt<br />
17 ADD (+) or<br />
REMOVE (+)<br />
activate/deactivate the<br />
delivery report<br />
18 DONE (-) return to the message editor<br />
19 SEND (+) send the message<br />
or<br />
M<br />
view message details, save<br />
the message in the drafts<br />
folder, or cancel the message
Using a Bluetooth® Wireless<br />
Connection<br />
Your phone supports Bluetooth wireless connections.<br />
You can set up a wireless link with a Bluetooth headset<br />
or handsfree car kit, or connect to a computer or<br />
hand-held device to exchange and synchronize data.<br />
Note: Your phone's Bluetooth features and Bluetooth<br />
Class 1 power levels are not allowed for outdoor<br />
operation in France. To avoid unlawful interference<br />
with radio signals, do not use the Bluetooth features<br />
in France unless you are indoors.<br />
Turning Bluetooth Power On or Off<br />
The preferred method for connecting your phone to a<br />
Bluetooth headset or handsfree car kit is to turn on<br />
Bluetooth power on your phone, then connect your phone<br />
to the headset or car kit.<br />
To turn Bluetooth power on:<br />
Find the Feature M > Settings > Connection<br />
> Bluetooth Link > Setup<br />
> Power > On<br />
This procedure turns Bluetooth power on and leaves it on<br />
until you turn it off. When your phone’s Bluetooth power is<br />
on, your handsfree accessory can automatically reconnect<br />
to the phone when you turn on the accessory or move it<br />
within range of the phone.<br />
Note: To extend battery life, use the above procedure and<br />
set Bluetooth power to Off when not in use.<br />
Highlight Features<br />
23
Highlight Features<br />
24<br />
Searching for Other Devices<br />
To connect your phone to a Bluetooth headset or<br />
handsfree device:<br />
Find the Feature M > Settings > Connection<br />
> Bluetooth Link<br />
> Handsfree<br />
> [Look For Devices]<br />
If Bluetooth power is turned off, your phone prompts you to<br />
Temporarily Power On? the Bluetooth power setting. Press<br />
YES (-) to proceed. Alternatively, set Power to On in the<br />
Setup menu to turn Bluetooth power on and leave it on.<br />
Your phone scans for and displays a list of device(s)<br />
located within range of the phone.<br />
Note: If your phone is already connected to a device, you<br />
must disconnect from it to search for other devices.<br />
To connect to a device, highlight the device name and<br />
press SELECT (+).<br />
The device may request permission to bond with your<br />
phone. Select YES (-) and enter the correct PIN code to<br />
create a secure connection with the device. When the<br />
connection is made, the Bluetooth indicator à displays in<br />
the home screen, and the external Bluetooth LED indicator<br />
flashes.
Sending Objects to Another Device<br />
You can use a Bluetooth wireless connection to send a<br />
picture, sound, video, phonebook entry, datebook<br />
event, or bookmark from your phone to another phone,<br />
computer, or hand-held device.<br />
Sending a Picture, Sound, or Video<br />
Highlight the object on your phone that you want to send to<br />
the other device, then press M > Copy.<br />
Select a recognized device name listed in the Object Exchange<br />
menu, or [Look For Devices] to search for the device to which<br />
you want to send the object.<br />
Sending a Phonebook Entry, Datebook Event, or<br />
Bookmark<br />
Highlight the item on your phone that you want to send to<br />
the other device, then press M > Send.<br />
Select a recognized device name listed in the Object Exchange<br />
menu, or [Look For Devices] to search for the device to which<br />
you want to send the item.<br />
Highlight Features<br />
25
Learning to Use Your Phone<br />
26<br />
Learning to Use Your<br />
Phone<br />
See page 1 for a basic phone diagram.<br />
Using the Display<br />
The home screen is displayed when you are not on a<br />
call or using the menu. You must be in the home screen<br />
to dial a phone number.<br />
Date<br />
Recent Calls<br />
Phonebook<br />
Left Soft Key<br />
Label<br />
Service Provider<br />
10/15/05<br />
CAMERA BROWSER<br />
Menu Indicator<br />
Messages<br />
Browser<br />
Clock<br />
Right Soft Key<br />
Label<br />
Press the 4-way navigation key S up, down, left, or right<br />
to select a menu feature icon. If you select a menu icon by<br />
mistake, press O to return to the home screen.<br />
The menu indicator M shows that you can press the menu<br />
key M to enter the main menu.
Labels at the bottom corners of the display show the<br />
current soft key functions. Press the left soft key - or<br />
right soft key + to perform the indicated function.<br />
Notes:<br />
Your home screen may appear different than shown.<br />
For example, the menu feature icons normally are<br />
hidden to allow a better view of the wallpaper image.<br />
You can still select the menu icons when they are<br />
hidden from view. To show or hide menu icons,<br />
see page 80.<br />
Your phone can display an analog or digital clock<br />
in the home screen (see page 79).<br />
Your phone’s display normally is visible only when the<br />
display backlight is on, or when the display is viewed<br />
in direct sunlight. To extend battery life, the backlight<br />
turns off automatically when no activity is detected for<br />
a specified time. The backlight turns back on when<br />
you open the flip or press any key. To set the time that<br />
the backlight stays on, see page 60.<br />
To further extend battery life, you can set the display<br />
to turn off (in addition to the backlight) when no<br />
activity is detected for a specified time. The display<br />
turns back on when you open the flip or press any key.<br />
To set the time that the display stays on, see page 61.<br />
Learning to Use Your Phone<br />
27
Learning to Use Your Phone<br />
28<br />
The following status indicators can display:<br />
4. Roam<br />
3. Signal<br />
Strength<br />
1. Data Transmission Indicator – Show connection and<br />
data transmission status. The Bluetooth® wireless<br />
connection indicator à shows when a Bluetooth<br />
connection is active. Other indicators can include:<br />
4 = secure packet<br />
data transfer<br />
3 = secure<br />
application<br />
connection<br />
2 = secure Circuit<br />
Switch Data<br />
(CSD) call<br />
Service Provider<br />
10/15/05<br />
CAMERA BROWSER<br />
8. Battery<br />
Level<br />
2. GPRS 9. Ring Style<br />
1. Data<br />
Transmission<br />
5. Call<br />
Status<br />
6. Messaging<br />
Presence 7. Message<br />
7 = unsecure packet<br />
data transfer<br />
6 = unsecure<br />
application<br />
connection<br />
5 = unsecure CSD<br />
call
2. GPRS Indicator – Shows that your phone is<br />
032380o using a high-speed General Packet Radio<br />
Service (GPRS) network connection. GPRS<br />
allows faster data transfer speeds. Other<br />
indicators can include:<br />
* = GPRS PDP<br />
context active<br />
3. Signal Strength Indicator – Vertical bars show the<br />
strength of the network connection. You cannot make<br />
or receive calls when the no signal indicator ! or no<br />
transmit indicator ) is displayed.<br />
032380o<br />
032380o<br />
032380o<br />
, = GPRS packet<br />
data available<br />
4. Roam Indicator – The roam indicator ã<br />
shows when your phone is seeking or using<br />
another network outside your home network.<br />
5. Call Status Indicator – Shows the call status<br />
of your phone. Indicators can include:<br />
? = phone in call > = call forward on<br />
6. Messaging Presence Indicator – Shows<br />
when AIM ® instant messaging is active. Indicators<br />
can include:<br />
G = AIM active F =away from AIM<br />
When a Java application is active, the Java midlet<br />
indicator ` displays in this location.<br />
Learning to Use Your Phone<br />
29
Learning to Use Your Phone<br />
30<br />
032380o<br />
7. Message Indicator – Displays when you<br />
receive a new message. Indicators can include:<br />
r = text message t = voicemail<br />
message<br />
s = voicemail and c = AIM message<br />
text message<br />
8. Battery Level Indicator – Vertical bars show the<br />
battery charge level. Recharge the battery when<br />
Low Battery displays and the battery alert sounds.<br />
9. Ring Style Indicator – Shows the ring style setting.<br />
y = loud ring z =soft ring<br />
| =vibrate } = vibrate then ring<br />
=vibrate & ring { = silent<br />
Using the 4-Way Navigation<br />
Key<br />
Press the 4-way navigation key<br />
S up, down, left, or right to scroll<br />
through the menu system,<br />
highlight menu items, change<br />
feature settings, and play games.<br />
Press the center select key C in<br />
the center of the 4-way navigation key to select a<br />
highlighted menu item. The center select key usually<br />
performs the same function as the right soft key +.
Using the Operator Key<br />
From the home screen, press the<br />
operator key L to go to your<br />
service provider’s portal site to<br />
access customized content and<br />
services.<br />
If a portal site is not available,<br />
press the operator key to start the micro-browser.<br />
Using the Message Key<br />
From the home screen, press the<br />
message key E to send a<br />
message or read messages you<br />
have received.<br />
Learning to Use Your Phone<br />
31
Learning to Use Your Phone<br />
32<br />
Using Menus<br />
From the home screen, press M to enter the main<br />
menu.<br />
Highlighted<br />
Menu Feature<br />
Icon<br />
Left Soft Key<br />
Perform left<br />
function.<br />
4-Way Navigation<br />
Key with Center<br />
Select<br />
Scroll up, down,<br />
left, or right.<br />
Press C to select<br />
menu feature.<br />
Phonebook<br />
040149o<br />
EXIT SELECT<br />
Right Soft Key<br />
Perform right<br />
function.<br />
Menu Key<br />
Enter menu<br />
system, or open<br />
a sub-menu.<br />
End Key<br />
Exit menu without<br />
making changes.<br />
Press S to scroll to and highlight a menu feature icon in<br />
the main menu. Press SELECT (+) or C to select the<br />
highlighted menu feature.
The following icons represent features that may display in<br />
the main menu, depending on your service provider and<br />
service subscription options.<br />
Menu<br />
Menu<br />
Icon Feature Icon Feature<br />
n Phonebook s Recent Calls<br />
e Messages É Office Tools<br />
Q Games & Apps á Web Access<br />
h Multimedia B AIM<br />
w Settings<br />
Some features require you to select an option from a list.<br />
Press<br />
BACK (-) to<br />
go back to<br />
previous<br />
screen.<br />
Dialed Calls<br />
10) John Smith<br />
9) Lisa Owens<br />
8) Adda Thomas<br />
7) Jack Bradshaw<br />
6) Dave Thompson<br />
5) Mary Smith<br />
4) Carlo Emrys<br />
3) Bob Adams<br />
BACK VIEW<br />
Press M to open sub-menu.<br />
Highlighted<br />
Option<br />
Press<br />
VIEW (+) to<br />
view details of<br />
highlighted<br />
option.<br />
Press S to scroll up or down to highlight the option<br />
you want.<br />
In a numbered list, press a number key to highlight the<br />
option.<br />
Learning to Use Your Phone<br />
33
Learning to Use Your Phone<br />
34<br />
In an alphabetized list, press a key repeatedly to cycle<br />
through the letters on the key and highlight the closest<br />
matching list option.<br />
When an option has a list of possible values, press S<br />
left or right to scroll through and select a value.<br />
When an option has a list of possible numeric values,<br />
press a number key to set the value.<br />
Entering Text<br />
Some features require you to enter information.<br />
Scroll down to<br />
bottom of list to<br />
view more<br />
options.<br />
Entry Details<br />
Name: John Smith<br />
Category: General<br />
No.: 212-555-1212<br />
Type: Work<br />
Store To: Phone<br />
Voice Name:<br />
Speed No.: 2 #(P)<br />
Ringer ID: Continental<br />
CANCEL EDIT/ADD<br />
Press CANCEL (-) to exit without<br />
making changes. DONE (-) displays<br />
when you enter or edit information.<br />
Highlighted<br />
option. Press<br />
S to scroll to<br />
other options.<br />
Press<br />
EDIT/ADD (+)<br />
to set or edit<br />
highlighted<br />
option.
Some features let you enter text.<br />
For indicator<br />
descriptions,<br />
see following<br />
section.<br />
Flashing<br />
cursor<br />
indicates<br />
insertion<br />
point.<br />
Msg 450<br />
CANCEL ADD MEDIA<br />
Press CANCEL (-) to exit<br />
without making changes.<br />
Selecting a Text Entry Mode<br />
Press M to<br />
open<br />
sub-menu.<br />
Press<br />
ADD MEDIA (+)<br />
to insert a quick<br />
note, picture, or<br />
sound.<br />
Multiple text entry modes make it easy for you to enter<br />
names, numbers, and messages. The mode you select<br />
remains active until you select another mode.<br />
Press # in a text entry screen to select one of the<br />
following entry modes:<br />
Primary Your primary text entry mode (see<br />
below to set).<br />
Numeric Enter numbers only (see page 44).<br />
Symbol Enter symbols only (see page 44).<br />
Secondary Your secondary text entry mode<br />
(see below to set).<br />
Learning to Use Your Phone<br />
35
Learning to Use Your Phone<br />
36<br />
Alternatively, you can select a text entry mode in any text<br />
entry screen by pressing M > Entry Mode.<br />
Setting Primary and Secondary Text Entry Modes<br />
You can set different primary and secondary text entry<br />
modes, and easily switch between modes as needed when<br />
you enter data or compose a message.<br />
Press M > Entry Setup in a text entry screen. Select<br />
Primary Setup or Secondary Setup, and choose:<br />
iTAP iTAP® software predicts each word as<br />
you enter it, to simplify and speed up<br />
text entry.<br />
Tap Enter individual letters and numbers by<br />
pressing a key one or more times.<br />
Tap Extended Enter individual letters, numbers, and<br />
symbols by pressing a key one or<br />
more times.<br />
None Hide the Secondary setting if you prefer<br />
not to set a secondary text entry mode<br />
(only available for Secondary Setup).<br />
Using Capitalization<br />
Press 0 in a text entry screen to change text case.<br />
Indicators at the top of the display show the capitalization<br />
setting:<br />
U= no capital letters V= capitalize next<br />
letter only<br />
T= all capital letters
Text Entry Mode Indicators<br />
In Primary or Secondary text entry mode, indicators at the top<br />
of the display show the text entry setting:<br />
Primary Secondary<br />
g m Tap, no capital letters<br />
h q Tap, capitalize next letter<br />
only<br />
f l Tap, all capital letters<br />
j p iTAP, no capital letters<br />
k n iTAP, capitalize next<br />
letter only<br />
i o iTAP, all capital letters<br />
The following indicators identify Numeric or Symbol entry<br />
mode:<br />
W = numeric mode [ = symbol mode<br />
Using iTAP® Mode<br />
iTAP mode lets you enter words using one keypress per<br />
letter. The iTAP software combines your keypresses into<br />
common words, and predicts each word as you enter it.<br />
For example, to type “the,” you would press<br />
843. The iTAP software recognizes that the<br />
most common word formed by this keypress combination<br />
is “the,” and predicts that “the” is the word you are spelling.<br />
Other common words or word fragments that can be<br />
spelled by the same keypress combination are presented<br />
as alternate choices at the bottom of the display.<br />
Learning to Use Your Phone<br />
37
Learning to Use Your Phone<br />
38<br />
If necessary, press # in a text entry screen to switch to<br />
iTAP mode. An indicator tells you which mode is active (see<br />
page 37). If iTAP mode is not set as the Primary or Secondary<br />
entry mode, see page 36.<br />
Entering Words in iTAP Mode<br />
Press To<br />
1 keypad keys<br />
(one press per<br />
letter)<br />
show possible letter<br />
combinations at the bottom of<br />
the display<br />
2 S left or right highlight the combination you<br />
want<br />
3 S up<br />
or<br />
*<br />
or<br />
SELECT (+)<br />
accept the predicted word<br />
completion, followed by a<br />
space<br />
enter the highlighted<br />
combination, followed by a<br />
space<br />
select the highlighted<br />
combination, with no space<br />
You can press keypad keys to<br />
add more letters at the end of<br />
the combination.
For example, if you press 7 764, your<br />
phone displays:<br />
Press * to<br />
enter Prog and<br />
a space.<br />
Press<br />
DELETE (-)<br />
to delete last<br />
letter.<br />
Msg 442<br />
Prog ram<br />
Prog Proh Spoi Proi<br />
DELETE SELECT<br />
Press S up to<br />
accept Program.<br />
Press S right<br />
to highlight<br />
another<br />
combination.<br />
Press SELECT (+) to select<br />
highlighted combination with no space.<br />
If you want a different word (such as Progress), continue<br />
pressing keypad keys to enter the remaining characters.<br />
Entering Novel Words in iTAP Mode<br />
You may enter a word that the iTAP software does not<br />
recognize. If your word is not shown as a letter<br />
combination choice at the bottom of the display:<br />
Action<br />
1 Press DELETE (-) one or more times to delete<br />
letters, until you see a letter combination at the<br />
bottom of the display that matches the start of<br />
the word you want to enter.<br />
2 Press S left or right to highlight the letter<br />
combination.<br />
Learning to Use Your Phone<br />
39
Learning to Use Your Phone<br />
40<br />
Action<br />
3 Press SELECT (-) to select the letter<br />
combination.<br />
4 Continue to enter letters and select letter<br />
combinations to spell the word.<br />
Your phone automatically stores the novel word and<br />
displays it as an option the next time you enter its letter<br />
combination. When the memory space for storing novel<br />
words is filled, your phone deletes the oldest words to<br />
add new words.<br />
Entering Numbers and Punctuation in iTAP Mode<br />
To enter numbers quickly, press and hold a number key to<br />
temporarily switch to numeric mode. Press the number<br />
keys to enter the numbers you want. Enter a space to<br />
revert to iTAP mode.<br />
Press 1 to enter punctuation or other characters as<br />
shown in the “Character Chart” on page 43.<br />
Using Tap Mode<br />
This is the basic text entry mode on your phone.<br />
Tap mode cycles through the letters and number of the key<br />
you press. Tap Extended mode also cycles through additional<br />
symbols as shown in the “Character Chart” on page 43.<br />
If necessary, press # in a text entry screen to switch to<br />
Tap mode. An indicator shows which mode is active (see<br />
page 37). If Tap or Tap Extended is not set as the Primary or<br />
Secondary entry mode, see page 36.
Tap Mode Text Entry Rules<br />
Press a keypad key repeatedly to cycle through its<br />
characters. For example, you would press 2 one<br />
time to enter “a,” two times to enter “b,” three times to<br />
enter “c,” or four times to enter “2.”<br />
After 2 seconds, Tap mode accepts the character, and<br />
the cursor moves to the next position.<br />
The first character of every sentence is capitalized.<br />
If necessary, press S down to change the<br />
character to lowercase before the cursor moves to<br />
the next position.<br />
Press S to move the flashing cursor to enter or edit<br />
message text.<br />
If you do not want to save your text or text edits, press<br />
O to exit without saving.<br />
Entering Words in Tap Mode<br />
Press To<br />
1 a keypad key<br />
one or more<br />
times<br />
enter a letter, number, or<br />
symbol<br />
2 keypad keys enter remaining characters<br />
3 OK (+)<br />
Tip: Press S right to accept<br />
a word completion, or * to<br />
insert a space.<br />
store the text<br />
Learning to Use Your Phone<br />
41
Learning to Use Your Phone<br />
42<br />
For example, if you press 8 one time, your phone<br />
displays:<br />
Character<br />
displays at<br />
insertion point.<br />
Press<br />
DELETE (-)<br />
to delete last<br />
character<br />
entered.<br />
T<br />
Msg 449<br />
DELETE OK<br />
After<br />
2 seconds,<br />
character is<br />
accepted and<br />
cursor moves<br />
to next<br />
position.<br />
Press OK (+) to accept<br />
and store text.<br />
When you enter 3 or more characters in a row, your phone<br />
may guess the rest of the word. For example, if you enter<br />
prog your phone might display:<br />
Press S right<br />
to accept<br />
program. Press<br />
* to reject it<br />
and enter a<br />
space after<br />
prog.<br />
Msg 432<br />
This is a prog ram<br />
DELETE OK<br />
To enter a<br />
different word<br />
(such as<br />
progress), press<br />
keys to enter<br />
remaining<br />
characters.
Character Chart<br />
Use this chart as a guide for entering characters with<br />
Tap Extended mode.<br />
1 . 1 ? ! , @ _ & ~ : ; " - ( ) '<br />
¿ ¡ % £ $ ¥ + x * / \ [ ]<br />
= > < # §<br />
2 a b c 2 ä å á à â ã α β ç<br />
3 d e f 3 δ ë é è ê φ<br />
4 g h i 4 ï í î γ<br />
5 j k l 5 λ<br />
6 m n o 6 ñ ö ø ó ò ô õ ω<br />
7 p q r s 7 π ß σ<br />
8 t u v 8 θ ü ú ù û<br />
9 w x y z 9 ξ ψ<br />
0 change text case, for capital letters<br />
* enter a space (hold to enter a return)<br />
# change text entry mode (hold for default)<br />
Note: This chart may not reflect the exact character set<br />
available on your phone. In an email or Web address<br />
editor, 1 first shows common characters for that editor.<br />
Learning to Use Your Phone<br />
43
Learning to Use Your Phone<br />
44<br />
Using Numeric Mode<br />
In a text entry screen, press # to switch entry modes<br />
until the numeric indicator W displays.<br />
Press the number keys to enter the numbers you want.<br />
When you finish entering numbers, press # to switch to<br />
another entry mode.<br />
Using Symbol Mode<br />
In a text entry screen, press # to switch entry<br />
modes until the symbol indicator [ displays.<br />
Press To<br />
1 keypad keys<br />
(one press per<br />
symbol)<br />
show possible symbol<br />
combinations at the bottom of<br />
the display<br />
2 S left or right highlight the combination you<br />
want<br />
3 SELECT (+)<br />
or<br />
*<br />
select the highlighted<br />
combination<br />
You can press keypad keys to<br />
add more symbols to the end<br />
of the combination.<br />
enter the highlighted<br />
combination
Symbol Chart<br />
Use this chart as a guide for entering characters with<br />
symbol mode.<br />
1 . ? ! , @ _ & ~ : ; " - ( ) ' ¿<br />
¡ % £ $ ¥<br />
2 @ _ \<br />
3 / : ;<br />
4 " & '<br />
5 ( ) [ ] { }<br />
6 ¿ ¡ ~<br />
7 < > =<br />
8 $ £ ¥<br />
9 # % *<br />
0 + - x * / = > < # §<br />
* enter a space (hold to enter a return)<br />
# change text entry mode (hold for default)<br />
Note: This chart may not reflect the exact character set<br />
available on your phone. In an email or Web address<br />
editor, 1 first shows common characters for that editor.<br />
Deleting Letters and Words<br />
Place the cursor to the right of the text you want to delete,<br />
and then:<br />
Action<br />
Press DELETE (-) to delete one letter at a time.<br />
Hold DELETE (-) to delete all entered text.<br />
Learning to Use Your Phone<br />
45
Learning to Use Your Phone<br />
46<br />
Using the Smart Key<br />
The smart key gives you another<br />
way to perform many basic<br />
phone functions. It anticipates<br />
the next action you are likely to<br />
040159o<br />
perform. For example, when you<br />
highlight a menu item, you can<br />
press the smart key to select<br />
it. You can use the smart key<br />
to make and end calls, turn<br />
features on and off, and open your phonebook. The<br />
smart key usually performs the same function as the right<br />
soft key +.<br />
Using the External Display<br />
When the flip is closed, the external display shows time<br />
and phone status information. It also displays messages to<br />
notify you of incoming calls and other events. You can<br />
perform the following functions in the external display.<br />
Setting Phone Ring Style<br />
Press To<br />
1 volume keys select Ring Styles<br />
2 smart key set a ring style<br />
3 volume keys return to the home screen
Returning an Unanswered Call<br />
Your phone keeps a record of your unanswered<br />
calls and displays X Missed Calls in the external<br />
display.<br />
Note: Because the microphone and earpiece are<br />
unavailable when the phone is closed, you must use a<br />
headset or other handsfree device with this feature.<br />
Action<br />
1 Press the smart key to display the received calls<br />
list.<br />
or<br />
Press the volume keys to dismiss the Missed Calls<br />
message.<br />
2 If necessary, press the volume keys to scroll<br />
through the list and highlight an unanswered call.<br />
3 If a headset is connected to your phone, press<br />
and hold the smart key to call the number.<br />
or<br />
Press the smart key to exit without calling.<br />
Learning to Use Your Phone<br />
47
Learning to Use Your Phone<br />
48<br />
Using the Handsfree Speaker<br />
When you activate your phone’s integrated handsfree<br />
speaker, you can talk to the other party without holding the<br />
phone to your ear.<br />
Press SPEAKER (+) to turn the handsfree speaker on or<br />
off during a call.<br />
Your phone displays Spkrphone On in the home screen.<br />
The handsfree speaker remains on until you press<br />
SPEAKER (+) again or end the call.<br />
Note: The handsfree speaker is disabled when you<br />
connect your phone to a handsfree car kit or headset<br />
accessory.<br />
Changing a Code, PIN, or<br />
Password<br />
Your phone’s 4-digit unlock code is originally set to 1234,<br />
and the 6-digit security code is originally set to 000000.<br />
Your service provider may reset these codes before you<br />
receive your phone.<br />
If your service provider has not reset these codes, we<br />
recommend that you change them to prevent others from<br />
accessing your personal information. The unlock code<br />
must contain 4 digits, and the security code must contain 6<br />
digits.<br />
You can also reset your SIM card PIN code, PIN2 code,<br />
and/or call barring password if necessary.
To change a code or password:<br />
Find the Feature M > Settings > Security<br />
> New Passwords<br />
Locking and Unlocking Your<br />
Phone<br />
You can lock your phone manually or set the phone to<br />
lock automatically whenever you turn it off.<br />
To use a locked phone, you must enter the unlock<br />
code. A locked phone still rings or vibrates for incoming<br />
calls or messages, but you must unlock it to answer.<br />
You can make emergency calls on your phone even when<br />
it is locked (see page 68).<br />
Locking Your Phone <strong>Manual</strong>ly<br />
Find the Feature M > Settings > Security<br />
> Phone Lock > Lock Now<br />
Press To<br />
1 keypad keys enter your unlock code<br />
2 OK (+) lock the phone<br />
Unlocking Your Phone<br />
Tip: Your phone’s unlock code is originally set to 1234.<br />
Your service provider may reset the unlock code to the last<br />
4 digits of your phone number.<br />
Learning to Use Your Phone<br />
49
Learning to Use Your Phone<br />
50<br />
At the Enter Unlock Code prompt:<br />
Press To<br />
1 keypad keys enter your unlock code<br />
2 OK (+) unlock your phone<br />
Setting Your Phone to Lock Automatically<br />
You can set your phone to lock every time you turn it<br />
off:<br />
Find the Feature M > Settings > Security<br />
> Phone Lock<br />
> Automatic Lock > On<br />
Press To<br />
1 keypad keys enter your unlock code<br />
2 OK (+) activate automatic lock<br />
If You Forget a Code, PIN, or<br />
Password<br />
Note: Your phone’s 4-digit unlock code is originally set to<br />
1234, and the 6-digit security code is originally set to<br />
000000. Your service provider may reset the unlock code<br />
to the last 4 digits of your phone number before you<br />
receive your phone.
If you forget your unlock code, try entering 1234 or the last<br />
4 digits of your phone number. If that does not work, do the<br />
following at the Enter Unlock Code prompt:<br />
Press To<br />
1 M display the unlock code<br />
bypass screen<br />
2 keypad keys enter your security code<br />
3 OK (+) submit your security code<br />
If you forget your security code, SIM card PIN code,<br />
PIN2 code, or call barring password, contact your<br />
service provider.<br />
Using the Phonebook<br />
This section describes basic phonebook operations. For<br />
more information about using the phonebook, see<br />
page 75.<br />
Storing a Phone Number<br />
Enter a phone number in the home screen, then press<br />
STORE (+) to create a phonebook entry with that number.<br />
Press DONE (-) to store the number by itself, or fill in the<br />
other fields as necessary to complete the entry.<br />
If you assign a Name to the phonebook entry, you can select<br />
MORE to store another number (for example, a work number)<br />
for the same Name.<br />
Learning to Use Your Phone<br />
51
Learning to Use Your Phone<br />
52<br />
Recording a Voice Name<br />
When creating a phonebook entry, scroll to Voice Name and<br />
press RECORD (+). Press and release the voice key and<br />
say the entry’s name (within 2 seconds). When prompted,<br />
press and release the voice key and repeat the name.<br />
Note: This option is not available for entries stored on the<br />
SIM card.<br />
Setting a Picture ID for a Phonebook<br />
Entry<br />
Press M > Phonebook > entry, press M > Edit<br />
> Picture > picture name.<br />
Also see pages 2 and 16.<br />
Dialing a Number<br />
Press M > Phonebook, highlight the phonebook entry,<br />
press N to call.<br />
Shortcut: In the phonebook, press a keypad key one or<br />
more times to jump to entries that begin with the key’s<br />
letters.<br />
Voice Dialing a Number<br />
Press and release the voice key, and say the entry’s name<br />
(within 2 seconds).
Sorting Phonebook Entries<br />
Press M > Phonebook, press M > Setup > Sort by, then<br />
select whether you want to sort the phonebook list by Name,<br />
Speed No., Voice Name, or Email.<br />
When sorting by name, you can view All numbers or just<br />
the Primary number for each name. To set the primary<br />
number for a name, see page 78.<br />
Tip: In Primary number view mode, highlight a name<br />
and press S left or right to view other numbers<br />
associated with the name.<br />
Viewing Entries By Category<br />
Press M > Phonebook, press M > Categories, then<br />
select whether you want to view All entries, entries in a<br />
predefined category (Business, Personal, General, VIPs), or<br />
entries in a category you created.<br />
To set the category for a phonebook entry, see page 77.<br />
Learning to Use Your Phone<br />
53
Setting Up Your Phone<br />
54<br />
Setting Up Your Phone<br />
Setting a Ring Style<br />
You can set the following ring style profiles on your phone:<br />
Loud<br />
Soft<br />
Vibrate<br />
Vibe then Ring<br />
Vibe & Ring<br />
Silent<br />
Each profile uses a different set of ring tone alerts or<br />
vibration alerts to notify you of incoming calls, text<br />
messages, and other events. The Silent setting silences<br />
your phone until you set another ring style.<br />
To set a ring style:<br />
Find the Feature M > Settings > Ring Styles<br />
> Style > style name<br />
The ring style indicator shows the current ring style setting<br />
(see page 30).
Changing the Call Alert<br />
You can change the alert that a ring style uses to notify you<br />
of incoming calls or other events. Any changes you make<br />
are saved to the ring style profile.<br />
Find the Feature M > Settings > Ring Styles<br />
> style Detail<br />
Note: style represents the current ring style. You cannot<br />
set an alert for the Silent ring style setting.<br />
Press To<br />
1 S scroll to Calls<br />
2 EDIT/ADD (+) select the event<br />
3 S scroll to the alert you want<br />
4 SELECT (+) select the alert<br />
5 BACK (-) save the alert setting<br />
The ring style profile contains additional settings for other<br />
events, and settings for ringer ID, ringer and keypad<br />
volume. You can change ring style profile settings as<br />
desired to personalize the ring style.<br />
Setting the Time and Date<br />
You must set the time and date to use the datebook.<br />
Find the Feature M > Settings > Initial Setup<br />
> Time and Date<br />
Setting Up Your Phone<br />
55
Setting Up Your Phone<br />
56<br />
Setting a Wallpaper Image<br />
Set a photo, picture, or animation as a wallpaper<br />
(background) image in your phone’s home screen. The<br />
wallpaper image appears as a faint watermark in text and<br />
menu displays.<br />
Find the Feature M > Settings > Personalize<br />
> Wallpaper<br />
Press To<br />
1 S scroll to Picture<br />
2 EDIT/ADD (+) open the picture viewer<br />
3 S up or down scroll to a picture/animation<br />
Scroll to (None) to turn off the<br />
wallpaper image.<br />
4 SELECT (+) select the image<br />
5 S scroll to Layout<br />
6 EDIT/ADD (+) adjust the image layout<br />
7 S scroll to Center, Tile, or<br />
Fit-to-screen<br />
Center places the image in the<br />
center of the display.<br />
Tile fills the display with<br />
adjacent copies of the image.<br />
8 SELECT (+)<br />
Fit-to-screen resizes the image,<br />
if necessary, to fit the display.<br />
confirm the layout setting<br />
9 BACK (-) save wallpaper settings
Setting a Screen Saver Image<br />
Set a photo, picture, or animation as a screen saver image.<br />
The screen saver image displays when the flip is open and<br />
no activity is detected for a specified time. If necessary, the<br />
image shrinks to fill the display. An animation repeats for 1<br />
minute, then the first frame of the animation displays.<br />
Tip: Turn off the screen saver to extend battery life.<br />
Find the Feature M > Settings > Personalize<br />
> Screen Saver<br />
Press To<br />
1 S scroll to Picture<br />
2 EDIT/ADD (+) open the picture viewer<br />
3 S up or down scroll to a picture/animation<br />
Scroll to (None) to turn off the<br />
screen saver image.<br />
4 SELECT (+) select the image<br />
5 S scroll to Delay<br />
6 EDIT/ADD (+) set the delay interval<br />
7 S scroll to the inactivity interval<br />
that starts the screen saver<br />
8 SELECT (+) select the inactivity interval<br />
9 BACK (-) save screen saver settings<br />
Setting Up Your Phone<br />
57
Setting Up Your Phone<br />
58<br />
Changing Phone Skin<br />
Change the look and feel of your phone’s user interface by<br />
selecting a different skin setting.<br />
Find the Feature M > Settings > Personalize<br />
> Skin> skin<br />
Your phone displays the new skin.<br />
Setting a Phone Theme<br />
A phone theme is of a grouped set of image and<br />
032380o<br />
sound files with a specific theme (such as a<br />
special event or cartoon character) that you can<br />
apply collectively to your phone. Phone themes<br />
typically include a wallpaper image, screen saver<br />
image, and ring tone. Your phone includes several<br />
preloaded themes. You can download and install<br />
additional themes on your phone.<br />
Downloading a Theme<br />
To download a theme from a Web page with the<br />
micro-browser, see page 91. When you install the theme,<br />
you can instantly apply its screen saver, wallpaper, and<br />
ring tone when your phone prompts you to Apply Theme Now?<br />
Selecting a Theme<br />
You can apply any of the themes installed on your phone.
Note: If one of a theme’s components is not available, then<br />
a default setting is applied.<br />
Find the Feature M > Multimedia > Themes<br />
> theme<br />
Deleting a Theme<br />
You cannot delete the preloaded themes on your phone.<br />
To delete one or all of the themes that you have<br />
downloaded and installed:<br />
Find the Feature M > Multimedia > Themes<br />
> theme<br />
Press To<br />
1 M open the Theme menu<br />
2 S scroll to Delete or Delete All<br />
3 SELECT (+) select the option<br />
Setting Answer Options<br />
You can use additional, alternative methods to answer an<br />
incoming call.<br />
Multi-Key answer by pressing any key<br />
Open to Answer answer by opening the flip<br />
To activate or deactivate an answer option:<br />
Find the Feature M > Settings > In-Call Setup<br />
> Answer Options<br />
Setting Up Your Phone<br />
59
Setting Up Your Phone<br />
60<br />
Press To<br />
1 S scroll to Multi-Key or<br />
Open to Answer<br />
2 EDIT/ADD (+) select the option<br />
3 S scroll to On or Off<br />
4 SELECT (+) confirm the setting<br />
Setting Display Brightness<br />
Find the Feature M > Settings > Initial Setup<br />
> Brightness<br />
Adjusting the Backlight<br />
Set the amount of time that the display backlight<br />
remains on.<br />
Find the Feature M > Settings > Initial Setup<br />
> Backlight<br />
Your phone’s display normally is visible only when the<br />
display backlight is on, or when the display is viewed in<br />
direct sunlight. To extend battery life, the backlight turns off<br />
automatically when no activity is detected for a specified<br />
time. The backlight turns back on when you open the flip or<br />
press any key.
Setting Display Timeout<br />
To further extend battery life, you can set the display to<br />
turn off (in addition to the backlight) when no activity is<br />
detected for a specified time.<br />
Find the Feature M > Settings > Initial Setup<br />
> Display Timeout<br />
You can set the display to stay on for 1 or 2 minutes, or set<br />
Off to disable display timeout.<br />
The display turns back on when you open the flip or press<br />
any key.<br />
Storing Your Name and Phone<br />
Number<br />
032380o<br />
To store or edit your name and phone number<br />
information on your SIM card:<br />
Find the Feature M > Settings > Phone Status<br />
> My Tel. Numbers<br />
Shortcut: Press M # from the home screen to view<br />
and edit your name and phone number(s).<br />
If you do not know your phone number, contact your<br />
service provider.<br />
Setting Up Your Phone<br />
61
Calling Features<br />
62<br />
Calling Features<br />
For basic instructions on how to make and answer calls,<br />
see page 14.<br />
Turning Off a Call Alert<br />
You can turn off your phone’s incoming call alert before<br />
answering the call.<br />
Action<br />
1 Press the volume keys to turn off the alert.<br />
2 Open the flip (or press the button on a handsfree<br />
headset) to answer the call.<br />
Viewing Recent Calls<br />
Your phone keeps lists of incoming and outgoing calls,<br />
even for calls that did not connect. The most recent calls<br />
are listed first. The oldest calls are deleted as new calls<br />
are added.<br />
Shortcut: Press N from the home screen to view the<br />
dialed calls list.<br />
Find the Feature M > Recent Calls<br />
Press To<br />
1 S scroll to Received Calls or<br />
Dialed Calls<br />
2 SELECT (+) select the list
Press To<br />
3 S scroll to an entry<br />
4 N<br />
or<br />
VIEW (+)<br />
or<br />
M<br />
Note: < means the call<br />
connected.<br />
call the entry’s number<br />
view entry details (such as<br />
time and date of call)<br />
open the Last Calls Menu to<br />
perform other procedures<br />
The Last Calls Menu can include the following options:<br />
Option Description<br />
Store Create a phonebook entry with<br />
the number in the No. field.<br />
Delete Delete the entry.<br />
Delete All Delete all entries in the list.<br />
Hide ID/Show ID Hide or show your caller ID for the<br />
next call.<br />
Send Message Open a new text message with the<br />
number in the To field.<br />
Add Digits Add digits after the number.<br />
Attach Number Attach a number from the<br />
phonebook or recent calls lists.<br />
Calling Features<br />
63
Calling Features<br />
64<br />
Option Description<br />
Send Tones Send the number to the network<br />
as DTMF tones.<br />
Note: This option displays only<br />
during a call.<br />
Talk then Fax Talk and then send a fax<br />
in the same call (see<br />
page 86).<br />
Redialing a Number<br />
Press To<br />
1 N view the dialed calls list<br />
2 S scroll to the entry you want to call<br />
3 N redial the number<br />
Using Automatic Redial<br />
032380o<br />
When you receive a busy signal, your phone<br />
displays Call Failed, Number Busy.<br />
Press To<br />
N or RETRY (+) redial the number<br />
When the call goes through, your phone rings or vibrates<br />
one time, displays Redial Successful, and connects the call.<br />
032380o
Returning an Unanswered Call<br />
Your phone keeps a record of your unanswered calls, and<br />
displays:<br />
the missed call indicator û<br />
XMissedCalls, where X is the number of missed calls<br />
Press To<br />
1 VIEW (+) display the received calls list<br />
2 S select a call to return<br />
3 N make the call<br />
Using the Notepad<br />
The most recent set of digits entered on the keypad are<br />
stored in your phone’s notepad memory. This can be a<br />
phone number that you called, or a number that you jot<br />
down during a call, for later use. To retrieve the number<br />
stored in the notepad:<br />
Find the Feature M > Recent Calls > Notepad<br />
Calling Features<br />
65
Calling Features<br />
66<br />
Press To<br />
N<br />
call the number<br />
or<br />
STORE (+)<br />
or<br />
M<br />
Putting a Call On Hold or Mute<br />
Using Call Waiting<br />
create a phonebook entry<br />
with the number in the No. field<br />
open the Dialing Menu to attach<br />
a number or insert a special<br />
character<br />
Press To<br />
M > Hold put all active calls on hold<br />
or<br />
M > Mute<br />
032380o<br />
mute all active calls<br />
When you are on a call, an alert tone sounds<br />
to indicate that you have received a second<br />
call.
Press To<br />
1 N answer the new call<br />
2 SWITCH (+)<br />
or<br />
switch between calls<br />
LINK (-)<br />
or<br />
connect the 2 calls<br />
M > EndCallOnHold end the call on hold<br />
If necessary, you must turn on call waiting to use the<br />
feature. To turn call waiting on or off:<br />
Find the Feature M > Settings > In-Call Setup<br />
> Call Waiting<br />
Using Caller ID (Incoming<br />
Calls)<br />
Calling line identification (caller ID) displays the<br />
032380o<br />
phone number for incoming calls in your<br />
phone’s external and internal displays.<br />
The phone displays the caller’s name (and picture ID, if<br />
available) when the name is stored in your phonebook, or<br />
Incoming Call when caller ID information is not available.<br />
You can also set your phone to play a distinctive ringer ID<br />
for specific entries stored in your phonebook. For more<br />
information, see page 75.<br />
Calling Features<br />
67
Calling Features<br />
68<br />
Calling an Emergency Number<br />
Your service provider programs one or more emergency<br />
phone numbers, such as 911 or 112, that you can call<br />
under any circumstances, even when your phone is locked<br />
or the SIM card is not inserted.<br />
Note: Emergency numbers vary by country. Your phone’s<br />
preprogrammed emergency number(s) may not work in all<br />
locations, and sometimes an emergency call cannot be<br />
placed due to network, environmental, or interference<br />
issues.<br />
Press To<br />
1 keypad keys dial the emergency number<br />
2 N call the emergency number<br />
Dialing International Numbers<br />
If your phone service includes international<br />
032380o<br />
dialing, press and hold 0 to insert the<br />
local international access code (+) for the<br />
country from which you are calling.<br />
(Inserting + enables your phone to make an<br />
international call.) Then press the keypad keys as<br />
usual to dial the country code and phone number.<br />
Calling With 1-Touch Dial<br />
To call phonebook entries 1 through 9, press and hold the<br />
single-digit speed dial number for one second.
You can set 1-touch dial to call the entries in your phone<br />
memory phonebook or the SIM card phonebook:<br />
Find the Feature M > Settings > Initial Setup<br />
> 1-Touch Dial<br />
Press To<br />
1 S scroll to the location you want<br />
2 SELECT (+) select the location<br />
Using Voicemail<br />
032380o<br />
Voicemail messages that you receive are stored<br />
on the network. To listen to your messages, you<br />
must call your voicemail phone number.<br />
Note: Your service provider may include additional<br />
information about using this feature.<br />
Listening to Voicemail Messages<br />
Find the Feature E > Voicemail<br />
The phone calls your voicemail phone number. If no<br />
voicemail number is stored, your phone prompts you to<br />
store a number.<br />
Calling Features<br />
69
Calling Features<br />
70<br />
Receiving a Voicemail Message<br />
When you receive a voicemail message, your phone<br />
displays the voicemail message indicator t and the<br />
New Voicemail notification.<br />
Press To<br />
CALL (+) listen to the message<br />
The phone calls your voicemail phone number. If no<br />
voicemail number is stored, your phone prompts you to<br />
store a number.<br />
Storing Your Voicemail Number<br />
If necessary, use the following procedure to store your<br />
voicemail phone number on your phone. Usually, your<br />
service provider has already done this for you.<br />
Find the Feature EM > Voicemail Setup<br />
Press To<br />
1 keypad keys enter your voicemail number<br />
2 OK (+) store the number<br />
Note: You cannot store a p (pause), w (wait), or n (number)<br />
character in this number. If you want to store a voicemail<br />
number with these characters, create a phonebook entry<br />
for it. Then, you can use the entry to call your voicemail.<br />
For more information about these characters, see the<br />
More Here guide.
Phone Features<br />
Main Menu<br />
This is the standard main menu layout. Menu<br />
organization and feature names may vary on your<br />
phone. Not all features may be available on your phone.<br />
n Phonebook<br />
s Recent Calls<br />
Received Calls<br />
Dialed Calls<br />
Notepad<br />
Call Times<br />
Call Cost<br />
Data Times<br />
Data Volumes<br />
e Messages<br />
Create Message<br />
Message Inbox<br />
Media Templates<br />
Quick Notes<br />
Voicemail<br />
Email Msgs<br />
Outbox<br />
É Office Tools<br />
SIM Apps<br />
Calculator<br />
Datebook<br />
Shortcuts<br />
Voice Records<br />
Alarm Clock<br />
Dialing Services<br />
Fixed Dial<br />
Service Dial<br />
Quick Dial<br />
Q Games & Apps<br />
á Web Access<br />
Browser<br />
Browser Setup<br />
Web Sessions<br />
h Multimedia<br />
Themes<br />
Camera<br />
My Pictures<br />
Sounds<br />
MotoMixer<br />
Videos<br />
B AIM ®<br />
w Settings<br />
(see next page)<br />
Phone Features<br />
71
Phone Features<br />
72<br />
Settings Menu<br />
l Personalize<br />
Home Screen<br />
Main Menu<br />
Skin<br />
Greeting<br />
Wallpaper<br />
Screen Saver<br />
Quick Dial<br />
t Ring Styles<br />
Style<br />
Style Detail<br />
L Connection<br />
Bluetooth Link<br />
Sync<br />
H Call Forward<br />
Voice Calls<br />
Fax Calls<br />
Data Calls<br />
Cancel All<br />
Forward Status<br />
U In-Call Setup<br />
In-Call Timer<br />
Call Cost Setup<br />
My Caller ID<br />
Talk and Fax<br />
Answer Options<br />
Call Waiting<br />
Z Initial Setup<br />
Time and Date<br />
1-Touch Dial<br />
Display Timeout<br />
Backlight<br />
TTY Setup<br />
Scroll<br />
Language<br />
Brightness<br />
DTMF<br />
Master Reset<br />
Master Clear<br />
m Phone Status<br />
My Mobile Numbers<br />
Battery Meter<br />
Other Information<br />
S Headset<br />
Auto Answer<br />
Voice Dial<br />
J Car Settings<br />
Auto Answer<br />
Auto Handsfree<br />
j Network<br />
New Network<br />
Network Setup<br />
Available Networks<br />
My Network List<br />
Service Tone<br />
Call Drop Tone<br />
u Security<br />
Phone Lock<br />
Lock Application<br />
Fixed Dial<br />
Call Barring<br />
SIM PIN<br />
New Passwords<br />
Certificate Mgmt<br />
c Java Settings<br />
Java System<br />
Delete All Apps<br />
App Vibration<br />
App Volume<br />
App Priority<br />
App Backlight<br />
Set Standby App<br />
DNS IP
Feature Quick Reference<br />
This section helps you locate and use additional phone<br />
features that are not described in detail in this guide.<br />
Calling Features<br />
Feature Description<br />
Conference<br />
Call<br />
Transfer a<br />
Call<br />
Caller ID<br />
(Outgoing)<br />
Attach a<br />
Number<br />
During a call:<br />
Dial next number, press N,<br />
press LINK (-)<br />
During a call:<br />
M > Transfer, dial<br />
transfer number, press N.<br />
Hide or show your caller ID<br />
phone number for the next<br />
outgoing call:<br />
M > Settings > In-Call Setup<br />
> My Caller ID. > Next Call Only<br />
> Hide ID or Show ID<br />
Dial an area code or prefix<br />
for a phonebook number,<br />
then:<br />
M > Attach Number<br />
Speed Dial Speed dial and call a<br />
phonebook entry:<br />
Enter speed dial number,<br />
press #, press N.<br />
032380o<br />
032380o<br />
032380o<br />
032380o<br />
032380o<br />
Phone Features<br />
73
Phone Features<br />
74<br />
Feature Description<br />
Call<br />
Forwarding<br />
Messages<br />
Set up or cancel call<br />
forwarding:<br />
M > Settings > Call Forward<br />
Call Barring Restrict outgoing or<br />
incoming calls:<br />
M > Settings > Security<br />
> Call Barring<br />
TTY Calls Set up your phone<br />
for use with an<br />
032380o<br />
optional TTY<br />
device:<br />
M > Settings > Initial Setup<br />
> TTY Setup<br />
Feature Description<br />
Send Text<br />
Message<br />
Send<br />
Multimedia<br />
Message<br />
Send Email<br />
Message<br />
Send a text message:<br />
E > Create Message<br />
> New Text Msg<br />
Send a multimedia<br />
message:<br />
E > Create Message<br />
> New Multimedia Msg<br />
Send an email message:<br />
E > Create Message<br />
> New Email<br />
032380o<br />
032380o<br />
032380o<br />
032380o<br />
032380o
Feature Description<br />
Use<br />
Multimedia<br />
Template<br />
Read New<br />
Message<br />
Read Old<br />
Messages<br />
Store<br />
Message<br />
Objects<br />
Phonebook<br />
Open a multimedia<br />
template with preloaded<br />
media:<br />
E > Media Templates<br />
Read a new text or<br />
multimedia message that<br />
you have received:<br />
Press READ (+) when the<br />
New Message notification is displayed.<br />
Read received messages:<br />
E > Message Inbox<br />
Tip: Press M to<br />
perform various operations on the<br />
message.<br />
Go to a multimedia<br />
message page, then:<br />
M > Store<br />
Feature Description<br />
Add New<br />
Entry<br />
Add a new entry to the phonebook:<br />
M > Phonebook<br />
M > New > Phone Number or<br />
Email Address<br />
032380o<br />
032380o<br />
032380o<br />
032380o<br />
Phone Features<br />
75
Phone Features<br />
76<br />
Feature Description<br />
Dial Number Call a number stored in the<br />
phonebook:<br />
M > Phonebook, highlight the<br />
phonebook entry, press N to call<br />
Voice Dial<br />
Number<br />
Set Ringer<br />
ID for Entry<br />
Set Picture<br />
ID for Entry<br />
Voice dial a number stored in the<br />
phonebook:<br />
Press and release the voice key, and<br />
say the entry’s name (within<br />
2 seconds).<br />
Assign a distinctive ringer alert to an<br />
entry:<br />
M > Phonebook > entry<br />
M > Edit > Ringer ID > ringer name<br />
Note: The Ringer ID option is not<br />
available for entries stored on the<br />
SIM card.<br />
To activate ringer IDs, see page 79.<br />
Assign a photo or picture to display<br />
when you receive a call from an<br />
entry:<br />
M > Phonebook > entry<br />
M > Edit > Picture > picture name<br />
Note: The Picture option is not<br />
available for entries stored on the<br />
SIM card.
Feature Description<br />
Set Picture<br />
ID View<br />
Set<br />
Category for<br />
Entry<br />
Set<br />
Category<br />
View<br />
Set<br />
Category<br />
Ringer ID<br />
View phonebook entries as a text list,<br />
or with picture caller ID photos:<br />
M > Phonebook<br />
M > Setup > View by > view name<br />
Set the category for an entry:<br />
M > Phonebook > entry<br />
M > Edit > Category<br />
> category name<br />
Note: The Category option is not<br />
available for entries stored on the<br />
SIM card.<br />
Set a category view:<br />
M > Phonebook<br />
M > Categories > category view<br />
Set a distinctive ring alert (ringer ID)<br />
to sound when you receive calls from<br />
entries in a specific category:<br />
M > Phonebook<br />
M > Categories, highlight the<br />
category, press M > Edit<br />
> Ringer ID.<br />
Note: The Ringer ID option is not<br />
available for entries stored on the<br />
SIM card.<br />
To activate ringer IDs, see page 79.<br />
Phone Features<br />
77
Phone Features<br />
78<br />
Feature Description<br />
Sort<br />
Phonebook<br />
List<br />
Set Primary<br />
Number or<br />
Address<br />
Copy<br />
Phonebook<br />
Entry<br />
Send<br />
Phonebook<br />
Entry to<br />
Another<br />
Device<br />
Create<br />
Group<br />
Mailing List<br />
Set the order in which entries are<br />
listed:<br />
M > Phonebook<br />
M > Setup > Sort by > sort order<br />
Set the primary number for an entry<br />
with multiple numbers:<br />
M > Phonebook, highlight the entry,<br />
press M > Set Primary > number or<br />
address.<br />
Copy an entry between the phone<br />
and SIM card:<br />
M > Phonebook, highlight the entry,<br />
press M > Copy > Entries > To<br />
Send a phonebook entry to another<br />
phone, computer, or device:<br />
M > Phonebook, highlight the entry,<br />
press M > Send<br />
Create a group mailing list as a<br />
phonebook entry:<br />
M > Phonebook<br />
M > New > Mailing List
Personalizing Features<br />
Feature Description<br />
Activate<br />
Ringer IDs<br />
Ring<br />
Volume<br />
Keypad<br />
Volume<br />
Activate distinctive ring alerts<br />
assigned to phonebook entries:<br />
M > Settings > Ring Styles<br />
> style Detail > Ringer IDs<br />
Set ringer volume:<br />
M > Settings > Ring Styles<br />
> style Detail > Ring Volume<br />
Set keypad keypress volume:<br />
M > Settings > Ring Styles<br />
> style Detail > Key Volume<br />
Reminders Set reminder alerts for messages<br />
that you receive:<br />
M > Settings > Ring Styles<br />
> style Detail > Reminders<br />
Clock View Display an analog clock or digital<br />
time readout in the home screen:<br />
M > Settings > Personalize<br />
> Home Screen > Clock<br />
Menu View Display the main menu as graphic<br />
icons or as a text-based list:<br />
M > Settings > Personalize<br />
> Main Menu > View<br />
Main Menu Reorder your phone’s main menu:<br />
M > Settings > Personalize<br />
> Main Menu > Reorder<br />
Phone Features<br />
79
Phone Features<br />
80<br />
Feature Description<br />
Show or<br />
Hide Menu<br />
Icons<br />
Change<br />
Menu Icons<br />
& Home<br />
Keys<br />
Show or hide menu feature icons in<br />
the home screen:<br />
M > Settings > Personalize<br />
> Home Screen > Home Keys >Icons<br />
Change menu feature icons, soft key<br />
labels, and smart key function in the<br />
home screen:<br />
M > Settings > Personalize<br />
> Home Screen > Home Keys<br />
Shortcuts Create a shortcut to a menu item:<br />
Highlight the menu item, then press<br />
and hold M.<br />
Use a shortcut:<br />
Press M, then press the shortcut<br />
number.<br />
AOL® Instant Messenger<br />
Feature Description<br />
Sign On Sign on to AOL Instant<br />
Messenger (AIM®):<br />
M > AIM > Sign On<br />
Find Others<br />
Online<br />
You need a screen name to sign<br />
on to AIM. To set up a screen<br />
name, see http://www.aim.com.<br />
After you sign on:<br />
Select Buddy List to see a<br />
list of other users.<br />
032380o<br />
032380o
Feature Description<br />
Start<br />
Conversation<br />
Open Active<br />
Conversation<br />
End<br />
Conversation<br />
Email<br />
Start a conversation:<br />
From your Buddy List,<br />
highlight a name in<br />
Online Buddies, press<br />
SEND IM (+).<br />
Open a conversation in<br />
progress:<br />
From your Buddy List,<br />
highlight a name in<br />
Conversations, press VIEW (+),<br />
press WRITE (+) to send a<br />
message.<br />
From the conversation<br />
display:<br />
M > End Conversation<br />
Sign Off Sign off of AIM:<br />
Select Sign Off from the<br />
AIM Online menu.<br />
Feature Description<br />
Send<br />
Email<br />
Message<br />
Read<br />
Email<br />
Message<br />
Send an email message:<br />
E > Create Message > New Email<br />
Read a new email message<br />
that you have received:<br />
Press READ (+).<br />
032380o<br />
032380o<br />
032380o<br />
032380o<br />
032380o<br />
032380o<br />
Phone Features<br />
81
Phone Features<br />
82<br />
Menu Features<br />
Feature Description<br />
Language Set menu language:<br />
M > Settings > Initial Setup > Language<br />
Master<br />
Reset<br />
Master<br />
Clear<br />
Reset all options except unlock code,<br />
security code, and lifetime timer:<br />
M > Settings > Initial Setup<br />
> Master Reset<br />
Clear all user settings and entries<br />
except SIM card information, erase all<br />
downloaded pictures and sound files,<br />
reset all options except unlock code,<br />
security code, and lifetime timer:<br />
M > Settings > Initial Setup<br />
> Master Clear<br />
Caution: Master clear erases all<br />
user-entered information (including<br />
phonebook and datebook entries) and<br />
user-downloaded content (including<br />
photos and sounds) stored in your<br />
phone’s memory. After you erase the<br />
information, you cannot recover it.
Special Dialing Features<br />
Feature Description<br />
Fixed Dial Turn fixed dialing on or off:<br />
M > Settings > Security<br />
> Fixed Dial<br />
Service<br />
Dial<br />
Use the fixed dial list:<br />
M > Office Tools > Dialing Services<br />
> Fixed Dial<br />
Dial service phone numbers:<br />
M > Office Tools<br />
> Dialing Services > Service Dial<br />
Quick Dial Dial preprogrammed phone<br />
numbers:<br />
M > Office Tools<br />
> Dialing Services > Quick Dial<br />
DTMF<br />
Tones<br />
Activate DTMF tones:<br />
M > Settings > Initial Setup > DTMF<br />
032380o<br />
032380o<br />
032380o<br />
Send DTMF tones during a call:<br />
Press number keys.<br />
Send stored numbers as DTMF tones<br />
during a call:<br />
Highlight a number in the phonebook<br />
or recent calls lists, then press<br />
M > Send Tones.<br />
Phone Features<br />
83
Phone Features<br />
84<br />
Call Monitoring<br />
Network connection time is the elapsed time from the<br />
moment you connect to your service provider's network to<br />
the moment you end the call by pressing O. This time<br />
includes busy signals and ringing.<br />
The amount of network connection time you track on<br />
your resettable timer may not equal the amount of time<br />
for which you are billed by your service provider. For<br />
billing information, please contact your service<br />
provider directly.<br />
Feature Description<br />
Call Times View call timers:<br />
M > Recent Calls > Call Times<br />
In-Call<br />
Timer<br />
Display time or cost<br />
information during a call:<br />
M > Settings > In-Call Setup<br />
> In-Call Timer<br />
Call Cost View call cost trackers:<br />
M > Recent Calls > Call Cost<br />
Handsfree Features<br />
Note: The use of wireless devices and their<br />
accessories may be prohibited or restricted in certain<br />
032380o<br />
032380o<br />
032380o
areas. Always obey the laws and regulations on the use of<br />
these products.<br />
Feature Description<br />
Auto<br />
Answer<br />
(car kit or<br />
headset)<br />
Voice Dial<br />
(headset)<br />
Auto<br />
Handsfree<br />
(car kit)<br />
Automatically answer calls<br />
when connected to a car kit<br />
or headset:<br />
M > Settings > Car Settings<br />
or Headset > Auto Answer<br />
Enable voice dial with<br />
headset send/end key:<br />
M > Settings > Headset<br />
> Voice Dial<br />
Data and Fax Calls<br />
Feature Description<br />
Send Data<br />
or Fax<br />
Receive<br />
Data or<br />
Fax<br />
Automatically route calls to a<br />
car kit when connected:<br />
M > Settings > Car Settings<br />
> Auto Handsfree<br />
Connect your phone to the<br />
device, then place the call<br />
through the device<br />
application.<br />
Connect your phone to the<br />
device, then answer the call<br />
through the device<br />
application.<br />
Phone Features<br />
85
Phone Features<br />
86<br />
Feature Description<br />
Talk Then<br />
Fax<br />
Connect your phone to the<br />
device, enter the number,<br />
press M > Dialing Menu<br />
> Talk Then Fax, then press N to<br />
make the call.<br />
Bluetooth® Wireless<br />
Connections<br />
Note: Your phone's Bluetooth features and Bluetooth<br />
Class 1 power levels are not allowed for outdoor<br />
operation in France. To avoid unlawful interference<br />
with radio signals, do not use the Bluetooth features<br />
in France unless you are indoors.<br />
Feature Description<br />
Make Phone<br />
Visible to<br />
Other<br />
Device<br />
Connect to<br />
Recognized<br />
Device<br />
Disconnect<br />
From<br />
Device<br />
Allow a Bluetooth device to<br />
discover your phone:<br />
M > Settings > Connection<br />
> Bluetooth Link > Setup > Find Me<br />
Connect to a recognized<br />
handsfree device:<br />
M > Settings > Connection<br />
> Bluetooth Link > Handsfree<br />
> device name<br />
Disconnect from a device:<br />
Highlight the device name<br />
and press DROP (+).
Feature Description<br />
Switch to<br />
Device<br />
During Call<br />
Send<br />
Multimedia<br />
Object to<br />
Device<br />
Move<br />
Multimedia<br />
Object to<br />
Device<br />
Send Data<br />
to Another<br />
Device<br />
Edit Device<br />
Properties<br />
Set<br />
Bluetooth<br />
Options<br />
Switch to a headset or car<br />
kit during a call:<br />
M > Use Bluetooth<br />
Send a multimedia object to<br />
another device:<br />
Highlight the object, press<br />
M > Copy, select the<br />
device name.<br />
Move a multimedia object to<br />
another device:<br />
Highlight the object, press<br />
M > Move, select the<br />
device name.<br />
Caution: Moving an object deletes<br />
the original object from your phone.<br />
Copy a phonebook entry,<br />
datebook event, or<br />
bookmark to another device:<br />
Highlight the item, press<br />
M > Send.<br />
Edit the properties of a<br />
recognized device:<br />
Highlight the device name<br />
and press M > Edit.<br />
Set your phone’s Bluetooth<br />
options:<br />
M > Settings > Connection<br />
> Bluetooth Link > Setup<br />
Phone Features<br />
87
Phone Features<br />
88<br />
Network Features<br />
Feature Description<br />
Network<br />
Settings<br />
View network information and<br />
adjust network settings:<br />
M > Settings > Network<br />
Personal Organizer Features<br />
Feature Description<br />
Set Alarm Set an alarm:<br />
M > Office Tools > Alarm Clock<br />
Turn Off<br />
Alarm<br />
Add New<br />
Datebook<br />
Event<br />
View<br />
Datebook<br />
Event<br />
Event<br />
Reminder<br />
Turn off alarm:<br />
Press DISABLE (-) or O.<br />
Set 8-minute delay:<br />
Press SNOOZE (+).<br />
Add a new event to the datebook:<br />
M > Office Tools > Datebook, highlight<br />
the day, press C, press M > New<br />
View or edit event details:<br />
M > Office Tools > Datebook, highlight<br />
the day, press C, highlight the event,<br />
press VIEW (+)<br />
View a datebook event reminder:<br />
VIEW (+)<br />
Dismiss an event reminder:<br />
EXIT (-)<br />
032380o
Feature Description<br />
Send<br />
Datebook<br />
Event to<br />
Another<br />
Device<br />
Create<br />
Voice<br />
Record<br />
Play Voice<br />
Record<br />
Send a datebook event to another<br />
phone, computer, or device:<br />
M > Office Tools > Datebook, highlight<br />
the day, press C, highlight the event,<br />
press M > Send<br />
Create a voice record:<br />
Press and hold voice key, speak into<br />
the phone, release voice key<br />
Note: Recording phone calls is subject<br />
to varying state and federal laws<br />
regarding privacy and recording of<br />
conversations.<br />
Play back a voice record:<br />
M > Office Tools > Voice Records<br />
> voice record<br />
Calculator Calculate numbers:<br />
M > Office Tools > Calculator<br />
Currency<br />
Converter<br />
Convert currency:<br />
M > Office Tools > Calculator<br />
M > Exchange Rate<br />
Enter exchange rate, press OK (+),<br />
enter amount, press<br />
M > Convert Currency.<br />
Phone Features<br />
89
Phone Features<br />
90<br />
Security<br />
Feature Description<br />
SIM PIN Lock or unlock the SIM card:<br />
M > Settings > Security > SIM PIN<br />
Caution: If you enter an incorrect<br />
PIN code 3 times in a row, your<br />
SIM card is disabled and your<br />
phone displays SIM Blocked.<br />
Lock<br />
Application<br />
Certificate<br />
Management<br />
Lock phone applications:<br />
M > Settings > Security<br />
> Lock Application<br />
Enable or disable security<br />
certificates stored on your phone:<br />
M > Settings > Security<br />
> Certificate Mgmt<br />
News and Entertainment<br />
Feature Description<br />
Manage<br />
Pictures<br />
Manage<br />
Sounds<br />
Manage<br />
Video Clips<br />
Manage pictures and<br />
animations:<br />
M > Multimedia<br />
> My Pictures<br />
Manage ring tones and music that<br />
you have downloaded or composed:<br />
M > Multimedia > Sounds<br />
Manage video clips:<br />
M > Multimedia > Videos<br />
032380o
Feature Description<br />
Edit Sounds<br />
With<br />
MotoMixer<br />
Start Micro-<br />
Browser<br />
Download<br />
Objects from<br />
Web Page<br />
Web<br />
Sessions<br />
Download<br />
Game or<br />
Application<br />
Start Game<br />
or<br />
Application<br />
Edit MIDI-based songs that you can<br />
use with your phone:<br />
M > Multimedia > MotoMixer<br />
> [New Mix] or mix file name<br />
Start a micro-browser<br />
session:<br />
Press L<br />
Download a picture,<br />
sound, or phone theme<br />
from a Web page:<br />
Highlight the file, press<br />
SELECT (+), press STORE (+).<br />
Select or create a Web<br />
session:<br />
M > Web Access<br />
> Web Sessions<br />
Download a Java game<br />
or application with the<br />
micro-browser:<br />
M > Web Access<br />
> Browser, highlight the application,<br />
press SELECT (+), press<br />
DWNLOAD (+)<br />
Start a Java game or<br />
application:<br />
M > Games & Apps,<br />
highlight the application,<br />
press SELECT (+)<br />
032380o<br />
032380o<br />
032380o<br />
032380o<br />
032380o<br />
Phone Features<br />
91
Phone Features<br />
92<br />
Feature Description<br />
Play Music Play a song on your phone:<br />
M > Multimedia > Sounds<br />
> song name<br />
Create<br />
Playlist<br />
Create Ring<br />
Tones<br />
Create a playlist of songs to play on<br />
your phone:<br />
M > Multimedia > Sounds<br />
> [New Playlist]<br />
Create iMelody ring tones that you<br />
can use with your phone:<br />
M > Multimedia > Sounds<br />
> [New iMelody]
Troubleshooting<br />
If you have questions or need help, we’re here to help.<br />
Go to www.motorola.com/consumer/support, where<br />
you can select from a number of customer care options.<br />
You can also contact the <strong>Motorola</strong> Customer Support<br />
Center at 1-800-331-6456 (United States),<br />
1-888-390-6456 (TTY/TDD United States for hearing<br />
impaired), or 1-800-461-4575 (Canada).<br />
Troubleshooting<br />
93
94<br />
Specific Absorption Rate Data<br />
The model wireless phone meets the government’s requirements for<br />
exposure to radio waves.<br />
Your wireless phone is a radio transmitter and receiver. It is designed and<br />
manufactured not to exceed limits for exposure to radio frequency (RF)<br />
energy set by the Federal Communications Commission (FCC) of the U.S.<br />
Government and by the Canadian regulatory authorities. These limits are<br />
part of comprehensive guidelines and establish permitted levels of RF<br />
energy for the general population. The guidelines are based on standards<br />
that were developed by independent scientific organizations through<br />
periodic and thorough evaluation of scientific studies. The standards<br />
include a substantial safety margin designed to assure the safety of all<br />
persons, regardless of age or health.<br />
The exposure standard for wireless mobile phones employs a unit of<br />
measurement known as the Specific Absorption Rate, or SAR. The SAR<br />
limit set by the FCC and by the Canadian regulatory authorities is<br />
1.6 W/kg. 1 Tests for SAR are conducted using standard operating<br />
positions accepted by the FCC and by Industry Canada with the phone<br />
transmitting at its highest certified power level in all tested frequency<br />
bands. Although the SAR is determined at the highest certified power<br />
level, the actual SAR level of the phone while operating can be well below<br />
the maximum value. This is because the phone is designed to operate at<br />
multiple power levels so as to use only the power required to reach the<br />
network. In general, the closer you are to a wireless base station, the<br />
lower the power output.<br />
Before a phone model is available for sale to the public in the U.S. and<br />
Canada, it must be tested and certified to the FCC and Industry Canada<br />
that it does not exceed the limit established by each government for safe<br />
exposure. The tests are performed in positions and locations (e.g., at the<br />
ear and worn on the body) reported to the FCC and available for review by<br />
Industry Canada. The highest SAR value for this model phone when
tested for use at the ear is 0.89 W/kg, and when worn on the body, as<br />
described in this user guide, is 0.58 W/kg. The SAR value for this product<br />
in its data transmission mode (body-worn use) is 1.24 W/kg. (Body-worn<br />
measurements differ among phone models, depending upon available<br />
accessories and regulatory requirements). 2<br />
While there may be differences between the SAR levels of various phones<br />
and at various positions, they all meet the governmental requirements for<br />
safe exposure. Please note that improvements to this product model<br />
could cause differences in the SAR value for later products; in all cases,<br />
products are designed to be within the guidelines.<br />
Additional information on Specific Absorption Rates (SAR) can be found<br />
on the <strong>Cell</strong>ular Telecommunications & Internet Association (CTIA) Web<br />
site:<br />
http://www.phonefacts.net<br />
or the Canadian Wireless Telecommunications Association (CWTA) Web<br />
site:<br />
http://www.cwta.ca<br />
1. In the United States and Canada, the SAR limit for mobile phones used by<br />
the public is 1.6 watts/kg (W/kg) averaged over one gram of tissue. The<br />
standard incorporates a substantial margin of safety to give additional<br />
protection for the public and to account for any variations in measurements.<br />
2. The SAR information includes the <strong>Motorola</strong> testing protocol, assessment<br />
procedure, and measurement uncertainty range for this product.<br />
95
96<br />
License Agreement for AOL®<br />
Instant Messenger Service<br />
AOL ® Instant Messenger License<br />
The AOL Instant Messenger service (the “Service”) is provided to you by<br />
AOL, “AS IS,” subject to the terms and conditions of this License<br />
Agreement (the “Agreement”). Please read this Agreement in full before<br />
using the Service. ONLY INDIVIDUALS WHO HAVE AGREED TO THE<br />
TERMS AND CONDITIONS OF THIS AGREEMENT MAY ACCESS THE<br />
AOL INSTANT MESSENGER SERVICE.<br />
BY YOUR USE OF THE AOL INSTANT MESSENGER SERVICE, YOU<br />
AGREE TO USE THE AOL INSTANT MESSENGER SOFTWARE (THE<br />
“SOFTWARE”) AND SERVICE AS PROVIDED IN THIS AGREEMENT.<br />
1. Limited License. AOL grants you a limited, non-exclusive license to use<br />
the Software solely for the specified platform to access the Service.<br />
2. Restrictions on Use. You may not create or use any software other than<br />
the Software provided by AOL to access the Service, without the express<br />
written authorization of AOL. You may not modify, reverse engineer,<br />
decompile or disassemble the Software or in any way ascertain, decipher,<br />
or obtain the communications protocol for accessing the Service. You may<br />
not adapt, alter, modify, translate, or create derivative works of the<br />
Software without the express written authorization of AOL. You may not<br />
block, disable or otherwise affect any advertising, advertisement banner<br />
window, links to other sites and services, or other features that constitute<br />
an integral part of the Software and Service. You may not incorporate,<br />
integrate or otherwise include the Software or any portion thereof into any<br />
software, program or product that communicates, access, or otherwise<br />
connects with any other instant messaging, Internet service, or online<br />
service. Finally, you may not authorize or assist any third party to do any<br />
of the things described in this paragraph.<br />
3. Your Representations. You represent and warrant that you will use the<br />
Software and Service only for lawful purposes and in accordance with this
Agreement, and that you will not use the Software or the Service to violate<br />
any law, regulation or ordinance or any right of AOL or any third party,<br />
including, without limitation, any right of privacy, publicity, copyright or<br />
trademark.<br />
4. Charges. Please consult your rate plan and agreement with your<br />
service provider to determine if the Service is included in your rate plan,<br />
or if other charges may apply.<br />
5. Termination. Should you breach this Agreement, your right to use the<br />
Software and the Service shall terminate immediately and without notice.<br />
You may also terminate this Agreement by simply discontinuing use of the<br />
Software and the Service. In the event of any termination of this<br />
Agreement, the restrictions on your use of the Software and Service as<br />
set forth in Paragraph 2 (“Restrictions on Use”) shall survive such<br />
termination, and you agree to be bound by those terms.<br />
6. No Support by AOL. You understand that you use the Software and the<br />
Service at your own risk and provides no assistance or support for your<br />
use of the Software or the Service.<br />
7. Disclaimer of Warranty. THE SOFTWARE AND THE SERVICE ARE<br />
PROVIDED “AS IS,” WITHOUT WARRANTIES OF ANY KIND, EITHER<br />
EXPRESS OR IMPLIED, INCLUDING WITHOUT LIMITATION<br />
WARRANTIES THAT THE SOFTWARE AND THE SERVICE ARE (A)<br />
FREE OF DEFECTS OR ERRORS, (B) VIRUS FREE, (C) ABLE TO<br />
MEET ANY REQUIREMENTS OF YOU OR ANYONE ELSE, (D) ABLE<br />
TO OPERATE ON AN UNINTERRUPTED BASIS, (E) MERCHANTABLE,<br />
(F) FIT FOR A PARTICULAR PURPOSE OR (G) NON-INFRINGING,<br />
UNLESS SUCH WARRANTIES ARE LEGALLY INCAPABLE OF<br />
EXCLUSION. AOL SHALL HAVE NO LIABILITY WITH RESPECT TO<br />
USE OF THE SOFTWARE OR THE SERVICE.<br />
8. Limitation of Liability. NEITHER AOL, ITS EMPLOYEES,<br />
DISTRIBUTORS, SUPPLIERS, DIRECTORS, NOR AGENTS SHALL BE<br />
LIABLE FOR ANY INDIRECT, INCIDENTAL, CONSEQUENTIAL,<br />
SPECIAL, OR EXEMPLARY DAMAGES, INCLUDING BUT NOT<br />
LIMITED TO LOST PROFITS AND LOST DATA, IN ANY WAY ARISING<br />
97
98<br />
OUT OF OR RELATING TO THIS AGREEMENT, EVEN IN THE EVENT<br />
SUCH PARTY HAS BEEN ADVISED AS TO THE POSSIBILITY OF<br />
SUCH DAMAGES. BECAUSE SOME STATES OR JURISDICTIONS DO<br />
NOT ALLOW THE EXCLUSION OR THE LIMITATION OF LIABILITY<br />
FOR CONSEQUENTIAL OR INCIDENTAL DAMAGES, IN SUCH STATES<br />
OR JURISDICTIONS, AOL'S LIABILITY SHALL BE LIMITED TO THE<br />
EXTENT PERMITTED BY LAW.<br />
9. No Trademark License. No license is granted to you in this Agreement,<br />
either expressly or implicitly, to use any trademark, service mark, names,<br />
or logos of AOL, including America Online, AOL, AOL Instant Messenger,<br />
Instant Messenger, AIM and the Running Man logo. AOL owns all<br />
intellectual property in the Software, the Service and the proprietary AOL<br />
name space database, including but not limited to AOL components and<br />
algorithms and access to the Service server complex. AOL and/or its<br />
suppliers or service providers own all customer data collected through the<br />
Service registration process.<br />
10. Injunctive Relief. You acknowledge that the Software contains AOL's<br />
proprietary and confidential information, and that disclosure of such<br />
information or misuse of the Software will give rise to irreparable injury to<br />
AOL, inadequately compensable in damages. Accordingly, AOL may seek<br />
and obtain injunctive relief against the breach or threatened breach of the<br />
foregoing undertakings, in addition to any other legal remedies that may<br />
be available.<br />
11. Construction. If any part of the Agreement is held invalid or<br />
unenforceable, that portion shall be construed to reflect the parties'<br />
original intent, and the remaining portions remain in full force and effect.<br />
The laws of the Commonwealth of Virginia, excluding its conflicts-of-law<br />
rules, govern this Agreement, and you expressly agree that jurisdiction for<br />
any claim or dispute arising from the use of the Protocols resides in the<br />
federal and state courts of the Commonwealth of Virginia.<br />
12. Safety. Please obey all local laws and keep safety in mind when using<br />
this device to access the Service while engaging in any activity that<br />
requires your full attention.
AOL, AOL Instant Messenger, AIM, Buddy List, and Triangle are<br />
trademarks, registered trademarks, and service marks of America Online,<br />
Inc.<br />
AOL Part No. AOLIM091901c SKU # (TM1029)<br />
99
100<br />
European Union Directives<br />
Conformance Statement<br />
[France Only]<br />
Hereby, <strong>Motorola</strong> declares that this product is in compliance with:<br />
The essential requirements and other relevant provisions of<br />
Directive 1999/5/EC<br />
All other relevant EU Directives<br />
0168 Product<br />
Approval<br />
Number<br />
The above gives an example of a typical Product Approval Number.<br />
You can view your product’s Declaration of Conformity (DoC) to Directive<br />
1999/5/EC (the R&TTE Directive) at www.motorola.com/rtte - to<br />
find your DoC, enter the product Approval Number from your product’s<br />
label in the “Search” bar on the Web site.
Index<br />
A<br />
accessories 9, 47, 74, 84,<br />
85, 86<br />
accessory connector port 1<br />
active line indicator 29<br />
AIM 26, 80<br />
AIM indicators 29<br />
alarm clock 88<br />
alert<br />
creating 92<br />
defined 54<br />
reminder 79<br />
setting 14, 46, 54, 55<br />
turning off 14, 62<br />
animation 19, 56, 57, 90<br />
answering a call 15, 59<br />
AOL Instant Messenger.<br />
See AIM<br />
attach number 63, 73<br />
B<br />
backlight 60<br />
barring calls 74<br />
battery 11<br />
battery level indicator 30<br />
battery life, extending 10,<br />
23, 27, 57, 60, 61<br />
Bluetooth connection<br />
indicator 2, 28<br />
Bluetooth wireless<br />
connection 3, 23, 78,<br />
86, 89<br />
brightness 60<br />
browser. See micro-browser<br />
C<br />
calculator 89<br />
call<br />
alert, turning off 14, 62<br />
answering 15, 59<br />
barring 74<br />
costs 84<br />
dialing 14, 52, 76<br />
emergency number 68<br />
ending 14, 15<br />
forwarding 74<br />
hold 66<br />
international dialing 68<br />
making 14, 52, 76<br />
mute 66<br />
receiving 15<br />
returning 47, 65<br />
talk then fax 64<br />
timers 84<br />
transferring 73<br />
101
102<br />
call barring password 48<br />
Call Failed, Number Busy<br />
message 64<br />
call forward indicator 29<br />
call waiting 66<br />
caller ID 3, 17, 52, 63, 67,<br />
73, 76<br />
camera 2, 16<br />
car kit 84<br />
center select key 1, 30<br />
certificate management 90<br />
character chart 43<br />
clock 26, 55, 79<br />
codes 48, 49, 50<br />
conference call 73<br />
CSD indicator 28<br />
cursor 35<br />
D<br />
data call 85<br />
data transmission indicator<br />
28<br />
date, setting 55<br />
datebook 88<br />
dialed calls 62<br />
dialing a phone number 14,<br />
52, 76, 83<br />
display<br />
backlight 60<br />
brightness 60<br />
language 82<br />
personalizing 79, 80<br />
skin 58<br />
timeout 61<br />
using 26<br />
download media objects<br />
75, 91<br />
drafts folder 22<br />
DTMF tones 64, 83<br />
E<br />
earpiece volume 14<br />
email 74, 81<br />
email address, storing 75<br />
emergency number 68<br />
end key 1, 14, 15<br />
ending a call 14, 15<br />
Enter Unlock Code<br />
message 50, 51<br />
external display 2, 46<br />
F<br />
fax call 64, 85, 86<br />
fixed dial 83<br />
flip 15, 17, 46, 59<br />
forwarding calls 74<br />
G<br />
games 91<br />
GPRS indicator 29<br />
group mailing list 78
H<br />
handsfree speaker 48<br />
handsfree use 84<br />
headset 47, 84<br />
Hide ID feature 63<br />
hold call 66<br />
home keys 80<br />
home screen 26<br />
I<br />
in-call indicator 29<br />
Incoming Call message 67<br />
indicators 26, 28, 29, 30,<br />
37, 65, 70<br />
instant messenger. See AIM<br />
international access code<br />
68<br />
iTAP text entry mode 37<br />
J<br />
Java applications 91<br />
Java midlet indicator 29<br />
K<br />
keypad 59, 79<br />
keys 1, 8, 13, 14, 15, 27,<br />
30, 31, 46, 47, 80<br />
L<br />
language 82<br />
left soft key 1, 27, 80<br />
lock<br />
application 90<br />
phone 49<br />
SIM card 90<br />
Low Battery message 30<br />
M<br />
making a call 14, 52, 76<br />
master clear 82<br />
master reset 82<br />
menu<br />
entering text 34<br />
language 82<br />
navigating 32<br />
personalizing 79, 80<br />
selecting feature 33<br />
menu icons 26, 33, 79, 80<br />
menu indicator 26<br />
menu key 1, 8<br />
message 26, 74, 75, 79<br />
message indicator 30<br />
message key 1, 31<br />
micro-browser 26, 91<br />
missed call indicator 65<br />
Missed Calls message 47,<br />
65<br />
MMS, defined 19<br />
MotoMixer 91<br />
103
104<br />
multimedia message 3, 19,<br />
74, 75<br />
music 90, 91, 92<br />
mute call 66<br />
my telephone number 15,<br />
61<br />
N<br />
navigation key 1, 8, 30<br />
network settings 88<br />
notepad 65<br />
number. See phone number<br />
numeric entry mode 44<br />
O<br />
object exchange 25<br />
1-touch dial 68<br />
open to answer 59<br />
operator key 1, 31<br />
optional accessory 9<br />
optional feature 9<br />
P<br />
passwords. See codes<br />
phone<br />
illustration 1, 2<br />
turning on/off 13<br />
unlocking 49, 50<br />
phone number<br />
redialing 64<br />
storing in phonebook 75<br />
storing your number 61<br />
viewing your number 15<br />
phone theme 58<br />
phonebook 26, 51, 63, 68,<br />
73<br />
photo 2, 3, 16, 19, 52, 56,<br />
57, 76, 90<br />
picture 19, 56, 57, 90<br />
picture ID 3, 17, 52, 67, 76<br />
PIN code 48, 90<br />
PIN2 code 48<br />
playlist 92<br />
power key 1, 13<br />
predictive text entry 37<br />
Q<br />
quick dial 83<br />
R<br />
received calls 62<br />
recent calls 26, 62, 84<br />
redial 64<br />
reminders 79<br />
right soft key 1, 27, 80<br />
ring style indicators 30<br />
ring style, setting 14, 46, 54<br />
ring tone 90, 91, 92<br />
ringer ID 67, 76, 77, 79<br />
ringer volume 14, 79<br />
roam indicator 29
S<br />
screen saver 57<br />
security code 48, 50<br />
send key 1, 14, 15<br />
service dial 83<br />
shortcuts 80<br />
Show ID feature 63<br />
signal strength indicator 29<br />
SIM Blocked message 13,<br />
90<br />
SIM card<br />
installing 9<br />
locking 90<br />
PIN code 48, 90<br />
PIN2 code 48<br />
precautions 9<br />
service dial 83<br />
skin 58<br />
smart key 1, 2, 17, 46, 47,<br />
80<br />
soft keys 1, 27, 80<br />
song 90, 91, 92<br />
sound 19, 90, 91, 92<br />
speakerphone 84<br />
speed dial 73<br />
Spkrphone On message 48<br />
symbol chart 45<br />
symbol entry mode 44<br />
T<br />
talk then fax call 64<br />
tap text entry mode 40<br />
telephone number. See<br />
phone number<br />
text entry 34<br />
text indicators 37<br />
theme 58<br />
time, setting 55<br />
timers 84<br />
transfer a call 73<br />
travel charger 12<br />
TTY device 74<br />
turning on/off 13<br />
U<br />
unanswered call 47, 65<br />
unlock<br />
application 90<br />
phone 49<br />
unlock code 48, 49, 50<br />
V<br />
video clip 19, 90<br />
voice dial 52, 76, 85<br />
voice key 1, 52<br />
voice record 19, 89<br />
voicemail 69<br />
voicemail message indicator<br />
30, 70<br />
105
106<br />
volume<br />
earpiece 14<br />
keypad 79<br />
ringer 14, 79<br />
volume keys 1, 14, 46, 47<br />
W<br />
wallpaper 56<br />
Web pages 91<br />
Web sessions 91<br />
U.S. patent Re. 34,976
motorola.com