You also want an ePaper? Increase the reach of your titles
YUMPU automatically turns print PDFs into web optimized ePapers that Google loves.
User <strong>Manual</strong>
English Dart User <strong>Manual</strong><br />
note: your fork’s appearance may vary from the illustrations/photos in this manual. for the latest<br />
information about your fork visit our website at www.rockshox.<strong>com</strong>.<br />
hinweis: das aussehen ihrer gabel kann von den zeichnungen oder fotos in diesem handbuch abweichen.<br />
aktuelle informationen zu ihrer gabel finden sie auf unserer website unter www.rockshox.<strong>com</strong>.<br />
nota: el aspecto de su horquilla puede diferir de las ilustraciones o fotografías de este manual. para<br />
consultar la información más actualizada sobre su horquilla, visite nuestro sitio web en<br />
www.rockshox.<strong>com</strong>.<br />
remarque: l’apparence de votre fourche peut etre differente de celle des fourches representees sur<br />
les illustrations/photos de ce manuel. vous trouverez les dernieres informations techniques concernant<br />
votre fourche en visitant notre site internet a l’adresse: www.rockshox.<strong>com</strong>.<br />
nota: l’aspetto effettivo della forcella potrà essere diverso dalle illustrazioni e dalle fotografie<br />
contenute nel presente manuale. per avere informazioni aggiornate sulla forcella, visitare il nostro sito<br />
web all’indirizzo www.rockshox.<strong>com</strong>.<br />
opmerking: uw vork kan er iets anders uitzien dan op de illustraties/foto’s in deze handleiding. bezoek<br />
voor de meest recente informatie over uw vork onze website op www.rockshox.<strong>com</strong>.<br />
nota: o aspecto da forqueta pode não ser exactamente o das ilustrações ou fotografias deste manual.<br />
para informações técnicas actualizadas acerca da forqueta, visite o website www.rockshox.<strong>com</strong>.<br />
95-401 -306-000 Rev D<br />
Dart User <strong>Manual</strong><br />
CongratUlations!<br />
English<br />
You have the best in suspension <strong>com</strong>ponents on your bicycle! This manual contains <strong>important</strong><br />
information about the safe operation and maintenance of your fork. To ensure that your RockShox fork<br />
performs properly, we re<strong>com</strong>mend that you have your fork installed by a qualified bicycle mechanic. We<br />
also urge you to follow our re<strong>com</strong>mendations to help make your riding experience more enjoyable and<br />
trouble-free.<br />
i m p o r t a n t<br />
consumer safety information<br />
1. The fork on your bicycle is designed for use by a single rider, on mountain trails, and<br />
similar off-road conditions.<br />
. Before riding the bicycle, be sure the brakes are properly installed and adjusted.<br />
Use your brakes carefully and learn your brakes’ characteristics by practicing your<br />
braking technique in non-emergency circumstances. Hard braking or improper use<br />
of the front brake can cause you to fall. If the brakes are out of adjustment, improperly<br />
installed or are not used properly, the rider could suffer serious and/or fatal injuries.<br />
3. Your fork may fail in certain circumstances, including, but not limited to, any condition<br />
that causes a loss of oil; collision or other activity bending or breaking the fork’s<br />
<strong>com</strong>ponents or parts; and extended periods of non-use. Fork failure may not be visible.<br />
Do not ride the bicycle if you notice bent or broken fork parts, loss of oil, sounds of<br />
excessive topping out, or other indications of a possible fork failure, such as loss<br />
of shock absorbing properties. Instead, take your bike to a qualified dealer<br />
for inspection and repair. In the event of a fork failure, damage to the bicycle or<br />
personal injury may result.<br />
4. Always use genuine RockShox parts. Use of aftermarket replacement parts voids the<br />
warranty and could cause structural failure to the shock. Structural failure could result in<br />
loss of control of the bicycle with possible serious and/or fatal injuries.<br />
5. Use extreme caution not to tilt the bicycle to either side when mounting the bicycle to a<br />
carrier by the fork drop-outs (front wheel removed). The fork legs may suffer structural<br />
damage if the bicycle is tilted while the drop-outs are in the carrier. Make sure the fork is<br />
securely fastened down with a quick release. Make sure the rear wheel is fastened down<br />
when using ANY bike carrier that secures the fork’s drop-outs. Not securing the rear can<br />
allow the bike’s mass to side-load the drop-outs, causing them to break or crack. If the<br />
bicycle tilts or falls out of its carrier, do not ride the bicycle until the fork is properly<br />
examined for possible damage. Return the fork to your dealer for inspection or call<br />
RockShox if there is any question of possible damage (See the International Distributor<br />
List). A fork leg or drop-out failure could result in loss of control of the bicycle with<br />
possible serious and/or fatal injuries.<br />
6. forks designed for use with ‘v’-style brakes: only mount cantilever-type brakes to the<br />
existing brake posts. Forks with hangerless style braces are only designed for V-style or<br />
hydraulic cantilever brakes. Do not use any cantilever brake other than those intended<br />
by the brake manufacturer to work with a hangerless brace. Do not route the front brake<br />
cable and/or cable housing through the stem or any other mounts or cable stops. Do not<br />
use a front brake cable leverage device mounted to the brace. forks designed for<br />
use with disc-style brakes: follow the brake manufacturer’s installation instruction for<br />
proper installation and mounting of the brake caliper.<br />
7. Observe all owner’s manual instructions for care and service of this product.<br />
ROCKSHOX FORKS ARE DESIGNED FOR COMPETITIVE OFF-ROAD RIDING AND DO<br />
NOT COME WITH THE PROPER REFLECTORS FOR ON-ROAD USE. YOUR DEALER<br />
SHOULD INSTALL PROPER REFLECTORS TO MEET THE CONSUMER PRODUCT<br />
SAFETY COMMISSIONíS (CPSC) REQUIREMENTS FOR BICYCLE STANDARDS IF<br />
THE FORK IS GOING TO BE USED ON PUBLIC ROADS AT ANY TIME.<br />
©SRAM Corporation • 007 3
English Dart User <strong>Manual</strong><br />
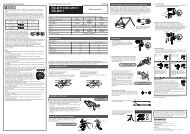
Fork installation<br />
It is extremely <strong>important</strong> that your RockShox fork is installed correctly by a qualified bicycle mechanic.<br />
improperly installed forks are extremely dangerous and can result in severe and/or fatal injuries.<br />
1. Remove the existing fork from the bicycle and the crown race from the fork. Measure the length of<br />
the fork steerer tube against the length of the RockShox steerer tube. The RockShox steerer tube<br />
may need cutting to the proper length. Make sure there is sufficient length to clamp the stem (refer<br />
to the stem manufacturer’s instructions).<br />
.<br />
3.<br />
4.<br />
5.<br />
w a r n i n g<br />
DO NOT ADD THREADS TO ROCKSHOX THREADLESS STEERERS<br />
THE STEERER TUBE CROWN ASSEMBLY IS A ONE-TIME PRESS FIT.<br />
REPLACEMENT OF THE ASSEMBLY MUST BE DONE TO CHANGE THE<br />
LENGTH, DIAMETER OR HEADSET TYPE (THREADED OR THREADLESS).<br />
DO NOT REMOVE OR REPLACE THE STEERER TUBE. THIS COULD RESULT<br />
IN THE LOSS OF CONTROL OF THE BICYCLE WITH POSSIBLE SERIOUS<br />
AND/OR FATAL INJURIES.<br />
Install the headset crown race (29.9mm for 1 1/8” steerers) firmly against the top of the fork crown.<br />
Install the fork assembly on the bike. Adjust the headset until you feel no play or drag.<br />
Install the brakes according to the manufacturer’s instructions and adjust brake pads properly. Use<br />
the fork only with disc style brakes mounted through the provided mounting holes. Do not use any<br />
cantilever brake other than those intended by the brake manufacturer to work with a hangerless<br />
brace.<br />
Forks designed for standard quick releases: adjust the front wheel quick release to clear the<br />
dropout’s counter bore. The quick release nut must be tightened after the wheel is properly seated<br />
into the dropout’s counter bore. Make sure four or more threads are engaged in the quick release<br />
nut when it is closed. Orient the quick release lever in front of and parallel to the lower tube in the<br />
locked position.<br />
Keep in mind tire clearance as you choose tires. Maximum size is .3” wide installed. Be sure to<br />
check this diameter whenever you change tires. To do this, remove the top caps and spring stack<br />
assemblies and <strong>com</strong>press the fork <strong>com</strong>pletely to make sure at least 5 mm of clearance exists<br />
between the top of the inflated tire and the bottom of the crown. Exceeding maximum tire size will<br />
cause the tire to jam against the crown when the fork is fully <strong>com</strong>pressed.<br />
PoPloC reMote installation<br />
The PopLoc Remote Lockout lever allows the rider to control the movement of their suspension fork<br />
without removing their hands from the handlebars. Specific left and right PopLocs are available.<br />
If needed, remove the grip, brake lever, and shifter from the handlebar. If you are unfamiliar with the<br />
removal of these items, please consult the manufacturer’s instructions.<br />
1. Slide the Poploc onto the handlebar.<br />
. Re-install the shifter, brake lever, and grip on the handlebars. If you are unfamiliar with the<br />
installation of these items, please consult the manufacturer’s instructions. Always adhere to the<br />
re<strong>com</strong>mended torque specifications for these items.<br />
3. Position the PopLoc as desired on the handlebar and tighten the clamp bolt to 0 in-lb ( . 5 Nm)<br />
4. Forks with PopLoc Adjust: Turn the blue <strong>com</strong>pression adjustment dial counterclockwise until it stops.<br />
5. Press the release button on the PopLoc.<br />
6. Install the cable in the PopLoc.<br />
7. Install the cable into the housing.<br />
4 95-401 -306-000 Rev D<br />
Dart User <strong>Manual</strong><br />
English<br />
8. Feed the cable and housing into the cable stop on the fork crown.<br />
9. Gently pull on the cable and align it with the groove in the rotating cam of the Motion Control<br />
damper.<br />
10. Tighten the cable fixing bolt on the rotating cam to 8 in-lb (.9 Nm)<br />
note: for pushloc installation or pushloc with matchmaker installation, please refer to the instructions<br />
on our website at www.rockshox.<strong>com</strong>.<br />
PerForManCe tUning<br />
RockShox forks can be tuned for your particular weight, riding style,<br />
and terrain.<br />
setting sag<br />
Dart forks are designed to sag when you are sitting on your bike.<br />
Sag is the <strong>com</strong>pression of the fork caused by the rider’s weight.<br />
Proper sag allows the front wheel to follow the contour of the terrain<br />
as you ride.<br />
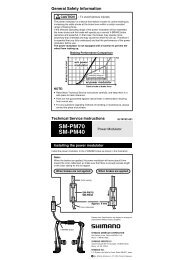
Sag is adjusted by turning the top cap preload adjuster (fig 1).<br />
Turning the adjuster clockwise increases spring preload (i.e.<br />
stiffening the spring) decreasing sag. Turning the adjuster counter<br />
Fig. 1<br />
clockwise decreases spring preload which increases sag.<br />
To measure sag, install a zip tie on the upper tube of the fork flush against the dust wiper. Sit on the bike<br />
with normal riding apparel. Step off the bike, and measure the distance between the dust wiper and the<br />
zip tie. This is your sag. Adjust the preload as needed to reach the re<strong>com</strong>mended sag.<br />
Coil sPring tUning<br />
travel re<strong>com</strong>mended sag<br />
80mm 1 - 0mm<br />
100mm 15- 5mm<br />
1 0mm 18-30mm<br />
Changing the sPring rate<br />
Spring rate is the amount of force needed to <strong>com</strong>press a spring one inch. Changing your fork’s coil<br />
spring for a spring of a higher or lower rate will alter the overall feel of your fork. Higher spring rates<br />
make the fork feel more “stiff”, while lower spring rates make the fork more “supple”. Contact your local<br />
RockShox dealer to order replacement springs.<br />
reboUnd daMPing<br />
external reboUnd adjUstMent (dart 2 with tUrnkey oPtion/dart 3)<br />
Rebound damping controls the speed at which a fork returns to its full extension following <strong>com</strong>pression.<br />
Located at the bottom of the right fork leg is the rebound adjuster knob. Turning the adjuster in the<br />
direction indicated by the “rabbit” on the rebound speed decal decreases rebound damping, causing<br />
the fork to return to full extension faster. Turning the adjuster in the direction indicated by the “turtle”<br />
increases rebound damping, slowing the return of the fork to full extension.<br />
Excessive rebound damping will cause the fork to “pack up” over successive bumps, reducing travel<br />
and causing the fork to bottom out. Set your fork to rebound as fast as possible without “topping out” or<br />
kicking back. This allows your fork to follow the contours of the trail, maximizing stability, traction and<br />
control.<br />
©SRAM Corporation • 007 5
English Dart User <strong>Manual</strong><br />
tUrnkey loCkoUt systeM<br />
(dart 2 with tUrnkey oPtion/dart 3)<br />
<strong>important</strong> note: when storing a bicycle or fork upside-down or on its side, oil sealed in the upper tube<br />
can collect above the turnkey assembly. upon returning the bicycle/fork to a normal riding position,<br />
initial performance of the turnkey system may be less than optimal. to quickly return the fork to proper<br />
performance, return the fork to ‘open’ position and cycle the fork through its travel 10-20 times. for<br />
information on returning your fork to ‘open’ position, keep reading!<br />
The TurnKey lockout system offers a two position ‘on/off’ lockout. Using either the crown mounted<br />
adjuster or an optional PopLoc Remote, the rider is able to choose between maximum <strong>com</strong>pliance and<br />
fork movement (when the lockout is ‘off’) and minimal <strong>com</strong>pliance and fork movement (when the lockout<br />
is ‘on’).<br />
The TurnKey lockout is ‘off’ when either the crown mounted adjuster (or remote spool) is in the full<br />
counterclockwise position or the PopLoc Remote lever returns to the ‘unlock’ position. The lockout turns<br />
‘on’ as the rider rotates the crown mounted adjuster clockwise or by pressing forward on the optional<br />
Poploc Remote located on the handlebar.<br />
note: when the turnkey lockout is ‘on’ and the fork encounters a considerable input force, the lockout<br />
will ‘blowoff’ and allow the fork to move into its travel to absorb the input force. the fork will return<br />
and remain in its lockout state until either another force is encountered or the rider turns the adjuster<br />
to the ‘off’ position.<br />
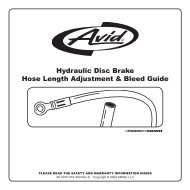
TurnKey Lockout<br />
TurnKey two position<br />
' On - Off ' lockout<br />
Fork movement<br />
Off On<br />
Off position<br />
On position<br />
Crown mounted adjuster<br />
On<br />
PopLoc Remote<br />
Fig. 2<br />
Off = maximum fork movement<br />
On = minimum fork movement<br />
6 95-401 -306-000 Rev D<br />
Off<br />
PopLoc Remote<br />
(optional)<br />
PopLoc Adjust Remote<br />
Dart User <strong>Manual</strong><br />
oil tUning (dart 2)<br />
English<br />
Changing the HydraCoil oil in your fork will alter its rebound characteristics. Rebound is the return stroke<br />
of the fork in opposition to <strong>com</strong>pression. To slow the rebound of your fork (greater damping), replace the<br />
stock 5 wt. oil with a heavier weight suspension oil. For faster rebound (less damping), replace the stock<br />
oil with a lighter weight suspension oil. For further information on oil volumes and adding oil to your fork,<br />
visit our website at www.rockshox.<strong>com</strong> or contact your local dealer or distributor.<br />
MaintenanCe<br />
To maintain the high performance, safety, and long life of your fork, periodic maintenance is required. If<br />
you ride in extreme conditions, maintenance should be performed more frequently.<br />
note: we re<strong>com</strong>mend this service be performed by a qualified bicycle mechanic. to obtain service<br />
information or instructions, visit our website at www.rockshox.<strong>com</strong> or contact your local rockshox<br />
dealer or distributor.<br />
torque tightening Values<br />
Top Caps 65 in-lb (7.3 Nm)<br />
Brake Posts 80 in-lb (9.0 Nm)<br />
Shaft Bolts 60 in-lb (6.8 Nm)<br />
U-Turn Adjuster Knob Screw 1 in-lb (1.4 Nm)<br />
serViCe interVals dart 1/2 dart 3<br />
Clean dirt and debris from upper tubes E E<br />
Inspect upper tubes for scratches E E<br />
Lubricate dust seals/tubes 10 10<br />
Check to caps, brake posts, and shaft bolts for proper torque 5 5<br />
Check air pressure * *<br />
Remove lowers, clean/inspect bushings, and change oil bath * 50<br />
Change oil in Motion Control System * *<br />
Clean and lubricate Air U-Turn/Dual Air/Air Assist assembly/Solo<br />
Air<br />
* *<br />
Clean and lubricate coil spring or coil U-Turn spring assembly 100 100<br />
Clean and lubricate PopLoc cable and housing * *<br />
notes:<br />
e = every ride<br />
numeric values represent hours of riding time.<br />
increase service intervals based on rider weight, aggressive riding style/conditions, inclement weather and racing.<br />
©SRAM Corporation • 007 7
English Dart User <strong>Manual</strong><br />
sraM CorPoration warranty<br />
extent oF liMited warranty<br />
SRAM warrants its products to be free from defects in materials or workmanship for a period of two<br />
years after original purchase. This warranty only applies to the original owner and is not transferable.<br />
Claims under this warranty must be made through the retailer where the bicycle or the SRAM <strong>com</strong>ponent<br />
was purchased. Original proof of purchase is required.<br />
loCal law<br />
This warranty statement gives the customer specific legal rights. The customer may also have other<br />
rights which vary from state to state (USA), from province to province (Canada), and from country to<br />
country elsewhere in the world.<br />
To the extent that this warranty statement is inconsistent with the local law, this warranty shall be<br />
deemed modified to be consistent with such law, under such local law, certain disclaimers and limitations<br />
of this warranty statement may apply to the customer. For example, some states in the United States<br />
of America, as well as some governments outside of the United States (including provinces in Canada)<br />
may:<br />
a. Preclude the disclaimers and limitations of this warranty statement from limiting the statutory<br />
rights of the consumer (e.g. United Kingdom).<br />
b. Otherwise restrict the ability of a manufacturer to enforce such disclaimers or limitations.<br />
liMitations oF liability<br />
To the extent allowed by local law, except for the obligations specifically set forth in this warranty<br />
statement, In no event Shall SRAM or its third party supplies be liable for direct, indirect, special,<br />
incidental, or consequential damages.<br />
liMitations oF warranty<br />
This warranty does not apply to products that have been incorrectly installed and/or adjusted according<br />
to the respective SRAM technical installation manual. The SRAM installation manuals can be found<br />
online at www.sram.<strong>com</strong> or www.rockshox.<strong>com</strong>.<br />
This warranty does not apply to damage to the product caused by a crash, impact, abuse of the product,<br />
non-<strong>com</strong>pliance with manufacturers specifications of usage or any other circumstances in which the<br />
product has been subjected to forces or loads beyond its design.<br />
This warranty does not apply when the product has been modified.<br />
This warranty does not apply when the serial number or production code has been deliberately altered,<br />
defaced or removed.<br />
This warranty does not apply to normal wear and tear. Wear and tear parts are subject to damage as a<br />
result of normal use, failure to service according to SRAM re<strong>com</strong>mendations and/or riding or installation<br />
in conditions or applications other than re<strong>com</strong>mended.<br />
Wear and tear parts are identified as:<br />
• Dust seals • Bushings<br />
• Air sealing o-rings • Glide rings<br />
• Rubber moving parts. • Foam rings<br />
• Rear shock mounting hardware • Upper tubes (stanchions)<br />
and main seals<br />
• Stripped threads/bolts (aluminium, • Brake sleeves<br />
titanium, magnesium or steel)<br />
• Brake pads • Chains<br />
• Sprockets • Cassettes<br />
• Shifter and brake cables (inner and outer) • Handlebar grips<br />
• Shifter grips • Jockey wheels<br />
•<br />
Disc brake rotors • Tools<br />
This warranty shall not cover damages caused by the use of parts of different manufacturers.<br />
This warranty shall not cover damages caused by the use of parts that are not <strong>com</strong>patible, suitable<br />
and/or authorised by SRAM for use with SRAM <strong>com</strong>ponents.<br />
8 95-401 -306-000 Rev D
95-4012-306-000, Rev. D<br />
2007<br />
1610 Garden of the Gods<br />
Colorado Springs, CO 80907<br />
Ride on open trails only<br />
Leave no trace<br />
Control your bicycle<br />
Always yield trail<br />
Never spook animals<br />
Plan ahead