Issue 62 Beginners Recurve Bow Tuning Part 2 - Perris Archery
Issue 62 Beginners Recurve Bow Tuning Part 2 - Perris Archery
Issue 62 Beginners Recurve Bow Tuning Part 2 - Perris Archery

Create successful ePaper yourself
Turn your PDF publications into a flip-book with our unique Google optimized e-Paper software.
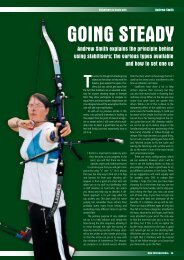
<strong>Recurve</strong> tuning<br />
Andrew Smith<br />
StAy tuned<br />
pARt two<br />
Andrew Smith goes<br />
through the crucial<br />
tests in the second<br />
instalment of his guide<br />
to recurve bow tuning<br />
22 BOW INTERNATIONAL<br />
022-025 <strong>Beginners</strong>_Rev2.indd 22 30/7/10 11:51:36
Andrew Smith<br />
<strong>Recurve</strong> tuning<br />
<strong>Bow</strong> tuning begins<br />
The most important thing to do from the<br />
start is make notes and only change one<br />
thing at a time. This way it is easier to find<br />
the correct settings and make changes. If<br />
you are shooting outdoors, select a very<br />
calm day with no wind.<br />
The first step is to put your bow<br />
together, ensuring it is strung correctly.<br />
You should by now be in the habit of<br />
checking that the limbs are the right way<br />
round and not twisted. Attach all the<br />
accessories you normally use, such as the<br />
longrod, to your bow, as these will affect<br />
the adjustments we are about to make. If<br />
you shoot with a clicker then you should<br />
use it for these tests, and do not forget to<br />
shoot with the same tab as you normally<br />
do. Lastly, it is important to warm up<br />
before shooting. The best thing to do is<br />
to shoot a few ends to get you into your<br />
shooting stride.<br />
There are a few settings you need<br />
to take care of before running the tests.<br />
Firstly, I will assume that the centreshot<br />
is set so the point of the arrow is to the<br />
left of the string when looking from the<br />
back of the bow (for left-handed archers<br />
this will be reversed). Secondly, set<br />
the bracing height using the method I<br />
described last issue.<br />
Finally – and this is very important –<br />
you need to make sure the arrow is not<br />
hitting any part of the bow on its way to<br />
the target, as this will make any results<br />
from the tests meaningless. To check for<br />
arrow clearance, sprinkle a fine powder<br />
around the arrow rest and shelf and shoot<br />
some arrows. Any marks in the powder<br />
will tell you where there is contact. To<br />
find out if the vanes are making contact,<br />
put a small amount of lipstick on them<br />
and, again, it will show on the riser.<br />
The best course of action depends on<br />
where the contact is. The most common<br />
issues are due to poor form: Twisting the<br />
bow handle, not setting the centreshot<br />
far enough out, having soft button spring<br />
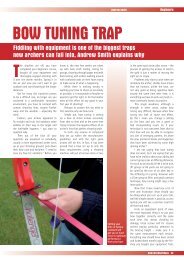
Above left:<br />
bare shaft<br />
nocking point<br />
too low, bare<br />
shaft nocking<br />
point too high<br />
Above right:<br />
bare shaft<br />
nocking point<br />
too low, bare<br />
shaft nocking<br />
point too high<br />
Right: <strong>Bow</strong>shaft<br />
correct spring<br />
tension<br />
tension or an arrow spine that is too<br />
whippy or too stiff, or setting the nocking<br />
point too low.<br />
the bare shaft test<br />
The general idea of this test is to fire a<br />
bare arrow shaft and see where it lands<br />
in relation to the fletched arrow in the<br />
vertical plane.<br />
The test is best shot at 10 yards (9m)<br />
with aluminium arrows (once you get<br />
better you can move back to 20 yards)<br />
and 20 yards (18m) with carbon arrows.<br />
You will need to remove the fletchings<br />
from one of your arrows.<br />
Wrap some insulation tape on the<br />
back of the stripped arrow to give it the<br />
same balance point as a fletched arrow,<br />
as this gives a more accurate result. The<br />
tape must be put on flat so as not to act<br />
as any sort of wing.<br />
Set the sight up for the distance you<br />
are shooting and set the windage so that<br />
the sight pin is above the arrow. Remove<br />
the brass nocking points and create a<br />
temporary nocking point using a small<br />
amount of insulation tape. This will make<br />
it easier to move to the best position.<br />
Start by setting this at the same point as<br />
the brass nocking points.<br />
Shoot three or six arrows with<br />
fletchings at the target, then shoot the<br />
bare shaft at the same point on the<br />
target. We are only interested in whether<br />
the bare shaft has landed above or below<br />
the fletched arrow group. If the bare shaft<br />
is above the group then your nocking<br />
point is too low; below the group and it<br />
is too high on the string.<br />
Your aim is to achieve a nocking<br />
point position where the bare shaft is<br />
about 1-3” below the group on the<br />
horizontal plain.<br />
I suggest you repeat this process a<br />
couple of times with each nocking point<br />
setting, and if the bare shaft is in roughly<br />
the same place, move the nocking<br />
point about 1 /8” in the right direction.<br />
Keep repeating the test and making<br />
adjustments until you get the desired<br />
result. When you are finished, don’t<br />
forget to re-apply your brass nocking<br />
points, or change over to nocking points<br />
that are tied on using dental floss or<br />
string serving thread.<br />
BOW INTERNATIONAL 23<br />
022-025 <strong>Beginners</strong>_Rev2.indd 23 30/7/10 11:51:37
<strong>Recurve</strong> tuning<br />
Andrew Smith<br />
Horizontal adjustments<br />
This test will correctly set the button<br />
spring pressure for a right-handed<br />
archer (the readings will be opposite if<br />
you are left- handed). It is again done<br />
at 10 or 20 yards, and this time we are<br />
interested in how close the bare shaft<br />
hits in relation to the fletched group on<br />
the horizontal plane.<br />
In this test we are looking for the<br />
bare shaft to land in the group of fletched<br />
arrows or just to the left, around seven<br />
o’clock (for a right-handed archer). Why<br />
this position? Because it gives the arrow<br />
good clearance from the bow.<br />
If the bare shaft lands to the right<br />
of the group then the spring pressure is<br />
set too soft. Likewise, to the left and the<br />
spring is too hard. To adjust the button,<br />
loosen the top locking grub screw on<br />
the side of the button and, using the<br />
Allen key in the end of the button,<br />
turn it clockwise to stiffen the spring<br />
or anti-clockwise to weaken the spring<br />
tension. Initially, how much you move<br />
it will depend on where the bare shaft<br />
lands in relation to the fletched group.<br />
If the bare shaft lands at just below nine<br />
o’clock in the white, with the fletched<br />
arrows grouped in the gold, then one<br />
whole turn anti-clockwise is worth<br />
doing, but after that quarter turns are<br />
all it should take.<br />
walk back test<br />
Once you have completed the bare shaft<br />
test, you can re-fletch your bare shaft.<br />
Another check you can do is the walk<br />
back test. The results of this test will<br />
gauge your arrow flight over a greater<br />
distance, identifying adjustments to your<br />
centreshot and button spring pressure<br />
and possibly addressing other issues<br />
such as poor arrow clearance.<br />
The test is quite simple but to get<br />
the best results you need to have a nice<br />
calm day or a long indoor hall. Set up<br />
a target at 50 yards, with a target pin<br />
at 12 o’clock just in the black, and put<br />
a second boss below it on the ground,<br />
resting on the top target. The target pin<br />
will be your aiming point. Stand five yards<br />
in front of the target and set your sight<br />
for five yards (don’t adjust your windage<br />
as it should still be set so the pin is above<br />
the arrow).<br />
Shoot one arrow at the target pin, then<br />
walk back five yards and shoot another<br />
arrow, again aiming at the target pin.<br />
Repeat this until your last arrow is at the<br />
bottom of the second boss.<br />
Where your arrows land will give you<br />
an indication of how your arrows fl y at<br />
long distances and whether or not your<br />
centreshot and button spring tension<br />
are correct. Keep repeating the tests and<br />
adjustments until you get a pattern that<br />
is more or less a straight line, taking into<br />
consideration your shooting ability.<br />
If your arrows drift to the right or<br />
left as you move back, you will need to<br />
adjust your centreshot. Drifting to the left<br />
indicates that your centreshot is too far<br />
out, and vice versa. The adjustments need<br />
to be quite small – about a quarter of a<br />
turn each time.<br />
If you get a pattern of arrows<br />
creating a curve to the left then your<br />
spring tension is too stiff. Try reducing<br />
the spring tension by one-quarter. If<br />
they curve to the right then your spring<br />
pressure is too soft (again, the reverse<br />
applies for left-handed archers).<br />
The diagrams to the left are<br />
exaggerated but it is important to adjust<br />
the centreshot fi rst, the objective being to<br />
get the arrows in a relatively straight line<br />
– before fi ne-tuning pressure<br />
Once you have completed this exercise<br />
and are happy with the results, go back to<br />
10 yards (9m) and repeat the bare shaft<br />
test. You will most probably fi nd that the<br />
bare shaft no longer lands where it did<br />
before completing the test. This is because<br />
you have now found a set-up suitable for<br />
you. Make a note of the position of the<br />
bare shaft and the group. This way, if you<br />
change something or something breaks<br />
then you can quickly do a bare shaft test<br />
and set the nocking point and button<br />
to get the bare shaft to hit in the same<br />
place again, saving you all<br />
that time doing the walk<br />
back tests.<br />
Above: <strong>Tuning</strong><br />
is essential, if<br />
you want top<br />
scores<br />
Below: The<br />
back screw<br />
alters button<br />
pressure,<br />
while the side<br />
screw locks<br />
everything<br />
down<br />
My patterns don’t<br />
match the pictures<br />
This is common and you have to take into<br />
consideration your own shooting ability,<br />
but if after checking all your adjustments<br />
the results do not seem right, there are a<br />
number of possibilities:<br />
● You are unable to get the bare shaft<br />
to move closer to the fl etched group when<br />
adjusting the spring tension. The most<br />
common reason for this is that the arrows<br />
have the wrong spine: they are either too<br />
weak or too stiff. The solution, after re-<br />
checking with your club coach, is to buy<br />
the correct arrows.<br />
● You are having issues with arrow<br />
clearance: re-check using the methods<br />
mentioned above and start again.<br />
● You are making odd left and right<br />
shots. Make sure that when you shoot<br />
you line the string picture up the<br />
same each time, otherwise erratic left<br />
and right shots will occur.<br />
A final word on<br />
carbon arrows<br />
It is not uncommon these<br />
days for archers to progress<br />
quickly from aluminium<br />
arrows to carbon arrows,<br />
mostly in an attempt to<br />
get lower poundage bows to<br />
reach longer distances. All the<br />
above tests can be carried out on<br />
24 BOW INTERNATIONAL<br />
022-025 <strong>Beginners</strong>_Rev2.indd 24 30/7/10 11:51:43
Andrew Smith<br />
<strong>Recurve</strong> tuning<br />
carbon arrows – although the walk back tests might be harder to<br />
interpret, as the patterns are not so defined.<br />
To get the best out of carbon arrows once your settings<br />
have been adjusted, the next stage is what the top archers call<br />
“shooting for groups”. This involves shooting arrows that plot<br />
the group’s sizes, making changes to the bow set-up and seeing<br />
how this affects the group size. This is very time-consuming, and<br />
unless you can shoot groups small enough to recognise any sort<br />
of pattern at, say, 60m or 70m (adults) then your time is much<br />
better spent practicing.<br />
Now that you have finished bow tuning, here is the bad<br />
news: The bow is tuned up only to how you shot during the tests.<br />
Tomorrow you might shoot differently due to tiredness, having a<br />
bad day at work, or any of a number of factors that affect your<br />
ability to shoot well. What does not change is the bow: It will<br />
shoot the arrows the same every time if allowed to do so. The<br />
good news is that you do not have to continually bow tune – just<br />
practice more. The only time you should consider checking the<br />
tune, especially at this early stage, is if you buy new pieces of<br />
equipment or something breaks or gets moved.<br />
Top left:<br />
Walkback<br />
centre shot too<br />
far out<br />
Top right:<br />
Walkback<br />
eratic results<br />
Above left:<br />
Walkback<br />
spring tension<br />
too stiff<br />
Above right:<br />
Walkback test<br />
finished result<br />
BOW INTERNATIONAL 25<br />
022-025 <strong>Beginners</strong>_Rev2.indd 25 30/7/10 11:51:44