MRX-1 Installation Manual - Universal Remote Control
MRX-1 Installation Manual - Universal Remote Control
MRX-1 Installation Manual - Universal Remote Control

Create successful ePaper yourself
Turn your PDF publications into a flip-book with our unique Google optimized e-Paper software.
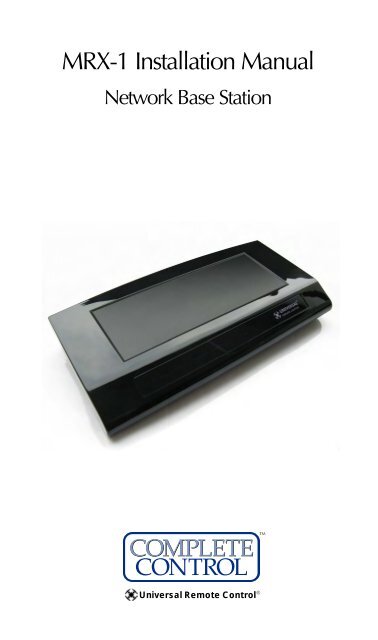
<strong>MRX</strong>-1 <strong>Installation</strong> <strong>Manual</strong><br />
Network Base Station<br />
COMPLETE<br />
<br />
CONTROL<br />
<strong>Universal</strong> <strong>Remote</strong> <strong>Control</strong> ®
<strong>MRX</strong>-1 <strong>Installation</strong> <strong>Manual</strong> ©2010 <strong>Universal</strong> <strong>Remote</strong> <strong>Control</strong>, Inc.<br />
The information in this manual is copyright protected. No part of this manual<br />
may be copied or reproduced in any form without prior written consent<br />
from <strong>Universal</strong> <strong>Remote</strong> <strong>Control</strong>, Inc.<br />
UNIVERSAL REMOTE CONTROL, INC. SHALL NOT BE LIABLE FOR OPER-<br />
ATIONAL, TECHNICAL OR EDITORIAL ERRORS/OMISSIONS MADE IN<br />
THIS MANUAL.<br />
The information in this manual may be subject to change without prior<br />
notice.<br />
Complete <strong>Control</strong> is a registered trademark of <strong>Universal</strong> <strong>Remote</strong> <strong>Control</strong>,<br />
Inc.<br />
All other brand or product names are trademarks or registered trademarks<br />
of their respective companies or organizations.<br />
500 Mamaroneck Avenue, Harrison, NY 10528<br />
Phone: (914) 835-4484 Fax: (914) 835-4532
TABLE OF CONTENTS<br />
Introduction 1<br />
Features and Benefits 2<br />
Parts Guide 2<br />
Front and Rear Panel Descriptions 3<br />
Network <strong>Installation</strong> 4<br />
Optimizing IR Flasher Levels 5<br />
Integrating Optional RFTX-1 to control URC LIghting 6<br />
Integrating Optional Video or Voltage Sensors 7<br />
Integrating RS-232 and Relays 10<br />
Network Discovery 13<br />
Overview of IR Routing 16<br />
Network or RF Setup in CCP 16<br />
IR over Narrow Band via Optional RFX-250 18<br />
Connecting multiple <strong>MRX</strong>-1’s via RF Out 20<br />
Frequently Asked Questions 21<br />
Specifications 21<br />
USA Limited Warranty Statement 22<br />
Warning 23
Introduction<br />
<strong>MRX</strong>-1 BASE STATION<br />
The <strong>MRX</strong>-1 Network Base Station receives IR and Serial commands<br />
from any URC Network <strong>Control</strong>s (like the KP-4000, MX-6000 or MX-<br />
5000) over the network. Each <strong>MRX</strong>-1 has a unique MAC Address,<br />
which allows correct routing to multiple <strong>MRX</strong>-1 units throughout the<br />
home.<br />
In installations with URC RF Lighting, the optional RFTX-1 transmitter<br />
will transmit RF commands from all URC Network <strong>Control</strong>’s. This<br />
enables installations with multiple <strong>MRX</strong>-1’s and RFTX-1’s to become<br />
whole house lighting control systems capable of multiple room paths<br />
and scenes.<br />
In addition, the <strong>MRX</strong>-1 offers traditional IR only control from URC<br />
Narrow Band RF <strong>Control</strong>s via an optional RFX-250.<br />
1. The KP-4000 communicates over the<br />
LAN (Local Area Network) to IP controlled<br />
components and the URC <strong>MRX</strong>-<br />
1 Network Base Station.<br />
2. The <strong>MRX</strong>-1 receives commands and<br />
controls the components via IR or<br />
Serial.<br />
WiFi Router<br />
IR <strong>Control</strong>led Device<br />
3. Self-adhesive “Flashers” affix to<br />
the Infrared sensors on the front<br />
panels of your client’s components.<br />
The Flashers relay commands<br />
to components. The flashers<br />
plug in to the <strong>MRX</strong>-1 rear<br />
flasher line outputs via their 10<br />
foot cables. The <strong>MRX</strong>-1 can also<br />
connect to components with rear<br />
panel IR Inputs via its adjustable<br />
IR Line Outputs.<br />
Page 1
Features and Benefits<br />
<strong>MRX</strong>-1 BASE STATION<br />
The Bridge for Network <strong>Remote</strong>s and Keypads<br />
The <strong>MRX</strong>-1 enables IR and RS-232 devices to be controlled by URC<br />
Network <strong>Control</strong>s.<br />
2-Way RS-232 Thermostats, Security Systems, Home Theater AVRS<br />
and Multi-Zone Matrixes<br />
Via the unique URC 2-Way database installers can drag and drop<br />
2-Way pre-programmed modules into any URC Network <strong>Control</strong><br />
powered by the <strong>MRX</strong>-1’s two RS-232 ports. RS-232 components<br />
can display Volume Pop Ups, Status displays, Tuner Modules, 2-<br />
Way Transport <strong>Control</strong>s, etc.<br />
Whole House URC Lighting via RFTX-1<br />
Via the RFTX-1 transmitter, the <strong>MRX</strong>-1 can relay commands from<br />
any URC Network <strong>Control</strong> to URC Lighting devices. By installing<br />
multiple <strong>MRX</strong>-1/RFTX-1 relay stations around a home, installers can<br />
create seamless coverage of any size house, allowing lighting paths<br />
and whole house scenes.<br />
Utilize <strong>MRX</strong>-1 Sensor Port to Automate TOAD Devices<br />
The <strong>MRX</strong>-1 offers URC Network <strong>Control</strong>s automation capability for<br />
devices that do not have discrete codes. It is equipped with a sensor<br />
port compatible with optional URC video or voltage sensors,<br />
thus an installer can program macros that test whether a device is<br />
on or off before issuing input commands etc.<br />
<strong>Control</strong> Devices with Relays<br />
URC Network <strong>Control</strong>s can control lifts, screens etc. via the <strong>MRX</strong>-<br />
1’s NO, NC or Momentary set of contacts.<br />
Traditional Narrow Band RF<br />
Complete <strong>Control</strong> remotes and keypads can also control the same<br />
IR devices with an optional RFX-250 or RFX-250i.<br />
Parts Guide<br />
The <strong>MRX</strong>-1 Network Base Station includes:<br />
1 - <strong>MRX</strong>-1 Network Base Station<br />
1 - 12V-1000mA Power Supply<br />
6 - Visible Emitters with 10 foot plug<br />
in cables including 1 pink sleeved<br />
emitter for the RFTX-1 port<br />
Page 2<br />
1 - Two Meter 3.5mm Stereo to<br />
3.5mm Stereo (for daisy chaining<br />
multiple <strong>MRX</strong>-1 with one RFX-<br />
250)<br />
1 - Adjustment Tool<br />
1 - Mounting Plate for wall mounting<br />
the <strong>MRX</strong>-1
Front and Rear Panel Descriptions<br />
Front<br />
<strong>MRX</strong>-1 BASE STATION<br />
The front panel consists of 4 indicator lights which will illuminate<br />
when in use.<br />
Power Status Sensor Ethernet<br />
Reset: Bottom<br />
Power: Illuminates when the power supply is connected to an outlet<br />
Status: Flashes in blue when an RF or Network signal is received.<br />
Sensor: Illuminates to indicate that it is sensing the presence of<br />
composite video or AC or DC voltage.<br />
Ethernet: Illuminates when connected to a Network Router<br />
Reset: Press the reset button located under the <strong>MRX</strong>-1 to restart the<br />
unit.<br />
Rear<br />
The rear panel ports are:<br />
Power<br />
Relay:NO,<br />
NC, COM<br />
Sensor<br />
IR Outputs: #1-6<br />
RFTX Port: #6<br />
RF ID<br />
Ethernet<br />
RS-232 Ports<br />
IR IN<br />
RF IN<br />
RF Out<br />
Power: Provides connection to included 12V/1Amp Power Supply.<br />
Ethernet: Provides connection to LAN(Local Area network) via RJ45<br />
cable.<br />
Relay NO, NC, COM: Provides configurable switch closure control.<br />
RS-232 Ports: Two RS232 ports provides direct control.<br />
Sensor: Provides connection to one URC Voltage Sensor (VS-1006)<br />
or to one URC Video Sensor (VID-6) for status in sensor based<br />
macros.<br />
IR IN: Allows <strong>MRX</strong>-1 control from a base station such as a MRF-260<br />
(IR Routing capability is lost from commands coming from the MRF-<br />
260)<br />
Page 3
<strong>MRX</strong>-1 BASE STATION<br />
IR Outputs: Connect emitters for IR control of connected devices.<br />
RFTX Port: Dual port #6 for the RFTX-1 connecting cable or included<br />
sleeved IR emitter.<br />
RF IN: Connects to a optional single RFX-250 (refer to manual)<br />
RF Out: Used for daisy chaining <strong>MRX</strong>-1s for RF Operation (Refer to<br />
RFX-250 manual)<br />
RF ID: 15 unique RF ID's provide RF control and routing to multiple<br />
<strong>MRX</strong>-1’s in the same home. (RF ID #0, the interference "sniffing" position,<br />
is used to detect RF interference in the area.)<br />
Network <strong>Installation</strong><br />
The <strong>MRX</strong>-1 is a network base station that allows full control of your<br />
components. Once installed to the network, and a button is pressed<br />
on the remote, a command is transferred over the customer’s network<br />
to the <strong>MRX</strong>-1 which sends IR, RS232 or Relay commands to<br />
the devices you specify. Note that the <strong>MRX</strong>-1 can only be utilized<br />
by URC Network <strong>Control</strong>s.<br />
1. Connect the Ethernet cable (RJ45) to the rear of the <strong>MRX</strong>-1 and<br />
into the network router.<br />
2. Connect your laptop into the same network as the <strong>MRX</strong>-1.<br />
3. Plug flashers into any of the six flasher ports on the rear of the<br />
<strong>MRX</strong>-1. If you utilize IR output #6, you must use the pink<br />
sleeved emitter. IR Output #6 is a dual purpose port, it can be<br />
used for IR control or to connect the RFTX-1 for URC Lighting.<br />
Page 4
Optimizing IR Flasher Levels<br />
<strong>MRX</strong>-1 BASE STATION<br />
Test a few commands for each device before fixing the flasher in<br />
place on the front panel of a device.<br />
Since TiVo, Replay TV, Satellite Receivers and Cable Boxes are all<br />
extremely sensitive to IR overload or saturation, you should test<br />
them thoroughly. Put up the on screen guide and test the navigation<br />
arrows. Compare operation via RF to the original remote control.<br />
Operation should be identical. If operation is inconsistent or sluggish,<br />
lower the IR line output and/or reposition the flasher.<br />
If you still have sluggish operation, check that the remote control is<br />
set to a particular LINE OUT, rather than ALL. When IR commands<br />
are sent to all the flashers in a cabinet, you can have difficulty<br />
adjusting the IR Output. Reprogram the remote control to send IR<br />
commands only via a specific (1-6) Line Output, then readjust the<br />
IR Line Output level.<br />
Note: Line 6 is a dual port and requires the included sleeved emitter<br />
for long term IR use.<br />
1. Connect an IR emitter to each IR output and run the emitter<br />
wire to the front panel of each component. DO NOT STICK the<br />
emitter in place. ADJUST the level first.<br />
2. Adjust each of the IR Output levels with the included adjustment<br />
tool for best operation . If the component operates best at<br />
minimum level, but is still operating sluggishly or intermittently,<br />
move the emitter farther away from the components IR sensor.<br />
IR Outputs:These ports can be conditioned as discrete, ‘routed’<br />
outputs that only send IR commands to the specific device that<br />
each emitter is attached to. This allows selective control of multiple<br />
same-brand, same-model components, (multiple DVD players, SAT<br />
receivers, etc.) and assures accurate control in that a given component’s<br />
commands are routed only to it’s dedicated IR output and<br />
emitter, preventing IR splash from multiple emitters flashing at the<br />
same time. Port #6 is a dual port with the RFTX-1 and requires a<br />
sleeved emitter when in use as an IR emitter. POLARITY: Tip=IR<br />
data, Sleeve=GND.<br />
Page 5
Integrating Optional RFTX-1 to control URC Lighting<br />
RFTX-1<br />
<strong>MRX</strong>-1 BASE STATION<br />
The RFTX-1 provides control of the URC Lighting<br />
1. Simply plug the RFTX-1 with the 10’ pink connecting cable<br />
(included with the RFTX-1) into the <strong>MRX</strong>-1 pink fixed port #6.<br />
2. Set the RFTX-1 to either 418MHz or 433MHz.<br />
Select either<br />
418MHz or<br />
433MHz<br />
3. Set the URC Lighting Device in the CCP Editor to Network and<br />
set the IR output to Port #6.<br />
4. Download to the MX remote and begin controlling your lights.<br />
Page 6
<strong>MRX</strong>-1 BASE STATION<br />
Integrating Optional Video or Voltage Sensors<br />
Voltage Power Sensor VS-1006<br />
The VS-1006 Voltage Power Sensor allows voltage output of a system<br />
component to be used to monitor that component’s ON/OFF<br />
status for power management when the device does not have discrete<br />
commands or a composite video output is not available for<br />
video sensing. Some components provide 12V Status outputs while<br />
with other applications, a DC power supply plugged into a component’s<br />
switched outlet can be used to provide device status.<br />
Connections<br />
<strong>Control</strong> Voltage Out/Switched AC Out (VS-1006)<br />
When using a switched AC outlet, an AC or DC power supply<br />
adapter can be used to trigger a VS-1006 Voltage Sensor. Using AC<br />
or unregulated DC adapters is recommended given the instant<br />
ON/OFF characteristics such supplies. Regulated DC adapters are<br />
slower to respond when turned on and off and are therefore not<br />
considered ideal for status sensing. RATING: 3-25V AC or DC.<br />
1. Using a two conductor stranded 24-14 AWG wire, connect the<br />
<strong>Control</strong> Voltage Out of the sensed device, or stripped ends of a<br />
Power Adapter, to the Two-Pin Plug In Connector on the VS-1006.<br />
Polarity is not critical with the VS-1006, as it can sense AC or DC.<br />
2. If using a Power Adapter, plug it in to the Switched Outlet on the<br />
Sensed Device.<br />
3. Connect the 4-circuit mini plug from the VS-1006 to the appropriate<br />
Video or Voltage Sensor Input on the <strong>MRX</strong>-1 Rear Panel.<br />
4. Once the system has been powered up, the VS-1006 Power LED<br />
should illuminate Red.<br />
5. To test Voltage Sensing, turn the Sensed Device on. The Sensor<br />
LED on the <strong>MRX</strong>-1 front panel should illuminate in blue. Turn<br />
the Sensed Device off and the LED should turn off as well. If not,<br />
check the connections and measure the device control out or<br />
power adapter with a volt meter to confirm voltage output.<br />
Current Sensing AC Outlet (VS-1006)<br />
1. Connect the Power cord from the sensed device to a sensed AC<br />
outlet on a current sensing AC outlet.<br />
2. Using two-conductor stranded 24-14AWG wire, connect the con-<br />
Page 7
<strong>MRX</strong>-1 BASE STATION<br />
trol voltage out of the current sensor to the two-pin plug-in connector<br />
on the VS-1006. The VS-1006 can sense AC or DC so<br />
polarity is not critical.<br />
3. Connect the 4-circuit mini plug from the VS-1006 to the sensor<br />
input on the <strong>MRX</strong>-1 rear panel.<br />
4. Plug the power cord on the current sensing device into an<br />
unswitched AC outlet.<br />
5. Once the system has been powered up, the VS-1006 Power LED<br />
should illuminate Red.<br />
6. To test Voltage Sensing, turn the Sensed Device on. The Sensor<br />
LED on the <strong>MRX</strong>-1 front panel should illuminate in blue. Turn<br />
the Sensed Device off and the LED should turn off as well. If not,<br />
check the connections and measure the device control out with a<br />
volt meter to confirm voltage output. Also confirm that the<br />
Sensed Device’s Power Cord is connected to a Sensed Outlet.<br />
VID-6 Video Sensor Cable<br />
The Video Sensor Cable VID-6 is a special cable for sensing composite<br />
video. When composite video is detected, the <strong>MRX</strong>-1 recognizes<br />
that the connected device is ON. System Power ON/OFF<br />
macros, conditional IF/ELSE Smart Macros and other control modes<br />
are typically associated with the status of these sensor inputs. When<br />
an ON condition is detected at the sensor input, the corresponding<br />
Front Panel Sensor LED will illuminate in blue to indicate the ON<br />
condition. Not all devices turn the composite video output off when<br />
in standby, some switch to a black screen. A black screen looks off<br />
and protects some types of video displays from ‘burn in’, but there<br />
is still a sync code present that is not compatible with video sensing<br />
for ON/OFF status. For devices that output a black screen, use a<br />
Voltage Power Sensor from a switched outlet (or status output on the<br />
device if available), a sensed AC outlet that outputs 12V or discrete<br />
IR ON/OFF codes or RS-232 commands.<br />
Connection<br />
Composite Video (VID-6 Video Sensor Cable)<br />
1. Connect the MALE end of a single male to two female RCA plug<br />
‘Y’ Adapter to the Composite Video Out on the device to be<br />
sensed.<br />
2. Connect the RCA Plug end of the VID-6 Sensor Cable to one of<br />
the jacks on the Y Adapter.<br />
3. Connect the 4-circuit mini plug end of the VID-6 cable to the<br />
Sensor input on the <strong>MRX</strong>-1 Rear panel.<br />
4. Connect the Second Jack on the Y adapter to the appropriate<br />
Page 8
<strong>MRX</strong>-1 BASE STATION<br />
Composite Video Input (A/V Receiver DVD, VCR input, etc) using<br />
a shielded RCA to RCA video cable with gold ends.<br />
5. To Test Video Sensing, once the system has been powered up,<br />
turn the sensed device on. The Sensor LED on the <strong>MRX</strong>-1 front<br />
panel, should illuminate in Blue. Turn the Sensed device off. The<br />
LED should turn off. If not, check connections and confirm the<br />
device is not outputting a ‘black screen’ or some other video<br />
sync information when off.<br />
6. Confirm Video Signal to the A/V Receiver by selecting the Input<br />
to which the Sensed device is connected. (Be sure TV or video<br />
display is on, connected and switched to the appropriate input.)<br />
Programming<br />
To program a Video or Voltage Sensor into CCP <strong>MRX</strong>-1:<br />
1. Click on the IF/Else icon within the macro window to add an<br />
IF/Else statement.<br />
2. Double click on the IF(True) line to open the IF Setting window.<br />
3. Click the Sensor button.<br />
4. Select the <strong>MRX</strong>-1 base station from the Base station drop down<br />
list.<br />
5. Click on the Sensor drop down list to select Sensor 1 and check<br />
whether the Sensor should check if it is on or off.<br />
6. Press Ok to save the configuration.<br />
7. Now the macro will Sense if a device is on.<br />
Page 9
<strong>MRX</strong>-1 BASE STATION<br />
Integrating RS-232 and Relays<br />
RS-232<br />
There are two versions of the RS232 cable. The RS232M has a male<br />
DB9 connector and the RS232F has a female DB9 connector. Be<br />
sure to verify the proper cable configuration by visually inspecting<br />
the RS232 terminal on the device to be controlled. Some devices<br />
will use other types of connectors such as RJ45 and mini jacks.<br />
Custom cables can be made using the pin-out for the <strong>MRX</strong>-1 jacks.<br />
Please refer to the devices’ owner’s manual for the pin-out of RS232<br />
Terminals that are not DB9 connectors. (<strong>Universal</strong> <strong>Remote</strong> <strong>Control</strong><br />
Part #’s: RS232M-male DB9 and RS232F-female DB9). Polarity<br />
(RS232): Tip = no connection, Ring 1 =TX (red wire), ring 2 = RX<br />
(white wire), ring 3=GND (shield).<br />
1. Connect the 3.5 mono 4-circuit mini plug end of a URC RS232<br />
Male or Female to the appropriate RS232 programmable output<br />
jack of the <strong>MRX</strong>-1 Network Base station.<br />
2. Connect the DB9 Connector to the device RS232 Terminal.<br />
Tighten the thumb screws to secure the connection.<br />
Once the connections have been made, the RS232 device properties<br />
need configuring before RS-232 communication can be established.<br />
The Baud Rate, Data bits, Parity and Stop Bit is supplied in<br />
the manufacturer’s manual and must be entered into CCP. Once all<br />
the information has been supplied, each of the entered RS-232<br />
commands can be tested to ensure communication and accuracy.<br />
1. Within CCP, double click on <strong>MRX</strong>-1 within the House Designer<br />
Tree.<br />
2. Double-click on <strong>MRX</strong>-1 in the House Designer tree.<br />
3. An image of the <strong>MRX</strong>-1 appears in the middle window.<br />
Page 10
<strong>MRX</strong>-1 BASE STATION<br />
4. Click on the <strong>MRX</strong>-1 in the Model Designer window.<br />
5. Click on the "Properties" tab at the lower right side of CCP<br />
6. Click on RS-232 Port #1 on the actual <strong>MRX</strong>-1 image.<br />
7. The Port 1 RS-232 Properties appear in the Properties tab.<br />
8. Set the Baud Rate, Data, Parity and Stop Bits for the connected<br />
RS-232 component. (The manufacturer of the RS-232 component<br />
will provide the correct values.)<br />
9. Click on RS-232 Port 2 and repeat the process if it will be controlling<br />
a component RS-232.<br />
Relay<br />
When connecting the <strong>MRX</strong>-1 Relay, the controlled device end may<br />
be terminated with a plug or connected to wire terminals. In either<br />
case, the connections to the <strong>MRX</strong>-1 Relays are the same for a given<br />
switch closure configuration. Discrete commands for open and<br />
close are programmable for three modes of operation: Latching,<br />
where the relay stays closed until told to open, (or stays open until<br />
told to close), Timed Momentary, where the relay can be set to stay<br />
open or closed for a specific duration, or Momentary, where the<br />
relay stays open or closed for as long as the remote button is<br />
pressed and held. DURATION (TIMED MOMENTARY): .1 – 99.9<br />
seconds. RATING: 30V;.5A<br />
NO (Normally Open)<br />
1. For a device that PROVIDES VOLTAGE for use with a switch closure:<br />
a. Connect the +V Terminal on the controlled device to the Relay<br />
NO terminal on the <strong>MRX</strong>-1 rear panel, using one of the<br />
included three -pin plug-in connectors.<br />
b. Connect the Ground Terminal on the controlled device to the<br />
Relay COM Terminal using the same plug-in connector.<br />
2. For a device that REQUIRES EXTERNAL CONTROL VOLTAGE:<br />
a. Splice the ends of a 12 volt wall adapter and connect it to the<br />
Relay COM Terminal.<br />
b. Connect the Relay NO Terminal to the +V Terminal on the<br />
controlled device.<br />
c. Connect the GND terminal on the controlled device to the<br />
GND terminal on the <strong>MRX</strong>-1 rear panel.<br />
When a properly programmed <strong>MRX</strong>-1 compatible remote sends an<br />
ON command, (latching, momentary or timed) RELAY will close<br />
and the controlled device will respond (turn ON an amplifier or<br />
powered sub, raise a lift, drop a screen, open or close drapes etc.).<br />
When the OFF command (latching, press and hold or time) is sent,<br />
RELAY will OPEN and the controlled device will respond (reverse<br />
previously switched mode). WIRE GAUGE: 24-14 AWG two-conductor<br />
stranded; MAX LOAD: 30V; .5A.<br />
Page 11
NC (Normally Closed)<br />
1. For a device that PROVIDES VOLTAGE for use with a switch closure:<br />
a. Connect the +V Terminal on the controlled device to the Relay<br />
NC Terminal on the <strong>MRX</strong>-1 rear panel, using one of the included<br />
Three-pin plug-in connectors.<br />
b. Connect the GROUND Terminal on the controlled device to the<br />
RELAY COM Terminal using the same plug-in connector.<br />
2. For a device that REQUIRES EXTERNAL CONTROL VOLTAGE:<br />
a. Splice the ends of a 12 volt wall adapter and connect it to the<br />
Relay COM Terminal.<br />
b. Connect the RELAY NC Terminal to the +V Terminal on the controlled<br />
device.<br />
c. Connect the GND Terminal on the controlled device to the<br />
GND terminal on the <strong>MRX</strong>-1 rear panel.<br />
When a properly programmed <strong>MRX</strong>-1 compatible remote sends and<br />
ON command (latching, press and hold or timed), RELAY will<br />
OPEN and the controlled device will respond with an interruption<br />
to it’s normal action. When the OFF command (latching, press and<br />
hold or timed) is sent, RELAY will CLOSE and the controlled device<br />
will respond by resuming its normal action. WIRE GAUGE: 24-14<br />
AWG two-conductor stranded; MAX LOAD: 30V; .5A.<br />
Page 12
Network Discovery<br />
<strong>MRX</strong>-1 BASE STATION<br />
Adding a <strong>MRX</strong>-1 in CCP, modifying it’s Settings and testing<br />
RS-232 and Relay Commands.<br />
1. Inside the CCP editor, select Program then Configure Home.<br />
2. Add a <strong>MRX</strong>-1 base station and the properties window opens.<br />
3. Type in a descriptive Name for the <strong>MRX</strong>-1 unit and select a RFID<br />
if using a RFX-250.<br />
4. Either type in the MAC address which can be found on a sticker<br />
located on the bottom of the unit or click on the Discover button.<br />
Status<br />
5. The Discover window opens to reveal a list of connected <strong>MRX</strong>-1<br />
units. Highlight the preferred <strong>MRX</strong>-1 MAC address and select<br />
Apply. The Discover window closes.<br />
Page 13
<strong>MRX</strong>-1 BASE STATION<br />
6. Now the <strong>MRX</strong>-1’s MAC address will populate the MAC address<br />
field.<br />
7. Within the Port Information field, type in the devices designated<br />
to each IR and Serial port.<br />
8. Press the Status button to open the Status and Firmware window.<br />
9. The Status and Firmware window opens to reveal the current<br />
description, MAC ID, IP Address, RFID, Date and Time, Firmware<br />
version and update button.<br />
Page 14
<strong>MRX</strong>-1 BASE STATION<br />
10. From the Status window, press the Settings button to open the<br />
Settings window.<br />
11. The Settings window allows changes to be made to the description<br />
name, a dynamic or static IP address, or the Date & Time.<br />
Press Save to return to the Status window.<br />
12. From the Status window, press the Test button to open the Test<br />
window.<br />
13. The Test window provides realtime RS-232 and Relay command<br />
testing. Press Ok to return to the Status screen.<br />
The Serial Command field box<br />
allows you to enter RS-232<br />
commands in either ASCII, HEX<br />
or DECIMAL then Test and see<br />
it’s result.<br />
The Relay Command field<br />
allows for device command<br />
testing.<br />
Page 15
Overview of IR Routing<br />
<strong>MRX</strong>-1 BASE STATION<br />
There are several considerations to take into account when you are<br />
installing an <strong>MRX</strong>-1 to control an array of identical components:<br />
1. Each identical component must receive IR commands ONLY<br />
from a dedicated Flasher affixed to its front panel or a rear panel<br />
direct IR input. The SIGNAL of the remote should be set to<br />
Network or RF ONLY for each identical component. IR can still<br />
be utilized for other devices in your system!<br />
2. When connecting a flasher from the <strong>MRX</strong>-1 to your component<br />
make sure to notate the Flasher Output Number being used.<br />
Network or RF Setup in CCP<br />
1. Open the RF Setup Window in CCP<br />
The RF Setup window opens after selecting RF <strong>Control</strong> from the<br />
Program Menu. The RF Setup window is composed of a “spread<br />
sheet” of options for EACH of your devices.<br />
2. Adjust the Signal For Each of the Identical Devices<br />
The RF Setup window enables you to adjust the Signal output for<br />
each device individually, by clicking on the intersection of a row<br />
and a column and then selecting Network or RF (for optional RFX-<br />
250) from the three options shown in the pull down list box.<br />
Page 16
<strong>MRX</strong>-1 BASE STATION<br />
Select Network or RF (for optional RFX-250) from the three<br />
options shown for EACH of the identical TVs. You may leave the<br />
other components with no flashers set to IR.<br />
3. Select a Receiver to <strong>Control</strong> Identical Devices<br />
Choose a Base station to send commands over the Network or via<br />
RF to control multiple components.<br />
4. Adjust the IR Outputs For Each of the Identical Devices<br />
The RF Setup window enables you to adjust which Flashers output<br />
by the remote control for each device individually, by clicking on<br />
the intersection of a row and a column and then selecting Ports 1-6<br />
from the seven options shown in the pull down list box.<br />
Select the correct IR Output (refer to your connection notes) for<br />
EACH of the identical TVs. You may leave the other components of<br />
the system set to ALL. In the figure below, each device is set to a<br />
specific flasher.<br />
5. Close the RF window and Download to the <strong>Remote</strong>.<br />
Page 17
<strong>MRX</strong>-1 BASE STATION<br />
IR Over Narrow Band via Optional RFX-250<br />
Note: RF remotes via RFX-250 can only control IR components.<br />
RS232, Relay and Sensor control are not available to RF remotes.<br />
1. Power on all AV components, lower all dimmers to 50% and<br />
power on anything that may create RF Interference (particularly<br />
devices with high speed microprocessors or hard drives).<br />
2. Check that the address wheel on the back of the <strong>MRX</strong>-1 is set to<br />
ID#0 (the interference “sniffing” position). If it is not, use the<br />
included small flat blade screwdriver to set the RF ID# to 0.<br />
3. Connect the <strong>MRX</strong>-1 to its DC wall adapter and plug the wall<br />
adapter into a live AC outlet. Place the <strong>MRX</strong>-1 in a convenient<br />
central location in the equipment rack. Unlike an MRF-250, the<br />
<strong>MRX</strong>-1 can be placed next to components with hard drives or<br />
high speed microprocessors. There is no RF circuitry inside the<br />
<strong>MRX</strong>-1 itself.<br />
4. Connect the RFX-250 to the <strong>MRX</strong>-1’s RF INPUT jack as shown.<br />
When connecting a single RFX-250 to the <strong>MRX</strong>-1 utilize the cable with 3.5<br />
mm plugs on both ends. When you need a longer wire or are connecting<br />
up to three RFX-250s, use a cable with tinned ends or splice it. Cable can<br />
be extended as much as 200’, then connected to the spliced end of a<br />
3.5mm cable.<br />
Page 18
<strong>MRX</strong>-1 BASE STATION<br />
5. Observe the RF LED of the RFX-250. Cup your hand over the<br />
RFX-250’s RF LED. If it is glowing or flickering you must relocate<br />
the RFX-250 to a location where the LED does not flicker.<br />
6. Observe the STATUS LED of the <strong>MRX</strong>-1. It is a little more sensitive<br />
than the RFX-250. If you see any flickering of this LED, move<br />
the RFX-250 to a new location. If your installation location simply<br />
doesn’t offer you any choice and you are detecting interference<br />
everywhere you place the RFX-250, you have three last<br />
resort options:<br />
a. Remove the RFX-250’s antenna. This will reduce the<br />
range enormously, but may still be enough for this client.<br />
b. Extend a wire to another room. Try this over the floor<br />
first, before attempting to conceal the wire.<br />
c. Admit defeat and install a “pointing again” IR repeater<br />
system. If no buttons are pressed on any remote control,<br />
no valid RF transmissions are being received.<br />
7. Once you have found a location that is absolutely clean with all<br />
components on, test to see if the range is adequate and that<br />
macro reliability is perfect. Start with the antenna angle set to 45<br />
degrees and positioned so that the long side of the antenna is facing<br />
the customer’s favorite seating position. When testing, set<br />
both the remote and the <strong>MRX</strong>-1 to the same VALID RF ID#. Keep<br />
in mind that zero (0) is not a valid RFID#. Watch the STATUS<br />
LED on <strong>MRX</strong>-1 - it should light every time you press a button on<br />
the remote. This will tell you that the signal was received and<br />
understood. You can ignore the RF LED on the RFX-250 (it only<br />
indicates that a signal was received, not that it was understood).<br />
8. If the range is inadequate, you may extend the wire to any area<br />
that is not getting good results and place an additional RFX-250<br />
in that area. Up to three RFX-250s can be connected to one<br />
<strong>MRX</strong>-1.<br />
9. Should you need more than six IR Outputs, connect as many as<br />
three different <strong>MRX</strong>-1s to one RFX-250 in a daisy chain using the<br />
supplied cable. To preserve addressability, set each <strong>MRX</strong>-1 to a<br />
different RF ID number. Remember “0” (zero) is not a valid RF<br />
ID.<br />
Page 19
<strong>MRX</strong>-1 BASE STATION<br />
Connecting multiple <strong>MRX</strong>-1’s via RF Out<br />
Multiple <strong>MRX</strong>-1 units can be daisy chained to control an unlimited<br />
amount of components in a home theater equipment rack. Follow<br />
the procedure below to daisy chain two or more <strong>MRX</strong>-1 units.<br />
1. Connect the RFX-250 to the RF In 3.5 mm jack of the first <strong>MRX</strong>-1<br />
unit.<br />
2. Use another 3.5mm cable included with each <strong>MRX</strong>-1 to connect<br />
to RF Out of the first <strong>MRX</strong>-1 to RF In of the second.<br />
3. Repeat Step 2 for multiple <strong>MRX</strong>-1 units.<br />
RF IN: using the included 10’ three circuit mini-mini plug cable.<br />
POLARITY: Tip=+5VDC; RING=data; SLEEVE=GND.<br />
RF Out:TIP=data; Sleeve=GND.<br />
Page 20
<strong>MRX</strong>-1 BASE STATION<br />
Frequently Asked Questions<br />
Can I use flasher/emitters that I have already installed in the system<br />
to connect to the <strong>MRX</strong>-1?<br />
Yes, the flashers are compatible if they use 3.5mm mono mini plugs<br />
with the same polarity (Tip is data, sleeve is ground). It is important<br />
to notate the RFTX-1 shared port utilizes a sleeved emitter for long<br />
term use.<br />
I’m getting inconsistent operation regardless of flasher level or<br />
position.<br />
Some components are easily overloaded with IR from nearby flashers.<br />
Prevent IR from affecting the problem component from other<br />
flashers by setting the device to a specific IR Line Output instead of<br />
ALL, then adjust the Line Output.<br />
I am unable to control my URC Lighting Dimmer/Switch with the<br />
<strong>MRX</strong>-1. Now what?<br />
Make sure the RF switch on the RFTX-1 is set to the correct frequency<br />
for the URC Dimmer or Switch. URC Lighting Models<br />
MRFA is 418MHz and MRFB is 433MHz.<br />
How do I update the firmware?<br />
Make sure the <strong>MRX</strong>-1 is connected to the Network then open CCP<br />
and click on the Firmware button located<br />
How can I set my <strong>MRX</strong>-1 to factory default?<br />
Look on the bottom of the <strong>MRX</strong>-1 and remove the cover plate to<br />
reveal a reset button. Reboot the unit by pressing the reset button<br />
once or press and hold for three seconds to factory default the unit.<br />
Specifications<br />
Network: One 10/100 Ethernet port<br />
Relay: One relay configurable to be NO, NC or Momentary<br />
Sensor: One sensor supports Video or Voltage sensing via URC sensors.<br />
RS-232: Two RS-232 ports support TX, RX and GND two way communication<br />
via URC cables.<br />
IR: Six adjustable IR ports enable the included URC emitters to<br />
control IR devices Note: 6th IR Output requires the included<br />
sleeved emitter (identified by a pink connector), since it can optionally<br />
be used to connect an RFTX-1<br />
Weight: 8.4 oz.<br />
Size: 248 x 120mm x28mm<br />
Power: 12v External Power Supply<br />
Page 21
<strong>MRX</strong>-1 BASE STATION<br />
USA Limited Warranty Statement<br />
Your <strong>Universal</strong> <strong>Remote</strong> <strong>Control</strong>, when delivered to you in new<br />
condition, is warranted against defects in materials or workmanship<br />
as follows: UNIVERSAL REMOTE CONTROL, INC.<br />
warrants this product against defects in material or workmanship<br />
for a period of one (1) year and as set forth below.<br />
<strong>Universal</strong> <strong>Remote</strong> <strong>Control</strong> will, at its sole option, repair the<br />
product using new or comparable rebuilt parts, or exchange the<br />
product for a comparable new or rebuilt product. In the event<br />
of a defect, these are your exclusive remedies.<br />
This Limited Warranty covers only the hardware components<br />
packaged with the Product. It does not cover technical assistance<br />
for hardware or software usage and it does not cover any<br />
software products whether or not contained in the Product; any<br />
such software is provided "AS IS" unless expressly provided for<br />
in any enclosed software Limited Warranty.<br />
To obtain warranty service, you must deliver the product,<br />
freight prepaid, in its original packaging or packaging affording<br />
adequate protection to <strong>Universal</strong> <strong>Remote</strong> <strong>Control</strong> at the address<br />
provided in the Owner's <strong>Manual</strong>. It is your responsibility to<br />
backup any macro programming, artwork, software or other<br />
materials that may have been programmed into your unit. It is<br />
likely that such data, software, or other materials will be lost<br />
during service and <strong>Universal</strong> <strong>Remote</strong> <strong>Control</strong> will not be<br />
responsible for any such damage or loss. A dated purchase<br />
receipt, Bill of Sale, <strong>Installation</strong> Contract or other verifiable<br />
Proof of Purchase is required. For product support and other<br />
important information visit <strong>Universal</strong> <strong>Remote</strong> <strong>Control</strong>'s website:<br />
http://www.<strong>Universal</strong><strong>Remote</strong><strong>Control</strong>.com or call the <strong>Universal</strong><br />
<strong>Remote</strong> <strong>Control</strong> Customer Service Center (914) 835-4484.<br />
This Limited Warranty only covers product issues caused by<br />
defects in material or workmanship during ordinary consumer<br />
use. It does not cover product issues caused by any other reason,<br />
including but not limited to product issues due to commercial<br />
use, acts of God, third-party installation, misuse, limitations<br />
of technology, or modification of or to any part of the<br />
<strong>Universal</strong> <strong>Remote</strong> <strong>Control</strong> product. This Limited Warranty does<br />
not cover <strong>Universal</strong> <strong>Remote</strong> <strong>Control</strong> products sold as USED, AS<br />
IS, REFURBISHED, so-called "B STOCK" or consumables (such<br />
as batteries). This Limited Warranty is invalid if the factoryapplied<br />
serial number has been altered or removed from the<br />
product. This Limited Warranty is valid only in the United States<br />
of America. This Limited Warranty specifically excludes products<br />
sold by unauthorized resellers.<br />
Page 22
Information To The User<br />
This equipment has been tested and found to comply with<br />
the limits for a Class B digital device, pursuant to part 15 of<br />
the FCC Rules. These limits are designed to provide reasonable<br />
protection against harmful interference in a residential<br />
installation. This equipment generates, uses and can radiate<br />
radio frequency energy and, if not installed and used in<br />
accordance with the instructions, may cause harmful interference<br />
to radio communications.<br />
However, there is no guarantee that interference will not<br />
occur in a particular installation. If this equipment does cause<br />
harmful interference to radio or television reception, which<br />
can be determined by turning the equipment off and on, the<br />
user is encouraged to try to correct the interference by one<br />
more of the following measures:<br />
Æ Reorient or relocate the receiving antenna.<br />
Æ Increase the separation between the equipment and<br />
receiver.<br />
Æ Connect the equipment into an outlet on a circuit different<br />
from that to which the receiver is connected.<br />
Æ Consult the dealer or an experienced radio/TV technician<br />
for help.<br />
Warning<br />
Changes or modifications not expressly approved by the manufacturer<br />
could void the user's authority to operate the equipment.<br />
Note : The manufacturer is not responsible for any Radio or TV<br />
interference caused by unauthorized modifications to this<br />
equipment. Such modifications could void the user's authority<br />
to operate the equipment.<br />
Page 23
COMPLETE<br />
<br />
CONTROL<br />
<strong>Universal</strong> <strong>Remote</strong> <strong>Control</strong> ®<br />
500 Mamaroneck Avenue, Harrison, NY 10528<br />
Phone: (914) 835-4484 Fax: (914) 835-4532<br />
www.universalremote.com