Durst AC 800 Manual
Durst AC 800 Manual
Durst AC 800 Manual

You also want an ePaper? Increase the reach of your titles
YUMPU automatically turns print PDFs into web optimized ePapers that Google loves.
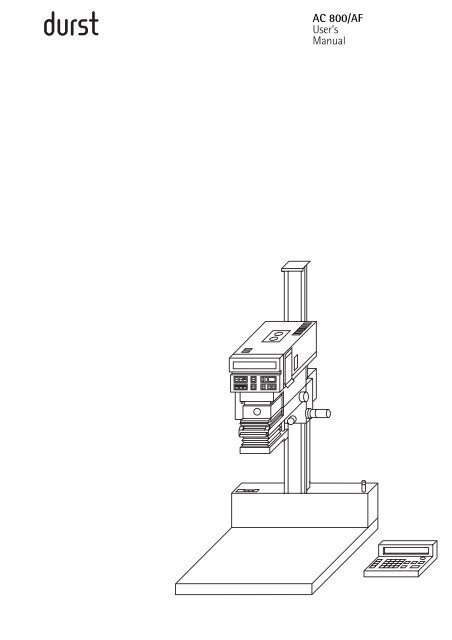
<strong>AC</strong> <strong>800</strong>/AF<br />
User’s<br />
<strong>Manual</strong>
Instructions for safe use of the <strong>Durst</strong> <strong>AC</strong> <strong>800</strong>/AF<br />
There are no hazards, specifically electrical hazards,<br />
under proper conditions of use. Extra precautions for<br />
the safe use of the equipment are given below.<br />
a)<br />
The enlarger <strong>Durst</strong> <strong>AC</strong> <strong>800</strong>/AF is fitted with an earth wire<br />
for protection against electrical shock, which also ensures<br />
electro-magnetic safety (EMS/interference suppression).<br />
This earth wire can however only fulfil its function if your<br />
mains connection (socket) is also earthed. Have your mains<br />
connection checked by a qualified electrician for an earth<br />
connection.<br />
b)<br />
Extra protection is offered by a ground fall interruptor,<br />
which an electrician can install in your lab.<br />
c)<br />
Avoid continuous high relative humidity and condensation.<br />
Protect the equipment from splashes of water and<br />
chemicals.<br />
d)<br />
To ensure proper functioning, maintain the following operating<br />
conditions:<br />
relative humidity: 5 - 95 % r. h.<br />
ambient temperature: 15 - 30 °C.<br />
e)<br />
Do not make any repairs to the electrical system of the<br />
equipment by yourself. Have them carried out by a service<br />
engineer.<br />
f)<br />
Before opening the power unit, lamp house or disconnecting<br />
cables, make sure that the unit is switched off and<br />
that the mains cable is unpluged.<br />
g)<br />
Danger of injury on AF version. Persons must keep clear of<br />
moving parts during motorized adjustment, due to the<br />
danger of injury.<br />
h)<br />
Before changing the lamp, switch off the equipment, let it<br />
cool down and pull out the mains plug. There is a risk of<br />
injury by burning when changing lamps.<br />
i)<br />
The manufacturer does not accept liability for any damage<br />
caused by neglect of the safety precautions.<br />
2 <strong>Durst</strong> <strong>AC</strong> <strong>800</strong>/AF-03/96
Congratulations on your purchase of this <strong>Durst</strong> equipment.<br />
It is the result of intensive research and development by<br />
<strong>Durst</strong> Phototechnik AG, Brixen, Italy.<br />
The <strong>Durst</strong> company has been attested by the German<br />
Society for the Certification of Quality Assurance Systems<br />
for conformity of its products to Standard ISO 9001/EN<br />
29001, Certificate No. 44 411 - 01 dated 30.04.93, which<br />
guarantees the highest quality in development and manufacture.<br />
<strong>Durst</strong> equipment is carefully inspected and tested<br />
before delivery.<br />
The technology and specification represent state-of-theart<br />
optics and electronics. New developments and enhancements<br />
are continuously incorporated; the diagrams,<br />
dimensions or technical data shown in this manual may<br />
therefore have been modified to take account of the latest<br />
advances.<br />
This manual describes the optimum operation of the<br />
machine, and contains basic instructions on handling,<br />
potential faults and operating mistakes; it is advisable to<br />
read it carefully before putting the instructions into practice.<br />
If you have any queries or require extra information,<br />
please contact your local <strong>Durst</strong> Service agent.<br />
Please help us to improve this manual, and send us your<br />
comments on the two pages at the end of the manual.<br />
<strong>Durst</strong> Phototechnik<br />
AG<br />
Brixen, Italy<br />
<strong>Durst</strong> <strong>AC</strong> <strong>800</strong>/AF-03/96 3
Index<br />
1.0 Introduction and brief description<br />
1.1 Description of the <strong>Durst</strong> <strong>AC</strong> <strong>800</strong> and <strong>AC</strong> <strong>800</strong> AF<br />
enlargers<br />
1.2 Technical data<br />
1.3 Items included<br />
2.0 Assembly and installation of enlarger<br />
3.0 Specific enlarger functions<br />
3.1 Autofocus<br />
3.2 Subtractive exposure control with pre-filtration<br />
3.3 Basic calibration by reflection densitometer<br />
3.4 Automatic colour filtration by integral reading<br />
method<br />
3.5 Automatic colour and density under-corrections<br />
3.6 „FXFF“ function: fixed exposure time and filtration<br />
3.7 „VXFF“ function: automatic density control and<br />
fixed filtration<br />
4.0 Description of functions of operating elements<br />
4.1 The colour head<br />
4.2 The transformer housing<br />
4.3 The remote control (accessory)<br />
5.0 The memory system of the <strong>Durst</strong> <strong>AC</strong> <strong>800</strong>/<br />
<strong>AC</strong> <strong>800</strong> AF<br />
5.1 „CAL“ basic memory<br />
5.2 „XCP“ paper slope<br />
5.3 Slope for under-exposed „LN“ (Light Negative)<br />
negatives or over-exposed slides<br />
5.4 Slope for over-exposed „DN“ (Dark Negative)<br />
negatives or under-exposed slides<br />
5.5 Colour and density under-corrections<br />
6.0 Calibrating the <strong>Durst</strong> <strong>AC</strong> <strong>800</strong>/<strong>AC</strong> <strong>800</strong> AF<br />
6.1 Preview<br />
6.2 Table of factory calibrations for the supplied<br />
test negatives<br />
6.3 Switching on the enlarger/preparations<br />
6.4 Autofocus and focus variator<br />
(only for <strong>Durst</strong> <strong>AC</strong> <strong>800</strong> AF)<br />
6.4.1 Preparations<br />
6.4.2 Steps for setting the autofocus<br />
6.4.3 Subsequent correction<br />
6.4.4 <strong>Manual</strong> focusing<br />
6.4.5 Setting the focus variator to a raised/lowered<br />
projection level<br />
6.5 Calibrating a memory channel for colour<br />
negatives/slides<br />
6.5.1 Making preparations<br />
6.5.2 Setting pre-filter arrangement<br />
6.5.3 Activating the basic calibration<br />
6.5.4 Adapting the exposure time for individual filters<br />
with pre-filters<br />
6.5.5 Continuing and finishing basic calibration<br />
6.5.6 Calibrating for maximum „XCP“ enlargement<br />
(compensation of reciprocity effect)<br />
6.5.7 Calibrating for under-exposed „LN“ negatives/<br />
over-exposed slides<br />
6.5.8 Calibrating for over-exposed „DN“ negatives/<br />
under-exposed slides<br />
6.5.9 Automatically ending the calibration mode<br />
Page<br />
6<br />
6<br />
7<br />
8<br />
9<br />
14<br />
14<br />
14<br />
15<br />
15<br />
16<br />
16<br />
16<br />
17<br />
17<br />
18<br />
18<br />
19<br />
19<br />
19<br />
20<br />
20<br />
20<br />
22<br />
22<br />
23<br />
24<br />
25<br />
25<br />
26<br />
29<br />
31<br />
31<br />
32<br />
32<br />
32<br />
33<br />
33<br />
34<br />
35<br />
36<br />
38<br />
39<br />
4 <strong>Durst</strong> <strong>AC</strong> <strong>800</strong>/AF-03/96
Page<br />
6.6 Calibrating a memory channel for black/white<br />
enlargements<br />
6.6.1 Preparations<br />
6.6.2 Setting pre-filters<br />
6.6.3 Basic „CAL“ calibration<br />
6.6.4 Calibrating for maximum enlargement (compensation<br />
of „XCP“ reciprocity effect)<br />
6.6.5 Calibrating for under-exposed „LN“ (Light<br />
Negative) negatives/over-exposed slides<br />
6.6.6 Calibrating for over-exposed „DN“ (Dark<br />
Negative) negatives/under-exposed slides<br />
6.6.7 Retrieving and noting the stored figures<br />
6.7 Pre-production test<br />
6.7.1 Pre-production test for colour negatives/slides<br />
6.7.2 Pre-production test for BW negatives<br />
6.8 Adapting memory to production<br />
6.8.1 Correcting colour negatives/slides<br />
6.8.2 Correcting BW negatives<br />
7.0 Practical work<br />
7.1 Preview<br />
7.2 Steps<br />
7.2.1 Switching on<br />
7.2.2 Making preparations<br />
7.2.3 Setting the focus variator<br />
7.2.4 Setting the enlargement<br />
7.2.5 <strong>Manual</strong> colour and density corrections<br />
7.2.6 Printing a different film or paper type<br />
7.2.7 Ending<br />
7.3 Using the „Automatic density control and fixed<br />
filtration“ function („VXFF“ key)<br />
7.4 Using the „Fixed exposure time and filtration“<br />
function („FXFF“ key): producing contact prints<br />
7.5 Distortion control<br />
8.0 Troubleshooting table and explanations of<br />
error warnings<br />
9.0 Maintenance and care<br />
10.0 Special accessories<br />
39<br />
39<br />
40<br />
40<br />
42<br />
43<br />
43<br />
44<br />
46<br />
46<br />
46<br />
47<br />
47<br />
48<br />
49<br />
49<br />
50<br />
50<br />
50<br />
51<br />
52<br />
53<br />
53<br />
53<br />
54<br />
55<br />
56<br />
57<br />
60<br />
61<br />
<strong>Durst</strong> <strong>AC</strong> <strong>800</strong>/AF-03/96 5
Introduction and brief description<br />
1.0<br />
1.1<br />
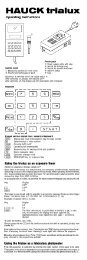
Description of the <strong>Durst</strong> <strong>AC</strong> <strong>800</strong> and <strong>AC</strong> <strong>800</strong> AF<br />
enlargers<br />
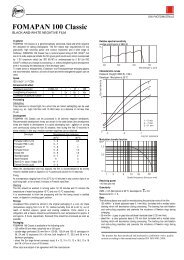
The <strong>Durst</strong> <strong>AC</strong> <strong>800</strong> is a universal microcomputer-controlled<br />
colour enlarger with built-in reflection densitometer for<br />
the automatic calibration of memory channels for colour<br />
and black-and-white negatives as well as transparencies<br />
for all sizes up to 6 x 9 cm (2 1/4 x 3 1/4 in.). The <strong>Durst</strong><br />
<strong>AC</strong> <strong>800</strong> controls the exposure by integrated readings<br />
below the negative stage during the exposure itself. All<br />
further operational characteristics are described in section<br />
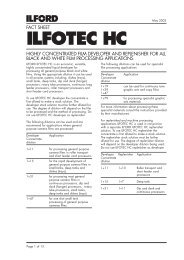
3.0 of this operating manual. The <strong>Durst</strong> <strong>AC</strong> <strong>800</strong> AF enlarger<br />
also incorporates autofocus.<br />
1<br />
<strong>AC</strong> <strong>800</strong><br />
1. Colour head with integrated reflection densitometer.<br />
2. Film-format-related interchangeable mixing box<br />
3. Mechanical focus knob<br />
4. Height adjustment with coarse and fine setting<br />
5. Column with distance and enlargement factors<br />
6. Power unit<br />
7. Baseboard<br />
3<br />
2<br />
4<br />
5<br />
6<br />
7<br />
1<br />
<strong>AC</strong> <strong>800</strong> AF<br />
1. Colour head with integrated reflection densitometer.<br />
2. Film-format-related interchangeable mixing box<br />
3. Autofocus<br />
4. Height adjustment with coarse and fine setting<br />
5. Column with distance and enlargement factors<br />
6. Power unit<br />
7. Baseboard<br />
3<br />
2<br />
4<br />
5<br />
6<br />
7<br />
6 1.0 Introduction<br />
<strong>Durst</strong> <strong>AC</strong> <strong>800</strong>/AF-03/96
1.2<br />
Technical data<br />
Column height:<br />
Total height:<br />
Baseboard size:<br />
Usable baseboard area:<br />
Optical axis/column<br />
distance:<br />
Light tracking:<br />
Exposure control:<br />
Light monitoring:<br />
Calibration system:<br />
Operating modes:<br />
Cooling:<br />
111 cm<br />
113 cm<br />
65 x 65 cm<br />
60 x 56 cm<br />
29 cm<br />
Via fade-proof interchangeable<br />
mirror shafts<br />
(35 mm, 6 x 6 cm, 6 x 9 cm)<br />
Via microprocessors<br />
Mixing shaft measurement<br />
for automatic compensation<br />
of colour temperature shifts<br />
in case of voltage fluctuations<br />
and lamp deterioration<br />
or lamp replacement<br />
Via built-in reflection densitometer<br />
and user’s guide<br />
Colour negatives, colour<br />
transparencies and blackand-white<br />
negatives<br />
cooling fan<br />
Filters: dichroic filters (Y, M, C)<br />
Max. filter density:<br />
<strong>Manual</strong> correction range:<br />
Lens focal lengths:<br />
130 densitometric units<br />
(= D 1.3)<br />
+/- 99 densitometric units<br />
(Y - M - C - D)<br />
50, 80, 100/105 mm<br />
Focusing: <strong>Manual</strong> (<strong>AC</strong> <strong>800</strong>)<br />
Autofocus for 3 focal<br />
lengths (<strong>AC</strong> <strong>800</strong> AF)<br />
Print sizes:<br />
Connection plugs for:<br />
up to 40 x 50 cm<br />
(16 x 20 in.)<br />
Roll paper easel or footswitch,<br />
<strong>AC</strong> <strong>800</strong> Control<br />
remote control, supplementary<br />
socket with supply<br />
voltage<br />
Mains supply: • for 100, 110, 120, 220,<br />
240 volts to be set with<br />
voltage selector switch<br />
• 50 - 60 Hz<br />
Power consumption:<br />
Netweight:<br />
approx. 350 watts<br />
40 kg<br />
<strong>Durst</strong> <strong>AC</strong> <strong>800</strong>/AF-03/96 1.0 Introduction<br />
7
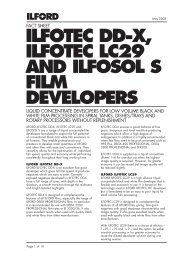
Enlargement factor<br />
Lens<br />
focal length<br />
100/105 mm<br />
80 mm<br />
50 mm<br />
Film size<br />
6 x 9 cm<br />
6 x 6 cm<br />
24 x 36 cm<br />
min.*<br />
1.5 x lin.<br />
1.1 x lin.<br />
4.3 x lin.<br />
max.*<br />
7.3 x lin.<br />
10.3 x lin.<br />
17.8 x lin.<br />
*Guide values<br />
1.3<br />
Items included<br />
<strong>Durst</strong> <strong>AC</strong> <strong>800</strong><br />
consisting of:<br />
1 basic unit both with built-in automatic subtractive<br />
exposure control and built-in reflection densitometer with<br />
baseboard, column and colour head.<br />
1 Cobineg film carrier with a top Bimagla AN glass.<br />
6 x 7 Binema 67 metal mask pair for print sizes up to 6 x 7<br />
cm.<br />
1 set <strong>AC</strong> test negatives with reference print.<br />
1 Colamp 250 S halogen lamp (250 W/12 V).<br />
1 <strong>AC</strong> <strong>800</strong> mixing box - Box 69.<br />
1 connecting or mains cable.<br />
1 operating manual.<br />
Without lenses and lens circuit board.<br />
<strong>Durst</strong> <strong>AC</strong> <strong>800</strong> AF<br />
As above, but with micro-processor controlled focusing for<br />
50, 80 and 100/105 mm lenses.<br />
1 test lens 69 for the focus calibration.<br />
8 1.0 Introduction<br />
<strong>Durst</strong> <strong>AC</strong> <strong>800</strong>/AF-03/96
Assembly and installation of enlarger<br />
2.0<br />
Space requirement<br />
The <strong>Durst</strong> <strong>AC</strong> <strong>800</strong> is designed to take up minimum operating<br />
space (100 x 100 cm or 40 x 40 in.) so that it can be<br />
located on a bench in any darkroom or mounted on the<br />
wall for use with roll paper easels.<br />
3<br />
1<br />
Assembling the basic enlarger<br />
Place the column (1) and column base with transformer<br />
housing (2) and enlarger head (3) so that the transformer<br />
housing protrudes beyond the table edge. Hold the baseboard<br />
(3) against the transformer housing and - using the<br />
wrench (6) supplied - screw the five hexagonal bolts from<br />
underneath through the baseboard into the column base,<br />
ensuring that the reinforcing plate (5) is first fitted<br />
beneath the baseboard.<br />
4<br />
5<br />
6<br />
2<br />
2<br />
3<br />
Fitting the tungsten-halogen lamp (COLAMP 250 S)<br />
To fit the 250 watt/24 volt tungsten-halogen lamp (1)<br />
press the locking button (3) and remove the lamphouse<br />
cover (2). A retaining ledge and springs are visible inside.<br />
Mount the tungsten-halogen lamp (1) on the lamp fitting<br />
and push it underneath the retaining springs. Take care<br />
never to touch the inside of the reflector with the fingers.<br />
1<br />
2<br />
1 3<br />
Fitting the lenses<br />
• Fully screw the lens into the appropriate lens board (1).<br />
• Insert the board together with the lens into the lens<br />
stage (2) so that the aperture scale is visible from the<br />
front.<br />
• Secure the lens board with milled screw (3).<br />
Lenses and the lens boards or tubes needed for them are<br />
available separately (see section 10.0).<br />
<strong>Durst</strong> <strong>AC</strong> <strong>800</strong>/AF-03/96 2.0 Assembly and installation<br />
9
Fitting the red filter for black-and-white enlarging<br />
To mount the red filter (1) screw the red filter shaft into<br />
the appropriate borehole on the lens stage and secure<br />
with locking screw (2).<br />
2<br />
1<br />
2<br />
1<br />
Fitting the mixing boxes<br />
Push the mixing box required with the two retaining studs<br />
(1) into the cutout in the catches (2) underneath the<br />
colour mixing head. The catches must therefore be in their<br />
forward position - pull them forward if necessary. Once<br />
the mixing box is in position, push the catches back. The<br />
enlarger is supplied complete with the <strong>AC</strong> <strong>800</strong> Box 69<br />
mixing box (3) for film sizes up to 6 x 9 cm. For increased<br />
light output when printing smaller film sizes, additional<br />
mixing boxes are available separately (see section 10).<br />
3<br />
Fitting the negative carrier<br />
Push the Cobineg negative carrier (1) fully into the enlarger<br />
head. To remove the carrier, slightly raise it first.<br />
1<br />
2<br />
4<br />
3<br />
3<br />
The negative carrier (1) is supplied complete with an upper<br />
anti-Newton glass (2) held in place by retaining springs<br />
(3). For glassless use the unit is supplied complete with a<br />
Binema 67 pair of metal format masks for the 6 x 7 cm<br />
film size. Additional pairs of metal format masks are available<br />
separately (see section 10). Raising the opening bar<br />
(4) locks the negative carrier open for insertion or adjustment<br />
of film strips.<br />
1<br />
10 2.0 Assembly and installation <strong>Durst</strong> <strong>AC</strong> <strong>800</strong>/AF-03/96
Adjusting the magnification<br />
Adjust the required print size by raising or lowering the<br />
enlarger head with the grips (1 and 2). For quick vertical<br />
adjustment disengage the mechanism by turning the inner<br />
milled grip (1). This way the enlarger head can be smoothly<br />
and quickly raised or lowered to the required position.<br />
Lock the head by turning the inner grip; fine adjustment is<br />
then possible with the outer grip (2).<br />
2<br />
1<br />
Focusing (manually only with the <strong>Durst</strong> <strong>AC</strong> <strong>800</strong>)<br />
Focus by turning the focusing knob (1) on the enlarger<br />
head. For focusing the lens diaphragm should be fully<br />
open; swing the filters out of the light path by pressing<br />
the „W. Light“ key.<br />
With the <strong>Durst</strong> <strong>AC</strong> <strong>800</strong> AF focusing is automatic once<br />
the autofocus has been programmed.<br />
1<br />
Description and mounting instruction of the <strong>AC</strong> <strong>800</strong><br />
Wallmount<br />
<strong>AC</strong> <strong>800</strong> Wallmount is to be used with <strong>Durst</strong> <strong>AC</strong> <strong>800</strong> and <strong>AC</strong><br />
<strong>800</strong> AF.<br />
It can be used:<br />
• when working with a roll paper easel<br />
• when doing high magnification (e. g. floor projection)<br />
Mounting the wallmount<br />
• Make sure that the wall does not show any uneveness.<br />
• Mark the position of the fixing screws on the wall.<br />
29 cm<br />
(11.4 in.)<br />
Note<br />
Distance between roll easel and holding plate (1) =<br />
approx. 12 cm (4 3/4 in.)<br />
48 cm<br />
(18.9 in.)<br />
1<br />
12 cm<br />
(4.7 in.)<br />
<strong>Durst</strong> <strong>AC</strong> <strong>800</strong>/AF-03/96 2.0 Assembly and installation<br />
11
4<br />
5<br />
8 cm<br />
3.1 in.)<br />
• Drill ø 10 mm holes for top fixture (5) and bottom<br />
holder (2) as described beside.<br />
• Fit top fixture (5) to the wall.<br />
• Screw the plate (4) to the bottom of the enlarger<br />
column.<br />
• Fasten parts (1) and (2) with screws (3) and fit it to the<br />
wall.<br />
• Lift the enlarger column on the bottom holder (2) and<br />
screw on at top and bottom with screws.<br />
• Set the enlarger vertical and horizontal with a spirit<br />
level and tighten the screws.<br />
1108 cm<br />
(436 in.)<br />
3<br />
12 cm<br />
(4.7 in.)<br />
1<br />
6,9 cm<br />
(2.7 in.)<br />
2<br />
Colorhead <strong>AC</strong> <strong>800</strong><br />
Connection for roll paper magazine<br />
The adjacent drawing shows the schematic layout for<br />
enlarging with a roll paper magazine. The cable connections<br />
as shown in this drawing are made for the power<br />
supply.<br />
<strong>AC</strong> <strong>800</strong><br />
Control<br />
Roll paper<br />
easel<br />
Remote<br />
Control<br />
Rollbox<br />
Mains cable<br />
Mains cable<br />
12 2.0 Assembly and installation <strong>Durst</strong> <strong>AC</strong> <strong>800</strong>/AF-03/96
Socket<br />
„Roll paper easel“<br />
The Pin arrangement for installing a roll paper magazine<br />
on the <strong>AC</strong> <strong>800</strong>/<strong>AC</strong> <strong>800</strong> AF is shown beside.<br />
Exposure end<br />
Ready<br />
Focus<br />
Start<br />
OV<br />
Power unit<br />
EPU 1200 (<strong>AC</strong> 900N,<br />
901, 1200N, 1201)<br />
<strong>AC</strong> <strong>800</strong>, PCM 1000N,<br />
PCM 1001<br />
2a<br />
2b<br />
1a<br />
1b<br />
3b<br />
4a<br />
Socket<br />
„Roll paper easel“<br />
Transport start<br />
A<br />
B<br />
C<br />
Roll paper easel<br />
Exposure end<br />
2a<br />
2b<br />
9<br />
10<br />
Transport start<br />
Focus<br />
1b<br />
Schottky<br />
Start<br />
3b<br />
1<br />
Ready<br />
1a<br />
OV<br />
4a<br />
3/4<br />
Power unit<br />
EPU 1200<br />
User<br />
connector<br />
Roll paper easel<br />
Effemme<br />
<strong>Durst</strong> <strong>AC</strong> <strong>800</strong>/AF-03/96 2.0 Assembly and installation<br />
13
Specific enlarger functions<br />
3.0<br />
3.1<br />
Autofocus (only with <strong>Durst</strong> <strong>AC</strong> <strong>800</strong> AF)<br />
The autofocus, which is set as the first step before calibrating<br />
the paper/film channel, permits exact focusing by a<br />
motor mounted on the side of the enlarger head.<br />
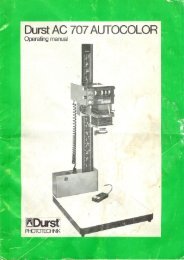
3.2<br />
Subtractive exposure control with pre-filtration<br />
The exposure system on the <strong>Durst</strong> <strong>AC</strong> <strong>800</strong> requires only<br />
one filter set, in spite of the pre-filtration. To make this<br />
clear, the schematic process of an exposure is explained<br />
first without pre-filtration.<br />
Phase 1<br />
Paper<br />
Phase 4<br />
BGR<br />
Y<br />
M<br />
C<br />
BGR<br />
Y<br />
Phase 2<br />
Paper<br />
Phase 5<br />
BGR<br />
Y<br />
M<br />
C<br />
BGR<br />
Y<br />
Phase 3<br />
Paper<br />
BGR<br />
Y<br />
M<br />
C<br />
Before the exposure (phase 1), all three filters (yellow,<br />
magenta, cyan) are slotted in, which reflects the entire<br />
white-light spectrum (consisting of blue, green and red<br />
light). The slotted-in filters therefore function as a shutter.<br />
In phase 2 at the start of the exposure (without pre-filtration),<br />
all the filters are completely outside the beam.<br />
Phase 2 is called the white-light phase. In the first milliseconds<br />
of phase 2 the negative is analysed by the reading<br />
cells mounted underneath the negative. In the following<br />
phases the three Y, M and C filters are exposed, depending<br />
on the strength of the colour correction.<br />
Now the Y, M and C filters are successively and completely<br />
slotted in in phases 3, 4 and 5 (see drawing). The<br />
length of the single phases is a measure of the relevant<br />
colour intensity. For instance if the yellow filter is slotted<br />
into the beam for a long time, a relatively large amount of<br />
blue is blocked, which results in less yellow coloration of<br />
the photo-paper. So in this case the filter exposure times<br />
in the white light regulate the colour composition of the<br />
exposure light.<br />
At the end of phase 5 all the filters are back in the<br />
beam, and so serve as a shutter.<br />
M<br />
M<br />
C<br />
C<br />
Paper<br />
Paper<br />
14 3.0 Specific enlarger functions <strong>Durst</strong> <strong>AC</strong> <strong>800</strong>/AF-03/96
Phase 2<br />
Paper<br />
BGR<br />
Y<br />
M<br />
C<br />
The pre-filtration<br />
Since colour paper is not equally sensitive in all three layers,<br />
the exposure times for blue, green and red vary widely.<br />
For example colour paper is relatively insensitive to red<br />
light, so the red exposure phase (phase 5) is longest. The<br />
length of the total exposure phase is therefore determined<br />
by the longest exposure phase of one colour. Shortening<br />
the exposure time by opening the aperture is usually not<br />
possible, since otherwise the short exposure time of the<br />
layer sensitive for the colour paper (e.g. blue) cannot be<br />
kept to exactly. Pre-filtering the white light can make the<br />
three exposure times equal, so that the total exposure<br />
time is shortened, for instance by opening the aperture.<br />
During pre-filtration two of three filters are slotted into<br />
the beam in phase 2, as needed (the three filter slot-in<br />
times should be equal, see drawing). The position of the<br />
filters can be set at the top right of the colour head, as<br />
shown in the right-hand diagram in the adjacent drawing.<br />
Full instructions are given in Section 6.5.2.<br />
3.3<br />
Basic calibration by reflection densitometer<br />
The projection light serves as light source for the reflection<br />
densitometer integrated in the enlarger. It is diverted<br />
via a cell in the diversion channel. During basic calibration<br />
the test grey field is compared with the reference grey<br />
field, and any variations are compensated via a microcomputer<br />
by controlling the filters. Full details are given in<br />
Section 5.1.<br />
3.4<br />
Automatic colour filtration by integral reading method<br />
The <strong>AC</strong> <strong>800</strong> relies on the integrated reading method comparing<br />
all negatives or transparencies against the calibration<br />
negative or transparency during the metering sequence.<br />
The unit considers the film original as a homogenously<br />
coloured image and matches colour as well density to the<br />
calibration (standard) negative or transparency.<br />
The automatic colour and density corrections can of<br />
course be manually changed. Refer to Section 7.2.5 for<br />
this.<br />
<strong>Durst</strong> <strong>AC</strong> <strong>800</strong>/AF-03/96 3.0 Specific enlarger functions<br />
15
3.5<br />
Automatic colour and density under-corrections<br />
One of the major advantages offered by the <strong>AC</strong> <strong>800</strong> is the<br />
automatic compensation of predominant negative or<br />
transparency colours. Thanks to this system it is possible to<br />
obtain a higher share of balanced prints, made at the first<br />
try, from negatives or transparencies having predominant<br />
colours, as opposed to conventional metering methods.<br />
For example:<br />
You might have a portrait of a girl in a brilliant red dress.<br />
With the integrated reading method this would yield a<br />
print with a blue-green cast. Low correction will automatically<br />
compensate this predominant colour of the film<br />
original, without affecting the colour balance of normal<br />
originals.<br />
Full explanations and instructions on setting the low<br />
correction are given in Section 5.5.<br />
3.6<br />
„FXFF“ function: fixed exposure time and filtration<br />
Pressing the „FXFF“ key disengages the automatic colour<br />
and density measurement (the red LED lights up). Negatives<br />
or transparencies are then printed with constant exposure<br />
time at the fixed filtration of the last negative or<br />
transparency to be measured.<br />
This mode still compensates for different magnifications. If<br />
a negative has to be moved in the carrier you can first<br />
make a blind exposure with the negative centered and<br />
then switch to „FXFF“.<br />
FXFF is also used to produce contact prints (see section<br />
7.4).<br />
3.7<br />
„VXFF“ function: automatic density control and fixed<br />
filtration<br />
Pressing the „VXFF“ key provides automatic density compensation<br />
with fixed filtration, based on the filter values<br />
of the last measured negative or transparency.<br />
All film originals exposed under identical conditions<br />
(same lighting, film emulsion etc.), for example studio<br />
shots, wedding pictures, snow pictures, seascapes etc. can<br />
be printed in the fixed filtration mode with automatic<br />
density correction, without being affected by uneven<br />
colour distribution in the original.<br />
16 3.0 Specific enlarger functions <strong>Durst</strong> <strong>AC</strong> <strong>800</strong>/AF-03/96
Description of functions of operating elements<br />
4.0<br />
4.1<br />
The colour head<br />
„Bal. adjust“ key:<br />
• To trigger the reflection densitometer’s<br />
metering cycle for reading the<br />
film original.<br />
• To record, in conjunction with the<br />
„Enter“ key, grey reference values<br />
(AIM values for YMC).<br />
2. „Enter“ key:<br />
• Electronic locking device for the<br />
single calibration modes (CAL-XCP-<br />
LN-DN) and their memory values.<br />
3. „Set-up“ key:<br />
• To trigger a calibration sequence or<br />
for jumping over the memory values<br />
of the memory channel being indicated.<br />
•To record, in conjunction with the<br />
„Enter“ key, the calibration values<br />
ascertained.<br />
• To reed, in conjunction with the<br />
„Enter“ key, correction values into the<br />
memory during the normal production.<br />
1<br />
2 3 10 11 12 13 14 15<br />
4 5 6 7 8 9 9<br />
4. „Hold“ key:<br />
• To retain colour and density correction<br />
values for further exposures in<br />
the normal printing mode, i. e. these<br />
values won’t be automatically erased<br />
after the exposure.<br />
5. „FXFF/VXFF“ key:<br />
„FXFF“ = Colour and density values of<br />
the previous exposure are recorded<br />
automatically and used for the following<br />
exposure.<br />
„VXFF“ = The filter balance of the previous<br />
exposure is recorded automatically<br />
and used for the following exposures<br />
- only density changes of the<br />
film original are compensated.<br />
Note: In the FXFF and VXFF modes,<br />
the enlarging paper’s reciprocity failure<br />
will be compensated automatically<br />
after magnification changes.<br />
6. „F.Var./ill“ key:<br />
• To enter the distance if the projection<br />
plane’s position changes (e.g.<br />
wall mounting or reductions).<br />
Enlarging easel range: -99/+999.<br />
• To switch the LED displays on or off.<br />
7. „Channel Mode sel.“ key:<br />
• To call up the required memory<br />
channel.<br />
• To select, in conjunction with the<br />
„Enter“ key, the desired mode of operation<br />
(Neg-Pos-B/W).<br />
8. „Disp. Select“ key:<br />
• To call up the following indications<br />
on the display:<br />
Basic Y-M-C filtration values (only<br />
with plastic slide open); Y-M-C exposure<br />
times (only with enlarger lamp<br />
switched on); Y-M-C-D memory<br />
values (in the calibration mode);<br />
Y-M-C-D correction values (in printing<br />
mode); lens focal lengths only<br />
„Cal.“; lens aperture.<br />
9. „+/-“ keys:<br />
• To change the values indicated on<br />
the display.<br />
10.<br />
Operating mode display (Neg = colour<br />
negatives, Pos = colour transparencies,<br />
B/W = black-and-white negatives).<br />
11.<br />
Display indicating the channel selected<br />
(0 - 9).<br />
12.<br />
Calibration mode display (Cal = basic<br />
calibration, XCP = paper slope, LN =<br />
slope for light film originals, DN =<br />
slope for dark film originals).<br />
13.<br />
Alternating display for:<br />
Head (H), Metering cycle (P), Focus<br />
Variator (d), Calibration (C), Lens (L),<br />
F/Stop (F), Exposure time (E), Magnification<br />
Factor (M-F)<br />
14.<br />
Memory values display for:<br />
Yellow (Y), Magenta (M), Cyan (C),<br />
Density (D).<br />
15.<br />
Memory value display of the calibration<br />
modes in use or correction value<br />
display in normal printing mode, display<br />
of lens focal length, lens aperture<br />
and number of exposures made.<br />
<strong>Durst</strong> <strong>AC</strong> <strong>800</strong>/AF-03/96 4.0 Description of function of<br />
17<br />
operating elements
4.2<br />
The transformer housing<br />
1 2 3 4<br />
1. „Expose“ key:<br />
To trigger or cancel an exposure.<br />
2. „Light“ key:<br />
To switch enlarger lamp on or off or to interrupt an exposure.<br />
3. „W. Light“ key:<br />
To swing the basic filtration out of the colour head’s light<br />
path.<br />
4. „Power“ switch:<br />
On/off main switch.<br />
4.3<br />
The remote control (accessory)<br />
1 2<br />
3 4 5 9<br />
8 6 10<br />
7<br />
1<br />
Coloured selector keys to call up colour and density correction<br />
keys (YMCD)<br />
2<br />
Numerical row of keys (0 - 9) to enter required correction<br />
values as well as the lens aperture value being used<br />
3<br />
„-“ key to change the sign of the value being displayed<br />
4<br />
„Clear“ key to cancel an input<br />
5<br />
„Hold“key to keep correction value settings for following<br />
exposures<br />
6<br />
„W. Light“ key to swing basic filtra-tion out of the colour<br />
head’s light path<br />
7<br />
„Light“ key to switch the enlarger lamp on or off<br />
8<br />
„F/Stop“ key to run off or enter the lens aperture value<br />
9<br />
„Expose“ key to trigger an exposure<br />
10<br />
Variation of the light strength of the darkroom safelight<br />
mounted above the keys<br />
18 4.0 Description of function of <strong>Durst</strong> <strong>AC</strong> <strong>800</strong>/AF-03/96<br />
operating elements
The memory system of the <strong>Durst</strong> <strong>AC</strong> <strong>800</strong>/<strong>AC</strong> <strong>800</strong> AF<br />
5.0<br />
The <strong>Durst</strong> <strong>AC</strong> <strong>800</strong> features 10 (0 - 9) memory channels per<br />
operating mode (30 in total), which can be allocated to<br />
different film and enlarging paper types or different shooting<br />
conditions. To select the desired memory channel,<br />
press the „Channel“ key (only possible while in the normal<br />
printing mode) until the desired memory channel number<br />
is indicated on the display.<br />
5.1<br />
„CAL“ basic memory<br />
This memory records the unit’s basic settings as far as<br />
colour and density are concerned. These settings depend<br />
upon enlarging paper emulsion, film type and processing.<br />
Pressing the „Setup“ key actuates the entire calibration<br />
mode. Lens focal length and lens aperture are selected by<br />
pressing the +/- keys and fed into the memory by pressing<br />
the „Enter“ key. By pressing the „Disp. Select“ key you may<br />
then call up the single memories for Y-M-C-D. The values<br />
stored in these memories can be modified by pressing the<br />
+/- keys.<br />
Note<br />
The Y-M-C-D memory values of the Cal, XCP, LN, DN<br />
operating modes are expressed in densitometric units<br />
(30 units = one lens aperture value).<br />
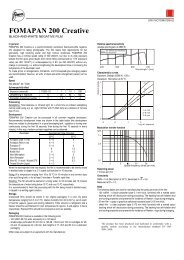
5.2<br />
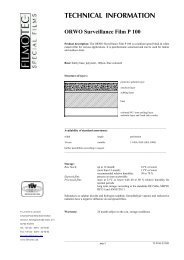
„XCP“ paper slope<br />
Paper = Cal, X.Comp<br />
Log E t<br />
1,4<br />
1,2<br />
1,0<br />
0,8<br />
Cal<br />
b<br />
a<br />
c<br />
E x t = constant<br />
This memory serves for the automatic compensation of<br />
colour and density shifts that may occur when printing<br />
overexposed negatives or underexposed transparencies.<br />
Depending upon the film material being printed, the yellow,<br />
magenta, cyan and density memory values can be<br />
modified during the programming sequence. Press the<br />
„Setup“ key to call up the „DN“ calibration mode and press<br />
the „Enter“ key to store the lens aperture value being displayed.<br />
Press the „Disp. Select“ key to call up the single Y-<br />
M-C-D memories and press the +/- keys to appropriately<br />
modify the memory values.<br />
In the chart shown the product of the radiation strength x<br />
time is plotted double logarithmically against the radiation<br />
strength. The reciprocity curve occurring with very<br />
short and very long exposure times deviates from the ideal<br />
constant Et (dashed line). The deviation is measured, interpolated<br />
linearly and automatically compensated.<br />
The instructions for producing „XCP“ are given in Section<br />
6.5.6 for colour negatives/slides, and in Section 6.6.4 for<br />
BW enlargements.<br />
100 X. Ref. 10 1<br />
log E<br />
Light output on the<br />
baseboard<br />
a = Reciprocity curve of paper<br />
b = Interpolation<br />
c = Compensation<br />
<strong>Durst</strong> <strong>AC</strong> <strong>800</strong>/AF-03/96 5.0 The memory system<br />
19
5.3<br />
Slope for under-exposed „LN“ (Light Negative) negatives<br />
or over-exposed slides<br />
This memory serves for the automatic compensation of<br />
colour and density shifts that may occur when printing<br />
underexposed negatives or overexposed transparencies.<br />
Depending upon the film material being printed, the yellow,<br />
magenta, cyan and density memory values can be<br />
modified during the programming sequence.<br />
Press the „Setup“ key to call up the „LN“ calibration<br />
mode and press the „Enter“ key to store the lens aperture<br />
values being displayed. Press the „Disp. Select“ key to call<br />
up the single Y-M-C-D memories and press the +/- keys to<br />
appropriately modify the memory values.<br />
The instructions for setting „LN“ are given in Section<br />
6.5.7 for colour negatives/slides, and in Section 6.6.5 for<br />
BW enlargements.<br />
5.4<br />
Slope for over-exposed „DN“ (Dark Negative) negatives<br />
or under-exposed slides<br />
This memory serves for the automatic compensation of<br />
colour and density shifts that may occur when printing<br />
overexposed negatives or underexposed transparencies.<br />
Depending upon the film material being printed, the yellow,<br />
magenta, cyan and density memory values can be<br />
modified during the programming sequence.<br />
Press the „Setup“ key to call up the „DN“ calibration<br />
mode and press the „Enter“ key to store the lens aperture<br />
values being displayed. Press the „Disp. Select“ key to call<br />
up the single Y-M-C-D memories and press the +/- keys to<br />
appropriately modify the memory values.<br />
Instructions for setting „DN“ are given in Section 6.5.8<br />
for colour negatives/slides, and in Section 6.6.6 for BW<br />
enlargements.<br />
5.5<br />
Colour and density under-corrections<br />
The colour and density under-correction takes priority<br />
over the calibration settings in all the memory channels<br />
(consisting of „CAL“, „XCP“, „LN“ and „DN“).<br />
Colour under-correction enhances the integrally read<br />
colour value (reading cells underneath the film carrier) for<br />
negatives and slides with dominant colours. The correction<br />
is made by a settable percentage which represents a limit<br />
for the integrally read colour value. The <strong>Durst</strong> <strong>AC</strong> <strong>800</strong>/<strong>AC</strong><br />
<strong>800</strong> AF incorporates over 17 under-correction steps (0 -<br />
16), with step 0 allowing full (100 %) under-correction.<br />
Step 16 makes no under-correction, so that the subordinate<br />
colour setting applies due to the integral reading<br />
method used. Each step therefore represents a percentage<br />
of approx. 6.25% (100:16). The following practical example<br />
will help you to understand colour-under-correction.<br />
The exposure times (in seconds) for the three colour filters<br />
amount for example as calibrated by the test negative<br />
Y = 4 M = 4 C = 4<br />
With a photo with a dominant colour (e.g. a red car on a<br />
grey car park), the colour correction is falsified by the<br />
integral reading system.<br />
Y = 4 M = 4 C = 8<br />
If the colour under-correction is now set to the figure of 8<br />
(percentage 50 %), this decreases the cyan filter time by 2<br />
seconds, that is<br />
Y = 4 M = 4 C = 6<br />
since 8 - 4 = 4 (integral reading system correction)<br />
4 x 50 % = 2<br />
In addition to colour under-correction a density undercorrection<br />
can be made in the same way (16 steps each of<br />
approx. 6.25 %).<br />
20 5.0 The memory system<br />
<strong>Durst</strong> <strong>AC</strong> <strong>800</strong>/AF-03/96
Factory pre-setting<br />
The factory pre-setting for colour under-correction incorporates<br />
an adaptation of the integrally read filter figures<br />
to approx. 50 %, no correction is made in density.<br />
Y M C D<br />
Neg. 6 7 8 16<br />
Pos. 4 4 4 8<br />
BW - - - 8<br />
Setting the colour and density under-correction<br />
The factory pre-setting can be adapted to special needs as<br />
follows.<br />
• With the enlarger switched off, hold down „Mode<br />
Select“ key and switch the enlarger on.<br />
• Holding down the „Enter“ key and pressing the „Disp.<br />
Select“ key displays one after another the Neg./BW/Pos.<br />
modes with the relevant parameters Y, M, C, D.<br />
• These parameters can now be allocated to the previously<br />
mentioned correction steps 0 - 16 with the +/- keys.<br />
Note<br />
As already mentioned, these corrections affect all the<br />
memory channels.<br />
<strong>Durst</strong> <strong>AC</strong> <strong>800</strong>/AF-03/96 5.0 The memory system<br />
21
Calibrating the <strong>Durst</strong> <strong>AC</strong> <strong>800</strong>/<strong>AC</strong> <strong>800</strong> AF<br />
6.0<br />
6.1<br />
Preview<br />
Switching on the enlarger/preparations<br />
Focusing/setting the autofocus/focus variator<br />
Calibrating the memory channels<br />
Pre-production test<br />
Adapting channels (optimising) for production:<br />
corrections in „CAL“/„XCP“/„LN“/„DN“ or „LC“<br />
Correcting the focus<br />
See Section 6.3<br />
See Section 6.4<br />
See Section 6.5 for colour negative/slides<br />
See Section 6.6 for BW<br />
See Section 6.7<br />
See Section 6.8<br />
See Section 6.4.3<br />
Production<br />
22 6.0 Calibrating<br />
<strong>Durst</strong> <strong>AC</strong> <strong>800</strong>/AF-03/96
6.2<br />
Table of factory calibrations for the supplied test negatives<br />
Channel no. Film type Aperture Cal XCP LN DN<br />
1 Kodak Gold II 100 8 Y - 13 7 1 9<br />
M - 4 3 0 8<br />
C - 11 6 1 - 1<br />
D 39 6 - 9 - 6<br />
2 Fujicolor Super HR II 100 8 Y - 23 0 1 3<br />
M - 8 - 2 - 7 6<br />
C - 13 7 7 - 3<br />
D 47 2 - 7 - 5<br />
3 Konica Super SR 100 8 Y - 12 0 1 1<br />
M - 5 - 2 0 0<br />
C - 17 4 12 - 3<br />
D 49 2 - 8 - 2<br />
4 Kodak 5026 VPS 8 Y - 12 - 5 1 - 1<br />
M - 3 - 6 2 3<br />
C - 16 - 3 3 1<br />
D 41 9 - 7 6<br />
5 Agfacolor XRC 100 8 Y 1 - 3 2 - 8<br />
M 1 - 7 4 - 9<br />
C - 11 - 4 4 - 12<br />
D 41 7 - 14 6<br />
6 Fujicolor Reala CS 120 8 Y 26 1 0 11<br />
M 33 - 1 - 3 13<br />
C 11 1 1 6<br />
D 87 - 1 - 8 - 6<br />
7 Kodak Vericolor 160 8 Y 26 1 - 1 3<br />
M 33 - 1 - 2 6<br />
C 11 1 - 3 4<br />
D 88 - 1 22 - 6<br />
Pre-filtration: Y = 81 M = 62 C = 6<br />
Filter times at F = 8: Y = 4.7 s M = 4.4 s C = 4.6 s<br />
<strong>Durst</strong> <strong>AC</strong> <strong>800</strong>/AF-03/96 6.0 Calibrating<br />
23
6.3<br />
Switching on the enlarger/preparations<br />
a)<br />
b)<br />
c)<br />
Fit the required mixing box and the<br />
appropriate format mask<br />
Switch the unit on with the main switch<br />
on the transformer housing<br />
Using a masking frame or roll paper easel<br />
means that the projection plane is no<br />
longer on the level of the baseboard. This<br />
differential is ascertained and entered<br />
• Insert the required mxing box.<br />
• Insert the format mask matching your film size as well<br />
as the AN-glass.<br />
Note: When printing transparencies, use the special Bidia<br />
insert. Bidia does not require the use of an AN-glass.<br />
Film size Mixing box Format mask Lens<br />
6 x 9 cm <strong>AC</strong> <strong>800</strong>- Binema 69 100/105<br />
6 x 7 cm Box 69 Binema 67 mm<br />
Bimagla AN<br />
6 x 6 cm <strong>AC</strong> <strong>800</strong>- Binema 66/ 80 mm<br />
4.5 x 6 cm BOX 66 Binema 45<br />
Bimagla AN<br />
35 mm <strong>AC</strong> <strong>800</strong>- Binema 35 50 mm<br />
Box 35 Bimagla AN<br />
„p“ will be indicated on the display.<br />
• A blue-green-red metering cycle will be taking place.<br />
The resulting values are automatically stored by the<br />
reflection densitometer and will be used as reference<br />
grey for further measurements.<br />
• At the end of the metering cycle the enlarger lamp is<br />
switched of automatically the unit is ready for operation.<br />
On the display will now be shown the operating mode<br />
(Neg-Pos-B/W), the channel being used and the lens aperture<br />
value.<br />
Note<br />
If on the display the lens aperture indication were to<br />
blink, enter a smaller or larger lens aperture value. For<br />
this switch the enlarger lamp on by pressing the „Light“<br />
key and place a negative in the negative carrier.<br />
24 6.0 Calibrating<br />
<strong>Durst</strong> <strong>AC</strong> <strong>800</strong>/AF-03/96
6.4<br />
Autofocus and focus variator (only for <strong>Durst</strong> <strong>AC</strong> <strong>800</strong> AF)<br />
6.4.1<br />
Preparations<br />
For programming the autofocus system kindly use the following<br />
flow chart. You can program the system for three<br />
different focal lengths (50, 80 or 105 mm). The focal<br />
lengths are allotted channels and processes.<br />
Before programming the autofocus system, the lens focal<br />
lengths must be fed into the paper calibration (CAL).<br />
Note<br />
The programming of the autofocus system is made<br />
easier by the use of the <strong>Durst</strong>-made and surface coated<br />
focusing magnifier. Order code: Proscop.<br />
a)<br />
b)<br />
c)<br />
d)<br />
e)<br />
Start<br />
Fit the unit with an enlarger lamp<br />
Insert required mixing box and appropriate<br />
format mask<br />
Place the focusing negative supplied in<br />
the film carrier<br />
Switch on the unit<br />
Into the film carrier’s bottom section insert the format<br />
mask matching the film size and a Bimagla AN glass into<br />
the film carrier’s top section.<br />
Note: When printing transparencies, insert the Bidia mask.<br />
In this case you will not be needing an AN glass.<br />
Film size Mixing box Format mask Lens<br />
6 x 9 cm <strong>AC</strong> <strong>800</strong>- Binema 69 100/105<br />
6 x 7 cm Box 69 Binema 67 mm<br />
Bimagla AN<br />
6 x 6 cm <strong>AC</strong> <strong>800</strong>- Binema 66/ 80 mm<br />
4,5 x 6 cm Box 66 Binema 45<br />
Bimagla AN<br />
35 mm <strong>AC</strong> <strong>800</strong>- Binema 35 50 mm<br />
Box 35 Bimagla AN<br />
„p“ appears on the display. The densitometer’s zero balance<br />
is carried out and the lens carrier moves to the reference<br />
setting; the projected image is then focused automatically.<br />
Note<br />
If the autofocus is not programmed (1st start up) the<br />
lens stage can move down (error 7 in the display).<br />
Remedy: Press the „Enter“ key.<br />
<strong>Durst</strong> <strong>AC</strong> <strong>800</strong>/AF-03/96 6.0 Calibrating<br />
25
6.4.2<br />
Steps for setting the autofocus<br />
a) Yes: set d, n figures to zero (see below)<br />
Does the „Foc. Var. Ill“ key LED light up?<br />
No: continue<br />
Set the positive variator to zero.<br />
Press and hold the „Foc. Var./Ill.“ key until „d“ is displayed.<br />
Release the „Foc. Var./Ill.“ key. Zero the value being displayed<br />
by pressing the +/- keys simultaneously.<br />
Set the negative variator to zero.<br />
Press and hold the „Foc. Var./Ill.“ key once - „n“ will appear<br />
on the display. Zero the value being displayed by pressing<br />
the +/- keys simultaneously. Pressing the „Foc. Var./Ill.“ key<br />
once more reverts the unit to the normal operating mode.<br />
b)<br />
c)<br />
d)<br />
e)<br />
f)<br />
g)<br />
h)<br />
i)<br />
Call up the required mode by pressing<br />
and holding the „Enter“ key and by<br />
simultaneously touching the „Channel<br />
Mode Sel.“ key<br />
Select the required memory channel<br />
Switch on the calibration mode by<br />
pressing the „Set-up“ key<br />
For feeding in the desired focal length<br />
press the +/- keys and store same by<br />
pressing the „Enter“ key<br />
Fit the appropriate lens<br />
Enter F22 by pressing the +/- keys and<br />
store this value by pressing the „Enter“<br />
key<br />
Move the enlarger head, depending on<br />
the focal length being used, to the<br />
following settings<br />
By pressing the „Enter“ and subsequently<br />
pressing the „Setup“ keys, the lens as<br />
well as various other values will be<br />
stored<br />
Neg. = Colour negatives<br />
Pos. = Colour transparencies<br />
B/W = Black-and-white negatives<br />
Press the „Channel“ key till the desired memory channel is<br />
displayed:<br />
• Touch briefly: the indication increases + 1<br />
• Keep pressing: the indication will be reduced (- 1)<br />
The display will be showing the channel, the calibration<br />
mode (Cal) and the focal length (50, 80 or 105).<br />
Note: Activating the exposure control calibration mode is<br />
only meant for storing the focal length.<br />
The lens aperture value will be displayed (e. g. F8).<br />
Film size Focal length Lens board<br />
24 x 36 50 Setopla 2839<br />
4,5 x 6/6 x 6 80 Lapla 39<br />
6 x 7/6 x 9 105 Lapla 39<br />
Setting on metric scale Focal length<br />
35 50 mm<br />
34 80 mm<br />
33 105 mm<br />
Note<br />
If Error 6 is indicated on the display, the metering range<br />
has been exceeded.<br />
Remedy: Touch the „Enter“ key. On the right-hand enlarger<br />
head side, push the plastic slide fully upwards. This<br />
turns on the enlarger lamp automatically and the display<br />
indicates „H“ (=head). Press the „Disp. Select“ key to call<br />
up the exposures for Y, M, C. If the exposure time for one<br />
of these colours is less than one second, the display will be<br />
flashing. With the calibration bolt turn the appropriate filter<br />
in the enlarger head till the exposure time is more than<br />
one second. Then press and hold the „Enter“ key, then<br />
press the „Setup“ key.<br />
„CALE“ must be displayed.<br />
26 6.0 Calibrating<br />
<strong>Durst</strong> <strong>AC</strong> <strong>800</strong>/AF-03/96
j)<br />
The calibration mode is switched automatically<br />
to „XCP“.<br />
k) The paper/film setup is thereby switched off.<br />
Press „Setup“ key for three times.<br />
l)<br />
m)<br />
n)<br />
o)<br />
p)<br />
q)<br />
r)<br />
s)<br />
Press and hold the „Enter“ key, then<br />
press the „Foc. Var/Ill.“ key<br />
Press the +/- keys simultaneously<br />
When using the 50 or 80 mm lens move<br />
the enlarger head all the way to the<br />
bottom. When using the 105 mm lens<br />
move the enlarger head to head elevation<br />
29 of the metric scale. Press and<br />
hold the „Expose“ key, then press the<br />
„Light“ key.<br />
Press the „Light“ key to move the lens<br />
carrier down until the focus setting is<br />
exceeded<br />
Lightly touch the „W.Light“ key to move<br />
the lens carrier up to the focus setting<br />
(use a focusing magnifier to check the<br />
focus<br />
Is the image on the projection plane in<br />
focus?<br />
Move colour head to next position.<br />
See adjacent table.<br />
By lightly touching the „W. Light“ key,<br />
move the lens carrier up to the focus<br />
setting (use a focusing magnifier)<br />
This switches on the AF setup-mode (programming the<br />
autofocus). The display indicates „SFOC“. The white-light<br />
mode is automatically switched on.<br />
This cancels all reference points stored for this focal<br />
length. The unit confirms this by switching the enlarger<br />
lamp brief-off before turning it on again.<br />
This causes the lens carrier to move to the reference setting.<br />
The up or down movement of the lens carrier is carried out<br />
in two speeds:<br />
- approx. 2 mm/sec. in the beginning<br />
- approx. 10 mm/sec. after about five seconds<br />
Important<br />
Always move the lens carrier to the final focus setting<br />
starting from below (using the „W. Light“ key) this to<br />
eliminate mechanical tolerances).<br />
Yes:<br />
Press and hold the „Enter“ key, then press the „Exppose“<br />
key. This stores the new setting. To double check the unit<br />
automatically focuses the image based on the setting that<br />
has been entered.<br />
No:<br />
back to step o)<br />
Head elevation positions for the following lenses:<br />
50 mm 80 mm 105 mm<br />
17 18 29<br />
21 19,5 31<br />
30 21 34<br />
55 24 39<br />
92 30 47<br />
50 60<br />
92 92<br />
Enlarger head settings on metric scale.<br />
Important<br />
Always move the lens carrier to the final focus setting<br />
starting from below (using the „W. Light“ key) this to<br />
eliminate mechanical tolerances.<br />
<strong>Durst</strong> <strong>AC</strong> <strong>800</strong>/AF-03/96 6.0 Calibrating<br />
27
t) Yes:<br />
Is the image on the projection plane in<br />
Press and hold the „Enter“ key, then press the „Expose“<br />
focus?<br />
key. This stores the new setting. To double check the unit<br />
automatically focuses the base on the setting that has<br />
been entered.<br />
No:<br />
back to step s)<br />
u<br />
v)<br />
w)<br />
Repeat steps r) to s) until the enlarger<br />
head positions are focused under step r)<br />
and stored<br />
Press and hold the „Enter“ key, then<br />
press the „Foc.Var./ill“ key<br />
End<br />
This switches off the AF-setup-mode (SFOC) and the program<br />
reverts to the normal operating mode with automatic<br />
focusing.<br />
Note: If after having programmed the three focal lengths<br />
(50, 80, 105 mm) a paper-film channel is called up or programmed<br />
anew, the programming values (autofocus) of<br />
the appropriate focal length will automatically be transfered<br />
to that paper-film channel.<br />
28 6.0 Calibrating<br />
<strong>Durst</strong> <strong>AC</strong> <strong>800</strong>/AF-03/96
6.4.3<br />
Subsequent correction<br />
a)<br />
b)<br />
c)<br />
d)<br />
e)<br />
f)<br />
g)<br />
h)<br />
i)<br />
Start<br />
Switch on the unit<br />
Call up the memory channel of the focal<br />
length to be corrected<br />
Fit enlarger with appropriate lens<br />
Does the „F. Var/ill“ key LED light up?<br />
Place the focusing negative supplied in<br />
the film carrier<br />
Move the enlarger head to the setting to<br />
be corrected<br />
Press and hold the „Enter“ key, then<br />
press the „ F.Var/ill“ key<br />
Press the „Light“ key to move the lens<br />
carrier down till the focus setting is<br />
exceeded<br />
A setup cycle will be running down.<br />
„p“ appears in the display. The densitometer is zeroed, and<br />
the lens carrier moves into the reference position, then<br />
focusing takes place automatically.<br />
Note<br />
If the autofocus is not programmed (during first use),<br />
the lens carrier may move into the bottom position<br />
(Error 7).<br />
Remedy: Press „Enter“ key.<br />
Press the „Channel“ key till the desired channel is displayed.<br />
• touch briefly: the indication increases + 1<br />
• keep pressing: the indication will be reduced (- 1)<br />
Film size Focal length Lens panel<br />
24 x 36 50 Setopla 2839<br />
4,5 x 6/6 x 6 80 Lapla 39<br />
6 x 7/6 x 9 105 Lapla 39<br />
Yes:<br />
Zero the „d“ and „n“ values.<br />
No:<br />
Continue<br />
Set the positive variator to zero.<br />
Press and hold the „Foc. Var/ill“ key until „d“ is displayed.<br />
Release the „Foc. Var/ill“ key. Zero the value being displayed<br />
by pressing the +/- keys simultaneously.<br />
Set the negative variator to zero.<br />
Press the „F. Var/ill“ key once - „n“ will appear on the display.<br />
Zero the value being displayed by pressing the +/-<br />
keys simultaneously.<br />
Pressing the „F. Var/ill“ key once more reverts the unit to<br />
the normal operating mode.<br />
This switches on the setup-focus mode (programming of<br />
the autofocus). The display indicates „SFOC“. The unit is<br />
automatically switched to the white-light mode.<br />
The up or down movement of the lens carrier is carried out<br />
in two speeds:<br />
• approx. 2 mm/sec. in the beginning<br />
• approx. 10 mm/sec. after about five seconds<br />
<strong>Durst</strong> <strong>AC</strong> <strong>800</strong>/AF-03/96 6.0 Calibrating<br />
29
j) Important<br />
Lightly touch the „W. Light“ key to move<br />
Always start from below when moving the lens carrier<br />
the lens carrier up to the focus setting<br />
to the final focus setting (using the „W. Light“ key) this<br />
(use a focusing magnifier to check the<br />
to eliminate mechanical tolerances.<br />
focus)<br />
k)<br />
l)<br />
m)<br />
n)<br />
Press and hold down the „Enter“ key and<br />
then press the „Expose“ key<br />
Is the image on the projection plane in<br />
focus?<br />
Press and hold the „Enter“ key, then<br />
press the „F. Var/ill“ key<br />
End<br />
This stores the new setting. To double check the unit automatically<br />
focuses the image based on the setting that has<br />
been entered.<br />
Note<br />
If Error 7 will be indicated see section 8.0.<br />
Yes:<br />
Continue<br />
No:<br />
Back to step j)<br />
If the corrected setting is already listed in the calibration<br />
table (section 6.4.2) (max. permissible deviation: 5 mm),<br />
the stored value is carried over; otherwise the new setting<br />
is inserted in the reference point table.<br />
This switches off the Af-setup-mode (SFOC) and the program<br />
reverts to the normal operating mode with automatic<br />
focusing.<br />
30 6.0 Calibrating<br />
<strong>Durst</strong> <strong>AC</strong> <strong>800</strong>/AF-03/96
6.4.4<br />
<strong>Manual</strong> focusing<br />
Special jobs may require manual focusing. For this kindly<br />
proceed as follows:<br />
a)<br />
b)<br />
c)<br />
d)<br />
e)<br />
f)<br />
g)<br />
Start<br />
Switch on the unit<br />
Fit the enlarger with the appropriate<br />
lens<br />
Press and hold the „Enter“ key, then<br />
press the „F. Var/ill“ key<br />
Focus the image<br />
Press and hold the „Enter“ key, then<br />
press the „F. Var/ill“ key<br />
End<br />
„P“ will be shown on the display. The densitometer will be<br />
balanced to zero and the lens carrier moves to the reference<br />
setting; the enlarger is then focused automatically.<br />
Film size Focal length Lens panel<br />
24 x 36 50 Setopla 2839<br />
4,5 x 6/6 x 6 80 Lapla 39<br />
6 x 7/6 x 9 105 Lapla 39<br />
The unit is switched to the Setup-Focus mode (programming<br />
of the autofocus system). SFOC will be shown on the<br />
display and the enlarger light is switched on automatically.<br />
For this press the „Light“ (down) or „W. Light“ (up) keys.<br />
The lens carrier’s up or down movement takes place in two<br />
speeds:<br />
• approx. 2 mm/sec. in the beginning<br />
• approx. 10 mm/sec. after about 5 sec.<br />
This switches off the AF-Setup-mode (programming of the<br />
autofocus system) and the program reverts to the normal<br />
printing mode.<br />
Note<br />
The autofocus sequence will take place once more only<br />
after changing the magnification.<br />
6.4.5<br />
Setting the focus variator to a raised/lowered projection<br />
level<br />
When using a masking frame or a roll paper easel the projection<br />
plane will no longer be in focus. This differential is<br />
determined and fed in as follows.<br />
a)<br />
b)<br />
c)<br />
d)<br />
Determining the distance<br />
Press and hold the “F. Var./ill“ key<br />
Key in the previously determined value<br />
of the differential<br />
Release the „F. Var./ill“ key<br />
Use a ruler to ensure the distance between the baseboard’s<br />
projection plane and your new projection plane.<br />
„d“ will be indicated on the display.<br />
• With the +/- keys feed in the previously determined<br />
distance by pressing „+“ or „-“ key, according to the<br />
projection plane height.<br />
• If the projection plane is higher than the baseboard<br />
level, enter the distance by prefixing „-“ (minus); if the<br />
projection plane is below the baseboard level, enter the<br />
distance by prefixing „+“ (plus).<br />
Note<br />
Enter distance in „mm“.<br />
• An input is confirmed and checked by the lighting up of<br />
the red LED.<br />
Note<br />
The „Foc.Var“ key has an additional function. If this key<br />
is pressed briefly, all illuminations or displays will be<br />
extinguished. Pressing any key again returns to the display.<br />
<strong>Durst</strong> <strong>AC</strong> <strong>800</strong>/AF-03/96 6.0 Calibrating<br />
31
6.5<br />
Calibrating a memory channel for colour negatives/<br />
slides<br />
The memory channel is calibrated for a certain combination<br />
of film type, paper size and paper type.<br />
6.5.1<br />
Making preparations<br />
a)<br />
Set the measuring cell slide-in unit’s<br />
(1) amplification switch to the correct<br />
position<br />
• Pull the measuring cell slide-in unit (1) out of the unit.<br />
• Push the switch (2) to the setting matching your process<br />
Neg or Pos.<br />
• Push the measuring cell slide-in unit (1) into the<br />
appropriate opening.<br />
1 2<br />
b)<br />
c)<br />
Call up the desired operating mode by<br />
pressing the „Enter“ and „Channel Mode<br />
sel.“ keys simultaneously<br />
Call up the desired memory channel<br />
Neg. = Colour negatives<br />
Pos. = Colour transparencies<br />
B/W= Black-and-white negatives<br />
Press the „Channel“ key until the desired memory channel<br />
number is displayed.<br />
6.5.2<br />
Setting pre-filter arrangement<br />
a)<br />
Set the basic filtration<br />
2<br />
• Remove the calibration pin (1) on the right-hand side of<br />
the transformer housing.<br />
• Fully push the plastic slide (2) upwards on the enlarger<br />
head’s right. This switches on the enlarger lamp and the<br />
indication „H“ (= Head) will appear on the display.<br />
• Fit the calibration pin on the Y or M screw and turn<br />
same until the desired Y-M basic filtration value is indicated<br />
on the display.<br />
• For Neg: Y = 70, M = 50, C = 0.<br />
• For Pos: 000 close the slide again.<br />
• Press the „Light“ key to switch off the enlarger lamp.<br />
1<br />
32 6.0 Calibrating<br />
<strong>Durst</strong> <strong>AC</strong> <strong>800</strong>/AF-03/96
6.5.3<br />
Activating the basic filtration<br />
a)<br />
b)<br />
c)<br />
d)<br />
e)<br />
Switch to the calibration mode by<br />
pressing the „Setup“ key<br />
With the +/- keys feed in the desired<br />
lens focal length and store same by<br />
pressing the „Enter“ key<br />
With the +/- keys feed in the desired<br />
lens aperture value and store same by<br />
pressing the „Enter“ key<br />
Set the enlarger head to the correct<br />
position<br />
Enter the memory values taken from the<br />
table supplied (section 6.2) and check<br />
On the display will be indicated the channel number, the<br />
calibration mode (Cal) and the lens focal length (L50, 80 or<br />
105).<br />
The display will then be showing the lens aperture (e. g. f8)<br />
Note<br />
If on the display the lens aperture indication is blinking,<br />
you can stop this by entering a smaller or larger aperture<br />
value.<br />
Note<br />
The lens aperture value that has been fed into the unit<br />
must be set on the lens.<br />
Move the enlarger head up or down until either one of the<br />
following indications, i. e.<br />
• M F 8 - with the 50 mm lens<br />
• M F 4 - with the 80 mm lens<br />
• M F 2 - with the 105 mm lens<br />
is extinguished.<br />
• With the „Disp. Select“ key call up the Y-M-C-D<br />
memories and check.<br />
• Display: Cy - Cm - Cc - Dd.<br />
• Using the „+/-“ keys, enter or modifiy the memory<br />
values.<br />
6.5.4<br />
Adapting the exposure time for individual filters with<br />
pre-filters<br />
a)<br />
b)<br />
c)<br />
d)<br />
e)<br />
Press the „Light“ key to switch on the<br />
enlarger lamp<br />
Place a correctly exposed <strong>Durst</strong> test<br />
negative in the film carrier<br />
Focus projection (with <strong>Durst</strong> <strong>AC</strong> <strong>800</strong>) or<br />
autofocus with <strong>Durst</strong> <strong>AC</strong> <strong>800</strong> AF<br />
Check exposure times<br />
Set to an exposure time of approx. 4<br />
seconds<br />
Switch on the enlarger lamp and press the „Disp. Select“<br />
key to call up, in sequential order, the Y-M-C exposure<br />
times, which will be indicated on the display. Display E =<br />
Exposure time.<br />
• Press the „Disp. Select“ key to call up the lens aperture<br />
indication.<br />
• Select a lens aperture, pressing the +/- keys, so that cyan<br />
yields an exposure time of approx. 4 seconds. Factory<br />
settings (section 6.2) were determined using F-Stop 8<br />
(lens 50 and 105).<br />
• Press the „Disp.Select“ key once more to call up the<br />
exposure time indication and check.<br />
• Acceptable tolerance limit = ± 0,1 second<br />
<strong>Durst</strong> <strong>AC</strong> <strong>800</strong>/AF-03/96 6.0 Calibrating<br />
33
f)<br />
g)<br />
If the deviation of ± 0.1 sec. is exceeded,<br />
the exposure times must be matched to<br />
each other by pre-filtration<br />
Set the correct lens aperture value on<br />
the lens<br />
• Pull the calibration pin out of its holder on the transformer<br />
housing.<br />
• Push the plastic slide upwards on the enlarger head’s<br />
right.<br />
• Fit the calibration pin on the Y-M filter screw and turn<br />
the same until the Y and M exposure match the C exposure<br />
time.<br />
• In the table in Section 6.2 the pre-filter settings are<br />
given with the relevant filter times for the factory<br />
pre-calibrations.<br />
Note<br />
Normally there are only two filters that may be moved<br />
into the light path. If because of material characteristics<br />
it becomes necessary to add cyan filtration, another filter<br />
must be set to zero.<br />
6.5.5<br />
Continuing and finishing basic calibration<br />
a)<br />
b)<br />
c)<br />
d)<br />
e)<br />
f)<br />
g)<br />
Prepare the test exposure<br />
Press the „Light“ key to switch off the<br />
enlarger lamp<br />
Insert a sheet of enlarging paper and<br />
expose<br />
Process the enlarging paper<br />
Carry out the zero balance for the<br />
densitometer<br />
Take a reading of the test print’s 0.70<br />
grey patch<br />
With the „Disp. Select“ key call up the<br />
Y-M-C-D memories and make a note of<br />
the new memory values<br />
Locate masking frame or roll paper easel so that the 70<br />
grey patch is exposed.<br />
• Trigger the exposure by pressing the „Expose“ key.<br />
Note<br />
The 70 grey patch must be exposed.<br />
For this press and hold the „Enter“ key. Then press the „Bal.<br />
Adjust“ key. This will result in a blue, green and red reference<br />
measurement.<br />
Note<br />
Do the zero balance shortly before the reference measurement.<br />
• First hold the test print against the room’s light source<br />
and, on the back of the print, mark the 0.70 grey patch<br />
with a circle.<br />
• Press the „Light“ key to switch on the enlarger light.<br />
• Push the test print underneath the reflection densitometer’s<br />
holder so that the 0.70 grey patch is metered.<br />
Center with the aid of the mark made before.<br />
Note<br />
The grey patch must face the metering opening.<br />
• Press the „Bal. Adj.“ key. The test print will now be measured<br />
automatically and the memory values corrected.<br />
34 6.0 Calibrating<br />
<strong>Durst</strong> <strong>AC</strong> <strong>800</strong>/AF-03/96
h) Yes:<br />
Do the memory values differ from the<br />
back to step 6.5.5 c)<br />
previous ones?<br />
No:<br />
continue with step i (the display shows „0 000“)<br />
i)<br />
The values are stored in the memories by<br />
pressing and holding the „Enter“ key<br />
and, thereafter, the „Setup“ key<br />
A metering cycle is triggered. Als Bestätigung erscheint die<br />
Anzeige CALE für Calibration. This ends the calibration<br />
mode for the basic memory. The program automatically<br />
switches to „XCP“.<br />
6.5.6<br />
Calibrating for maximum „XCP“ enlargement (compensation<br />
of reciprocity effect)<br />
a)<br />
b)<br />
c)<br />
d)<br />
e)<br />
f)<br />
g)<br />
Enter the aperture with the „+/-“ keys<br />
which was last set when the calibration<br />
figures for the basic memory CAL were<br />
stored, and transfer the aperture to the<br />
lens. Pressing the „Enter“ key stores the<br />
aperture figure.<br />
Move the enlarger head to the correct<br />
position<br />
Focus the projection (with <strong>Durst</strong> <strong>AC</strong> <strong>800</strong>)<br />
or autofocus (with <strong>Durst</strong> <strong>AC</strong> <strong>800</strong> AF)<br />
Enter the memory values taken from the<br />
table supplied (section 6.2) and check<br />
Prepare a test exposure<br />
Load the photo-paper, expose and<br />
process<br />
Carry out the zero balance for the<br />
densitometer<br />
Move the enlarger head up or down until either one of the<br />
following indications is extinguished:<br />
• M F 17 - for the 50 mm lens<br />
• M F 10 - for the 80 mm lens<br />
• M F 7 - for the 105 mm lens<br />
Press the „W. Light“ key to switch on the enlarger lamp.<br />
• Set the lens to the largest aperture.<br />
• Focus the projected image.<br />
• Set the lens aperture to the value used before.<br />
• Press the „W. Light“ key to switch off the enlarger lamp.<br />
• With the „Disp. Select“ key call up the Y-M-C-D<br />
memories and check.<br />
• Display: Cy - Cm - Cc - Dd.<br />
• With the +/- keys enter and if necessary modify the<br />
memory values.<br />
• Switch on the enlarger lamp.<br />
• Locate the masking frame or roll paper easel so that the<br />
0.70 grey patch is exposed.<br />
• Trigger the exposure by pressing the „Expose“ key.<br />
Note<br />
The 70 grey patch must be exposed.<br />
For this press and hold the „Enter“ key, then press the „Bal.<br />
Adjust“ key. This will result in a blue, green and red reference<br />
measurement.<br />
Note<br />
Do the zero balance shortly before the reference measurement.<br />
<strong>Durst</strong> <strong>AC</strong> <strong>800</strong>/AF-03/96 6.0 Calibrating<br />
35
h) • First hold the test print against the room’s light source<br />
Take a reading of the test print’s 0.70<br />
and, on the back of the print, mark the 0.70 grey patch<br />
grey patch<br />
with a circle.<br />
• Press the „Light“ key to switch on the enlarger light.<br />
• Push the test print underneath the reflection densitometer’s<br />
holder so that the 0.70 grey patch is metered.<br />
Center with the aid of the mark made before.<br />
Note<br />
The grey patch must face the metering opening.<br />
• Press the „Bal. Adj.“ key. The test print will now be<br />
measured automatically and the memory values corrected.<br />
i)<br />
j)<br />
k)<br />
With the „Disp. Select“ key call up the<br />
Y-M-C-D memories and make a note of<br />
the new memory values<br />
Do the memory values differ from the<br />
previous ones?<br />
The values are stored by pressing and<br />
holding the „Enter“ and subsequently<br />
pressing the „Setup“ key<br />
Yes:<br />
back to step f)<br />
No:<br />
Confirmation by display „0 000“ and continue with step k)<br />
A metering cycle is triggered.<br />
The „SLPE“ (Slope Enter) appears to confirm the calibration<br />
made. The calibration mode continues automatically with<br />
„LN“.<br />
6.5.7<br />
Calibrating for under-exposed „LN“ negatives/overexposed<br />
slides<br />
a)<br />
b)<br />
c)<br />
d)<br />
„LN“ and the entered aperture are displayed.<br />
If the display flashes, the exposure<br />
time is too short. This is remedied<br />
by setting the next higher aperture.<br />
(Remember: transfer the aperture to<br />
the lens!)<br />
Move the enlarger head to the correct<br />
position<br />
Place an underexposed <strong>Durst</strong> test negative<br />
or an overexposed test transparency<br />
in the negative carrier<br />
Focus the projection (with <strong>Durst</strong> <strong>AC</strong> <strong>800</strong>),<br />
or autofocus (with <strong>Durst</strong> <strong>AC</strong> <strong>800</strong> AF)<br />
Move the enlarger head up or down until either one of the<br />
following indications is extinguished:<br />
• M F 8 - for the 50 mm lens<br />
• M F 4 - for the 80 mm lens<br />
• M F 2 - for the 105 mm lens<br />
• Press the „W. Light“ key to switch on the enlarger lamp.<br />
• Set the lens to the largest aperture.<br />
• Set the lens aperture to the value used before.<br />
• Press the „W. Light“ or „Expose“ keys to switch off the<br />
enlarger lamp.<br />
36 6.0 Calibrating<br />
<strong>Durst</strong> <strong>AC</strong> <strong>800</strong>/AF-03/96
e) • With the „Disp. Select“ key call up the Y-M-C-D<br />
Enter the memory values taken from the<br />
memories and check.<br />
table supplied (section 6.2) and check<br />
• Display: Cy -Cm - Cc - Cd.<br />
• With the +/- keys enter and if necessary modify the<br />
memory values.<br />
f)<br />
g)<br />
h)<br />
i)<br />
i)<br />
k)<br />
l)<br />
Prepare a test exposure<br />
Load the photo-paper, expose and<br />
process<br />
Carry out the zero balance for the<br />
densitometer<br />
Take a reading of the test print’s 0.70<br />
grey patch<br />
With the „Disp. Select“ key call up the Y-<br />
M-C-D memories and make a note of the<br />
new memory values<br />
Do the memory values differ from the<br />
previous ones?<br />
The values are stored by pressing and holding<br />
the „Enter“ and subsequently pressing<br />
the „Setup“ key<br />
• Switch on the enlarger lamp with the „Light“ key.<br />
• Locate the masking frame or roll paper easel so that the<br />
0.70 grey patch is exposed.<br />
• Switch off the enlarger lamp by pressing the „Light“ key.<br />
• Trigger the exposure by pressing the „Expose“ key.<br />
Note<br />
The 70 grey patch must be exposed.<br />
For this press and hold the „Enter“ key, then press the „Bal.<br />
Adjust“ key. This will result in a blue, green and red reference<br />
measurement.<br />
Note<br />
Do the zero balance shortly before the reference measurement.<br />
• First hold the test print against the room’s light source<br />
and, on the back of the print, mark the 0.70 grey patch<br />
with a circle.<br />
• Press the „Light“ key to switch on the enlarger light.<br />
• Push the test print underneath the reflection densitometer’s<br />
holder so that the 0.70 grey patch is metered.<br />
Center with the aid of the mark made before.<br />
Note<br />
The grey patch must face the metering opening.<br />
• Press the „Bal. Adj.“ key. The test print will now be<br />
measured automatically and the memory values<br />
corrected.<br />
Yes:<br />
back to step g)<br />
No:<br />
confirmation by „0 000“ as display and continue with step<br />
e)<br />
A blue-green-red metering cycle will be triggered.<br />
Memory confirmation by display „LNEn (LN Enter). The<br />
calibration mode continues automatically with „DN“.<br />
<strong>Durst</strong> <strong>AC</strong> <strong>800</strong>/AF-03/96 6.0 Calibrating<br />
37
6.5.8<br />
Calibrating for over-exposed „DN“ negatives/underexposed<br />
slides<br />
a)<br />
b)<br />
c)<br />
d)<br />
e)<br />
f)<br />
g)<br />
h)<br />
If the display flashes when the previously<br />
used aperture is entered, the exposure<br />
time is again not ideal, and can be corrected<br />
by changing the aperture („+/-“<br />
key). The change in aperture must again<br />
be transferred to the lens. Pressing the<br />
„Enter“ key stores the aperture setting<br />
Load the over-exposed <strong>Durst</strong> test negative<br />
or under-exposed test slide in the<br />
film carrier (use „over (+2)“ negative)<br />
Enter the memory values taken from the<br />
table supplied (section 6.2) and check<br />
Prepare a test exposure<br />
Load the photo-paper, expose and<br />
process<br />
Carry out the zero balance for the<br />
densitometer<br />
Take a reading of the test print’s 0.70<br />
grey patch<br />
With the „Disp. Select“ key call up the Y-<br />
M-C-D memories and make a note of the<br />
new memory values<br />
Do not change enlarger head and lens aperture settings.<br />
• With the „Disp. Select“ key call up the Y-M-C-D<br />
memories and check.<br />
• Display: Cy - Cm - Cc - Cd.<br />
• With the +/- keys enter and if necessary modify the<br />
memory values.<br />
• Switch on the enlarger lamp with the „Light“ key.<br />
• Locate the masking frame or roll paper easel so that the<br />
0.70 grey patch is exposed.<br />
• Switch off the enlarger lamp by pressing the „Light“ key.<br />
• Trigger the exposure by pressing the „Expose“ key.<br />
Note<br />
The 70 grey patch must be exposed.<br />
For this press and hold the „Enter“ key, then press the „Bal.<br />
Adjust“ key. This will result in a blue, green and red reference<br />
measurement.<br />
Note<br />
Do the zero balance shortly before the reference measurement.<br />
• First hold the test print against the room’s light source<br />
and, on the back of the print, mark the 0.70 grey patch<br />
with a circle.<br />
• Press the „Light“ key to switch on the enlarger light.<br />
• Push the test print underneath the reflection densitometer’s<br />
holder so that the 0.70 grey patch is metered.<br />
Center with the aid of the mark made before.<br />
Note<br />
The grey patch must face the metering opening.<br />
• Press the „Bal. Adj.“ key. The test print will now be<br />
measured automatically and the memory values<br />
corrected.<br />
38 6.0 Calibrating<br />
<strong>Durst</strong> <strong>AC</strong> <strong>800</strong>/AF-03/96
i)<br />
Do the memory values differ from the<br />
Yes:<br />
previous ones?<br />
back to step e)<br />
No:<br />
confirmation by display „0 000“, continue with next step.<br />
j)<br />
The values are stored by pressing and holding<br />
the „Enter“ and subsequently pressing<br />
the „Setup“ key<br />
A metering cycle will be triggered.<br />
Storage of the readings is confirmed by the display „DNEn“<br />
(for DN Enter).<br />
6.5.9<br />
Automatically ending the calibration mode<br />
After confirmation of storage the calibration operation<br />
ends automatically. Normal operation starts.<br />
6.6<br />
Calibrating a memory channel for black/white enlargements<br />
Note<br />
The automatic calibration works only for a medium gradation<br />
of approx. 3.<br />
6.6.1<br />
Preparations<br />
a)<br />
Set the measuring cell slide-in unit’s (1)<br />
amplification switch to the correct<br />
position<br />
• Pull the measuring cell slide-in unit (1) out of the unit.<br />
• Set the switch (2) to B/W.<br />
• Push the measuring cell slide-in unit (1) into the<br />
appropriate opening.<br />
1 2<br />
b)<br />
c)<br />
Select the „B/W“ operating mode by<br />
simultaneously pressing the „Enter“ and<br />
„Channel-Mode Sel.“ key<br />
Call up the desired memory channel<br />
B/W = Printing black-and-white negatives.<br />
Press the „Channel“ key until the desired memory channel<br />
number is displayed.<br />
<strong>Durst</strong> <strong>AC</strong> <strong>800</strong>/AF-03/96 6.0 Calibrating<br />
39
6.6.2<br />
Setting pre-filters<br />
2<br />
1<br />
• Remove the calibration pin (1) on the right-hand side of<br />
the transformer housing.<br />
• Fully push the plastic slide (2) upwards on the enlarger<br />
head’s right. This switches on the enlarger lamp and the<br />
indication „H“ (= Head) will appear on the display.<br />
• Fit the calibration pin on the Y-M-C screw and turn<br />
same until all filters have reached their mechanical stop<br />
(the display mustn’t necessarily indicate zero). If necessary<br />
set the grey value by moving in all three filters by<br />
the same amount.<br />
• Close the plastic slide (2) again.<br />
• Press the „Light“ key to switch off the enlarger lamp.<br />
Note<br />
The exposure times must be matched to the time whose<br />
pre-filter is on mechanical zero stop (normally the cyan<br />
filter).<br />
6.6.3<br />
Basic „CAL“ calibration<br />
a) On the display will be indicated the channel number, the<br />
Switch to the calibration mode by<br />
calibration mode (Cal) and the lens focal length (L50, 80 or<br />
pressing the „Setup“ key<br />
105).<br />
b)<br />
c)<br />
d)<br />
e)<br />
f)<br />
With the +/- keys feed in the desired<br />
lens focal length and store same by<br />
pressing the „Enter“ key<br />
With the +/- keys feed in the desired<br />
lens aperture value and store same by<br />
pressing the „Enter“ key<br />
Set the enlarger head to the correct<br />
position<br />
Press the „Light“ key to switch on the<br />
enlarger lamp<br />
Place a correctly exposed test<br />
negative in the film carrier<br />
The display will then be showing the lens aperture (e. g. f8)<br />
Note<br />
If on the display the lens aperture indication is blinking,<br />
you can stop this by entering a smaller or larger aperture<br />
value.<br />
Note<br />
The lens aperture value that has been fed into the unit<br />
must be set on the lens.<br />
Move the enlarger head up or down until either one of the<br />
following indications, i. e.<br />
• M F 8 - with the 50 mm lens<br />
• M F 4 - with the 80 mm lens<br />
• M F 2 - with the 105 mm lens<br />
is extinguished.<br />
40 6.0 Calibrating<br />
<strong>Durst</strong> <strong>AC</strong> <strong>800</strong>/AF-03/96
g)<br />
h)<br />
i)<br />
i)<br />
k)<br />
l)<br />
m)<br />
n)<br />
o)<br />
p)<br />
Focus projection (with <strong>Durst</strong> <strong>AC</strong> <strong>800</strong>) or<br />
autofocus with <strong>Durst</strong> <strong>AC</strong> <strong>800</strong> AF<br />
Check exposure times<br />
Set to an exposure time of approx. 4<br />
seconds<br />
Prepare the test exposure<br />
Load the photo-paper, expose and<br />
process.<br />
Carry out the zero balance for the<br />
densitometer<br />
Take a reading of the test print’s 0.70<br />
grey patch<br />
With the „Disp. Select“ key call up the D<br />
memory and make a note of the new<br />
memory value<br />
Do the memory values differ from the<br />
previous ones?<br />
Store the calibration value in the „Cal“<br />
mode<br />
Switch on the enlarger lamp, press the „Disp. Select“ key.<br />
The exposure time will then be indicated on the display.<br />
Display E = exposure time.<br />
• Press the „Disp. Select“ key to call up the lens aperture<br />
indication.<br />
• Select a lens aperture, pressing the +/- keys, so that cyan<br />
yields an exposure time of approx. 4 seconds.<br />
• Press the „Disp.Select“ key once more to call up the<br />
exposure time indication and check.<br />
• Acceptable tolerance limit = ± 1 second<br />
• Set the correct aperture value on the lens.<br />
• Locate masking frame or roll paper easel so that the 70<br />
grey patch is exposed.<br />
• Press the „Light“ key to switch off the enlarger lamp.<br />
Make a test exposure sequence by modifying the density<br />
values being displayed as follows: -30/-15/0/ +15/+30.<br />
• With the „Disp. Select“ key call up the density memory<br />
channel.<br />
• Display: CD.<br />
• With the +/- keys enter the memory value.<br />
• Trigger the exposure by pressing the „Expose“ key.<br />
Note<br />
The 70 grey patch must be exposed.<br />
• For this press and hold the „Enter“ key. Then press the<br />
„Bal. Adjust“ key. This will result in a blue, green and red<br />
reference measurement.<br />
Note<br />
Do the zero balance shortly before the reference measurement.<br />
• First hold the test print against the room’s light source<br />
and, on the back of the print, mark the 0.70 grey patch<br />
with a circle.<br />
• Press the „Light“ key to switch on the enlarger light.<br />
• Push the test print underneath the reflection densitometer’s<br />
holder so that the 0.70 grey patch is metered.<br />
Center with the aid of the mark made before.<br />
Note<br />
The grey patch must face the metering opening.<br />
• Press the „Bal. Adj.“ key. The test print will now be measured<br />
automatically and the memory values corrected.<br />
Yes: back to step k)<br />
No: confirmation by display „0 000“<br />
For this press and hold the „Enter“ key, then press the<br />
„Setup“ key. Make a note of the lens aperture.<br />
Confirmation by „CAL“ display (for calibration). The calibration<br />
mode automatically continues with „XCP“ („XCP“ is<br />
displayed).<br />
<strong>Durst</strong> <strong>AC</strong> <strong>800</strong>/AF-03/96 6.0 Calibrating<br />
41
6.6.4<br />
Calibrating for maximum enlargement (compensation of<br />
„XCP“ reciprocity effect<br />
a)<br />
Enter the aperture with the „+/-“ keys<br />
which was last set during storage of the<br />
calibration figures for the basic „CAL“<br />
memory, and transfer the aperture to the<br />
lens. Pressing the „Enter“ key stores the<br />
aperture figure.<br />
b) Move the enlarger head up or down until either one of the<br />
Move the enlarger head to the correct<br />
following indications is extinguished:<br />
position<br />
• M F 17 - for the 50 mm lens<br />
• M F 10 - for the 80 mm lens<br />
• M F 7 - for the 105 mm lens<br />
c)<br />
d)<br />
e)<br />
f)<br />
g)<br />
Focus the projection (with <strong>Durst</strong> <strong>AC</strong> <strong>800</strong>)<br />
or autofocus (with <strong>Durst</strong> <strong>AC</strong> <strong>800</strong> AF)<br />
Prepare the test exposure<br />
Load the photo-paper, expose and<br />
process<br />
Carry out the zero balance for the<br />
densitometer<br />
Take a reading of the test print’s 0.70<br />
grey patch<br />
Press the „W. Light“ key to switch on the enlarger lamp.<br />
• Set the lens to the largest aperture.<br />
• Focus the projected image.<br />
• Set the lens aperture to the value used before.<br />
• Press the „W. Light“ key to switch off the enlarger lamp.<br />
• Switch on the enlarger lamp.<br />
• Locate masking frame or roll paper easel so that the 0.70<br />
grey patch is exposed.<br />
• With the „Disp. Select“ key call up the density memory.<br />
• Display: CD.<br />
• With the +/- keys enter and if necessary modify the<br />
memory values.<br />
• Press the „Light“ key to switch off the enlarger lamp.<br />
• Trigger the exposure by pressing the „Expose“ key.<br />
Note<br />
The 70 grey patch must be exposed.<br />
For this press and hold the „Enter“ key, then press the „Bal.<br />
Adjust“ key. This will result in a blue, green and red reference<br />
measurement.<br />
Note<br />
Do the zero balance shortly before the reference measurement.<br />
• First hold the test print against the room’s light source<br />
and, on the back of the print, mark the 0.70 grey patch<br />
with a circle.<br />
• Press the „Light“ key to switch on the enlarger light.<br />
• Push the test print underneath the reflection densitometer’s<br />
holder so that the 0.70 grey patch is metered.<br />
Center with the aid of the mark made before.<br />
Note<br />
The grey patch must face the metering opening.<br />
• Press the „Bal. Adj.“ key. The test print will now be<br />
measured automatically and the memory values<br />
corrected.<br />
42 6.0 Calibrating<br />
<strong>Durst</strong> <strong>AC</strong> <strong>800</strong>/AF-03/96
h)<br />
i)<br />
j)<br />
With the „Disp. Select“ key call up the D<br />
memories and make a note of the new<br />
memory values<br />
Do the memory values differ from the<br />
previous ones?<br />
The values are stored by pressing and holding<br />
the „Enter“ and subsequently pressing<br />
the „Setup“ key.<br />
Yes: back to step e)<br />
No: confirmation by display „0 000“ and continue with<br />
next step<br />
A deviation of +/- 2 figures here is acceptable.<br />
Another reading cycle takes place. Storage is confirmed by<br />
„SLPE“ in the display. The calibration mode continues<br />
automatically with „LN“. „LN“ is displayed and the entered<br />
aperture.<br />
6.6.5<br />
Calibrating for under-exposed „LN“ (Light Negative)<br />
negatives/over-exposed slides<br />
Under-exposed negatives or over-exposed slides are calibrated<br />
for BW enlargements with the normal „CAL“ calibration.<br />
The density correction therefore does not need to<br />
be set to zero in this step.<br />
a)<br />
b)<br />
c)<br />
d)<br />
With the +/- keys enter the lens aperture<br />
that has been used in the „Cal“ mode<br />
and store this value by pressing the<br />
„Enter“ key<br />
Move the enlarger head to the correct<br />
position<br />
Set density figure to zero.<br />
The values are stored by pressing and<br />
holding the „Enter“ and subsequently<br />
pressing the „Setup“ key<br />
Set the lens aperture to this value.<br />
Move the enlarger head up or down until either one of the<br />
following indications is extinguished:<br />
• M F 8 - for the 50 mm lens<br />
• M F 4 - for the 80 mm lens<br />
• M F 2 - for the 105 mm lens<br />
• Using the „Disp. Select“ key select the density „D“.<br />
• Set to zero by simultaneously pressing the „+/-“ keys.<br />
A reading cycle takes place whose figures are then stored<br />
(confirmation by the display „LNEn“, LN Enter). The calibration<br />
mode automatically continues with „DN“.<br />
6.6.6<br />
Calibrating for over-exposed „DN“ (Dark Negative)<br />
negatives/under-exposed slides<br />
Also in this case the procedure is the same as for „LN“. The<br />
following steps explain again only the zero-setting of density<br />
and how to memorize.<br />
a)<br />
b)<br />
c)<br />
Enter the previously set aperture with<br />
the „+/-“ key and store by pressing the<br />
„Enter“ key<br />
Set the density to zero<br />
The values are stored by pressing and holding<br />
the „Enter“ and subsequently pressing<br />
the „Setup“ key<br />
• Using the „Disp. Select“ key select the density „D“.<br />
• Set to zero by simultaneously pressing the „+/-“ keys.<br />
A reading cycle takes place whose figures are then stored<br />
(confirmation by the display „DNEn“, e.g. DN Enter on the<br />
display). The calibration mode automatically continues<br />
with the normal mode.<br />
<strong>Durst</strong> <strong>AC</strong> <strong>800</strong>/AF-03/96 6.0 Calibrating<br />
43
6.6.7<br />
Retrieving and noting the stored figures<br />
a)<br />
Retrieving filter and density figures in<br />
• Pressing the „Set-up“ key switches the enlarger into the<br />
the basic „CAL“ memory<br />
calibration mode again.<br />
• After the focal length and aperture have been confirmed<br />
with „Enter“, the colour head must be moved to the<br />
right enlarging position (MF 8 with 50 mm lens).<br />
• Using the „Disp.Select“ key retrieve the filter and density<br />
correction figures and note them in the table (page 45).<br />
b)<br />
c)<br />
Recall filtration and density values of<br />
XCP-LN and DN<br />
Pre-filtration settings<br />
• After the „Set-up“ key has been pressed, the next „XCP“<br />
calibration mode is displayed, whose figures can be displayed<br />
consecutively with the „Disp. Select“ key.<br />
• The procedure is the same for the next two memory<br />
channels.<br />
Since the variations in filter exposure time are not very<br />
great (up to 30 %) for different film and paper figures<br />
(that is different memory channels), it is advisable to set<br />
the pre-filtration only when the first memory channel is<br />
calibrated, and to leave the figure the same for the remaining<br />
memory channels. The exposure times are checked,<br />
with the enlarger light on, by means of the „Disp. Select“<br />
key. The filter figures (C) are shown first, then the exposure<br />
times (E) for the various colours.<br />
Steps for retrieving the pre-settings:<br />
• Leave the Set-up mode (the Set-up LED goes out).<br />
• Pushing up the plastic slide on the right-hand side of<br />
the colour head shows the display „H“.<br />
• With the „Disp. Select“ key the various pre-settings are<br />
retrieved, and can be entered in the following table.<br />
44 6.0 Calibrating<br />
<strong>Durst</strong> <strong>AC</strong> <strong>800</strong>/AF-03/96
Channel no.<br />
mode<br />
Film type<br />
Size/<br />
Aperture<br />
Paper type Filter Cal XCP LN DN H<br />
Y<br />
M<br />
C<br />
D<br />
Y<br />
M<br />
C<br />
D<br />
Y<br />
M<br />
C<br />
D<br />
Y<br />
M<br />
C<br />
D<br />
Y<br />
M<br />
C<br />
D<br />
Y<br />
M<br />
C<br />
D<br />
Y<br />
M<br />
C<br />
D<br />
Y<br />
M<br />
C<br />
D<br />
<strong>Durst</strong> <strong>AC</strong> <strong>800</strong>/AF-03/96 6.0 Calibrating<br />
45
6.7<br />
Pre-production test<br />
6.7.1<br />
Pre-production test for colour negatives/slides<br />
a)<br />
b)<br />
The enlarger is in the normal mode.<br />
Make 10 to 15 prints 20 x 25 cm<br />
(8 x 10 in.) in size from typical customer<br />
negatives or transparencies (these film<br />
originals should be correctly exposed<br />
and free of extremely predominant<br />
colours) of the film type just programmed<br />
(preproduction test)<br />
After processing judge the test prints’<br />
colour balance and density and if necessary<br />
correct the basic memory (section<br />
6.8)<br />
• Press the „Light“ key to switch on the enlarger light.<br />
• Place the negative in the negative carrier.<br />
• Open the lens diaphragm fully and focus the projection<br />
(with <strong>Durst</strong> <strong>AC</strong> <strong>800</strong>), or autofocus (with <strong>Durst</strong> <strong>AC</strong> <strong>800</strong><br />
AF).<br />
• Stop the lens down again.<br />
Note<br />
The lens aperture value indicated on the display must<br />
match the aperture setting on the lens.<br />
• Switch off the enlarger lamp.<br />
• Insert enlarging paper.<br />
• Trigger the exposure.<br />
6.7.2<br />
Pre-production test for BW negatives<br />
a)<br />
The pre-production test is in principle the<br />
same as for colour negatives/slides, and<br />
only the test prints need their density<br />
checking<br />
46 6.0 Calibrating<br />
<strong>Durst</strong> <strong>AC</strong> <strong>800</strong>/AF-03/96
6.8<br />
Adapting memory to production<br />
6.8.1<br />
Correcting colour negatives/slides<br />
a)<br />
Correct memory values<br />
• With the „Disp. Select“ key call up the appropriate colour<br />
and density channel (Y-M-C-D).<br />
• With the +/- keys enter the required correction values.<br />
• By pressing and holding the „Enter“ key and by subsequently<br />
pressing the „Setup“ key the correction values<br />
just entered are fed into the basic memory. On the display<br />
zero will be indicated once more.<br />
If the corrections are required for just one of the XCP-LN-<br />
DN calibration modes, the memory values of the calibration<br />
mode concerned are to be corrected as follows:<br />
• Press the „Setup“ key repeatedly to call up the required<br />
calibration mode.<br />
• With the +/- keys enter the appropriate value and store<br />
same by pressing the „Enter“ key.<br />
• With the „Disp. Select“ key call up the appropriate colour<br />
and density channel (Y-M-C-D).<br />
• Place the corresponding test negative in the negative<br />
carrier.<br />
• Press and hold the „Enter“ key, then press the „Setup“<br />
key.<br />
• Press the „Setup“ key repeatedly to switch to the normal<br />
printing mode.<br />
b)<br />
c)<br />
d)<br />
e)<br />
Repeat the preproduction test (step<br />
6.7.1a)<br />
If the result is satisfactory, produce a<br />
20 x 25 cm test print from a normally<br />
exposed <strong>Durst</strong> test negative or slide<br />
Enter the „Cal-XCP-LN-DN“ memory<br />
values in the table supplied (section<br />
6.6.7)<br />
With the „Setup“ key switch back to the<br />
normal printing mode<br />
With the „Setup“ key call up the „Cal-XCP-LN-DN“ calibration<br />
modes and with the „Disp. Select“ key the Y-M-C-D<br />
memory values and make a note thereof.<br />
The programming of a channel is thus completed.<br />
<strong>Durst</strong> <strong>AC</strong> <strong>800</strong>/AF-03/96 6.0 Calibrating<br />
47
6.8.2<br />
Correcting BW negatives<br />
a)<br />
b)<br />
c)<br />
Correct the memory value<br />
Enter the figure stored for „CAL-XCP“ in<br />
the table in Section 6.6.7<br />
With the „Setup“ key switch back to the<br />
normal printing mode<br />
The steps here are also basically the same.<br />
• With the „Disp. Select“ key call up the density channel.<br />
• With the +/- keys enter the required correction value.<br />
• To feed the entered correction value into the basic<br />
memory, press and hold the „Enter“ key, then press the<br />
„Setup“ key. The display will indicate zero once more.<br />
Note<br />
If corrections are required for XCP, modify the memory<br />
values as follows:<br />
• Press the „Setup“ key to call up the desired calibration<br />
mode.<br />
• With the +/- keys enter the appropriate lens aperture<br />
value and store same by pressing the „Enter“ key.<br />
• With the „Disp. Select“ key call up the density channel.<br />
With the „Setup“ key call up the calibration modes „Cal-<br />
XCP“ and with the „Disp. Select“ key call up the D memory<br />
values and make a note thereof.<br />
The programming of a channel is thus finished.<br />
48 6.0 Calibrating<br />
<strong>Durst</strong> <strong>AC</strong> <strong>800</strong>/AF-03/96
Practical work<br />
7.0<br />
7.1<br />
Preview<br />
Switching on<br />
Making preparations<br />
Setting focus variator<br />
Setting enlargement<br />
Possibly manual correction of:<br />
a) focus<br />
b) colour and density<br />
Printing a different film or paper type<br />
Ending<br />
After calibration has ended, the enlarger automatically<br />
switches from the set-up mode to working mode. The following<br />
flow chart provides a preview of the individual<br />
steps.<br />
Section 7.2.1<br />
Section 7.2.2<br />
Section 7.2.3<br />
Section 7.2.4<br />
a) Section 6.4.3<br />
b) Section 7.2.5<br />
Section 7.2.6<br />
Section 7.2.7<br />
<strong>Durst</strong> <strong>AC</strong> <strong>800</strong>/AF-03/96 7.0 Practical work<br />
49
7.2<br />
Steps<br />
7.2.1<br />
Switching on<br />
a) „P“ will be indicated on the display.<br />
Switch the unit on with the mains<br />
• A blue-green-red metering cycle will be taking place.<br />
switch on the transformer housing<br />
The resulting values are automaticaly stored by the<br />
reflection densitometer and will be used as reference<br />
grey for further measurements.<br />
• At the end of the metering cycle the enlarger lamp is<br />
switched off automatically; the unit is ready for operation.<br />
On the display will now be shown the operating mode<br />
(Neg-Pos-B/W), the channel being used and the lens aperture<br />
value.<br />
Note<br />
If on the display the lens aperture indication were to<br />
blink, enter a smaller or larger lens aperture value.<br />
7.2.2<br />
Making preparations<br />
a)<br />
b)<br />
c)<br />
Select the desired memory channel<br />
Call up the appropriate operation mode<br />
(Neg-Pos-B/W) by simultaneously pressing<br />
the „Enter“ and „Channel-Mode-sel“<br />
keys.<br />
Set the measuring cell slide-in unit’s<br />
(1) amplification switch to the correct<br />
position<br />
Press the „Channel“ key until the number of the desired<br />
memory channel is displayed.<br />
Neg.= colour negative printing<br />
Pos.= colour transparency printing<br />
B/W = black-and-white negative printing<br />
• Pull the measuring cell slide-in unit (1) out of the unit.<br />
• Push the switch (2) to the setting matching your process<br />
Neg, Pos or BW.<br />
• Push the measuring cell slide-in unit (1) into the<br />
appropriate opening.<br />
1 2<br />
50 7.0 Practical work<br />
<strong>Durst</strong> <strong>AC</strong> <strong>800</strong>/AF-03/96
c)<br />
Fit desired mixing box and appropriate<br />
format mask<br />
• Insert the required mxing box.<br />
• Insert the format mask matching your film size as well<br />
as the AN-glass.<br />
Note: When printing transparencies, use the special Bidia<br />
insert. Bidia does not require the use of an AN-glass.<br />
Film size Mixing box Format mask Lens<br />
6 x 9 cm <strong>AC</strong> <strong>800</strong>- Binema 69 100/105<br />
6 x 7 cm Box 69 Binema 67 mm<br />
Bimagla AN<br />
6 x 6 cm <strong>AC</strong> <strong>800</strong>- Binema 66/ 80 mm<br />
4.5 x 6 cm Box 66 Binema 45<br />
Bimagla AN<br />
35 mm <strong>AC</strong> <strong>800</strong>- Binema 35 50 mm<br />
Box 35 Bimagla AN<br />
7.2.3<br />
Setting the focus variator<br />
a)<br />
b)<br />
c)<br />
d)<br />
e)<br />
Using a masking frame or roll paper easel<br />
means that the projection plane is no<br />
longer on the level of the baseboard. This<br />
differential is ascertained and entered as<br />
follows.<br />
Determining the distance<br />
Press and hold the “F. Var./ill“ key<br />
Key in the previously determined value<br />
of the differential<br />
Release the „F. Var./ill“ key<br />
Use a ruler to ensure the distance between the baseboard’s<br />
projection plane and your new projection plane.<br />
„d“ will be indicated on the display.<br />
• With the +/- keys feed in the previously determined<br />
distance by pressing „+“ or „-“ key, according to the<br />
projection plane height.<br />
• If the projection plane is higher than the baseboard<br />
level, enter the distance by prefixing „-“ (minus); if the<br />
projection plane is below the baseboard level, enter the<br />
distance by prefixing „+“ (plus).<br />
Note<br />
Enter distance in „mm“.<br />
• An input is confirmed and checked by the lighting up of<br />
the red LED.<br />
Note<br />
The „Foc. Var“ key has an additional function. If this key<br />
is pressed briefly, all illuminations or displays will be<br />
extinguished. Pressing any key again returns to the display.<br />
<strong>Durst</strong> <strong>AC</strong> <strong>800</strong>/AF-03/96 7.0 Practical work<br />
51
7.2.4<br />
Setting the enlargement<br />
a)<br />
b)<br />
c)<br />
d)<br />
Press the „Light“ key to switch on the<br />
enlarger lamp<br />
Place a film strip in the negative carrier<br />
Open the lens aperture fully and adjust<br />
the enlarger head to obtain the desired<br />
print size<br />
Focus projection (with <strong>Durst</strong> <strong>AC</strong> <strong>800</strong>) or<br />
autofocus (with <strong>Durst</strong> <strong>AC</strong> <strong>800</strong> AF).<br />
e) Note<br />
With the +/- keys enter the desired lens<br />
If the aperture display flashes (sign of a poor exposure<br />
aperture value<br />
time), you can stop this by entering a smaller or larger<br />
aperture.<br />
f)<br />
g)<br />
h)<br />
i)<br />
Set the lens aperture on the lens<br />
Press the „Light“ key to switch off the<br />
enlarger lamp<br />
Load the photo-paper, expose and<br />
process. Expose by pressing the „Expose“<br />
key<br />
To make another print of the same film<br />
or paper type, repeat Section 7.2.4.<br />
Note<br />
The lens aperture value being displayed must match the<br />
lens aperture setting of the lens.<br />
52 7.0 Practical work<br />
<strong>Durst</strong> <strong>AC</strong> <strong>800</strong>/AF-03/96
7.2.5<br />
<strong>Manual</strong> colour and density corrections<br />
The enlarger is in normal mode. Generally production is<br />
satisfactory, but individual prints need correcting. In these<br />
cases manual corrections can be made. They apply only to<br />
the relevant enlargement, and are normally automatically<br />
deleted for the next setting. If two enlargements with the<br />
same corrections occur, the correction figures can be fixed<br />
by pressing the „Hold“ key.<br />
a)<br />
b)<br />
c)<br />
Select the colour or density to be<br />
corrected with „Disp. Select“<br />
The correction can be made with the<br />
„+/-“ keys.<br />
It applies to the current enlargement. If<br />
the „Hold“ function is activated (green<br />
light on the „Hold“ key), the correction<br />
applies to all further prints. If the key is<br />
pressed again, now only the calibrated<br />
filter and density figures apply (green<br />
light goes out).<br />
If the remote control is used, the corrections are entered<br />
with the numerical keyboard and the relevant colour/density<br />
correction keys.<br />
7.2.6<br />
Printing a different film or paper type<br />
If enlargements of another film or paper type must be<br />
produced, select the suitably calibrated memory channel<br />
and make the other preparations. To do this, start with<br />
Step 7.2.2 a), and then carry out all the following steps.<br />
7.2.7<br />
Ending<br />
Switch off the <strong>AC</strong> <strong>800</strong> with the main switch.<br />
Note<br />
Keeping the unit at operating temperature will ensure<br />
best results. Therefore, after longer periods without<br />
exposures, switch on the enlarger lamp for a short time.<br />
<strong>Durst</strong> <strong>AC</strong> <strong>800</strong>/AF-03/96 7.0 Practical work<br />
53
7.3<br />
Using the „Automatic density control and fixed filtration“<br />
function („VXFF“ key)<br />
This function is mainly used for studio photographs, since<br />
the filter settings of these are frequently the same.<br />
a)<br />
b)<br />
Load the negative, focus the image (only<br />
for <strong>Durst</strong> <strong>AC</strong> <strong>800</strong>), and produce a test<br />
print (press the „Expose“ key)<br />
After processing correct any colour and<br />
density faults, and fix the corrections by<br />
pressing the „Hold“ key (see Section 7.2.5)<br />
c)<br />
d)<br />
Pressing the „VXFF“ key retains the<br />
colour and density corrections found by<br />
the reading for the next prints (a similar<br />
negative). The enlarging scale can be<br />
changed at will, since the reciprocity<br />
effect is automatically compensated and<br />
the exposure time is matched to the<br />
density to be retained („VX“ variable<br />
exposure time)<br />
If the „VXFF“ key is pressed again, the<br />
„LED“ goes out and the function is ended<br />
54 7.0 Practical work<br />
<strong>Durst</strong> <strong>AC</strong> <strong>800</strong>/AF-03/96
7.4<br />
Using the „Fixed exposure time and filtration“ function<br />
(„FXFF“ key): producing contact prints<br />
If you produce an enlargement under this function, the<br />
colour and density reading is not made during the exposure<br />
as usual, but the previous enlargement readings are<br />
automatically adopted. The „FXFF“ function is primarily for<br />
producing contact prints. Since the film material with this<br />
type of exposure is not in the film carrier but on the projection<br />
level, with the normal mode the reading cells<br />
mounted underneath the film carrier would be disturbed<br />
by the approximately white light. Only error warnings such<br />
as „Wrong aperture setting“ (aperture number flashes)<br />
would be displayed.<br />
The steps for setting contact prints now follow.<br />
a)<br />
b)<br />
c)<br />
d)<br />
e)<br />
f)<br />
g)<br />
First load the negative to be printed in<br />
the film carrier, and set the enlargement<br />
to match the space needed by the negative<br />
strip on the projection area<br />
After focusing (manually with the <strong>Durst</strong><br />
<strong>AC</strong> <strong>800</strong>), make a blank exposure (no<br />
photo-paper) (press the „Expose“ key).<br />
This automatically measures the colour<br />
and density<br />
Pressing the „FXFF“ key (LED shows red)<br />
stores the readings and keeps them for<br />
the next exposure<br />
Take the negative out of the film carrier<br />
and put it on the baseboard together<br />
with the other strips<br />
Position the negative strip for the<br />
contact print over the photo-paper on<br />
the projection level. It is possible to use<br />
a contact frame or sheet of glass<br />
Make the exposure („Expose“ key) and<br />
process the contact print<br />
If no more contact prints are needed, the<br />
„FXFF“ function is ended by pressing the<br />
„FXFF“ key (LED goes out)<br />
<strong>Durst</strong> <strong>AC</strong> <strong>800</strong>/AF-03/96 7.0 Practical work<br />
55
7.5<br />
Distortion control<br />
Converging verticals cannot always be avoided when a<br />
shot is taken. With the <strong>AC</strong> <strong>800</strong> complete distortion control<br />
is possible by tilting the enlarger head and the lens plane.<br />
There are scales on the enlarger to permit repeats.<br />
2<br />
3<br />
1<br />
Procedure<br />
• Load the negative to be corrected and focus it.<br />
• Fix the required head position by turning the handle (1).<br />
• Pivot the colour head by loosening the knob (2) to the<br />
required side. The head must always be held firm with<br />
one hand. It can be panned in both directions by 45°. A<br />
scale (3) indicates the angle, and so permits accurate<br />
repeats. Fasten in the required position again with the<br />
knob (2).<br />
• To permit the lens carrier to be pivoted, loosen the screw<br />
(4). The lens will now slide and pivot, and two scales (5)<br />
show the rectification, and so ensure simple repetition.<br />
The required position is fixed by fastening the screw (4).<br />
• Focus by slanting the mask frame.<br />
4 5<br />
56 7.0 Practical work<br />
<strong>Durst</strong> <strong>AC</strong> <strong>800</strong>/AF-03/96
Troubleshooting table and explanations of error warnings<br />
8.0<br />
Signal/fault<br />
Lens aperture indication blinks<br />
No digital display<br />
Desired operating mode (Neg-Pos-<br />
B/W) can’t be selected<br />
In the calibration mode (Cal-XCP-LN-<br />
DN) the memory values can’t be<br />
modified or the enlarger lamp can’t<br />
be switched on<br />
<strong>Manual</strong>ly entered correction values<br />
are erased after each exposure<br />
Cause or problem<br />
Too long or too short an exposure<br />
(acceptable exposure time 1 - 300<br />
sec)<br />
Possible causes:<br />
a) Lack of measuring cell slide-in unit<br />
or amplification switch is not on the<br />
setting of your process.<br />
b) No negative or transparency in the<br />
negative carrier.<br />
c) Lens aperture too large or too<br />
small.<br />
„F. Var./ill“ key has been pressed.<br />
Functions only in print mode.<br />
Calibration conditions not fulfilled.<br />
Enlarger head position incorrect.<br />
Display in CAL, LN, DN<br />
MF 8 for the 50 mm lens<br />
MF 4 for the 80 mm lens<br />
MF 2 for the 100/105 mm lens<br />
Display in: XCP<br />
MF 17 for the 50 mm lens<br />
MF 10 for the 80 mm lens<br />
MF 7 for the 100/105 mm lens<br />
Exposure made without actuating<br />
„Hold“ function.<br />
Remedy<br />
a) Fit measuring cell slide-in unit and<br />
get the amplification switch to the<br />
position of your process.<br />
b) Insert negative or transparency<br />
c) Enter smaller or larger lens<br />
aperture<br />
Press the „F. Var./ill“ key.<br />
Press the „Setup“ key to call up the<br />
print mode. Press and hold the „Enter“<br />
key, then with the „Mode Sel.“ key<br />
select the desired process.<br />
Attention<br />
Set the amplification switch of the<br />
measuring cell slide-in unit to the<br />
appropriate position.<br />
Adjust the enlarger head until said<br />
indication disappears.<br />
Key in correction values and press the<br />
„Hold“ key. Correction values will be<br />
kept for the following exposures.<br />
<strong>Durst</strong> <strong>AC</strong> <strong>800</strong>/AF-03/96 8.0 Troubleshooting table and<br />
57<br />
explanations of error warnings
Error indication<br />
Err 0<br />
Err 1<br />
Err 2<br />
Err 3<br />
Err 4<br />
Err 5<br />
Err 6<br />
Err 7<br />
Err 8<br />
Err 9<br />
Brightly lit E on the display<br />
Cause or problem<br />
Upper mixing shaft sensitivity limit<br />
Lower mixing shaft sensitivity limit<br />
Upper negative sensitivity limit<br />
Lower negative sensitivity limit<br />
Upper sensitivity limit of the built-in<br />
reflection densitometer. Wrong original<br />
(completely white)<br />
Upper sensitivity limit of the built-in<br />
reflection densitometer. Wrong original<br />
(completely dark)<br />
Computer overflow of the automatic<br />
memory value determination.<br />
When you program the autofocus you<br />
can store up to 20 base points per<br />
lens. If the 20 points are exceeded,<br />
the display shows Error 6!<br />
Faulty electronics<br />
The lens carrier locks<br />
Faulty enlarger head position measurement<br />
signal<br />
Calibration values have been erased<br />
Calibration values have been erased<br />
Remedy<br />
Contact the service department of<br />
your <strong>Durst</strong> agency<br />
Contact the service department of<br />
your <strong>Durst</strong> agency<br />
Set amplification switch to correct<br />
position (Neg-Pos-BW) on the bottom<br />
of the measuring cell slide-in unit. If<br />
the fault can’t be remedied with this,<br />
contact the service department of<br />
your <strong>Durst</strong> agency<br />
Set amplification switch to correct<br />
position (Neg-Pos-BW) on the bottom<br />
of the measuring cell slide-in unit. If<br />
the fault can’t be remedied with this,<br />
contact the service department of<br />
your <strong>Durst</strong> agency<br />
Take a reading of the correct original<br />
(0.70 patch). If the fault can’t be<br />
remedied, contact the service department<br />
of your <strong>Durst</strong> agency<br />
Take a reading of the correct original<br />
(0.70 patch). If the fault can’t be<br />
remedied, contact the service department<br />
of your <strong>Durst</strong> agency<br />
Set the previous (Y-M-C-D) memory<br />
values and take another reading of<br />
the test exposure (0.70 patch). If the<br />
fault can’t be remedied, contact the<br />
service department of your <strong>Durst</strong><br />
agency<br />
Press the „Enter“ key. Delete all the<br />
base points and recalibrate the enlarger<br />
by selecting suitable base points.<br />
Contact the service department of<br />
your <strong>Durst</strong> agency<br />
Press the „Enter“ key or on/off switch.<br />
If the fault recurs frequently, please<br />
contact the after-sales service department<br />
of your authorised <strong>Durst</strong> agent<br />
Check cable connections. If the fault<br />
can’t be remedied, contact the service<br />
department of your <strong>Durst</strong> agency<br />
Enter calibration values once more,<br />
i.e. calibrate the unit anew<br />
Enter calibration values once more,<br />
i.e. calibrate the unit anew<br />
58 8.0 Troubleshooting table and <strong>Durst</strong> <strong>AC</strong> <strong>800</strong>/AF-03/96<br />
explanations of error warnings
Maintenance and care<br />
9.0<br />
The <strong>Durst</strong> <strong>AC</strong> <strong>800</strong> resp. <strong>AC</strong> <strong>800</strong> AF is designed for heavyduty<br />
use with minimum maintencance.<br />
It retains its high efficiency even in the most demanding<br />
operating conditions. Periodically grease the self-coiling<br />
counterweight spring at the rear of the enlarger column<br />
with vaseline or mineral oil. Depending on the amount of<br />
use of the enlarger, the counterweight spring is subject to<br />
constant wear which can eventually lead to cracks along<br />
both edges. Regularly check the counterweight sprint -<br />
uncoil it by lowering the enlarger head to the bottom of<br />
the column.<br />
Important:<br />
If the counterweight spring shows signs of damage it<br />
would be replaced immediately. To avoid injuries to darkroom<br />
personnel this operation should be carried out by<br />
the service department of your agency in your country.<br />
Periodically dust the negative carrier glasses and lenses<br />
with a chamois leather or antistatic brush or cloth. Periodically<br />
also clean the colour filters of the colour head<br />
with a wad of cotton wool soaked in alcohol.<br />
Diffusers of the mixing boxes and the heat filter below<br />
the tungsten-halogen lamp of the colour head should also<br />
be cleaned regularly.<br />
Before opening the colour head for servicing or for<br />
changing the tungsten-halogen lamp always check that<br />
the unit is desconnected from the mains supply. For safety,<br />
unplug the mains lead from the supply socket.<br />
Fuses<br />
Before replacing defect fuses, the power cable must be<br />
disconnected from the socket. Fuses are located at the<br />
back side of the power unit (specifications are indicated).<br />
If after the replacement of fuses the error still persists or if<br />
the source fuse needs to be replaced more often call a<br />
qualified service technician.<br />
Maintenance and care of the autofocus (<strong>AC</strong> <strong>800</strong> AF<br />
only)<br />
The spindle and the guiding rails of the lens stage need a<br />
special treatment every 6 months. They should be cleaned<br />
and a special grease should be used for smooth operation.<br />
We recommend Isoflex Topas AK 50.<br />
<strong>Durst</strong> <strong>AC</strong> <strong>800</strong>/AF-03/96 9.0 Maintenance and care<br />
59
Special accessories<br />
10.0<br />
<strong>AC</strong> <strong>800</strong> Box 66<br />
Description<br />
Accessories for the lighting system<br />
Mixing boxes for film sizes up to 6 x 6 cm<br />
As above, but up to 24 x 36 mm<br />
Accessories for the film carrier<br />
Format masks for 6 x 9 cm films are fastened in the film<br />
carrier instead of the glasses<br />
As above, but for 6 x 6 cm<br />
As above, but for 4.5 x 6 cm<br />
As above, but for 4.5 x 6 cm<br />
As above, but for 24 x 36 cm<br />
As above, but for 110 film<br />
As above, but on request for special sizes<br />
(only DIN or ASA standards). The delivery<br />
period for special sizes is approx. 30 days.<br />
Special masks for mounted 35 mm slides<br />
for use in Cobineg film carriers<br />
Order code<br />
<strong>AC</strong> <strong>800</strong> -<br />
Box 66<br />
<strong>AC</strong> <strong>800</strong> -<br />
Box 35<br />
Binema 69<br />
Binema 66<br />
Binema 45<br />
Binema 45 H<br />
Binema 35<br />
Binema 110<br />
Binema S<br />
Bidia<br />
Setopla<br />
Accessory for lens mounting<br />
Lens circuit boards for 50 mm lenses<br />
with M 39 threads<br />
Lens circuit boards for 80 - 105 mm lenses<br />
with M 39 threads<br />
Lens circuit boards for 80 - 105 mm lenses<br />
with M 50 threads<br />
Adapter ring for using lenses with M 25<br />
threads on lens circuit boards and extension<br />
tubes with M 39 threads Flaring<br />
Lens extension tube for 1:1 enlargements<br />
Film size Lens Lens board<br />
focal length platine<br />
24 x 36 mm 50 mm Setopla 2839<br />
4.6 x 6/<br />
6 x 6 cm 80 mm Lapla 39<br />
6 x 7/<br />
6 x 9 cm 105 mm Lapla 39<br />
Setopla 2839<br />
Lapla 39<br />
Lapla 50<br />
Flaring<br />
Femotub<br />
Femotub<br />
60 10.0 Special accessories<br />
<strong>Durst</strong> <strong>AC</strong> <strong>800</strong>/AF-03/96
<strong>AC</strong> <strong>800</strong> Wallmount<br />
Description<br />
General accessories<br />
Special wallmount for big enlargements on<br />
the floor, also suitable for the <strong>AC</strong> <strong>800</strong>/<br />
<strong>AC</strong> <strong>800</strong> AF used with the roll paper magazine<br />
Portable remote control with numerical keys with the following<br />
functions:<br />
• manual colour and density correction<br />
• „Hold“ key for holding set corrections<br />
• entry of lens aperture<br />
• switching the enlarger light on and off<br />
• automatically slots out the pre-filtration<br />
• making the exposure<br />
BW test negative (24 x 36 mm) for focus<br />
calibration (<strong>AC</strong> <strong>800</strong> AF)<br />
Plastic protective cover<br />
Order code<br />
<strong>AC</strong> <strong>800</strong> -<br />
Wallmount<br />
<strong>AC</strong> <strong>800</strong><br />
Control<br />
Test 35<br />
Autocuf<br />
<strong>AC</strong> <strong>800</strong> Controll<br />
Spare parts<br />
Standard film carrier with a top Bimagla<br />
AN glass<br />
Glass for Cobineg film carrier with anti-<br />
Newton ring coating<br />
Metal mask pair for the glassless enlargement<br />
of 6 x 7 cm films in Cobineg film<br />
carriers<br />
Light box for film sizes up to 6 x 9 cm<br />
Specially selected halogen lamp 250 W/<br />
24 V<br />
BW test negatives (6 x 9 cm) for focus calibration<br />
Cobineg<br />
Bimagla AN<br />
Binema 67<br />
<strong>AC</strong> <strong>800</strong> -<br />
Box 69<br />
Colamp 250<br />
Test 69<br />
Colamp 250<br />
<strong>Durst</strong> <strong>AC</strong> <strong>800</strong>/AF-03/96 10.0 Special accessories<br />
61
EU-Conformity declaration<br />
We,<br />
<strong>Durst</strong> Phototechnik<br />
AG<br />
Postfach 223<br />
Vittorio-Veneto-Straße 59<br />
I-39042 Brixen<br />
declare, that the apparatus named hereafter complies with the applicable EU Safety and Health Guidelines.<br />
This declaration is void, if any alterations to the apparatus have been implemented prior to our consent.<br />
Nature of the apparatus:<br />
Type:<br />
Applicable EU Guidelines:<br />
Applied Standard in particular:<br />
Date:<br />
Enlarger<br />
<strong>Durst</strong> <strong>AC</strong> <strong>800</strong>/AF<br />
EU machine guideline (89/392/EEC)<br />
version 93/44/EEC<br />
EU low-voltage guideline (73/23/EEC)<br />
EU guideline for electro-magnetic compatibility<br />
(89/336/EEC) version 93/31/EEC<br />
DIN EN292-1: 11.1991,<br />
DIN EN292-2: 11.1991,<br />
DIN EN294: 08.1992,<br />
DIN EN349:06.1993,<br />
EN 60950,<br />
EN 55022,<br />
EN 50082-1,<br />
EN 55024-2,<br />
EN 55024-3,<br />
EN 55024-4<br />
Brixen, December 1995<br />
Manufacturer’s signature:<br />
Title of Signer:<br />
Dr. Richard Piock<br />
Managing Director<br />
62 <strong>Durst</strong> <strong>AC</strong> <strong>800</strong>/AF-03/96
Improvements<br />
<strong>Durst</strong> <strong>AC</strong> <strong>800</strong>/AF-03/96 63
Improvements<br />
64 <strong>Durst</strong> <strong>AC</strong> <strong>800</strong>/AF-03/96
<strong>Durst</strong> <strong>AC</strong> <strong>800</strong>/AF-03/96 65
<strong>Durst</strong> Phototechnik<br />
AG<br />
Division Phototechnik<br />
Vittorio-Veneto-Straße 59<br />
I-39042 Brixen, Italy<br />
Telefon +39/0472 810111<br />
Telefax +39/0472 83 09 80<br />
www.durst-online.com<br />
E-Mail:info@durst.it<br />
IV60045