
You also want an ePaper? Increase the reach of your titles
YUMPU automatically turns print PDFs into web optimized ePapers that Google loves.
<strong>Wetplate</strong> <strong>Collodion</strong> <strong>Kit</strong><br />
Thank you for purchasing this <strong>Wetplate</strong> <strong>Collodion</strong> kit by Bostick & Sullivan. These mixing instructions<br />
are meant to be a basic guide to working with Bostick & Sullivan <strong>Wetplate</strong> kits and in no way should be<br />
considered a working guide to the wetplate process.<br />
We recommend reading extensively on the process before attempting making images, and recommend<br />
joining the excellent online forum at www.collodion.com.<br />
Your kit contains:<br />
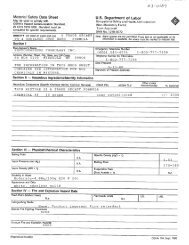
150ml Salted <strong>Collodion</strong> Solution A – A solution containing Cadmium Bromide and Ammonium Iodide in 95%<br />
Grain Alcohol.<br />
350ml Salted <strong>Collodion</strong> Solution B – A solution of 60% <strong>Collodion</strong> and 40% Ether.<br />
250ml 10% Silver Nitrate Solution – A standard 1.08 specific gravity solution of Silver Nitrate for sensitizing the<br />
collodion-coated plate.<br />
100ml Glacial Acetic Acid - Used in many photographic applications, wetplate artists use Glacial Acetic acid<br />
to adjust the pH level of silver nitrate baths.<br />
1000ml <strong>Wetplate</strong> Developer – The Bostick & Sullivan <strong>Wetplate</strong> Developer is a traditional Ferrous Sulfate<br />
forumlation that can be used for both negative and positive development. Makes 2 liters of positive developer<br />
and 4 liters of negative developer.<br />
1000g Sodium Thiosulfate – A safe, non-toxic fixer for all silver-based films, papers and photographic<br />
processes. A safe and sane alternative to deadly cyanide-based fixers.<br />
250ml Sandarac Varnish – An aromatic mixture of Gum Sandarac, 95% Grain Alcohol and steam distilled Oil of<br />
Lavender. Used to create a beautifully glossy and protective lacquer finish on the emulsion side of a finished<br />
plate.<br />
Alcohol Lamp – Warm your plates, solutions or varnishes over the low, even flame produced by this simple<br />
alcohol lamp. Fill with high-proof grain alcohol or isopropyl alcohol from the drugstore.<br />
Hydrometer – Measure the specific gravity of your silver nitrate solution with this high quality glass hydrometer.<br />
PH Strips – pH testing strips and chart for measuring the acidity and alkalinity of solutions<br />
Funnel – A high quality 4.25” Paterson funnel<br />
(3x) Amber Bottles – For storing mixed solutions.<br />
(1x) Plastic 1 liter Bottle<br />
100ml Glass Graduated Cylinder
Step 1 – Preparing Salted <strong>Collodion</strong><br />
From Your <strong>Kit</strong> You Need:<br />
Salted <strong>Collodion</strong> Solution A<br />
Salted <strong>Collodion</strong> Solution B<br />
500ml Empty Amber Glass Bottle<br />
100ml Glass Graduated Cylinder<br />
For Clean-Up:<br />
70% Isopropyl Alcohol – Available from your local drug or grocery store.<br />
Safety gear required:<br />
Safety glasses, latex or nitrile gloves, apron. Optional: gas mask respirator<br />
Mix Solutions A and B in the Following Ratios:<br />
Solution A Solution B<br />
15ml<br />
35ml<br />
30ml<br />
70ml<br />
45ml<br />
105ml<br />
60ml<br />
140ml<br />
90ml<br />
210ml<br />
150ml<br />
350ml<br />
Warning! These solutions contain Ether and <strong>Collodion</strong>. Avoid prolonged<br />
exposure to their fumes. Always work in a well ventilated area.<br />
Mixing<br />
Step 1. Pour Salted <strong>Collodion</strong> Solution A into a glass graduated cylinder until the desired<br />
amount is reached.<br />
Step 2. Transfer Solution A from the graduated cylinder to a clean, dry amber glass bottle.<br />
Mark this bottle with today's date.<br />
Step 3. Using the same graduate or beaker measure the appropriate quantity of Salted<br />
<strong>Collodion</strong> Solution B from the chart above.<br />
Step 4. Pour Solution B into the dated amber bottle, allowing the thick solution to drip from<br />
the graduate until the <strong>Collodion</strong> beads on the lip and stops flowing. Cap the amber bottle<br />
tightly. It is normal for white clumps to appear or stringy pieces of <strong>Collodion</strong> to form in the<br />
bottle.<br />
Step 5. Shake vigorously for 5 to 10 seconds, or until the solutions have mixed.
Aging<br />
Freshly mixed Salted <strong>Collodion</strong> from your Bostick & Sullivan kit will appear milky and may<br />
take from as little as 10 minutes to clear and as long as 2 hours, depending on temperature.<br />
For optimum results, allow the Salted <strong>Collodion</strong> mixture to clear for a minimum of 2 hours<br />
before coating plates. Many artists report that this formula ripens and improves with time,<br />
usually 2 to 3 weeks for peak performance. We recommend testing or discarding after 6-8<br />
weeks.<br />
Clean up<br />
Fill used beakers and graduates with Isopropyl Alcohol. Stir, or cap and shake to help<br />
dissolve the thick collodion mixture clinging to the sides of the glass. Allow the alcohol<br />
solution to soak for 1 hour to help penetrate the <strong>Collodion</strong>. Dump, and rinse with Isopropyl<br />
Alcohol a second time. Wash with cold water. Any remaining <strong>Collodion</strong> will turn white and<br />
stringy and can is easily removed. You may discard the Isopropyl washing solution in your<br />
drain, while running plenty of water.<br />
Storage<br />
Store mixed Salted <strong>Collodion</strong> solutions in the amber glass bottles supplied with your kit.<br />
Store in temperatures below 100F (38C). Keep bottles capped tightly, as the solutions will<br />
readily absorb water from the atmosphere.<br />
Disposal<br />
Outdoors, away from buildings, children and animals, pour the unused salted <strong>Collodion</strong><br />
solution in a shallow glass or ceramic dish for evaporation. Rinse the storage bottle with<br />
50-100 ml of Isopropyl Alcohol, adding that solution to the dish. Allow the solution to<br />
evaporate for 24-48 hours. A brown or yellow crust of hard nitrocellulose will form in the<br />
dish. Wrap this crust in a plastic bag and discard with your regular trash.<br />
The above method works well with smaller quantities of <strong>Collodion</strong>. Check with your local<br />
solid waste department of fire department for the proper disposal of large amounts of<br />
<strong>Collodion</strong> and Ether.
Preparing and Maintaining Silver Nitrate Bath<br />
The Silver Nitrate bath is arguably the single most important component of the <strong>Wetplate</strong><br />
process, since a properly maintained Silver Nitrate bath will have a usable life of many<br />
years. It is important that the solution be systematically prepared for usage, and then<br />
constantly nursed so that it's properties remain constant.<br />
From Your <strong>Kit</strong> You Need:<br />
Silver Nitrate 10% Solution<br />
Glacial Acetic Acid<br />
Plastic Dropper<br />
pH Testing Strips<br />
Dated bottle containing cleared Salted <strong>Collodion</strong><br />
Funnel<br />
Hydrometer<br />
100ml Graduate<br />
You supply:<br />
One glass plate<br />
For Clean-Up:<br />
70% Isopropyl Alcohol – Available from your local drug or grocery store.<br />
Safety gear required:<br />
Safety glasses, latex or nitrile gloves, apron. Optional: gas mask respirator<br />
Warning! Glacial Acetic Acid fumes are extremely irritating to the eyes and lungs.<br />
We recommend using a respirator gas mask when working with this chemical.<br />
Adjusting pH<br />
Before sensitizing plates in the Silver Nitrate 10% Solution, it is sometimes necessary to<br />
lower the pH to a range of 4 – 6. If you plan on printing negatives, a slightly acidic solution<br />
of pH 6 is desirable, while positive development works best with a more acidic pH 4-5.<br />
Step 1. Open the bottle of Glacial Acetic Acid and draw up a full dropper of solution. Cap<br />
the bottle and set aside.<br />
Step 2. Open the bottle of Silver Nitrate 10% Solution and insert a pH testing strip or<br />
electronic pH testing probe. The pH of the fresh solution should be around pH 5. (If you are<br />
using the testing strips that came with your kit, match the strip to the closest matching pH<br />
level on the chart provided).<br />
Step 3. If the Silver Nitrate solution is pH 6 or above, add 1 drop of Glacial Acetic Acid to<br />
the bottle for every 250ml of Silver Nitrate 10%. Cap bottle and shake.<br />
Step 4. Measure the pH using a fresh testing strip or electronic probe. The pH will drop<br />
considerably, and should be in the pH 4-5 range with just 1 or 2 drops of Glacial Acetic<br />
Acid.
Preparing a Plate with Salted <strong>Collodion</strong><br />
Silver Iodide is a soluble form of Silver that must be present in the Silver Nitrate Bath<br />
before a properly sensitized plate can be made. The simplest way to introduce Silver<br />
Iodide into the Silver Nitrate Bath is to soak a Salted <strong>Collodion</strong>-Coated plate in the Silver<br />
Nitrate Bath for several hours. This plate will not be exposed after soaking, it is simply used<br />
to prepare the bath for the 'real' plates you will expose later.<br />
Step 1. Pour the pH adjusted Silver Nitrate Solution into the tray or dunk tank you will be<br />
using to sensitize plate.<br />
Step 2. Clean a 4x5” glass plate. Many formulas and techniques are prescribed for<br />
cleaning a glass plate. Pick your favorite one from the internet, and follow it exactingly.<br />
Step 3. Measure out 5ml of cleared Salted <strong>Collodion</strong> mixture from your dated bottle into a<br />
small, clean glass graduated cylinder.<br />
Step 4. Place the supplied funnel into the top of dated Salted <strong>Collodion</strong> bottle to act as a<br />
catch container.<br />
Step 5. While holding the glass plate in one hand, pour the entire 5ml of Salted <strong>Collodion</strong><br />
along one edge of the glass plate, then tilt the plate in a circular motion to complete cover<br />
the plate in a thin layer of <strong>Collodion</strong>. If the temperature is below 60F, you may need to<br />
warm the glass plate over the Alcohol Lamp. Be careful not to heat the glass too quickly, or<br />
you may crack it or ignite the <strong>Collodion</strong> fumes.<br />
Step 6. When the plate is covered, allow the excess <strong>Collodion</strong> to drain off one corner of the<br />
plate into the funnel.<br />
Step 7. Place the coated plate into the Silver Nitrate Bath. Since this plate will not be<br />
exposed, it is ok to do this step in full light.<br />
Step 8. After 5 minutes, pull the plate and inspect. The plate is a cloudy white color. This is<br />
the color you should expect to see everytime you pull a plate from the Silver Nitrate Bath,<br />
just before you put it in the holder and expose.<br />
Step 9. Place the plate back in the Silver Nitrate Bath and allow it to soak for 6-8 hours, or<br />
until the plate is nearly translucent again. The Silver Nitrate Bath is now ready to sensitize<br />
glass and aluminum plates.
Measuring Specific Gravity<br />
Pour 50ml of the prepared Silver Nitrate Bath into a tall 100ml graduated cylinder. Lower<br />
the Hydrometer into the graduated cylinder. Add solution until the Hydrometer begins to<br />
float. Read the scale on the side of the hydrometer, noting the number where the<br />
Hydrometer passes through the surface of the solution. Record this number, and use it as a<br />
future reference as your “standard” solution of Silver Nitrate.<br />
Clean Up<br />
Clean funnel, graduate and glass plate with plenty of Isopropyl Alcohol and water.
Maintaining Silver Nitrate Bath<br />
Periodically the Silver Nitrate bath must be tested and adjusted to maintain consistent<br />
properties. As you sensitize plates, <strong>Collodion</strong>, Ether, Alcohol and other contaminants will<br />
build up in the Silver Nitrate Bath. A simple procedure will help remove foreign substances<br />
and help keep a properly maintained Silver Nitrate bath working for years.<br />
Sunning Silver Nitrate - Pour the Silver Nitrate bath into a widemouth container, preferably<br />
a clear glass beaker or tray. Place in bright, direct sunlight for several hours. After a few<br />
hours, a layer of white, grey and black contaminants will settle to the bottom of the<br />
container. Filter this solution using a paper coffee filter placed in the funnel that comes<br />
with your kit.<br />
Testing Specific Gravity – After sunning and filtering the Silver Nitrate bath, measure the<br />
specific gravity using the hydrometer supplied with your kit. A “fresh” bath will be 1.08,<br />
while a good working bath can measure as low as 1.04.<br />
If the Specific Gravity is lower than 1.04 you must add Silver Nitrate crystals to the bath.<br />
Slowly add Silver Nitrate crystals to the bath a few grams at a time, and mix to completely<br />
dissolve. Re-test the Specific Gravity each time, and stop when it reaches 1.06 to 1.07.<br />
Testing pH – Take a baseline reading of the pH using a pH strip or electronic meter. Follow<br />
the “Adjusting pH” instructions above to bring the Silver Nitrate bath to a range of pH 4-5<br />
using Glacial Acetic Acid.<br />
Your Silver Nitrate bath will provide years of use if you maintain it properly!
Developer<br />
The <strong>Wetplate</strong> Developer shipped with your Bostick & Sullivan kit uses the classic Ferrous<br />
Sulfate formula in a concentrated form.<br />
For Positives:<br />
Mix 1 part <strong>Wetplate</strong> Developer with 1 part water.<br />
For Negatives:<br />
Mix 1 part <strong>Wetplate</strong> Developer with 3 parts water.<br />
These dilutions are a basic guidline, and you may find that you prefer a weaker or stronger<br />
developer.<br />
Fixer<br />
Many fixers have been tried and used with <strong>Wetplate</strong> images. Bostick & Sullivan<br />
recommends a safe Sodium Thiosulfate fixer, which is virtually harmless to people and the<br />
environment. We recommend that beginners use a non-toxic fixer and then move towards<br />
others as they gain experience in the <strong>Wetplate</strong> process.<br />
Standard Fixer Formula:<br />
200g Sodium Thiosulfate Crystals (about 200ml of dry crystals)<br />
Add 100F Distilled Water to make 1000ml<br />
Store in the clear 1 liter bottle included with your kit. Mark the bottle with today's date.<br />
Sandarac Varnish<br />
Your kit includes an aromatic varnish made from the sap of the Tetraclinis Articulata. This<br />
varnish will leave a lustrous, glossy, and protective finish on your plates.<br />
Pour a small amount of Sandarac Varnish into the 4oz bottle included with your kit, and<br />
place it in a hot water bath, until the temperature reaches 90-100F.<br />
Place the funnel into the larger Sandarac Bottle as a catch container.<br />
Heat your plate gently over the alcohol lamp until it is warm, but not too hot to handle with<br />
bare hands.<br />
Pour approximately 10-12 ml of warm Sandarac Varnish onto the plate, and tilt the plate in a<br />
circular motion to completely cover the plate. Pour any excess off of one corner into the<br />
funnel. Dry the plate flat for 24 hours, or longer, in a dust free environment.<br />
Clean up with Isopropyl Alcohol and water.